Photographing Yellow Throated Vireos – The Impact of Stray Light

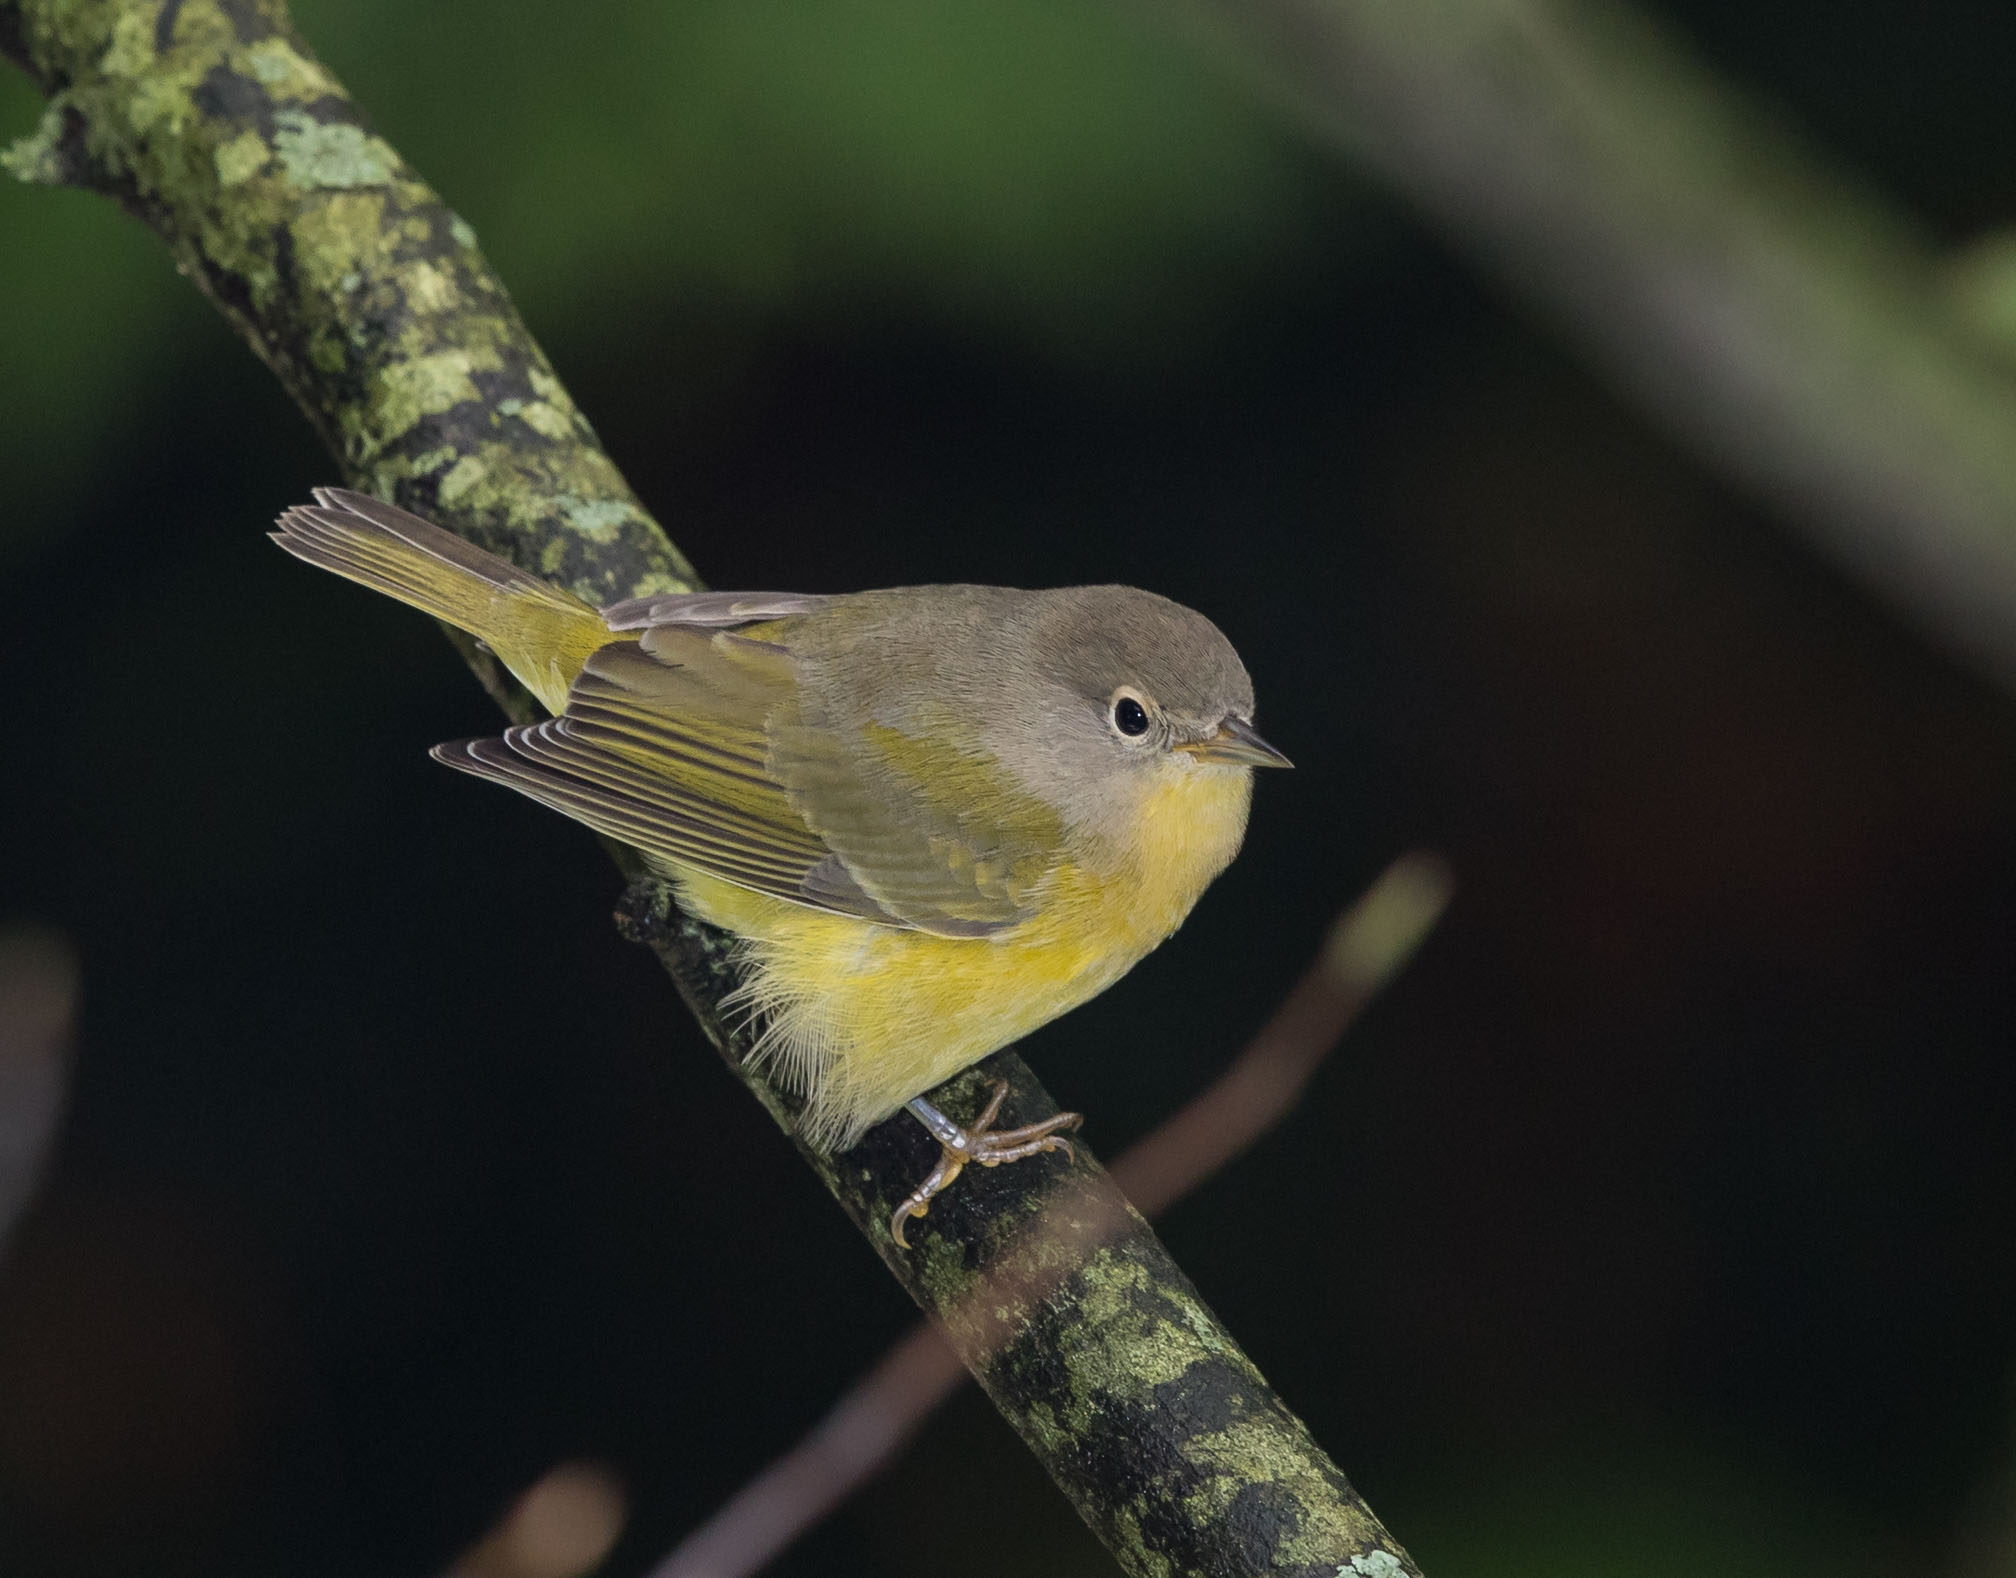
Photographing a Yellow Throated Vireo

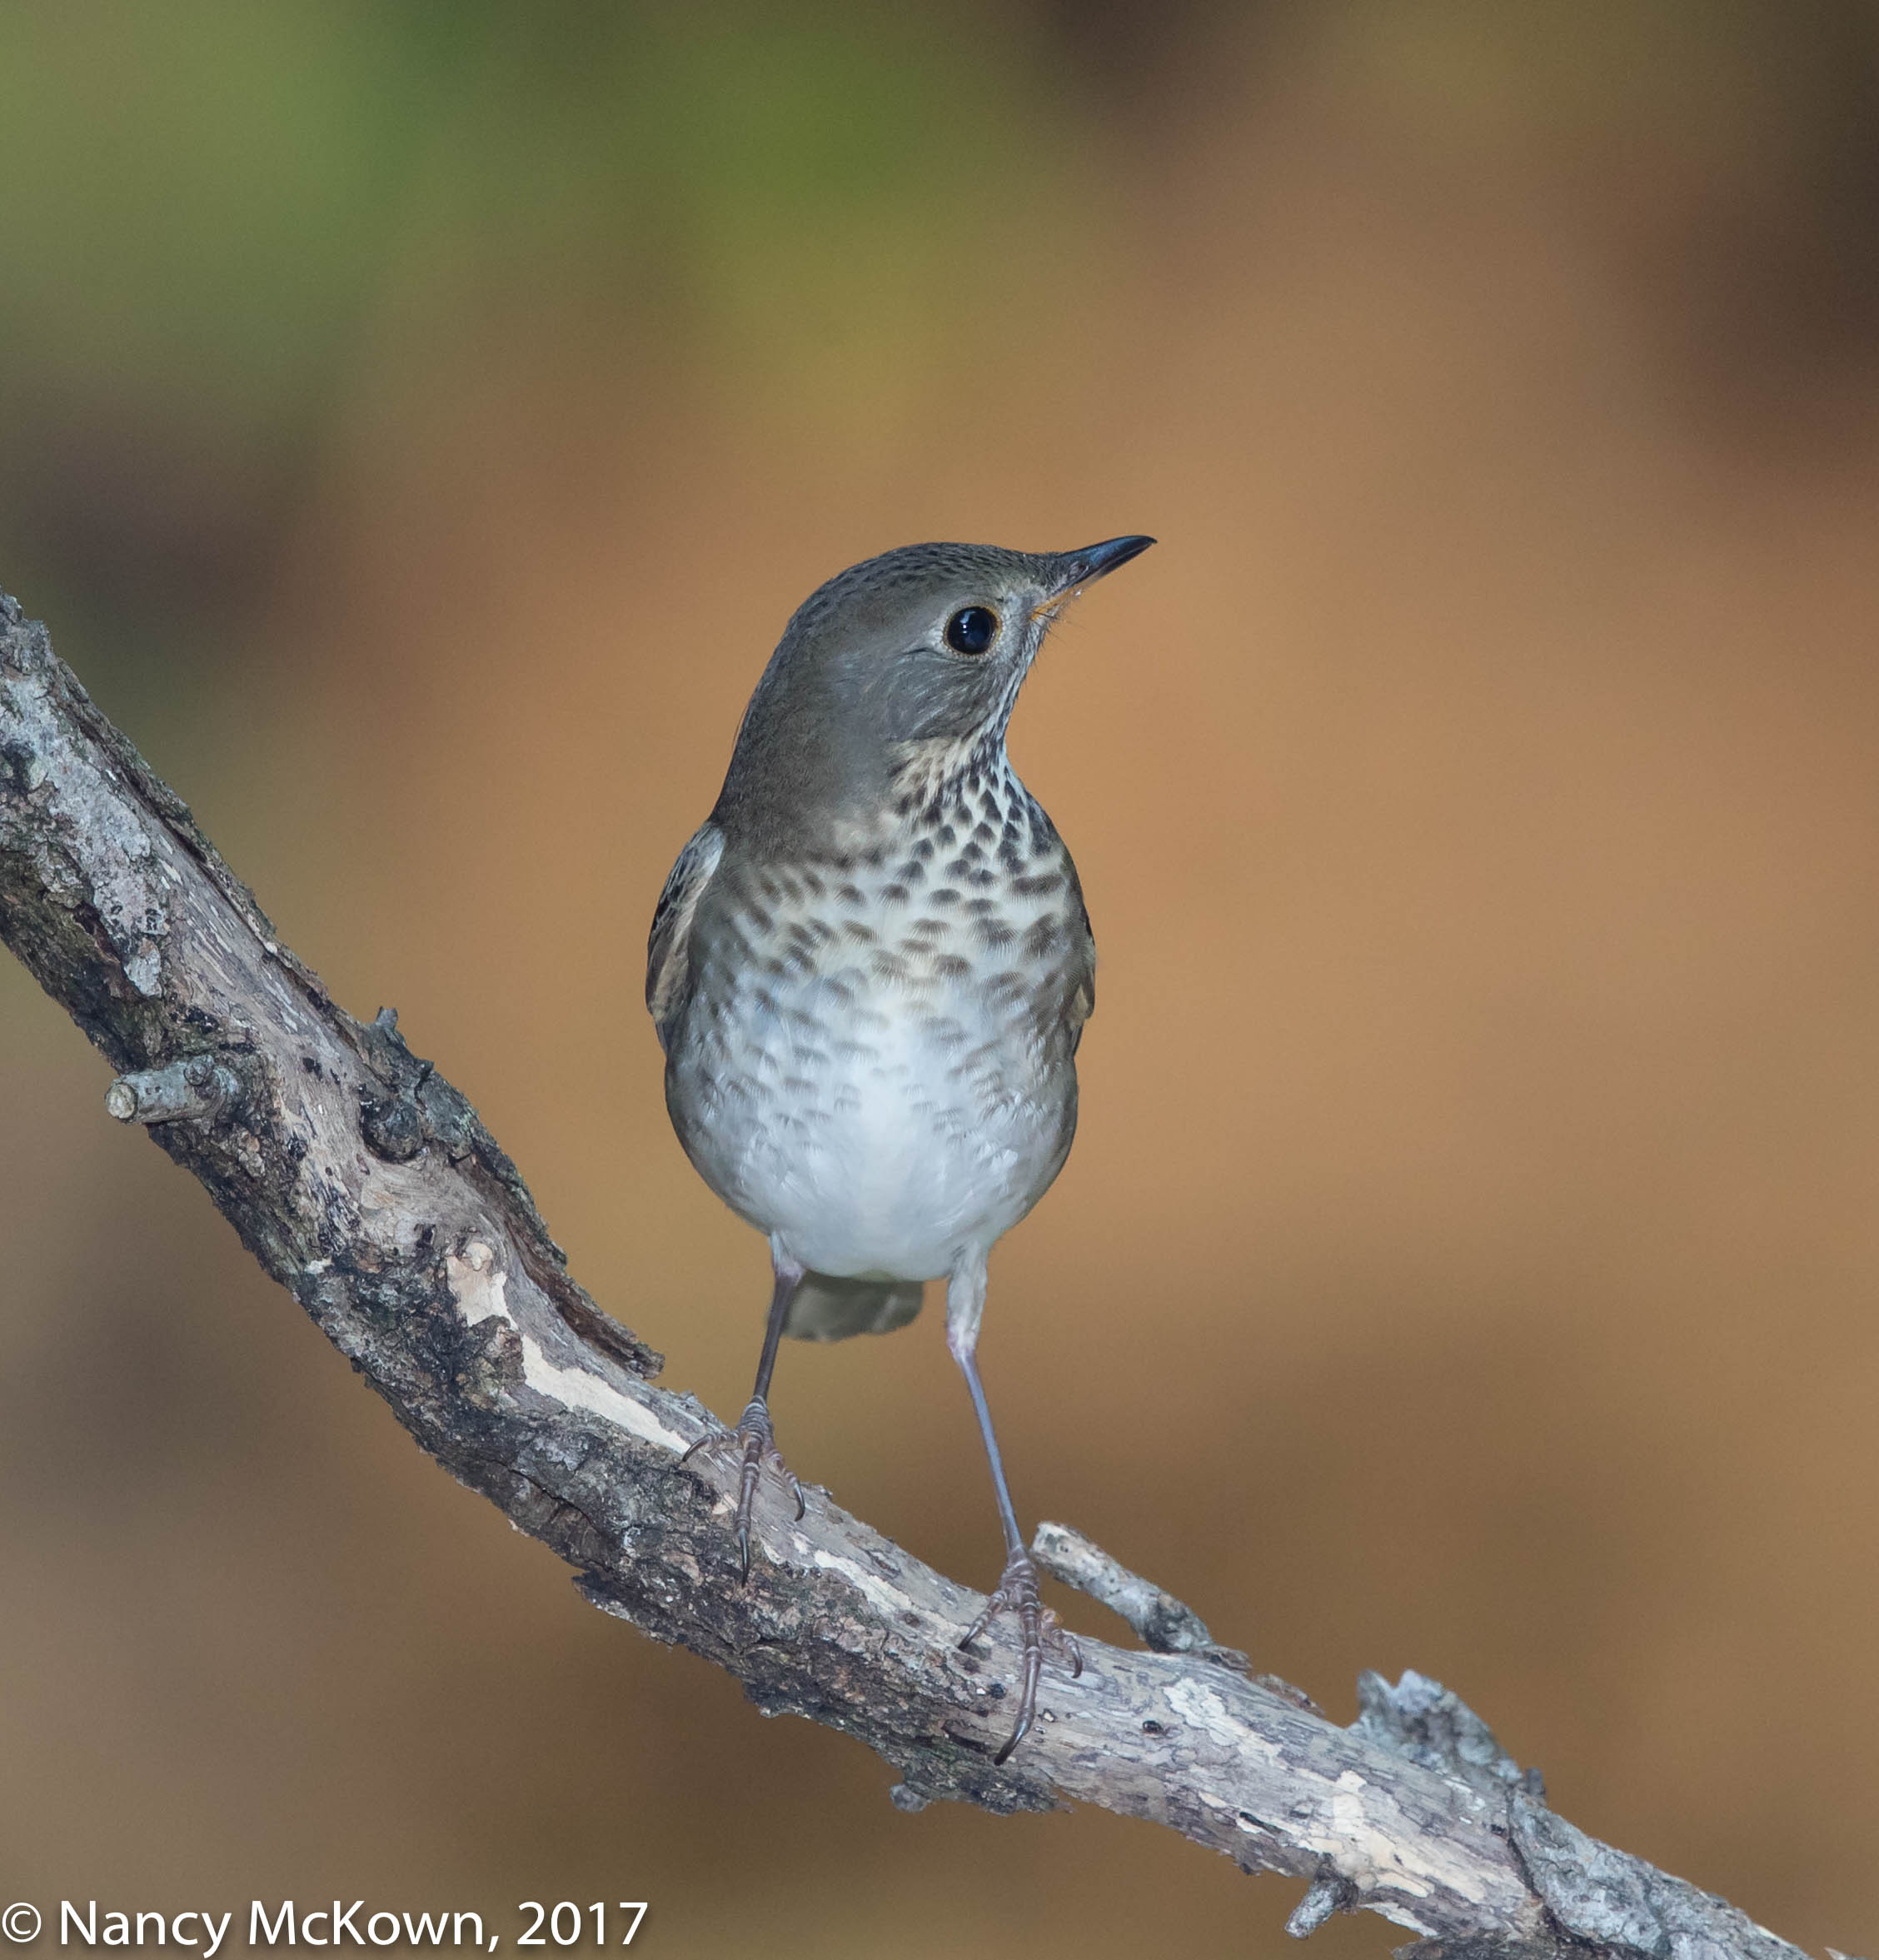
Lots of warblers coming through….. mostly drab coloring on the plumage. In most cases, I rarely get more than a glance. The camera’s lens is crucial to successfully examine colors and patterns.  Without it, I certainly couldn’t ID most migrators with any conviction.

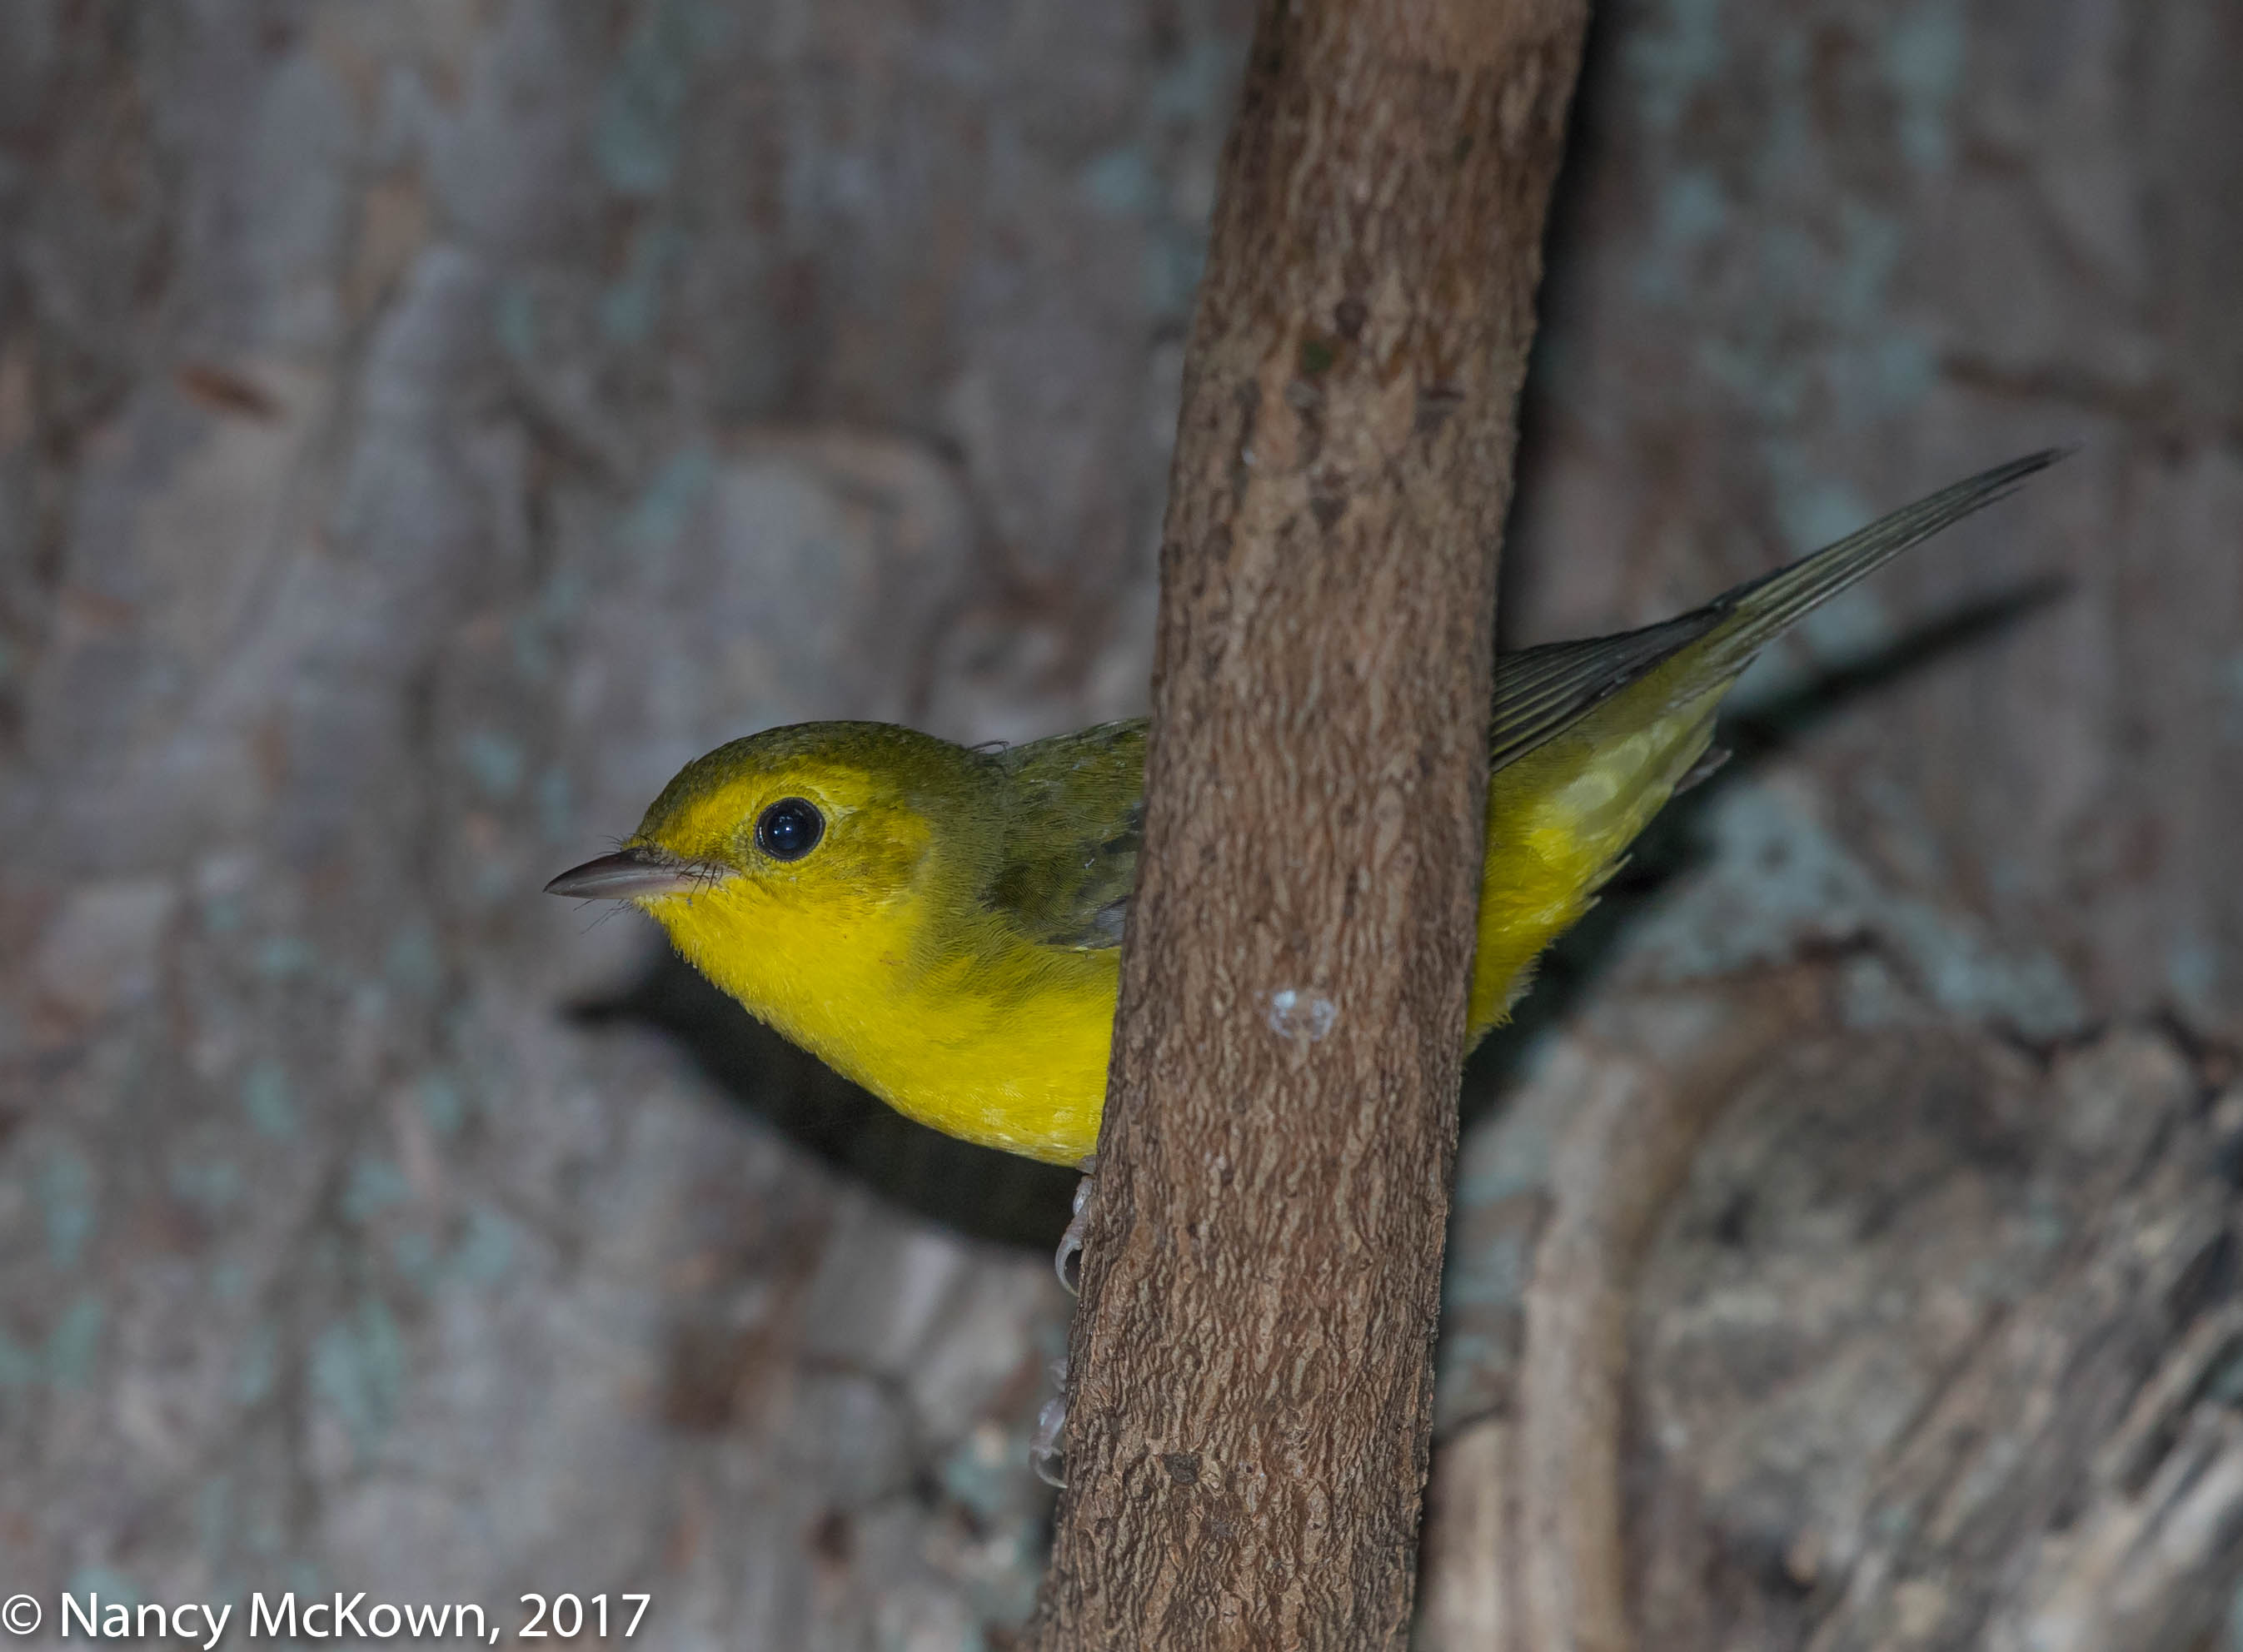
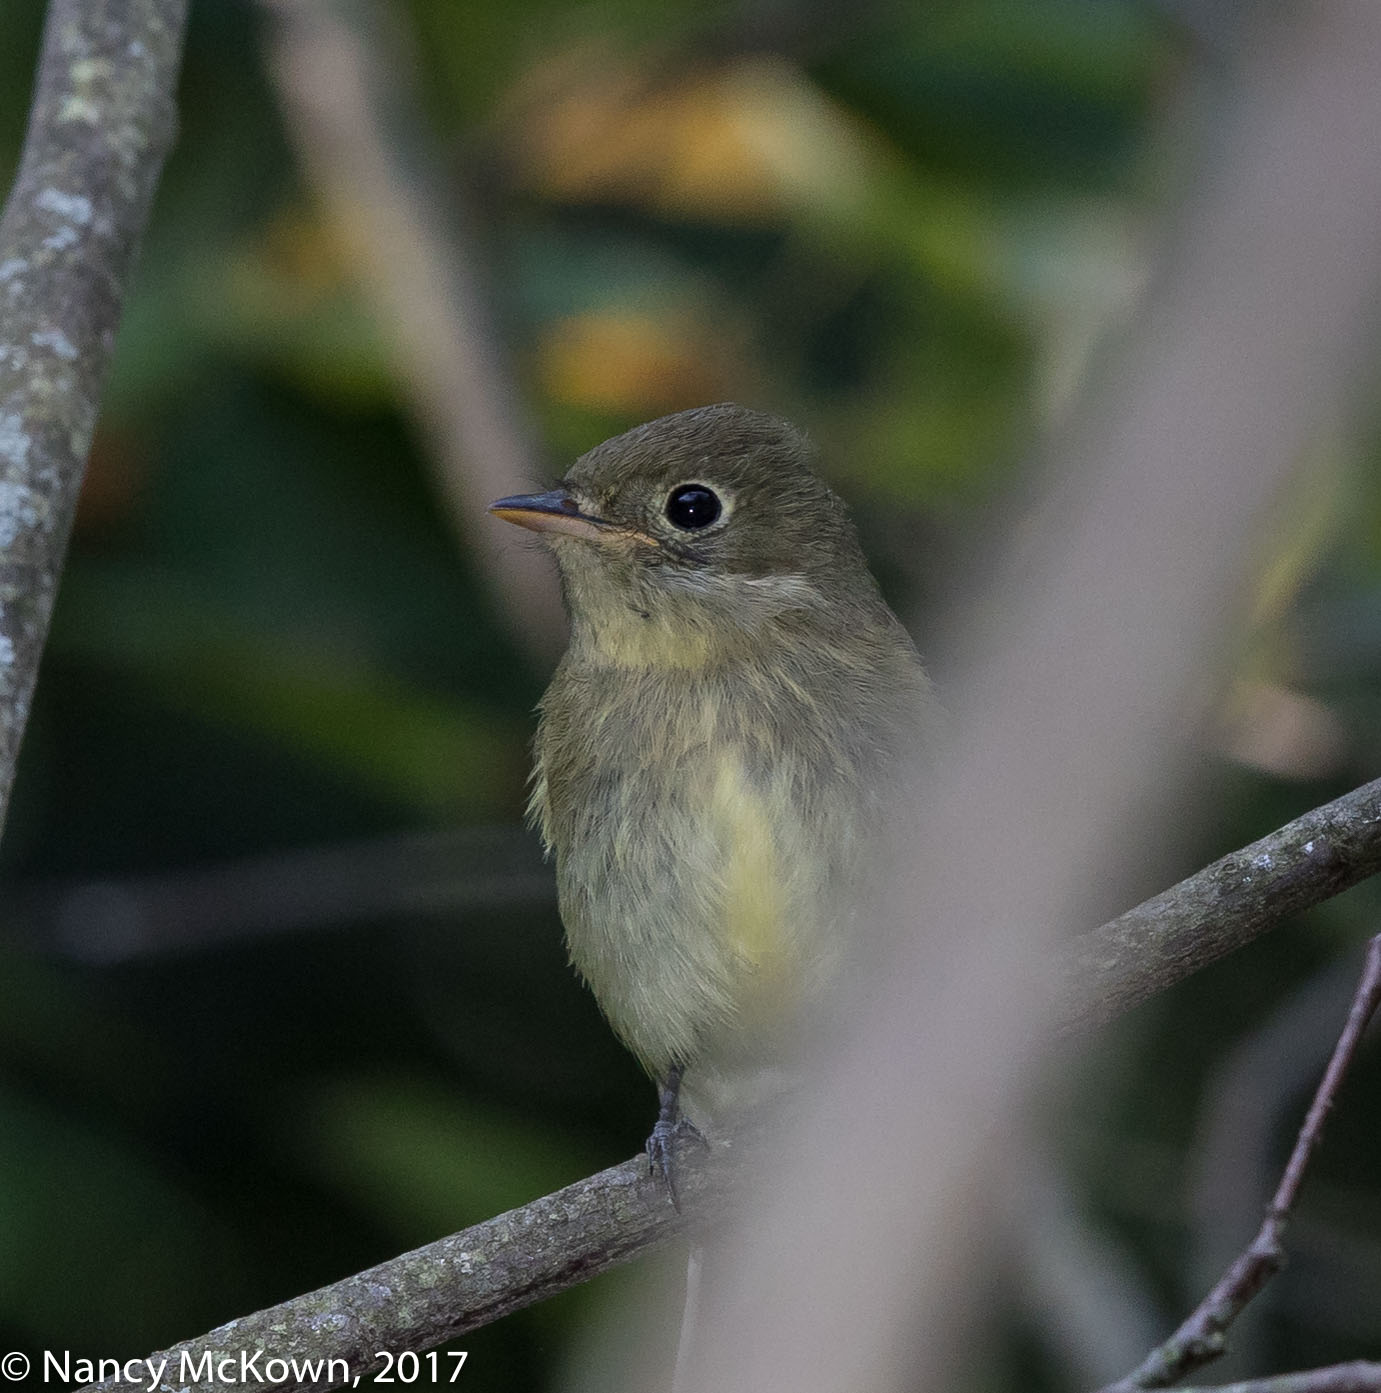
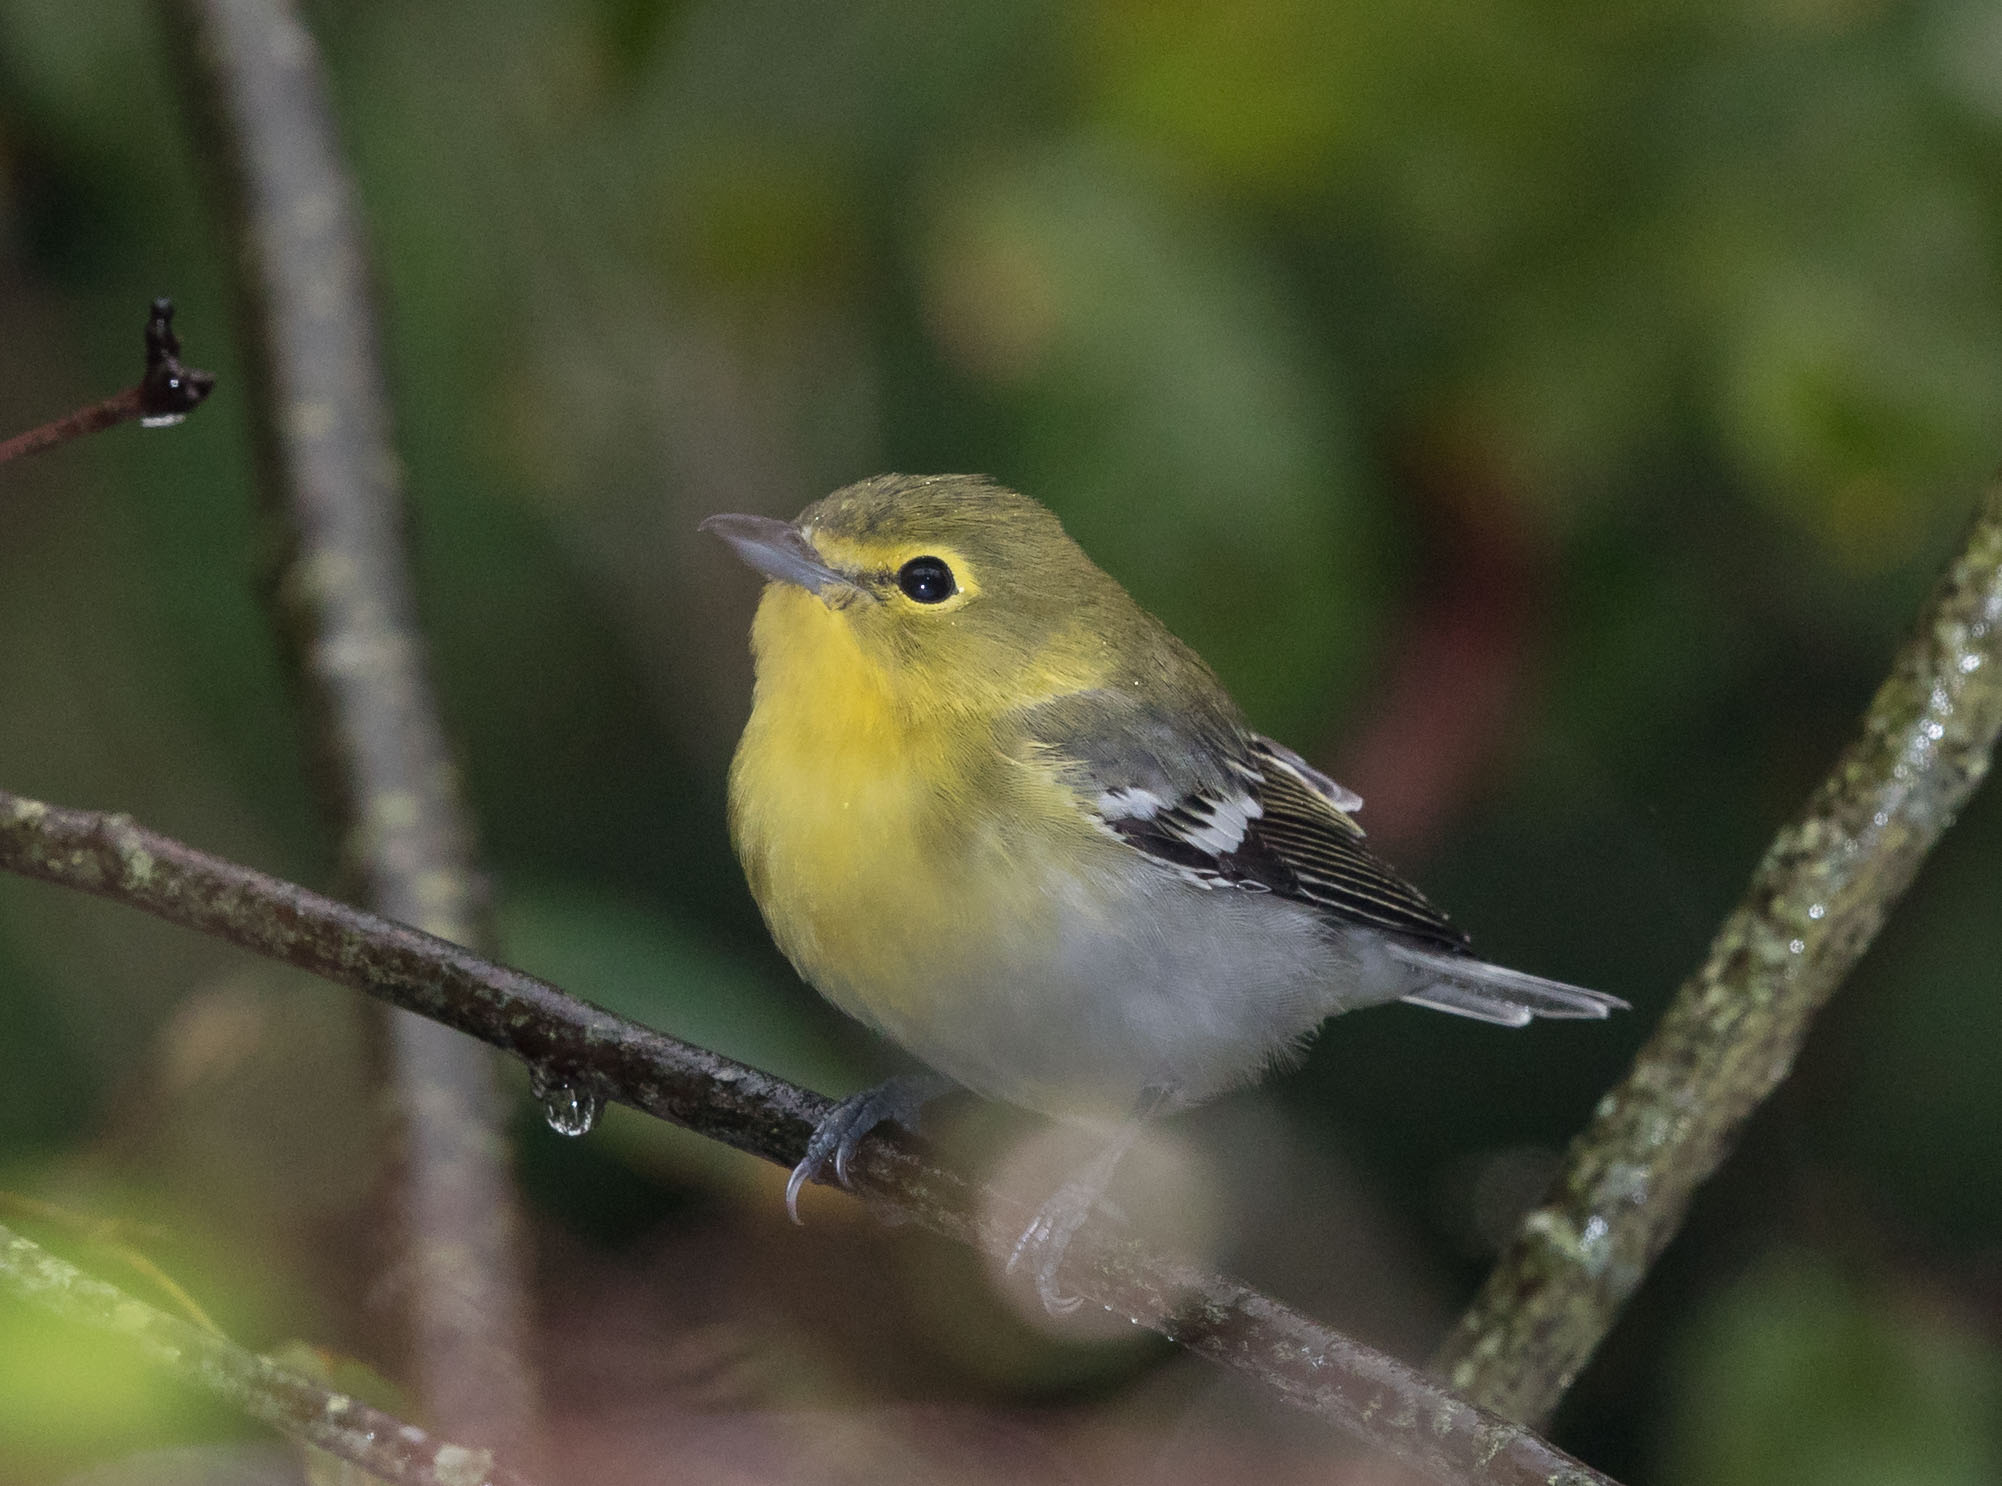
Based on this bird’s shape, size and elusive prowling behavior, I was pretty sure I had some kind of a warbler. Then I took a close look at the digital image…examining the size of her beak and her lemon yellow chest, throat and eye rings. Not a long, thin, pointy bill like a warbler, but thick; more like a Shrike with that large hook at the end. And what about those large bluish gray feet? Definitely not a warbler.

Photo of Yellow Throated Vireo
Yellow Throated Vireo.
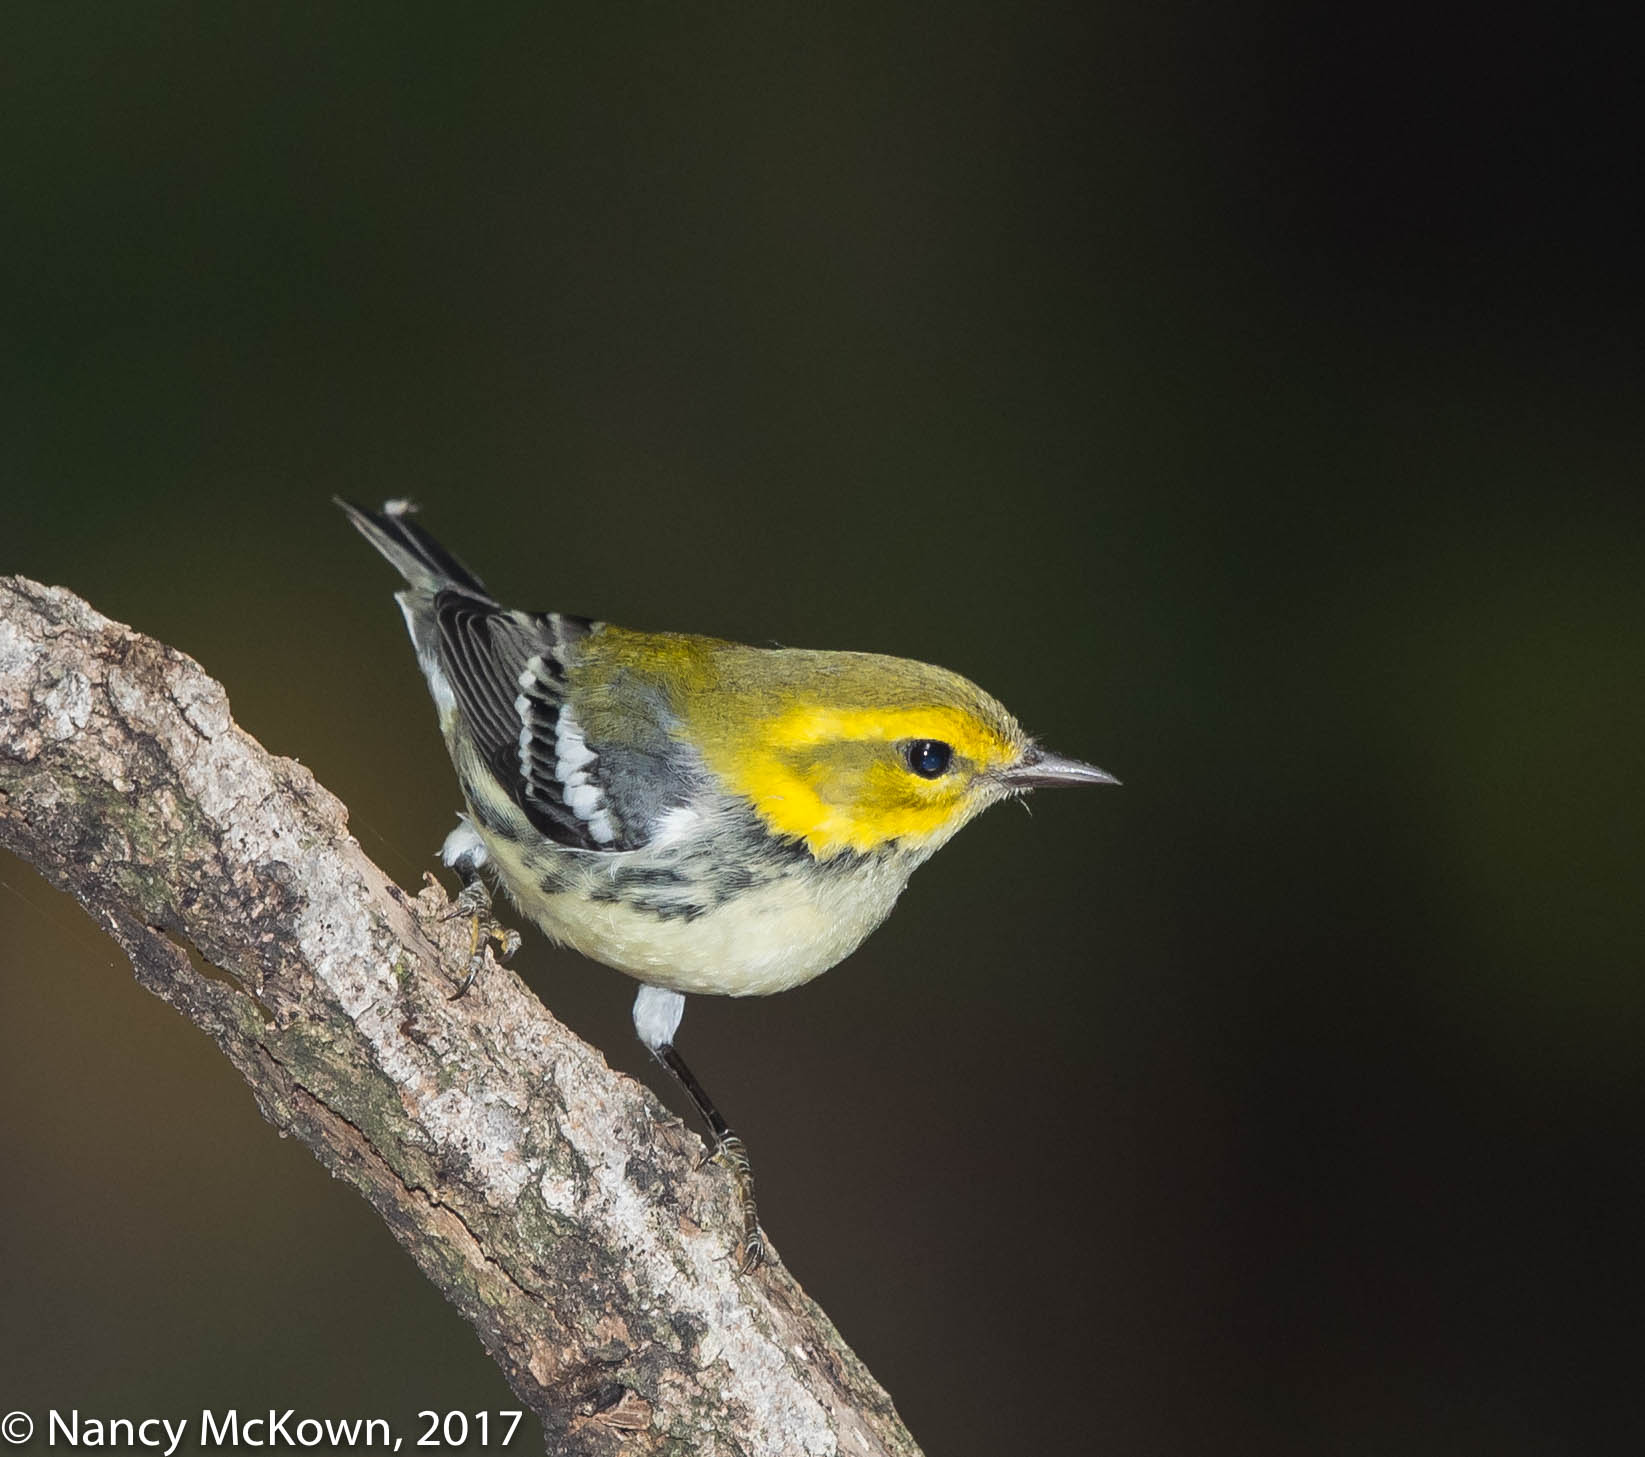
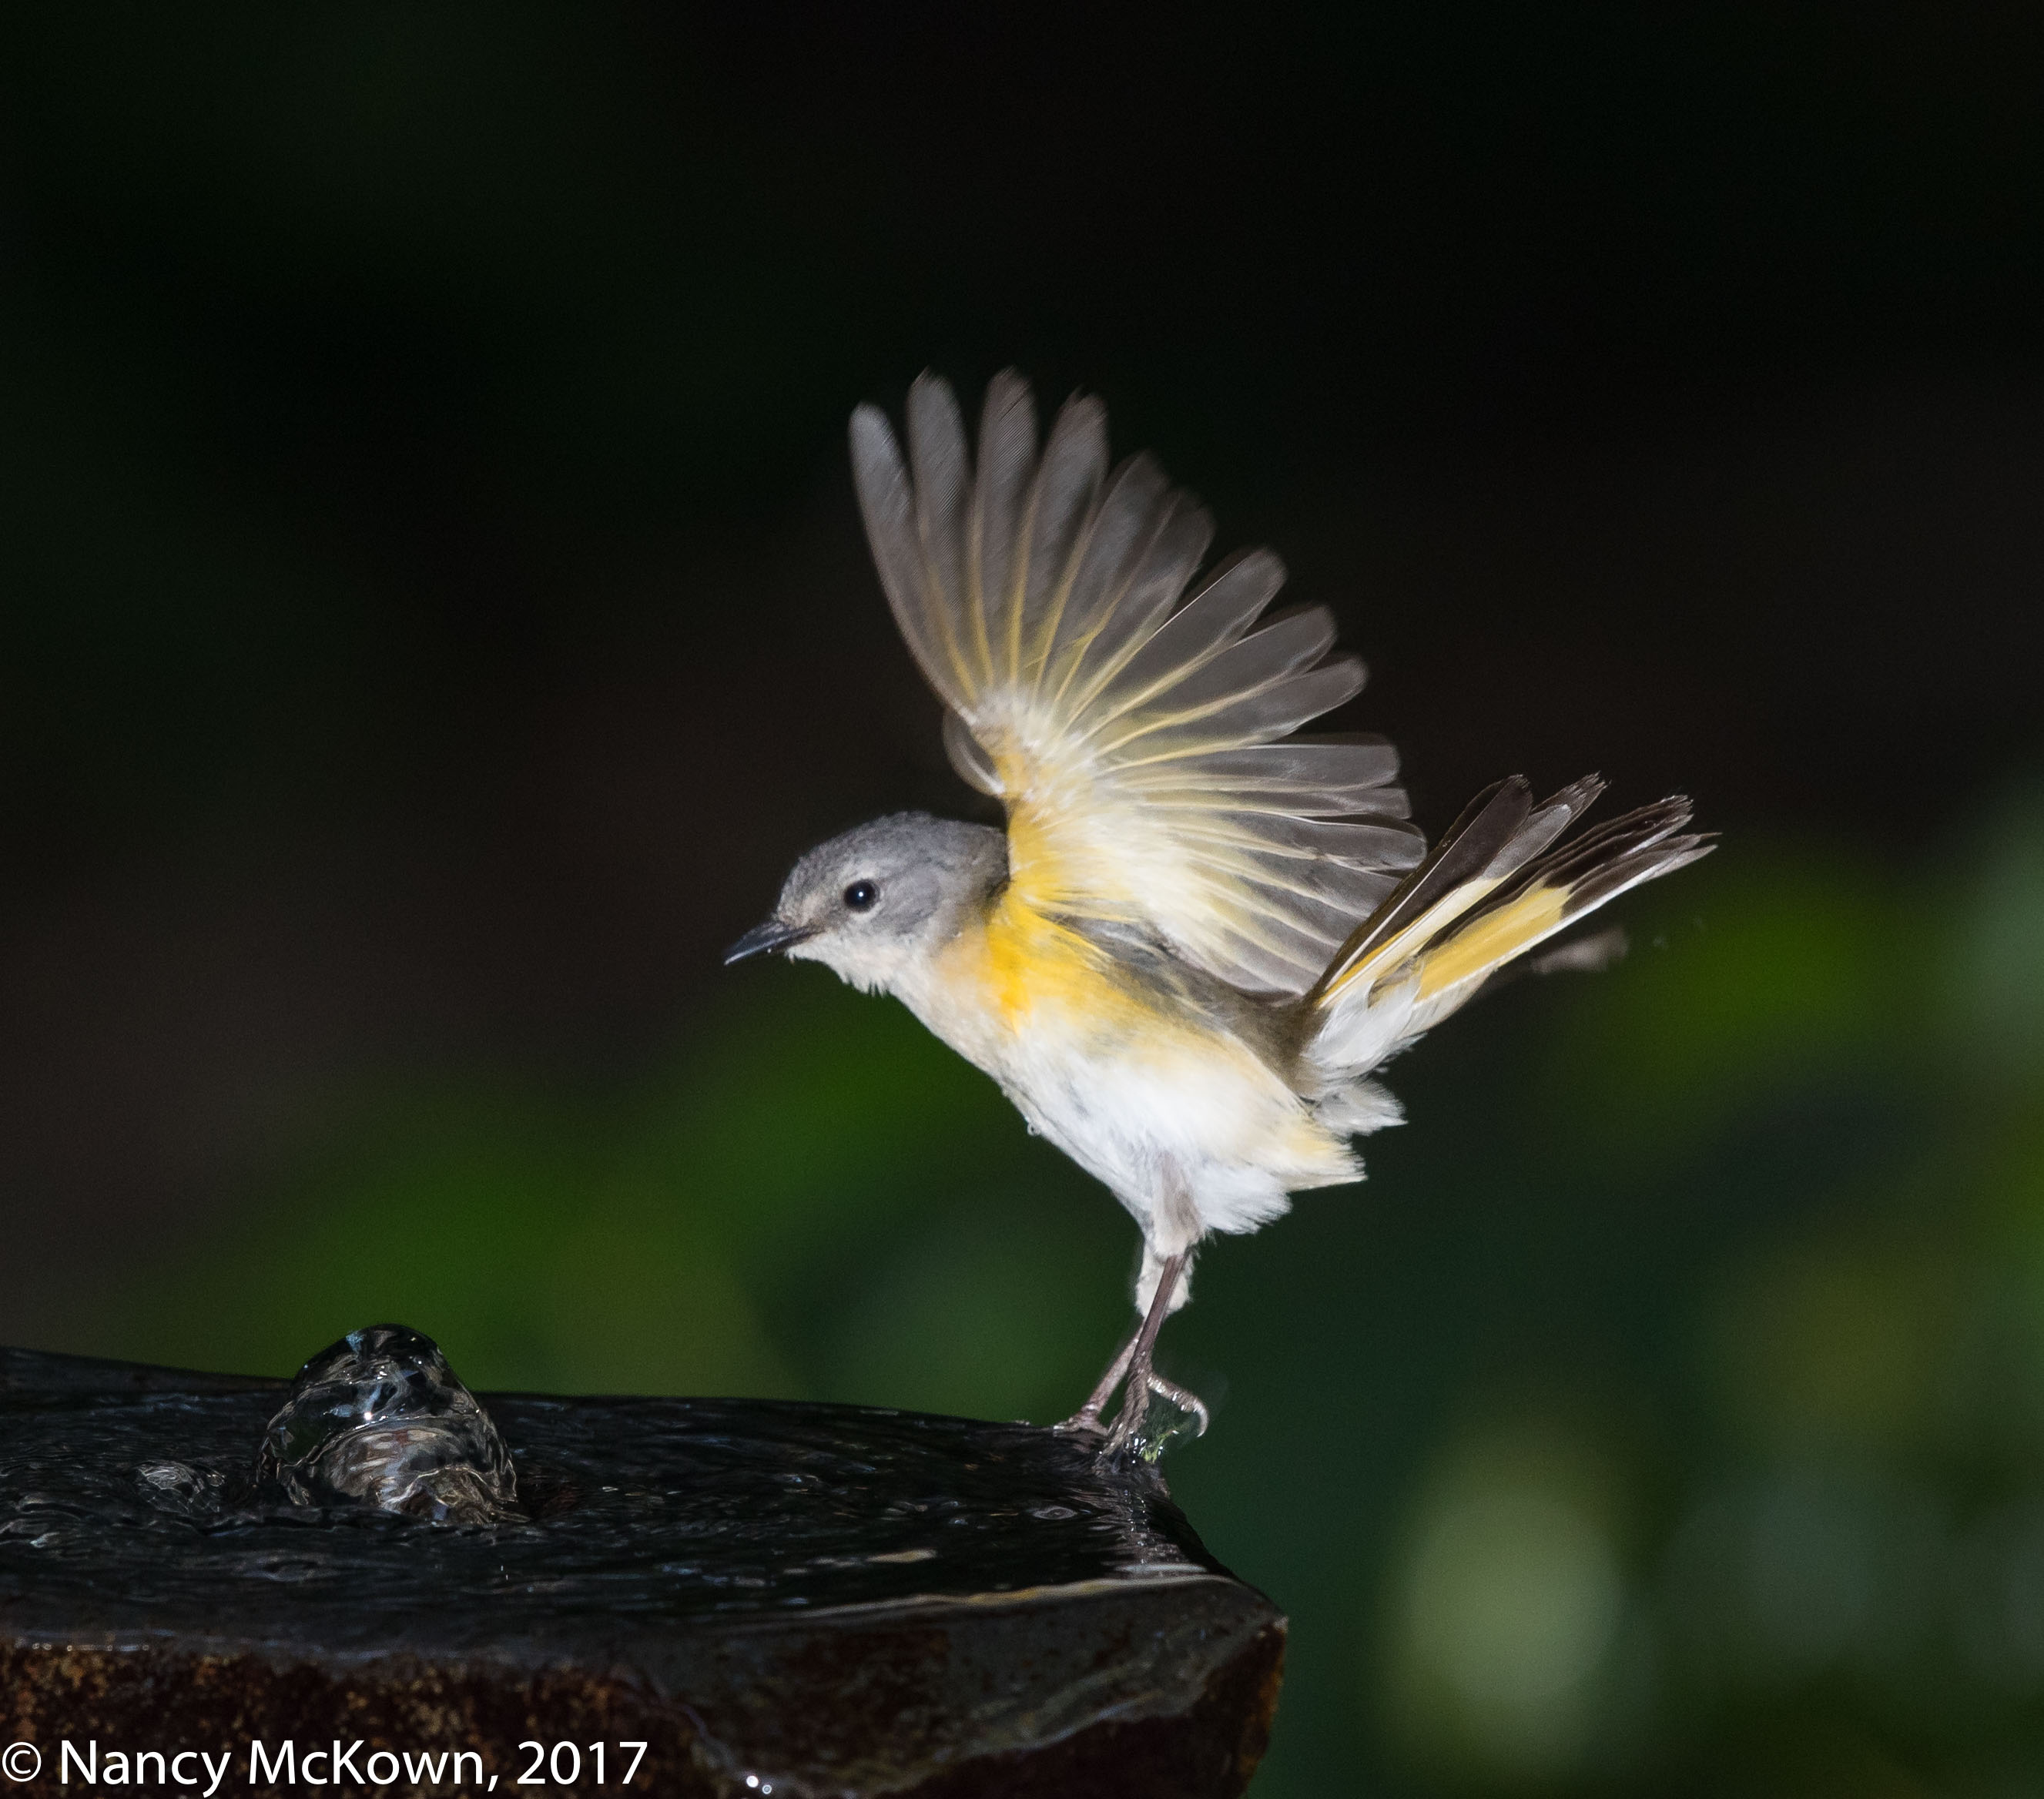
Circular Orbs Obstructing Left Foot.
ISO800; f/8; 1/250 Second

Stray Light

The sky was dark and pouring rain when this little Yellow Throated Vireo plopped down on a nearby branch in front of the camera. Small, drenched service berry leaves in front of and around the bird prevented the lens from getting a clean shot.

Somehow, on 3 sequential images, the camera recorded foggy looking circular overlapping orbs on the foreground of the bird’s left foot and all across the bottom of the image. This despite low ambient light, E-TTLII flash, lens hood attached, and advanced optical design multi-coating technology on my 500mm Canon L lens.  OUCH!!

But Why?

  • It was a dark day. There was no background source of ambient light equal or stronger than the existing light on the subject.
  • The flash (with FEC set at -1/3) was doing most of the work.
  • No pieces of dust, debris or water droplets were on the camera’s front or rear lens elements. (NOTE: Dust on the front of the lens hardly ever impacts image quality.)

It looks like overexposed lens flare, possibly combined with an out-of-focus elliptical Serviceberry leaf in the foreground. I can only surmise that those wet leaves in front of the bird bounced the light back toward the lens, causing not only lens flare, but also spotty reduction in saturation and contrast. (NOTE: Long lenses are more likely to produce pronounced lens flare.)

Yellow Throated Vireo
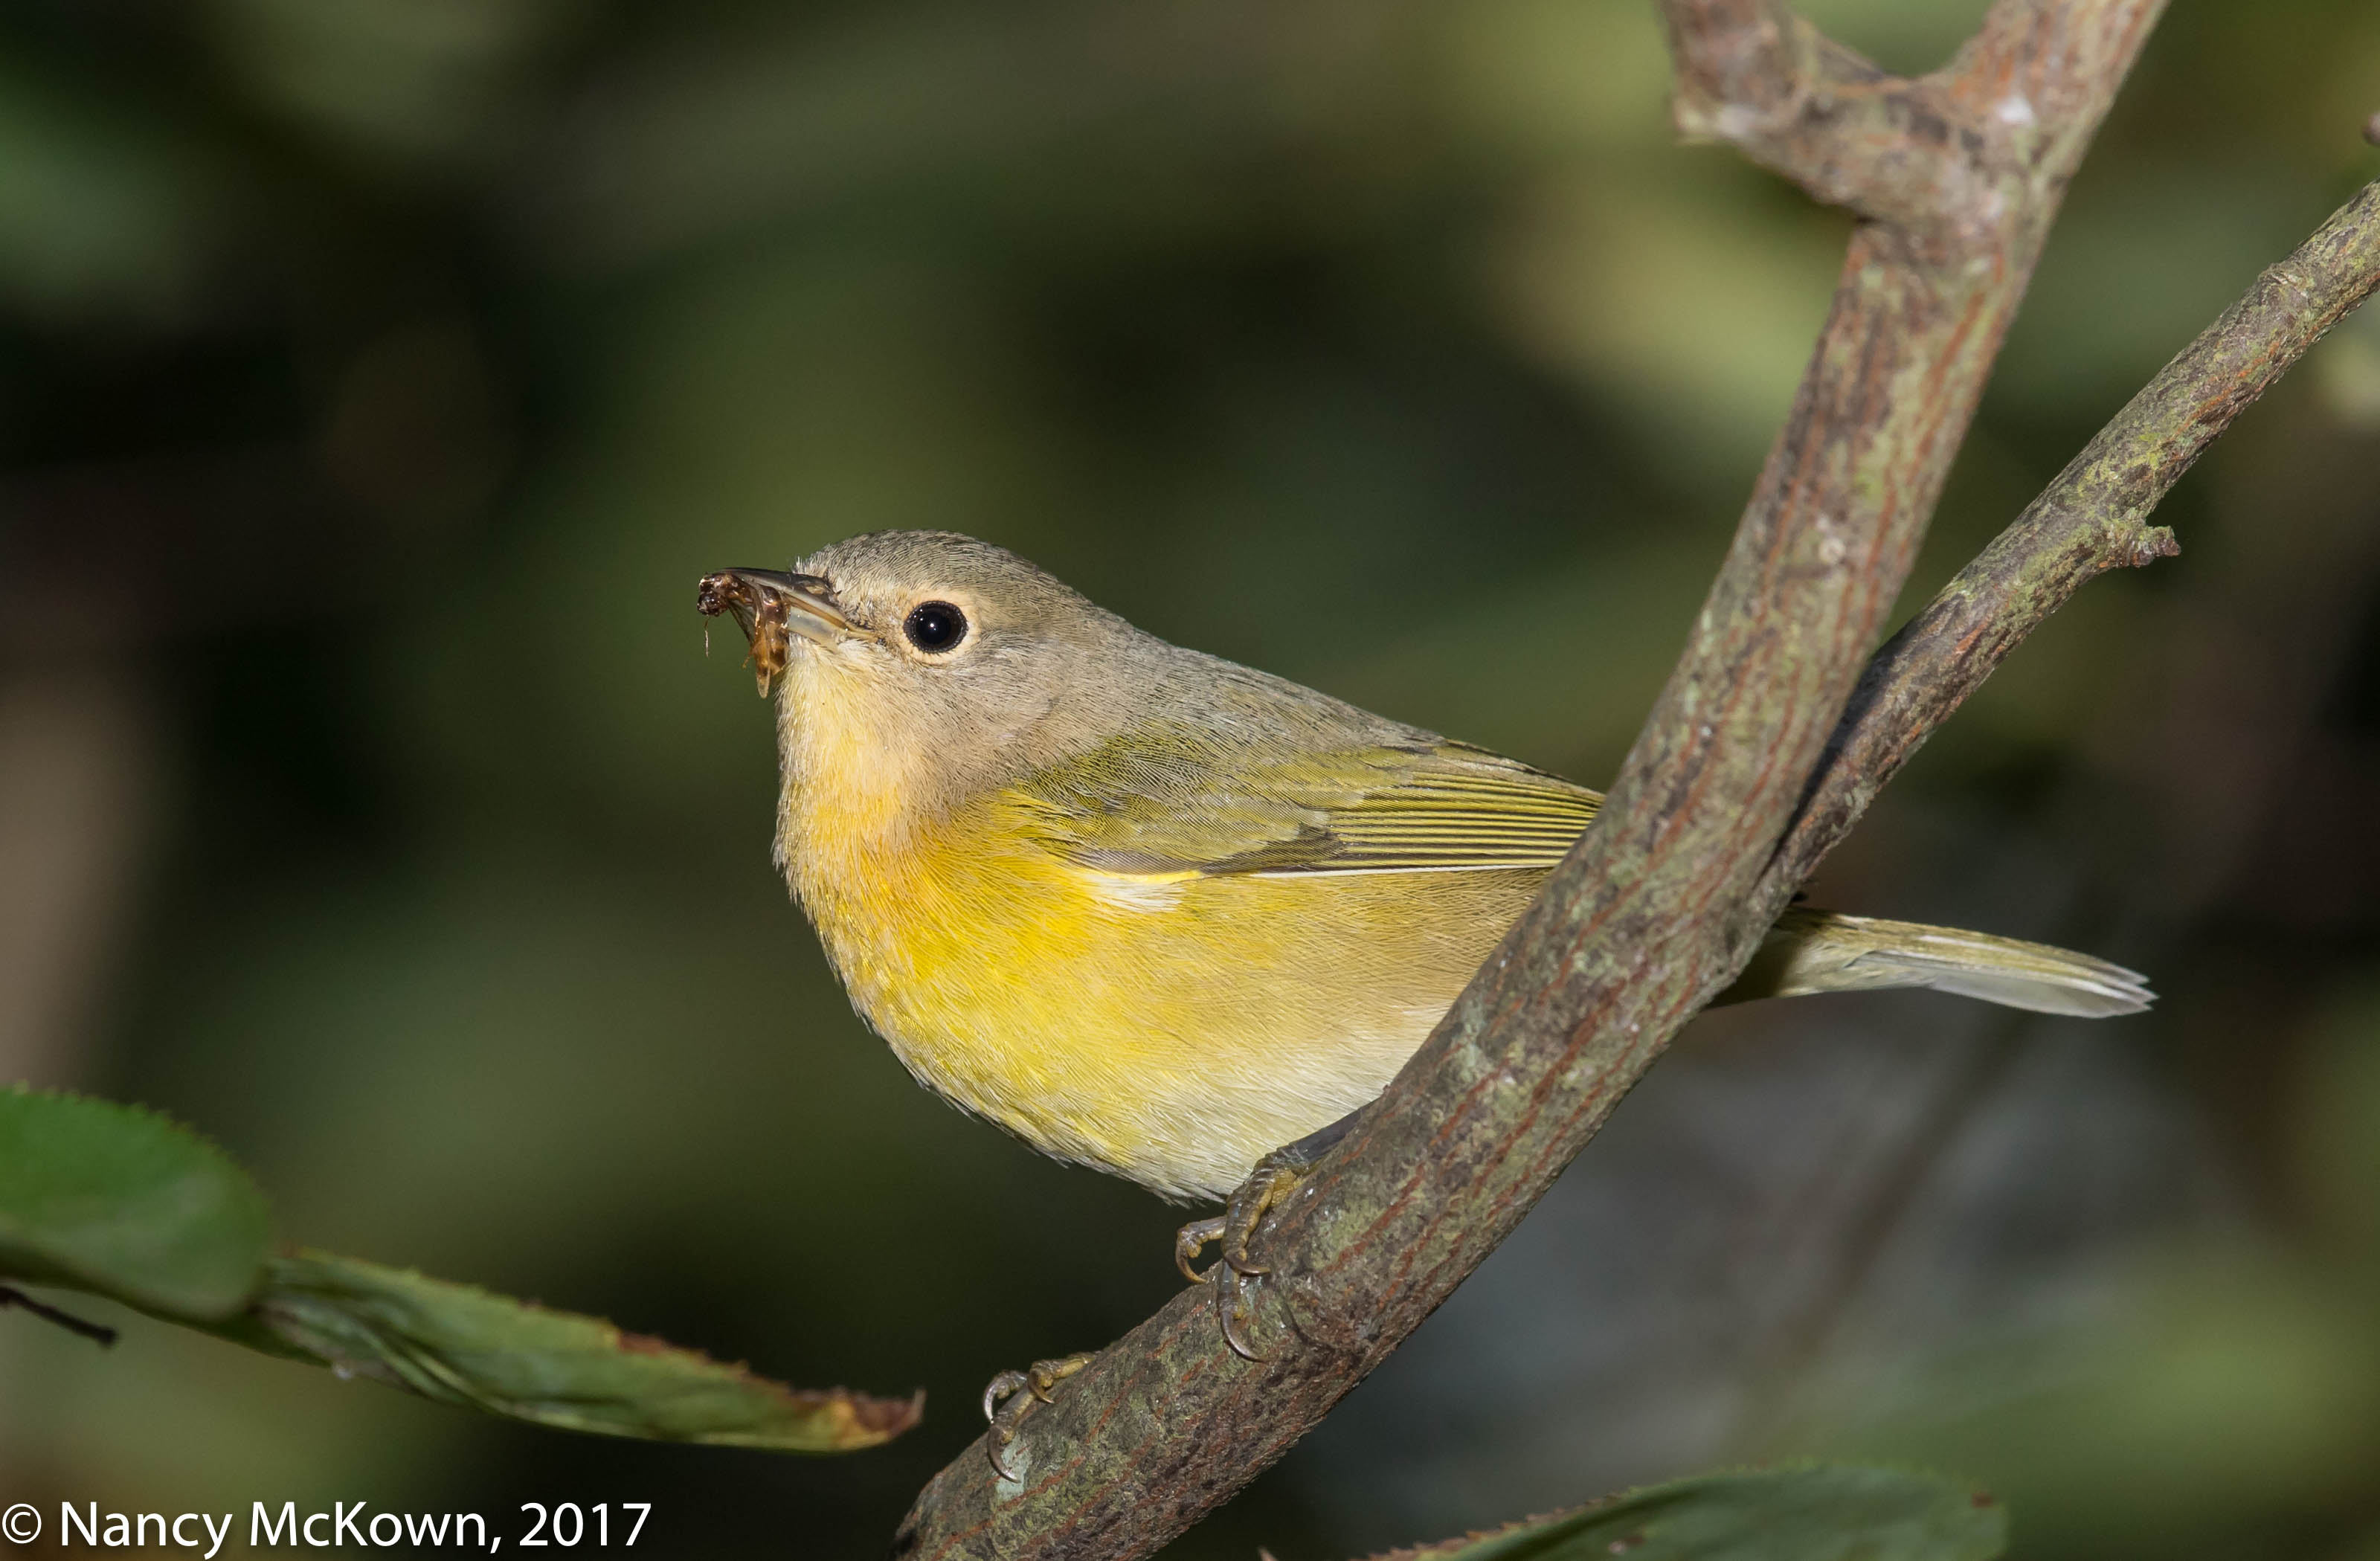
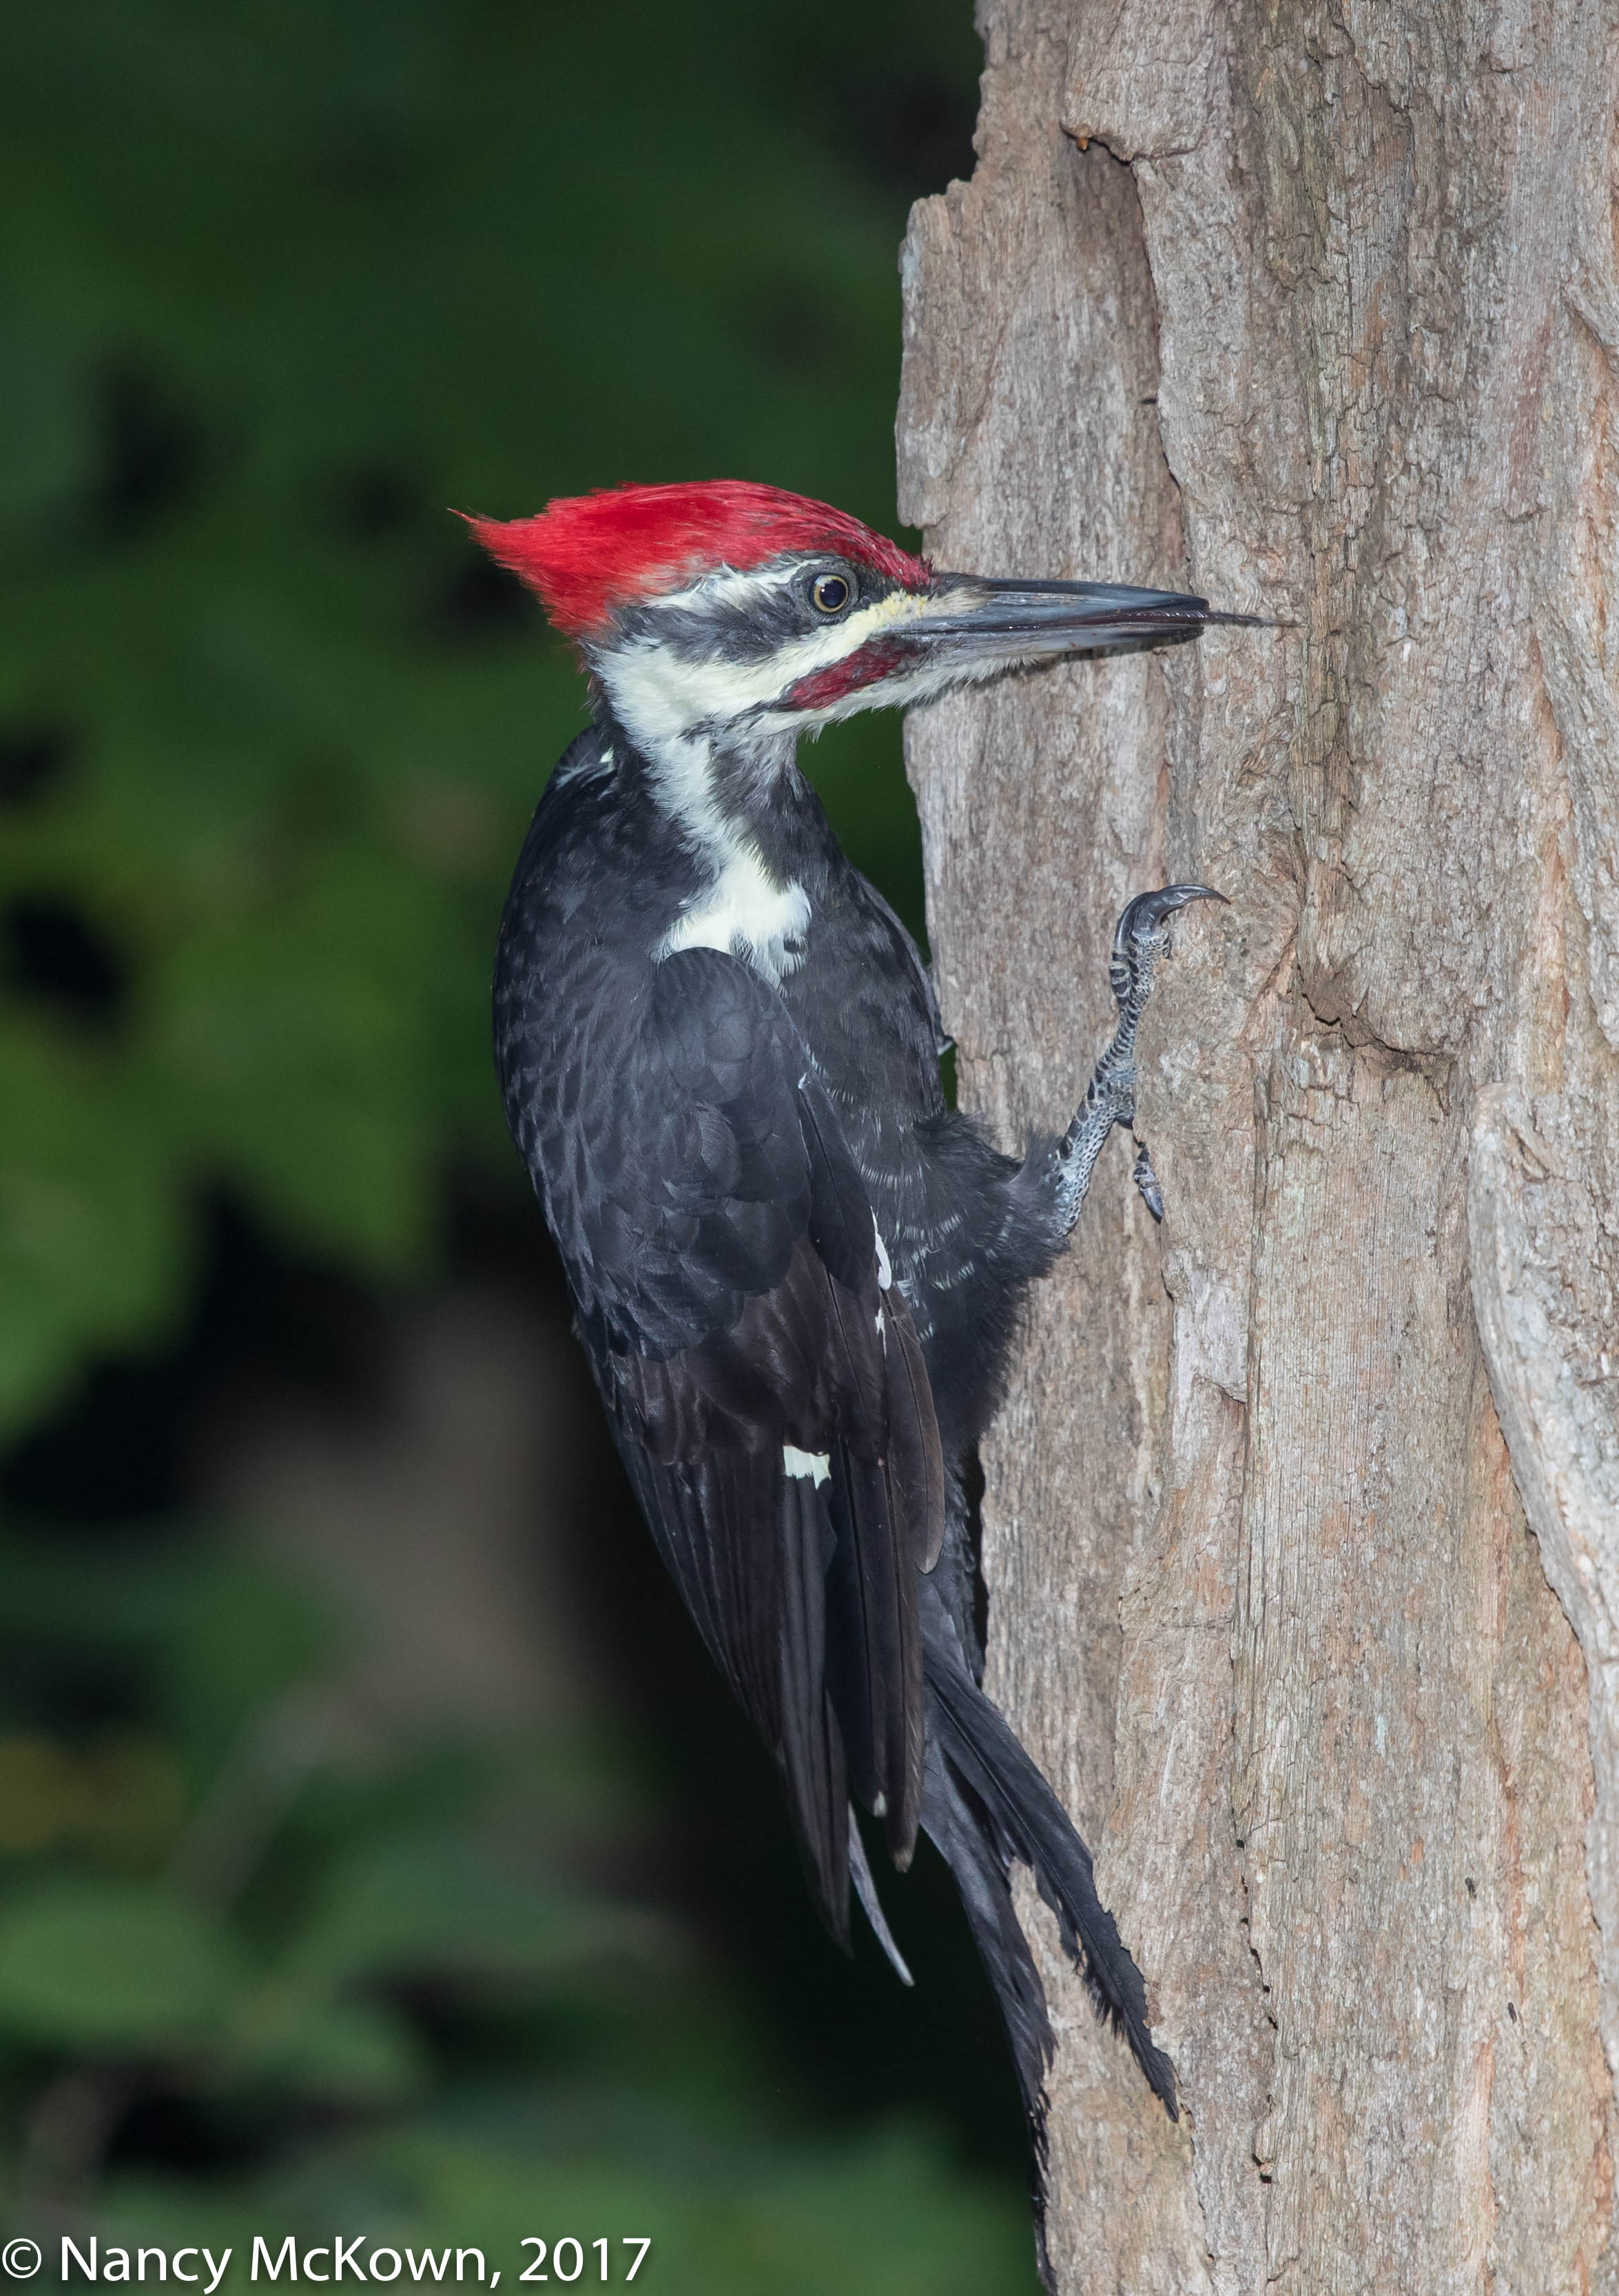
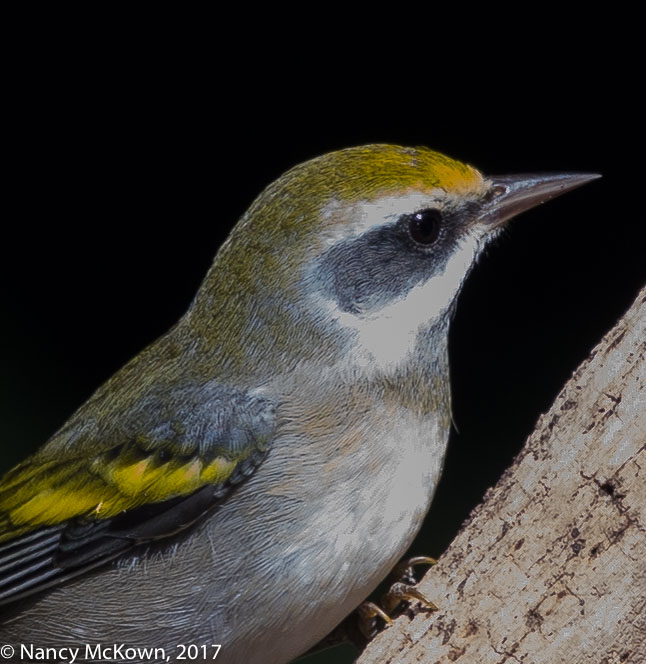
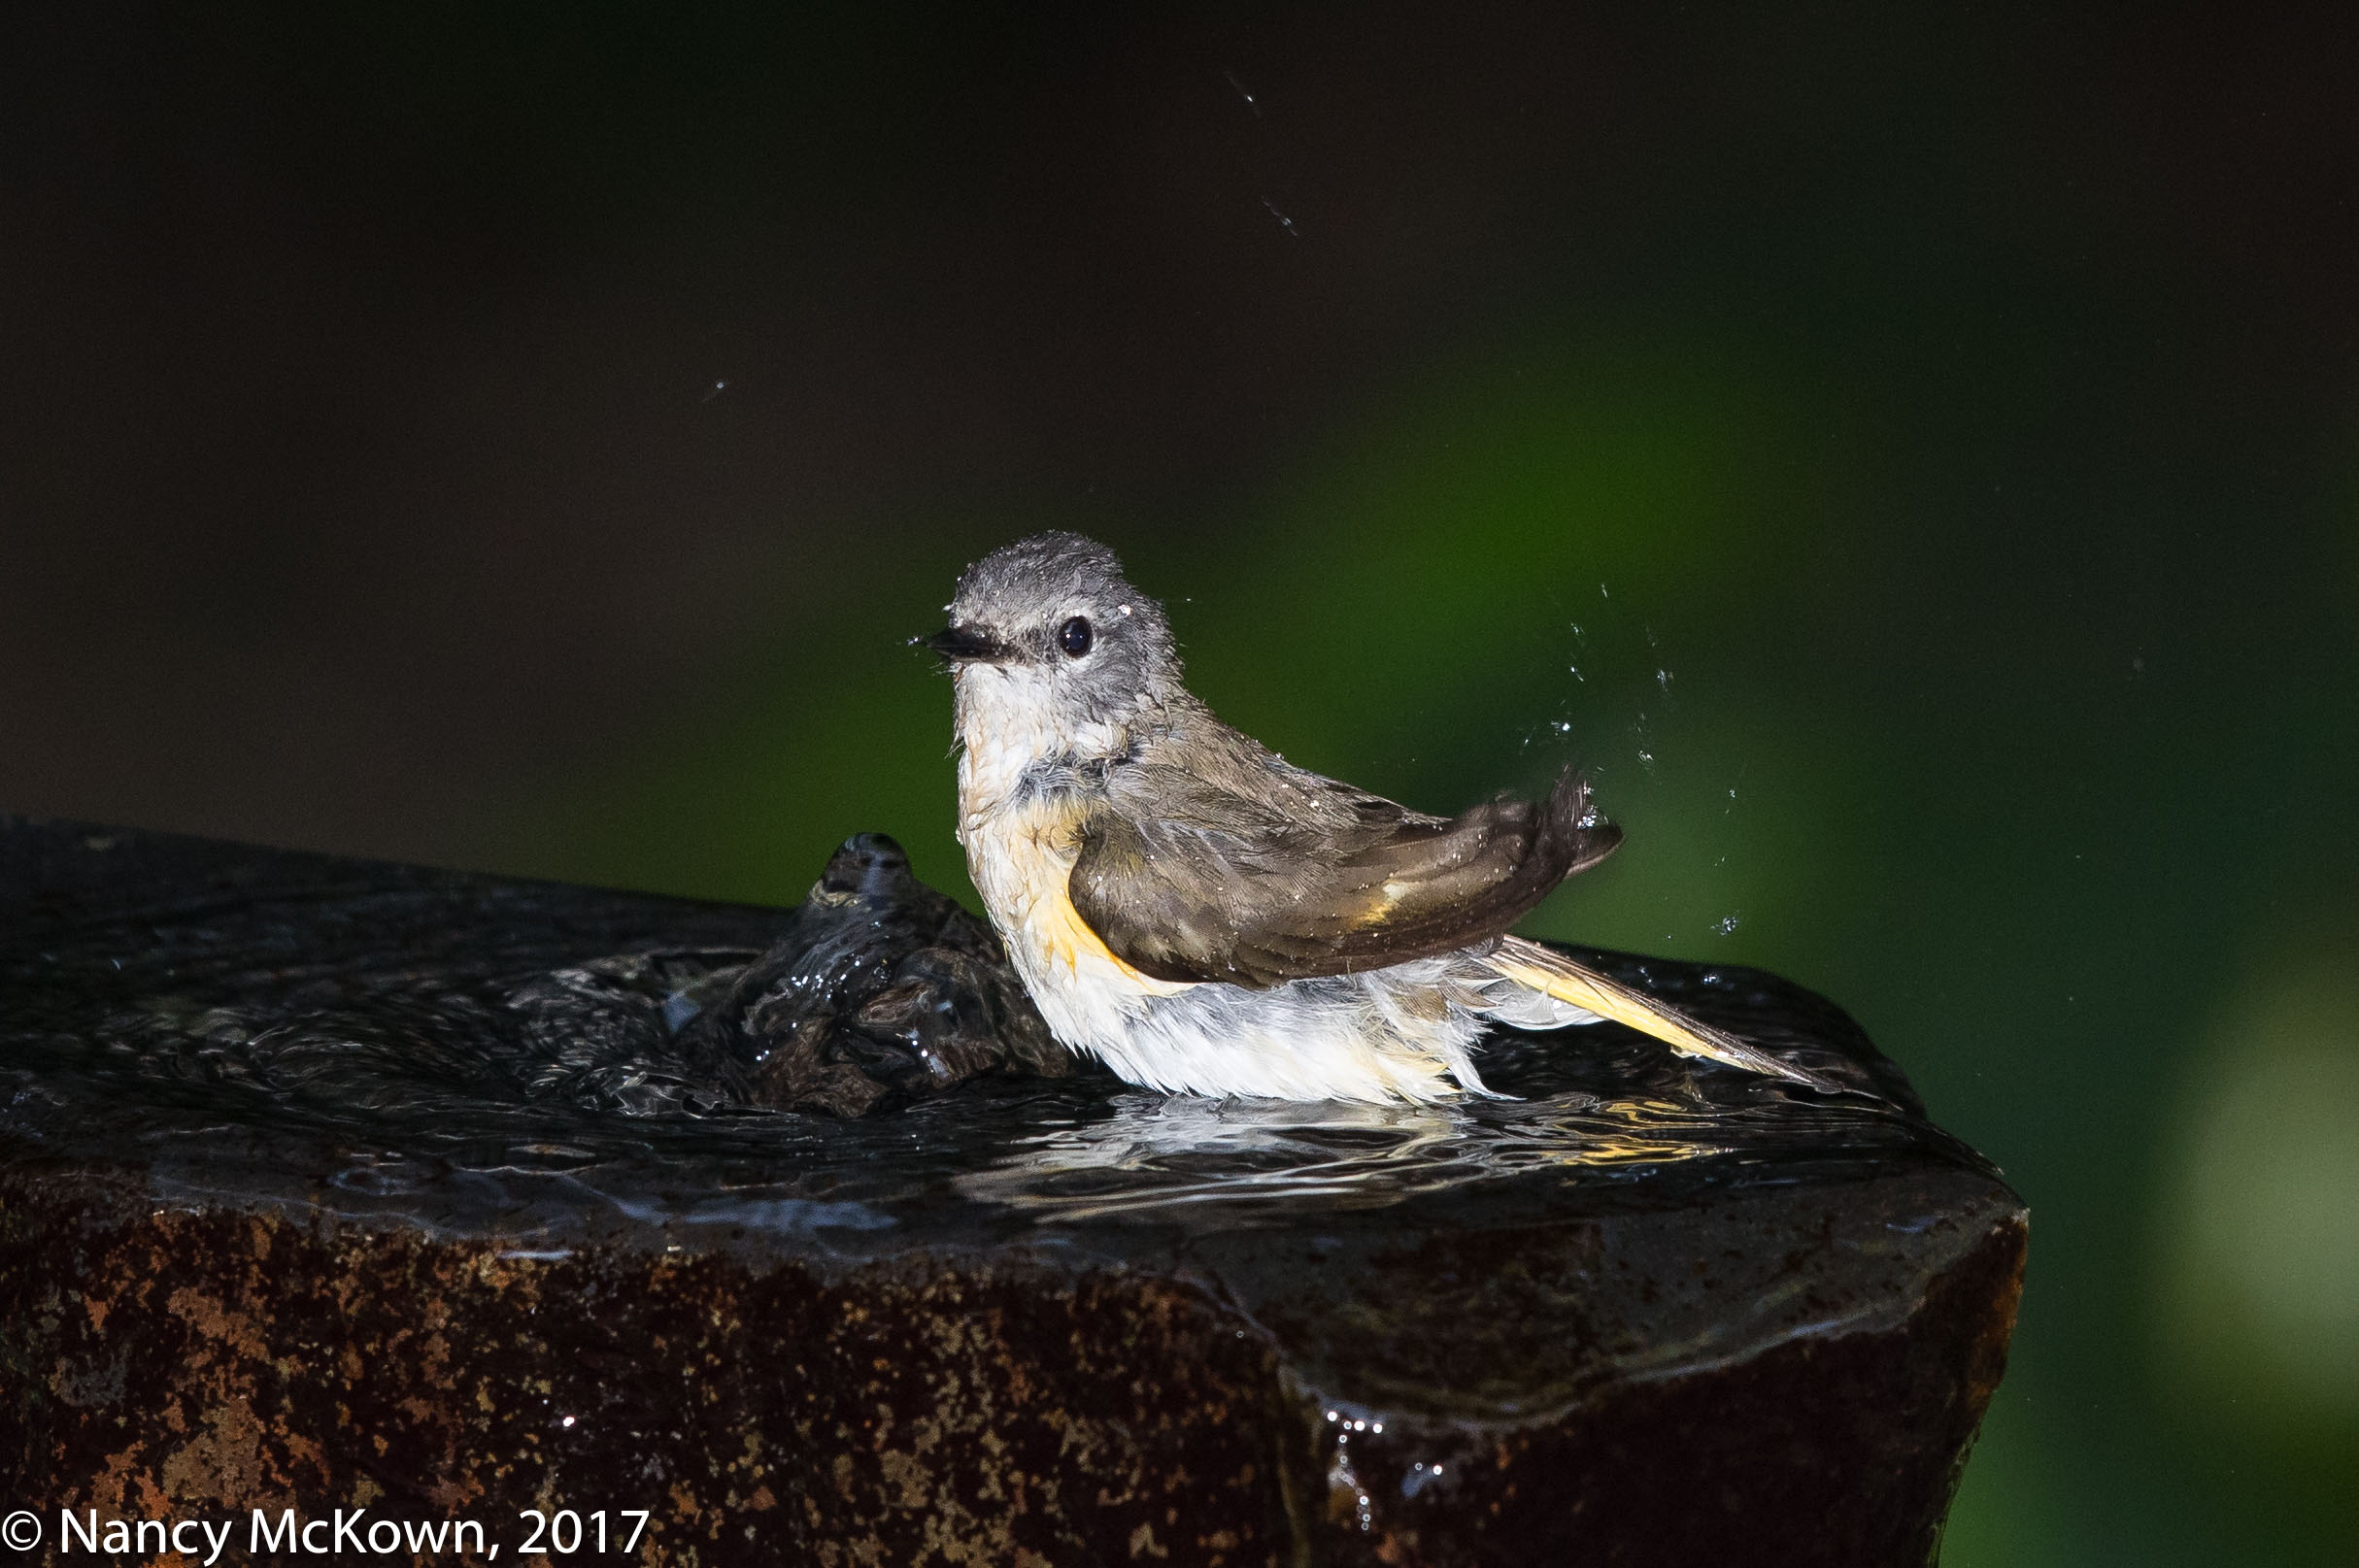
Thick Branches Obstructing Line of Sight,
But No Lens Flare.
ISO800; f/8; 1/250 Second

Unpredictable Lens Flare

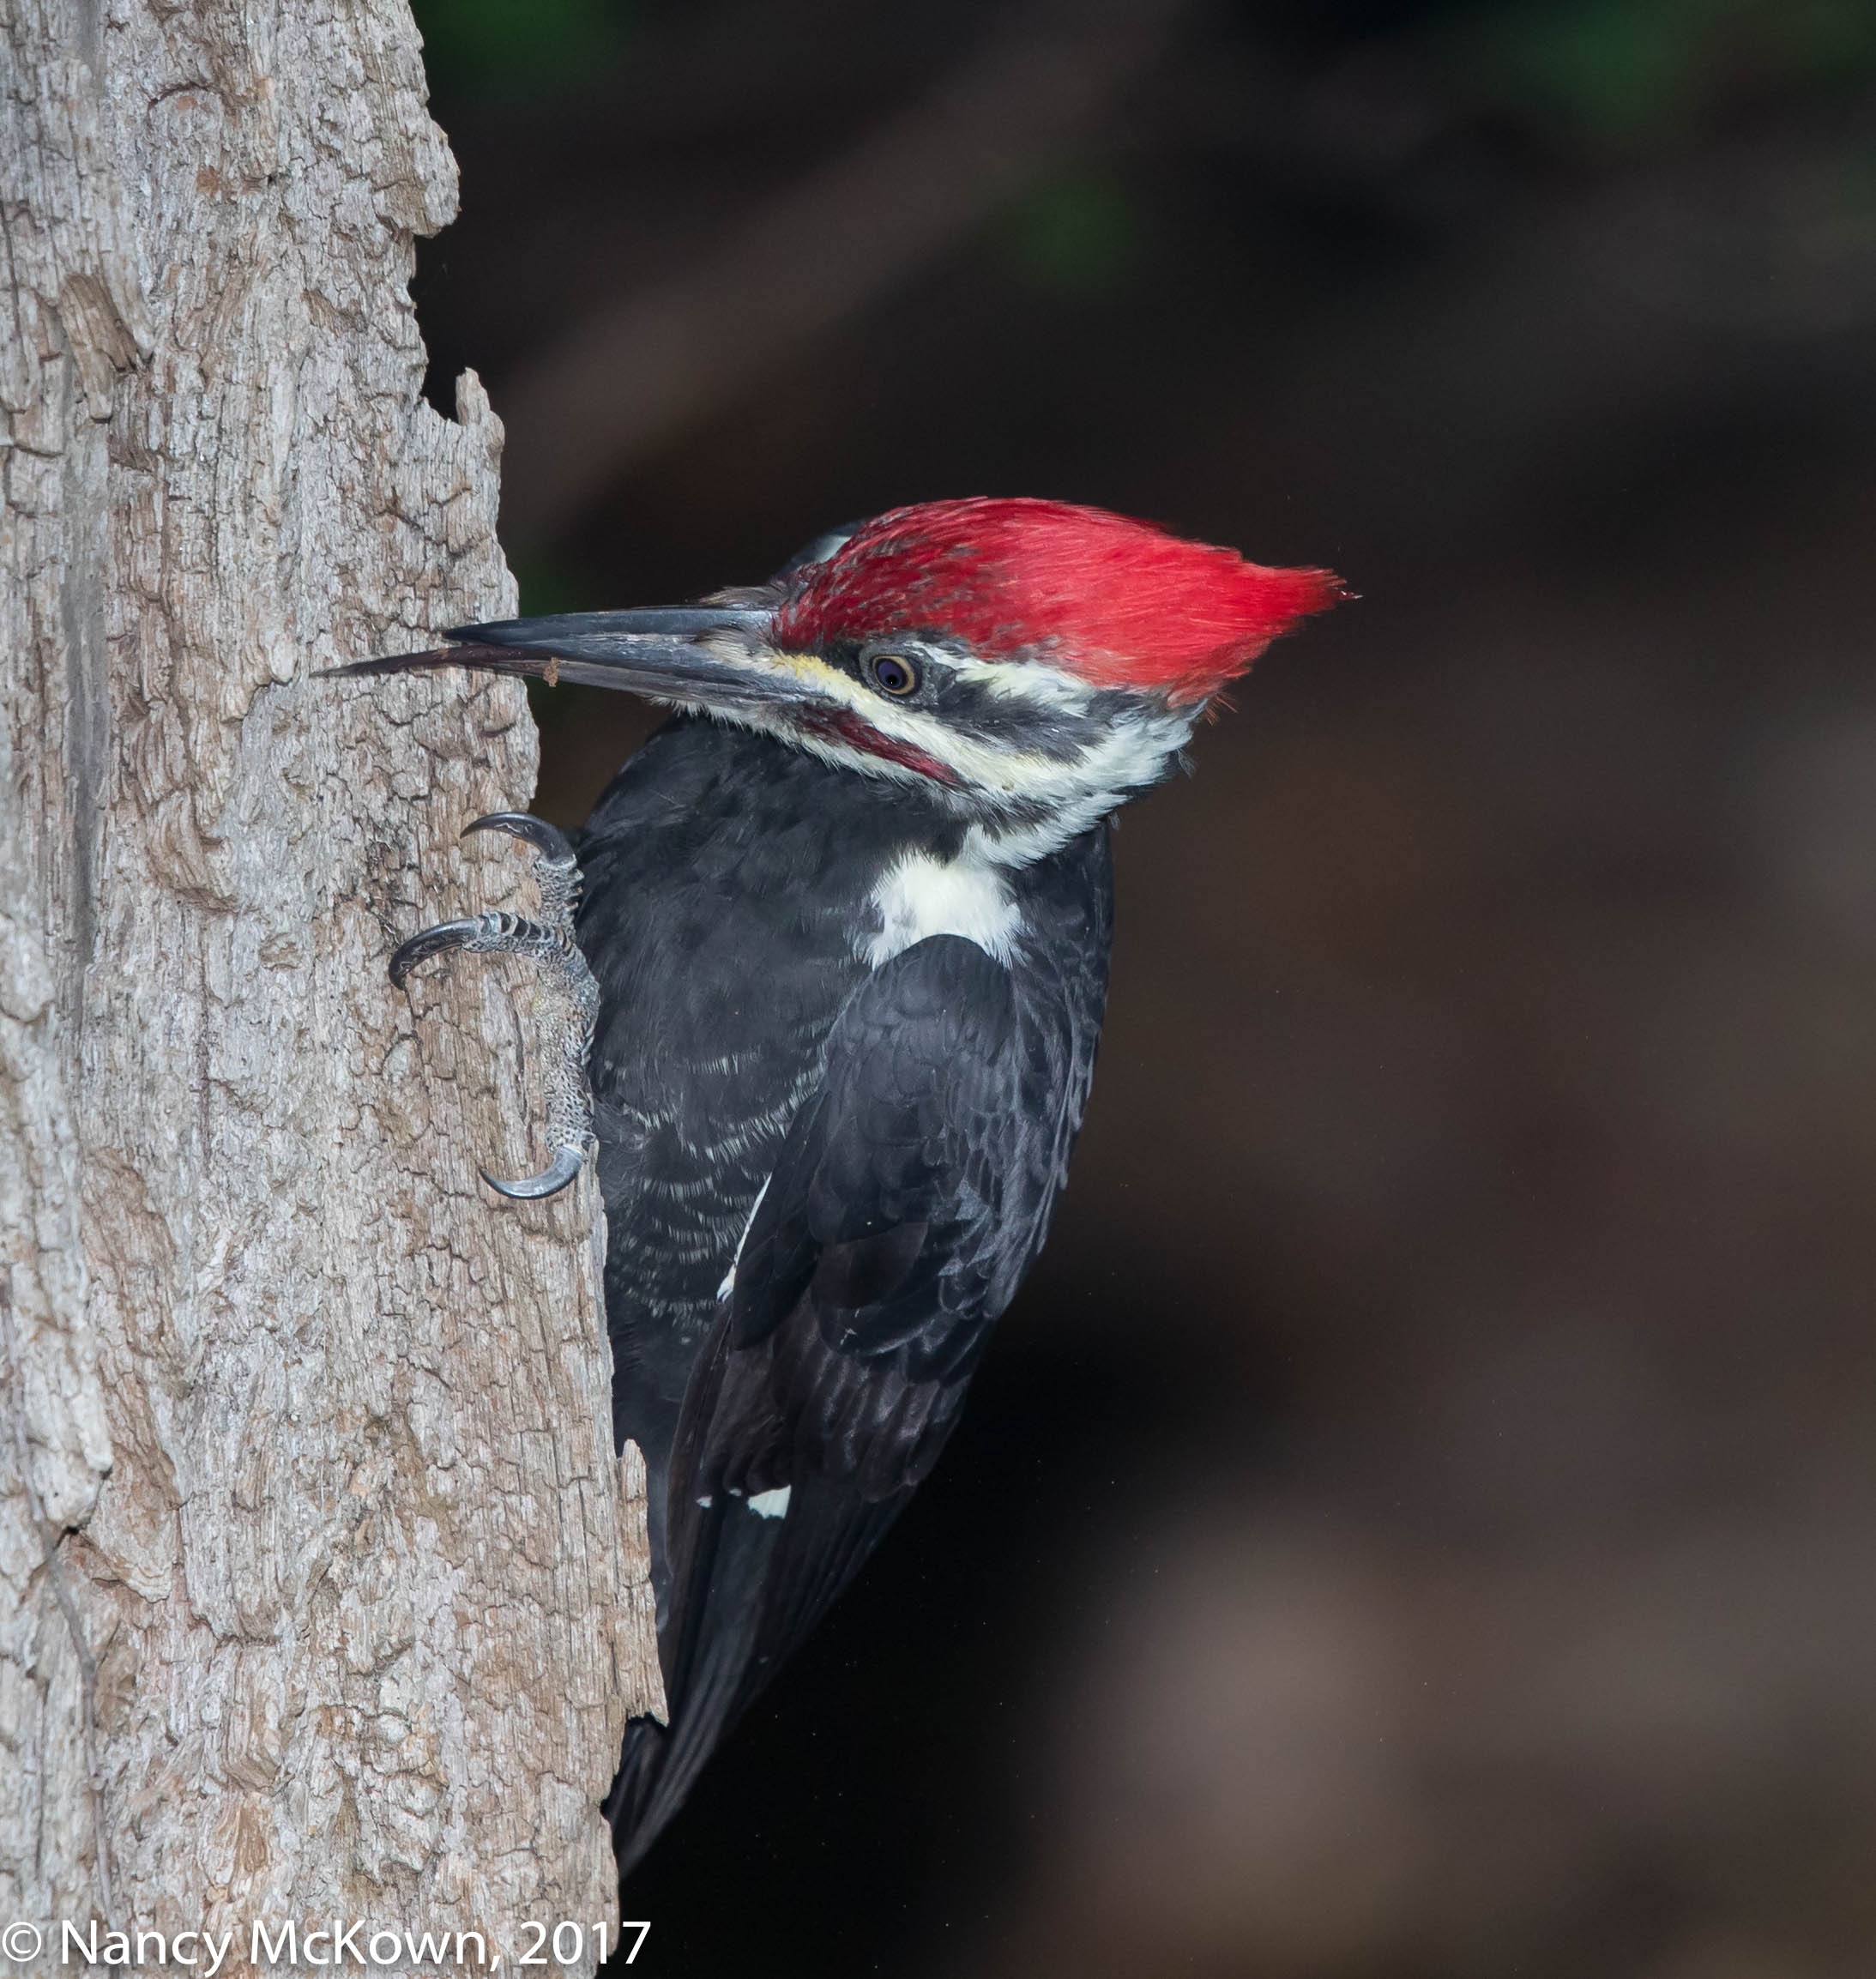
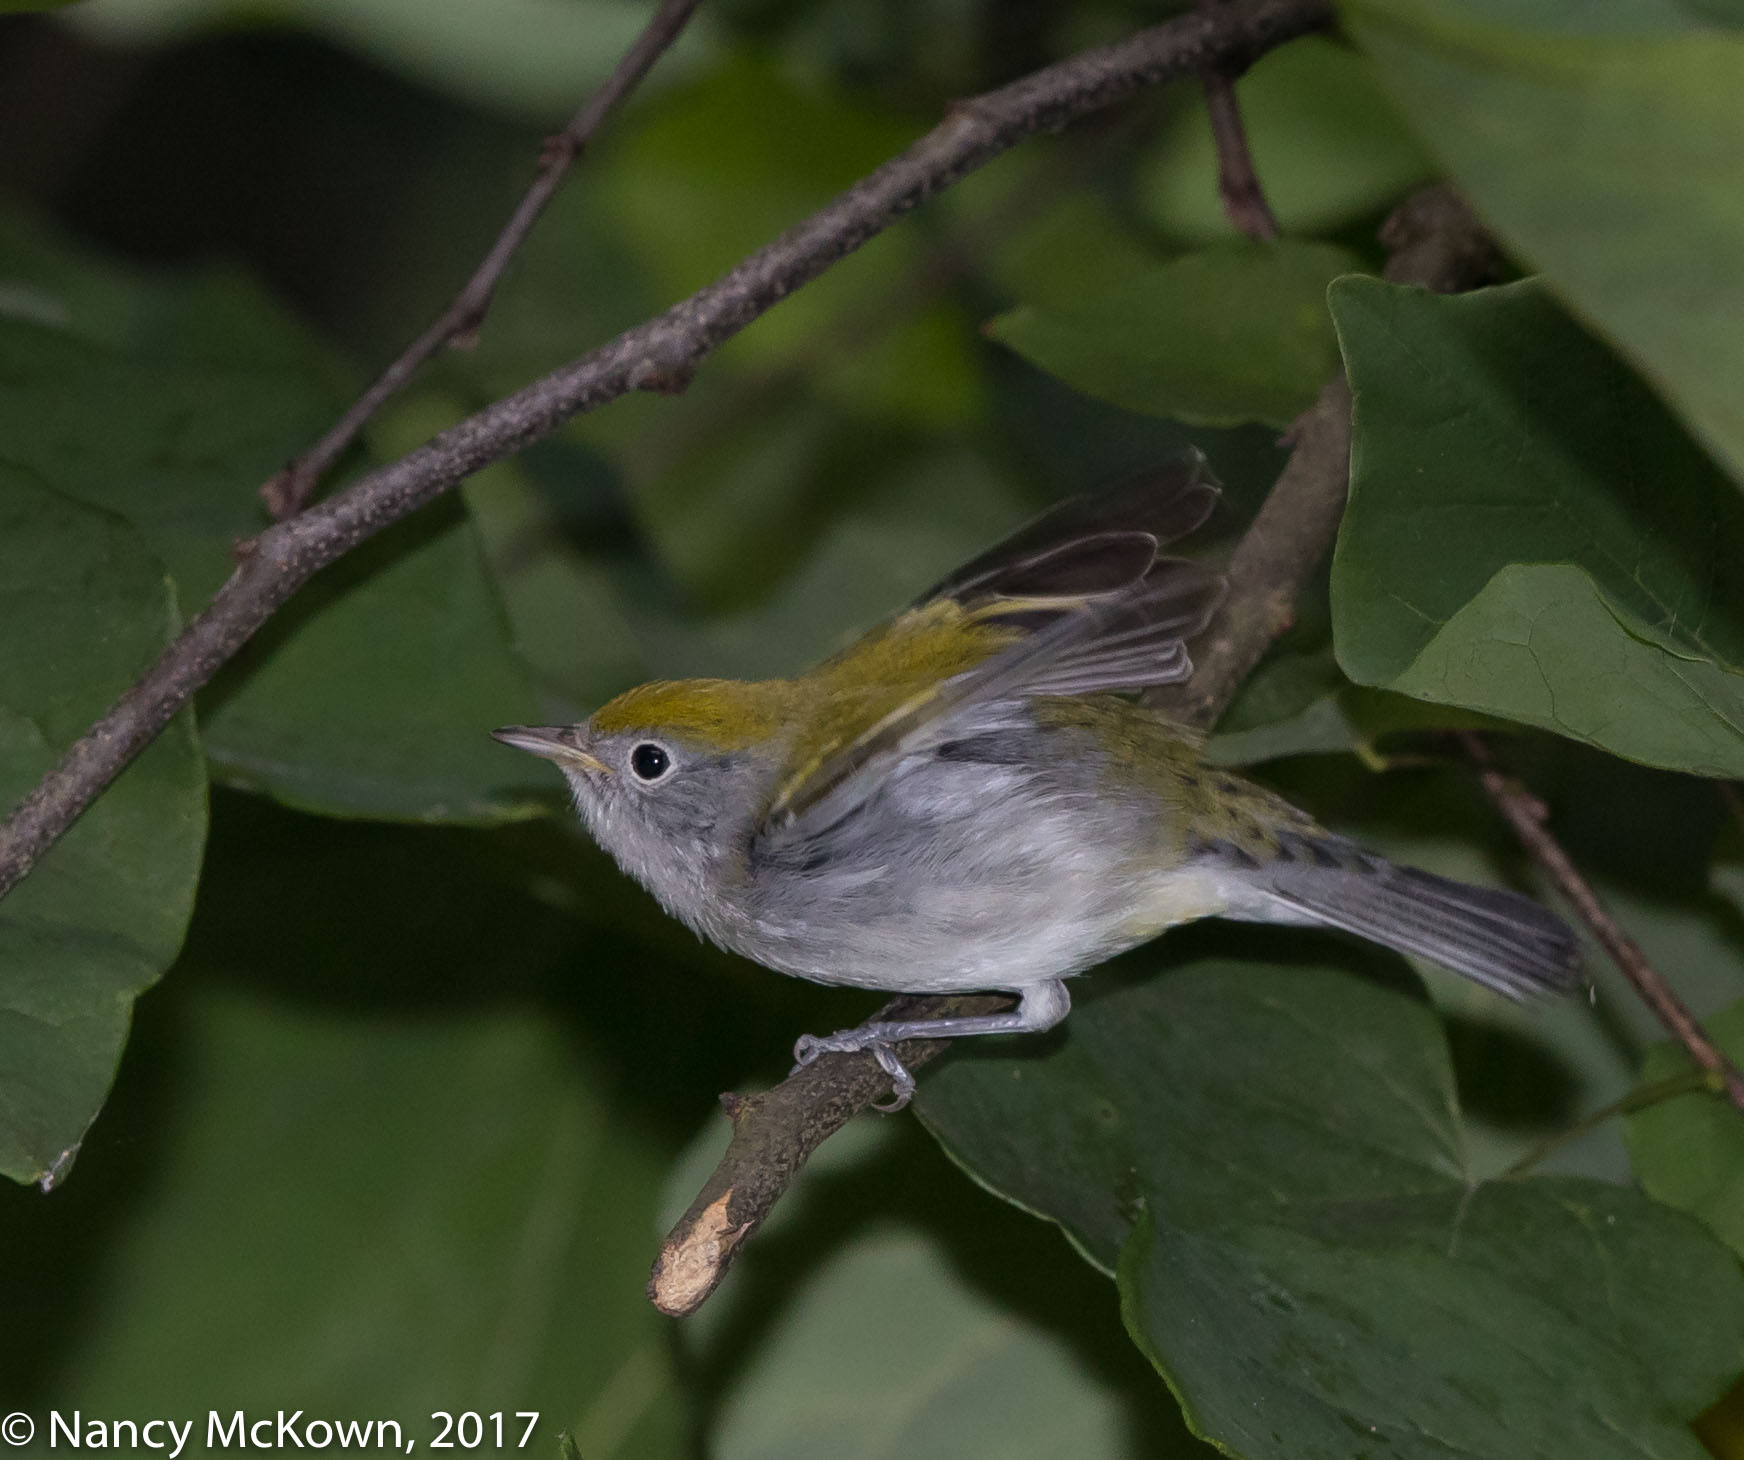
Flare doesn’t require sun, just a light source. The light’s angle must have been just right to pass through multiple lens elements (and ultimately reach the sensor) and blast the images with little orbs. It all disappeared when the bird moved to a higher branch. I countered by moving the lens up, thus altering the angle of light. (See second photo.)

Flare and glare are unpredictable (for the most part) and can show up on digital images even when photographing on a dark day. In bird photography, I find these artifacts to be unattractive and distracting- an operator error which can be remedied if you notice it soon enough…. and the bird sticks around.

Photographing Wood Thrushes in Near Darkness

Photographing Wood Thrushes

Over the years, I’ve photographed the migrating  Veery Thrush and Swainson’s Thrush as they were passing through our yard, but never a resident Wood Thrush. Wood Thrushes tend to be very camera shy. I was familiar with their captivating flute like spring songs (filled with low mellow notes and high pitched trills) long before I connected the voice with the vocalist. It wasn’t until we installed a fountain near our deck that I realized that these handsome birds must spend the summer nesting and foraging in our back woods.

Photo of Wood Thrush
Wood Thrush
ISO400; f/8; 1/250 Second

Photographing in Evening’s Twilight

Around evening’s twilight, four or five Wood Thrushes quietly congregated at the fountain after all the other bird species had left. At first, only one or two bold and curious birds came. I could see a few more of their wary companions hiding in the dimness beyond the fountain. Light was quickly declining.

Metering and Managing the Light

They came in the near darkness, so that’s how I had to manage exposure. I switched the camera’s light meter mode from “Evaluative” to “Partial”.  Metering modes tell the camera system WHERE in the scene to meter the reflected light. If you change the metering mode from “evaluative” (total scene) to “partial” (approx 6-10% of the area) or “spot” (approx 2.5% or less of the area), the light meter will narrow the area it takes into account when metering and possibly use different algorithms to read the reflected light. (NOTE: The histogram is a reliable way to see how the light meter is balancing the light coming into the lens.)

It’s always a challenge to control the light intensity of the flash and properly expose the subject (and not the background) especially when there’s so little ambient light to help out. The background area was so dark as to be indiscernible. The camera was set to Manual Mode and the flash (with fresnel flash extender) to E-TTL II so that the camera would automatically calculate the burst needed based on the exposure settings I chose. I toned down this burst by setting the flash exposure compensation (FEC) to -2/3. It turned out to be a good place to start. (NOTE: Often the sudden flash blast will disturb wary birds, but the thrushes did not scatter or even flinch when the flash went off.)

Wood Thrush
Wood Thrush
A Twilight Dip
In the Fountain.
ISO1000; f/8; 1/250 Second

A Lens Can Not Focus in Darkness

As it got darker, my eyes and the lens struggled to find edges and contrast on which to focus. (NOTE: A lens can not focus in darkness. If it’s too dark, it won’t even go thru the motion to hunt back and forth. There is nothing upon which its technical eye can fix – no contrast, no color, no edges, nothing.)

The moonlight and starlight that night offered some help. In addition, the fresnel attached flash emitted a light beam (auto focus assist beam) so the lens could do its calculations for autofocus to work. NOTE: That assist beam only travels so far, and no doubt not as far as the fountain…a good 20 feet.

As you can see in the photos above, the lens did have sufficient light to lock focus.

Thrush ID

In January, 2017, I published a post on what I thought was a Wood Thrush, but when I looked back at those photos and compared them to the boldly colored Wood Thrushes included in this post, it was clear that I made an ID error and instead posted photos of a Hermit Thrush.

A rather obvious mistake, considering how distinctive looking Wood Thrushes are. I’m getting better at bird ID as time goes by, but I still have trouble telling the difference between thrush species. Wood Thrushes are one of the easiest thrushes to identify with their rich cinnamon feathers and bold brown densely spotted white breast. Like Robins, they spends most of their time hopping around on the ground flipping leaves and pouncing on whatever little creature surfaces. Most of the time, if I am at all unsure, I don’t publish without having the experts at What Bird.com verify a species ID. Clearly I skipped that step when I posted in January.  Corrections have been made.

Photographing Nashville Warblers and Thoughts About HDR Images

Photographing Nashville Warblers

Nashville Warblers have been our most common visitor during this Fall’s migration. Individuals don’t stay long and they are as skittish and unpredictable as most other warblers. I’m always very pleased when I get at least one good, unobstructed shot.

If a warbler pauses for a few seconds and I do get more than one shot, (assuming the flash keeps up with the shutter action) there is always bird movement within the sequence. Warblers don’t sit still, calmly, quietly, motionless. And that makes HDR bird photography impractical.

Nashville Warbler
Nashville Warbler
With Colorful Fall Plumage
Tonal Richness Sparse on the
Right Side of the Histogram.
ISO800; f/8; 1/250 Second

What HDR Does

Whenever I come across well done, realistic HDR photography on the web, it is most often a promotion for high-end housing or other real estate on the market. A High Dynamic Range (HDR) photo is the compilation of multiple exposures into one and works well with static subjects like fancy interior housing layouts.

The purpose of HDR photography is to capture a careful blend (usually AEB bracketed) of identical images, and then digitally combine them to create a single photo that has a wide dynamic range ..much wider than the camera’s sensor can capture with only one photo.

Photo of Nashville Warbler
Nashville Warbler
ISO400; f/7.1; 1/250 second
Could not create a Decent HDR image
with the Dozens of Shots I Took of
This Nashville Warbler.

Why Use HDR?

Photographers practice HDR to enhance tonal richness (expand the dynamic range) of the image. The HDR algorithm incorporated in the camera (or post processing software) pulls multiple images together into one and thus captures more detail on both ends of the 0-256 tonal range spectrum.

Each image file is set up with slightly different exposure settings allowing the camera to create a different dynamic range for each. Most often, the photographer will set up the sequence of shots to use the same ISO, the same aperture, but different shutter speeds. They take the time to measure the shutter speed required for the darkest and the brightest parts of the scene and then add additional shutter stops at the high end and low end. Finally, they blend only those images that expand the tonal range spectrum, i.e. overall dynamic range.

Tone Mapping

At its best, the HDR process exposes different portions of the final image by different amounts. Called tone mapping, the software allows you to lighten shadows and darken highlights in specific regions. Some photographic artists prefer to use tone mapping to make the blended image look surreal and/or unnatural.

How to Know When to Use HDR

There is no point in considering HDR if the dynamic range of the scene does not exceed the sensor’s light intensity range. It’s easy to check.

Every dSLR camera maps the light intensity range of its sensor on its histogram, so a photographer can instantly determine the dynamic range. If the histogram is ‘clipped‘ at either edge of the scale, picture detail will be lost – either in the shadows (if it’s clipped on the left) or in the highlights (if it’s clipped on the right). If the histogram shows large peaks overflowing at both ends and a low dip in the center, the camera’s sensor can not handle the dynamic range of the subject.

HDR with Bird Photography

Certainly a living, breathing, highly active bird in his natural environment looks much better when the light is outstanding–   – when the direction, intensity, and overall quality brings out distinct contrast and eye popping detail.

With HDR, there must be no movement (no discernible heartbeat, no wind, no camera shake) within the sequence of fast continuous shots. In bird photography, there is almost always some evidence of movement between the shots, creating ghosting and alignment issues and making a successful image meld impossible.

Perhaps I should practice on a statue of a bird.

Photographing a Female Hooded Warbler – Image Editing Limitations

Photographing a Female Hooded Warbler

This female Hooded Warbler alighted on a branch near the camera for less than a minute. Right before dusk, she perched 3 or 4 feet above eye level on a Sassafras tree very near the camera. Instead of staying put, she took off like a shot…a yellow blur flying directly at the camera and then swooping up 10 feet or so to avoid crashing into the window. She must have decided that with me there, it was too risky to attempt a drink at the fountain.

There is very little to recommend this image file. The detail is good and the blurred background is OK. However, harsh shadows (created by the flash blast) outline the underside of the warbler’s profile and make the overall image look very unattractive. I was able to minimally correct the darkness of the shadowy outline with Lightroom’s Shadow slider. If only there had been some distance between the tree trunk and the branch on which she perched, the dark shadow outlining the bottom of the bird’s profile would not have been so noticeable.

Hooded Warbler, female
Hooded Warbler, female.
Taken Right before Dusk.
Harsh Shadows in the Background
from Flash blast. Corrected Minimally With Shadow slider.
ISO 800, f/9; 1/250

(NOTE: The shadow so prevalent on this image is not the kind of shadow that would be highlighted in the camera’s clipping indicators. It is just a background shadow created by the flash and made a little less black by pushing Lightroom’s shadow slider all the way to the right.)

Photo Editing

I do not own Photoshop, but maybe I should. The thought makes me weary because I think of post processing as a hateful but necessary chore. Time consuming as Lightroom is, I can not master image editing by using it. I can only minimally fix issues with the shadow slider and adjustment brushes and make minor adjustments with cropping, exposure, contrast, clarity, and sharpening.

Photoshop (and the hundreds of fancy plug-ins designed to enhance this software) would  have helped improve this image. First and foremost, it would give me the tools to separate the subject (Bird Layer) from its tree (Background Layer) and then replace the background completely. There’s also image magic to be had with the Masking, Brushing, Adjusting, Cloning, Layering, Blending, Liquifying, and Transforming tools.

Keep it Simple; Keep it Real

Bottom line: Learning Photoshop is not something I want to do to. When I first go through a day’s shoot, I’m looking for promise and potential – something pleasing that will draw the eye. If I don’t see this, the image is just not worth the time and effort it takes to fix.

Photographing a Pileated Woodpecker and Boosting Exposure in Post

Photographing a Pileated Woodpecker

Pileated Woodpeckers are year-long residents in SW Michigan, but rarely have I had the pleasure of photographing one. These woodpeckers are startlingly large (the size of a crow) for a forest dwelling bird, and spend much of their time excavating high-in-the-sky trees to forage for carpenter ants and beetle larvae. Pileated Woodpeckers are primary cavity excavators (PCE) who tunnel broad and deep to shape a deadwood cubbyhole in which to raise their young. Once abandoned by the woodpeckers, SNAG dependent birds and mammals move in.

I love that conspicuous Woody Woodpecker-ish red crest atop his head and I get goosebumps when I hear the wild whinnying calls of these dashing and pre historic looking birds reverberating high above us. Pileated Woodpeckers are known to be very skittish around people. Most often by the time I see one, he has already spotted me and is headed the other way, giving me only belly or tail feather shots. This individual (see below) is obviously a male, as indicated by the mustache-like red patch of feathers on his cheek.

Photo of Pileated Woodpecker
Pileated Woodpecker
A Little Too Much Flash.
ISO800; f/8; 1/250 Second

Patience Pays Off

It was early evening with patchy light covering the foreground off the deck. The meter calculated the woodsy background at approximately 2 stops darker. I heard the Pileated Woodpecker before I saw him…something probing, prying, hammering and clawing behind the thick trunk (of a live Maple tree); and then some rustling, possibly from him hopping around on the ground amongst the wide reaching hosta leaves.

I quickly reset the len’s focusing range to 4.5m to infinity. The focusing mechanism was noisily hunting in and out, trying to pinpoint something within the darkness on which to focus. (NOTE: The Canon 500 mm 4.0L II IS USM telephoto lens has 3 specific options from which to choose a working distance or focusing range. A focus limiter switch on the lens barrel allows you to choose from 3 distance ranges: 4.5m to 10m, 10m to infinity, or 4.5m to infinity. )

It took a long 5 minutes before this Pileated Woodpecker showed himself, emerging slowly around the bend of the tree trunk. The lens immediately locked focus. As he began circling the Maple, he ignored the camera, intent on pounding the tree bark and lapping up insects with that long, sticky tongue. I pressed the shutter, set to silent, continuous shooting and held it just long enough to burst 3 shots.

(NOTE: When I first spot a bird, I always assume that the encounter will be fleeting. My camera is usually set to silent Low Speed Continuous Burst Mode, just in case I need it to capture some action. When using flash, there is no choice but to slow down to allow the flash to recycle.)

Pileated Woodpecker
Pileated Woodpecker
Slowly Moving Around the Tree Trunk and into View. Flash Worked,
Very little boosting needed in Post.
ISO800; f/8; 1/250 Second

Manual Mode Without Auto ISO

The flash did not fire in the 3rd photo of this sequence…causing a 3-stop underexposed image…no doubt because there was no time for the flash gun to refresh. See photo below.

Note: The ISO on all of these images was set to a relatively low ISO800. Generally, when I set exposure parameters for flash use, I leave the ISO at “Auto”. When the flash fires, Auto = ISO400. If the flash does not fire, Auto ISO will automatically readjust the exposure parameters for the scene. Since ISO was set to ISO800 during this shoot, the camera was in total manual mode. The ISO exposure parameters did not auto adjust and the image was underexposed.

Pileated Woodpecker
Pileated Woodpecker
Flash Did Not Have Time to Fully Recharge.
Boosted Exposure in Post Processing +3.06
Creating Noise on Bird and background.
ISO800; f/8; 1/250 Second

Fixing Underexposure Problems in Lightroom

It’s relatively easy to remedy underexposure in Lightroom by fine tuning the Brightness, Highlights, Shadows and Contrast sliders until you get the look you want. In the severely underexposed image shown directly above, I had to boost exposure +3.06 in Lightroom. I used as much of the noise reduction slider as I dared and that helped to soften the gritty look. You can see in the last image (especially if you enlarge and compare the images) that the bird’s crest lacks feather detail and the dark background looks as though it has a grainy image lustre coating applied. Evenly distributed background noise is prevalent, even though: 1) I was shooting in RAW; 2) Used a low ISO; and 3) Applied noise reduction in post. Even with my camera’s high end sensor, there was not enough data in the darkest portions of the image, forcing Lightroom to insert a good amount of amplified pixelated noise in those areas.

The image above looks OK, especially when I don’t enlarge and examine it carefully. Would the image have been as noisy if exposure parameters had been correct “in-camera” (with an auto-adjusted and sky high ISO) as opposed to a post processed exposure adjustment?  I don’t think so.  Dramatically pushing up those exposure sliders in post processing to achieve the right exposure balance can seriously harm the “look” of low and high ISO images. In general, getting exposure right in camera instead of relying on post processing to correct your exposure mistakes will give the grain a more consistent look, and create more pleasing images.

Photographing a Gray Cheeked Thrush and Bokeh Blur Quality

Photographing a Gray Cheeked Thrush

The Gray Cheeked Thrush is a long distance migrant who travels back and forth between its remote breeding areas in Northern Canada/Alaska and South America. It is known to be shy and unobtrusive, spending a lot of time hidden in the brushy undergrowth. It’s a new bird for me. In this shot the thrush turns his head to give us a full view of its cheeky namesake.

Migrating Thrushes at the Fountain

The migrating thrushes have been dominating the fountain area lately. Swainson and Wood Thrushes arrive a little before dusk and gather in the gushing water or on the ground near to where the water dribbles down. The thrush numbers are highly variable day to day…depending on the migrating stream. For the most part, they have the fountain to themselves during the evening hours.

photo of Gray Cheeked Thrush
Gray Cheeked Thrush
Acting Very Suspicious of His Surroundings.
ISO800; f/8; 1/250 Second

Noticing That A Bird is Slightly Different

With a half dozen or more birds flocking the fountain area, it often takes a while to notice if one of the thrushes is a different species. It may have similar size, shape, beak, or plumage colors, certainly enough to blend in with the other thrushes at dusk. Something usually sets the newcomer apart, like her overall comfort level, behavior, or perhaps an understated but distinguishing feature.

Some of the time, I don’t notice if a bird is different than the other birds until after it’s long gone…when I’m processing the photos the next day. Unfortunately, if I don’t notice, I’m less likely to train the lens onto that particular bird and take lots of photos. In this instance, I took one shot because I liked a radiant glow in the background…and not because I spotted a new species perched in front of that warm light.

The Quality of Image Bokeh

Our human eyes combined with a big brain see things very differently than a camera lens. Photographers don’t really see bokeh– good or bad – until they look through a camera lens and examine the out-of-focus areas of an image.

Unlike the human eye, the camera’s lens can blur the image in front of and behind its points of focus. The area of focus and the areas of blur depend on the aperture setting and the type of lens. In general, the more you open up your aperture, the thinner your area of focus and the more blur the lens delivers.

Bokeh is defined as the quality of the out-of-focus blur areas within your image. This blur  – how much it enhances or diminishes the subject – has everything to do with aesthetics and feelings…quality and character. Essentially, rating the quality of bokeh is a judgement call.

Regarding Bokeh, Ask Yourself…..

  1. Does it have an abstract character or any attributes that enhance the subject?
  2. Does it give the image a more 3D quality by adding depth and dimension?
  3. Do the out of focus blurs meld together in a pleasing, creamy sort of way, or do background details individually appear and stand out, showing off their hard edges?
  4. Does the background blur accomplish what you want for your bird images, perhaps achieving what looks to be smooth isolation from the subject or telling details of a natural habitat?

What Defines Bokeh:

  • Lens design…. the more precisely the aperture blades within the lens form a circle, the more likely they will intersect smoothly and minimize defined edges within the blur. (Quality, high-end professional lenses generally have 9 or more rounded blades.)
  • Fast lenses…. the wider your maximum opening is,  the more you can blur.
  • Quality of light….harsh, overhead or insufficient lighting will cancel out a good lens any day.
  • Background detail… is it mellow or crazy?  What blur will it create? Can you get out there and clear unattractive background debris before the shot or possibly reposition the camera?  (NOTE: It’s very difficult to reposition the bird.)
  • Background color…..is the background evenly lit and full of complementary colors?
  • Distance between the lens and the subject… It’s best to get as close as possible to your subject to optimize blurriness in the background.
  • Distance between the subject and its background. It’s best to have the background well outside of the focus area… so individual details are not in focus and not close enough to be distinguishable.
  • Long lenses (300mm+) have shallow DOF– so much so that when they are wide open, much of your intended subject may not be in focus. (See depth of field calculator for your lens.)

Talent and Luck

When an uncommon bird presents himself, there’s rarely time to consider how the blurred background will impact the overall ascetics of the image.  Some bird photographers strive to capture the perfect bokeh by setting up the scene during optimal light and targeting the lens onto an ideal perch pre-positioned in what amounts to a sumptuous background. Luck has a lot to do with success in these situations.  I haven’t had much luck with setups, mainly because it has been my experience that birds descend and settle whimsically, mostly alighting in all the wrong places.


Photographing a Black Throated Green Warbler High in the Tree

Traveling Along, Virtually

So far, warblers have been relatively scarce this Fall. While I wait, I wonder if the devastating hurricanes in Texas, Florida, Mexico and the Caribbean temporarily put the birds’ migratory schedules into a holding pattern.

Bird photographers marvel at the distances and travails involved in the seasonal movement phenomena that is bird migration, yet critical knowledge gaps remain in the how, why, when and where of this spectacle. I hope that one day I might spot and photograph a tiny, durable, battery powered transmitter attached to one of these champions of endurance…. a geolocating device intended to track an entire migration route. These trackers will plot the movements, behaviors and timelines of thousands of bird species on world wide maps. They will allow us to travel along with the birds, virtually.

Photographing a Black Throated Green Warbler

A colorful transient appeared in short order. This little Black Throated Green Warbler perched high in a Sassafras tree that was less than 10 feet away from the tripod and camera. The soft brown bokeh comes from another thicker, taller tree directly behind where the bird sits. Tilting the lens upward with the Gimbal tripod head, I estimate that the distance between the 500mm lens and the warbler was approximately 24-25 feet.

NOTE: Gimbal Tripod heads are smooth and steady swing mounts designed to fit atop tripods and maneuver long lenses easily and quickly. A Gimbal head will support heavy equipment and enable the photographer to easily move it around horizontally and vertically. This includes the weight of not only the camera and long lens, but also the lens hood, the flash and its fresnel extender, battery pack, flash bracket, telephoto extender and various straps.

Black throated Green Warbler
Black Throated Green Warbler
ISO640; f/8; 1/250 Second.
Shot with telephoto lens pointing upward
Distance between lens and bird
approximately 24-25 feet

Shooting with the Lens Tilted Upward

The plane of the camera’s sensor was not parallel to the subject when I took the shots above…in fact it was substantially below it. So why do these images look like the bird was situated at or slightly above eye level with the camera?  When looking up through a long lens, parts of the subject will be at varying distances from the camera’s sensor. Shouldn’t this cause the camera to record a distortion? This bird is so tiny, so possibly its whole body was recorded at the same magnification because there was very little distance between the bird’s head and feet.  (Of course, the aperture setting … depth of field … has an impact on the sharpness of the entire image, especially when the camera is not parallel to its subject.)

This doesn’t explain why the bird looks like it’s perched almost parallel to the camera. 

Black Throated Green Warbler
The Background is a Nearby Tree Trunk.
ISO640; f/8; 1/250 Second
Lens Pointing Up 24-25 feet

At Camera Level

The Black Throated Green Warbler eventually flew down to the fountain area and I was able to get a few shots of him. Comparing the images where camera’s sensor was not parallel to the subject (see above) to an image that was taken when the bird was situated about the same distance away but at camera level (see below) is one sure way to determine if there is distortion. It is definitely easier to see that the lens was angled dramatically in those first shots. The camera level shot is a much more pleasing perspective.

Black Throated Green Warbler
Warbler at Eye Level with Camera
in This Shot.
ISO800; f/8; 1/250 Second

Photographing A Golden Winged Warbler in Very Different Light

Photographing a Golden Winged Warbler

The Golden Winged Warbler (female or young male) is a new bird for me. She appeared near the fountain suddenly and stayed only a few minutes. Too nervous to jump into the water with the other birds, she flew back and forth perching on different branches situated close to each other, but in very different light.

Golden Winged Warbler
Golden Winged Warbler.
Enlarge to see strong image
detail in the white areas.
On a Branch Situated in evenly
filtered light- with Flash.
ISO640; f/8; 1/250 Second

Transitioning With the Light

The darkish branch upon which the bird perches in the above shot was situated in evenly lit shade. A relatively dark scene, the flash provided a good amount of fill light and captured details on the dark and light parts of the bird. The wooded background (already 2 stops or more darker than the perching area), came through as black. The histogram shows many more dark areas than light… not an ideal bell curve, but no blinkies.

If she had only stayed there! Dashing quickly and erratically, she flew over to a light toned, more reflective branch located only a few feet away. This branch (see photo below) was saturated in overhead direct sunlight and so was the bird when she alighted there. The highlight alerts I saw through the viewfinder confirmed that the harsh light would overexpose the images, rendering certain white areas on the warbler with little or no detail.

Golden Winged Warbler
Golden Winged Warbler in Harsh Light.
Shot in Raw.
No details Could be Restored
in Post Processing – See close-up below.
ISO640; f/8; 1/250 Second
Golden Winged Warbler
Close up of Golden Winged Warbler.
Feather Details on Face, Neck and
Breast were lost and are Irretrievable in Post Processing

Time to Address Highlight Alerts

A Highlight Alert is basically a quick check of overly bright areas (overexposure) on the image. If you have turned this DSLR camera option on, you will see blinking alerts on your LCD review screen after you’ve taken the photo. If the alert is not in an obvious or important portion of the image, the patch of overexposure does not matter. Ignore the blink and stick with the initial exposure readings. If the blinkies are flashing on critical areas of the subject, it’s probably best to quickly adjust your exposure settings. (NOTE: With bird photography, there is rarely time move to a different location and reshoot.)

During this shoot, all it took was for the bird to relocate a few feet away to a nearby branch and the bulk of my images were ruined. As I think back, there might have been time and opportunity to: a) Check the highlight alerts (to see if they were blinking in critical areas of the image); b) Turn off the flash; c) Alter exposure settings to correct the overexposed portions of the image; and d) Reshoot.

Given adequate time, this is how I should have proceeded:

  • If the graph of the histogram is just touching the right edge, the exposure should be fine.
  • If the data is not quite to the right edge of the histogram, just add exposure – either manually or by moving the AEC dial a little to the right.  (on the “+” side)
  • If the data is crawling way over the right edge of the histogram (clipping) that means that there’s WAY TOO MUCH LIGHT. This is very bad. Lost details means lost forever. No post processing software can bring back those over exposed details. Simple solution: Manually adjust exposure or move the AEC dial one or more stops to the left (subtract exposure – on the “-” side).
  • Take another test photograph and recheck your histogram. Keep making adjustments until the RIGHTMOST data is just touching the right edge of the histogram.

It’s not hard to screw up exposure settings when a fabulous bird appears unexpectedly in front of the camera.  Despite all my time in the field, excitement can still cause me to neglect to change some setting on the camera. In this instance, even with the camera set to RAW, mistakes like that almost always matter.

Subspecies or Hybrid

This individual photographed above has the markings of a classic Golden Winged Warbler. Golden Winged Warblers occasionally hybridize with the Blue Winged Warblers and produce two separate hybrid types: a) the Brewster: yellow head and throat, white belly and white wing bars; and b) the Lawrence version: yellow crown and belly, black throat and eye patch and white wing bars.

In my many bird photography adventures, I have photographed several subspecies, but I have never seen or photographed a bird that would be considered a hybrid. A subspecies is a variety of the same species….a population (usually geographically isolated) that has a slightly different appearance than others of its own species. A hybrid is born when two different and closely related species successfully breed.

An excellent article about hybridized warblers “Why Hybridize?” by Dr. Rachel Vallender, can be found at this link.


Golden Winged Warbler
Golden Wing Warbler
Fall, 2018
ISO400; f/7.1; 1/200 Second


Photographing a Female American Redstart Warbler and Birding Festivals

The Joy of Bathing

Birds bathe to maintain optimal feather health, but they also appear to savor their time in the water -and seem reinvigorated afterwards.

This little female American Redstart Warbler clearly relishes her evening baths in our little oasis off the deck. She first checks her surroundings then takes a quick drink. She then wades into the water wholeheartedly, immerses her head and saturates her little body, then jiggles and shivers to release the heavy droplets. Up she rises to the branch above the fountain to continue shaking out excess water on her feathers and to preen. Once is often not enough….she goes back and does it all again. All part of her nightly spa ritual before heading off to roost for the night.

Definitely fun to watch and photograph.

Photo of Female American Redstart Warbler at Fountain
Female American Redstart Warbler.
Lightly Touching Down
at the Fountain for her
Evening Bath
ISO1250; f/8; 1/250 Second

Thoughts About Birding Hotspots

I’ve been a bird photographer long enough to know the rush and the rewards of good bird photo opportunity.

The best Spring and Fall Migration birding hotspots are widely publicized and photographers flock to secure the prime locations at the best times. No doubt fabulous photographs are to be had by those who put in the time and effort to pack up their gear and travel to these places.

This Spring, I had planned to travel to Magee Marsh on the southern shore of Lake Erie (3+ hours away) to watch and photograph the Warbler migration. Unexpected and sad circumstances intervened. I am not unhappy about missing the event, even though I no doubt missed photographing some new colorful warblers who would never venture into my part of the woods.

Photo of Female American Redstart warbler.
Female American Redstart Warbler.
Enjoying her Bath.
ISO1250; f/8; 1/250 Second

A Paparazzi After Birds

This year, I was just not ready to squeeze in onto some bridge or public path early in the morning with dozens of other nature photographers positioning their camera gear, lawn chairs, bug spray and coolers. At times, bird festivals become nothing short of a high energy spectacle. A gaggle of photographers clusters onto one spot in an effort to capture the best birds in the best light. It is impossible to practice stealth in these settings.

Generally, these birding festivals/events bring out the worst in me. Impatience, envy, and frustration…all in the name of getting a lucky shot of a new and/or uncommon bird. I’ll admit that most participants do their best not to get in the way of other photographers, but sometimes limited space just does not allow for comfortable distances. This provokes bad behavior in the form of rude glaring, annoying comparisons about equipment, and unsubstantiated judgments about skills and abilities. (NOTE: Some of these people have never had an unexpressed thought.)

Impact on Birds

Birds may appear acclimated to human behavior, but that does not mean that they are unaffected by it. The competition in the air gets in the way of concern or respect for birds. It also stresses wildlife and complicates bird routines. At times behaviors are so intrusive that they breach ethical practices.

Should I Stay Or Should I Go

So ultimately, each Spring, I’ve got to decide…. should I stay or should I go. No doubt lots of good shots to be had, but I’m spoiled here in my private bird space even though I saw very few migrators this Spring.

Bottom line: As a bird photographer, I’m not going to be continually challenged and rewarded with anticipatory delight unless I get myself out there. So I will go.


Bird Migration- August Field Notes

They Come, They Go

August 10

The House Wrens that were so prevalent in our yard during the spring and summer are suddenly no where to be found. I miss their bright beautiful songs and their industrious display and hunting behaviors.  I’ll keep watching, but I’m pretty sure they are laying low, going through their molts, taking advantage of the ground level hunting opportunities and resting up for migration.

Rose Breasted Grosbeaks and Baltimore Orioles who were so busily tending to their fledglings only a week ago are no longer showing themselves. I can see an abandoned Oriole nest from my window, hanging by only a few threads, in disarray and looking quite uninhabitable. One good wind will bring it down.

The Hummers never disappoint…. always flitting in and out, displaying, chasing, divebombing… ever watchful. They will continue their activities through September undeterred, no matter how close the camera and flash intrude into their escapades. Why these diminutive birds don’t feel the biological urge to rest before their long migratory journey ahead I’ll never know.

Ruby Throated Hummer
Hummers Let the Camera Get Close.
Female Ruby Throated Hummingbird.
ISO400; f/7.1; 1/250 Second.

August 15

I no longer hear the the cacophony of bird song that use to fill the air in early morning, even though migrators like Robins, Red Winged Blackbirds, Gold Finches, Song Sparrows, House Finches, Towhees, and Wood Thrushes are still around. No journey ahead for Titmice, Chickadees, Cardinals, most woodpeckers and doves. Is it more of a relief to stay through the MI winter or face the perils of migration?

I look around and note that the Gray Catbirds, Cowbirds, Phoebes, and Chipping Sparrows are not showing themselves in our yard anymore.

August 20

Glimpses of yellow flash around the fountain. Too quick to get an ID shot. We have a nesting pair of American Redstart Warblers so what I see may be the female. Both cameras are set up in different locations in the house. Soon I’ll have those windows open most of the day…..mosquitoes permitting.

August 25

Leaves are still green and heavy on the trees, making bird ID and tracking birds with a long lens very difficult. Cicadas are droning -alternately loud then fading. It’s hot and muggy here in SW MI. The windows are open to facilitate a clear shot and that makes for a damp and sticky house. I have the fans going to help keep out the mosquitos.

Sunny with a strong east wind today. I saw a Tennessee Warbler, a Red Eyed Vireo and one Merlin Falcon on Lakeshore Drive. Got in a couple shots to confirm ID but the resulting images were awful.

August 26

Spent most of the day watching, but only saw a Least Flycatcher peeking around in his hiding place in the Serviceberry tree. A few gold leaves have a tentative hold to their branches.

Least Flycatcher
Least Flycatcher, trying to Hide
Deep within the Serviceberry Tree.
ISO1000; f/9; 1/250 Second

August 27

A rain storm –might it bring some traveling warblers down to the understory trees?  Two cameras on swivel tripod heads facing different directions in the library. I keep checking other possible warbler landing spots–like near the dining room, in back near the fountain or off the front porch. Thinking about relocating one of the cameras… but doesn’t make sense to keep moving the equipment unless I see more activity in that location. I can stretch myself only so far. Uneven cloud cover blankets the yard with intermittent light, mostly sparse. Each camera has a flash and telephoto extender attached. (I fiddled with the wires on my old Canon 580 flash with old Better Beamer flash extender. So far, it’s been working, although I don’t know how accurate the Flash enhanced exposure readings will be.) The rain tickles the leaves. So much movement to track even before I point the lens.

Last year on this date, two warblers were feasting on the bugs on the Serviceberry trees (A Black Throated Green Warbler male and a female Magnolia Warbler). This year I saw and managed a shot of a perky little Chestnut Sided Warbler. (See below. Female or first year male…so different looking than the mature males.)  The flash intensity was reduced to -2/3. (Surprisingly the flash blast doesn’t seem to worry the birds.)

Female Chestnut Sided Warbler
Chestnut Sided Warbler
An Early Arrival
ISO1000; f/9; 1/250 Second

The usual birds are out and about….. Titmice, Blue Jays, Gold Finches, Downy Woodpeckers.  That’s good.  It seems that birds find comfort and safety in crowds…. much more likely to have a warbler sighting when there’s lots of other activity. I take a few shots of the oft photographed faithfuls/dependables to review the exposure settings and flash intensity. Keeps me going.

August 31

Keep hoping for a migrating newcomer, but no luck. I was happy to get ID shots of a Wilson’s Warbler and female Magnolia Warbler. I look forward to September… migration has only just begun.