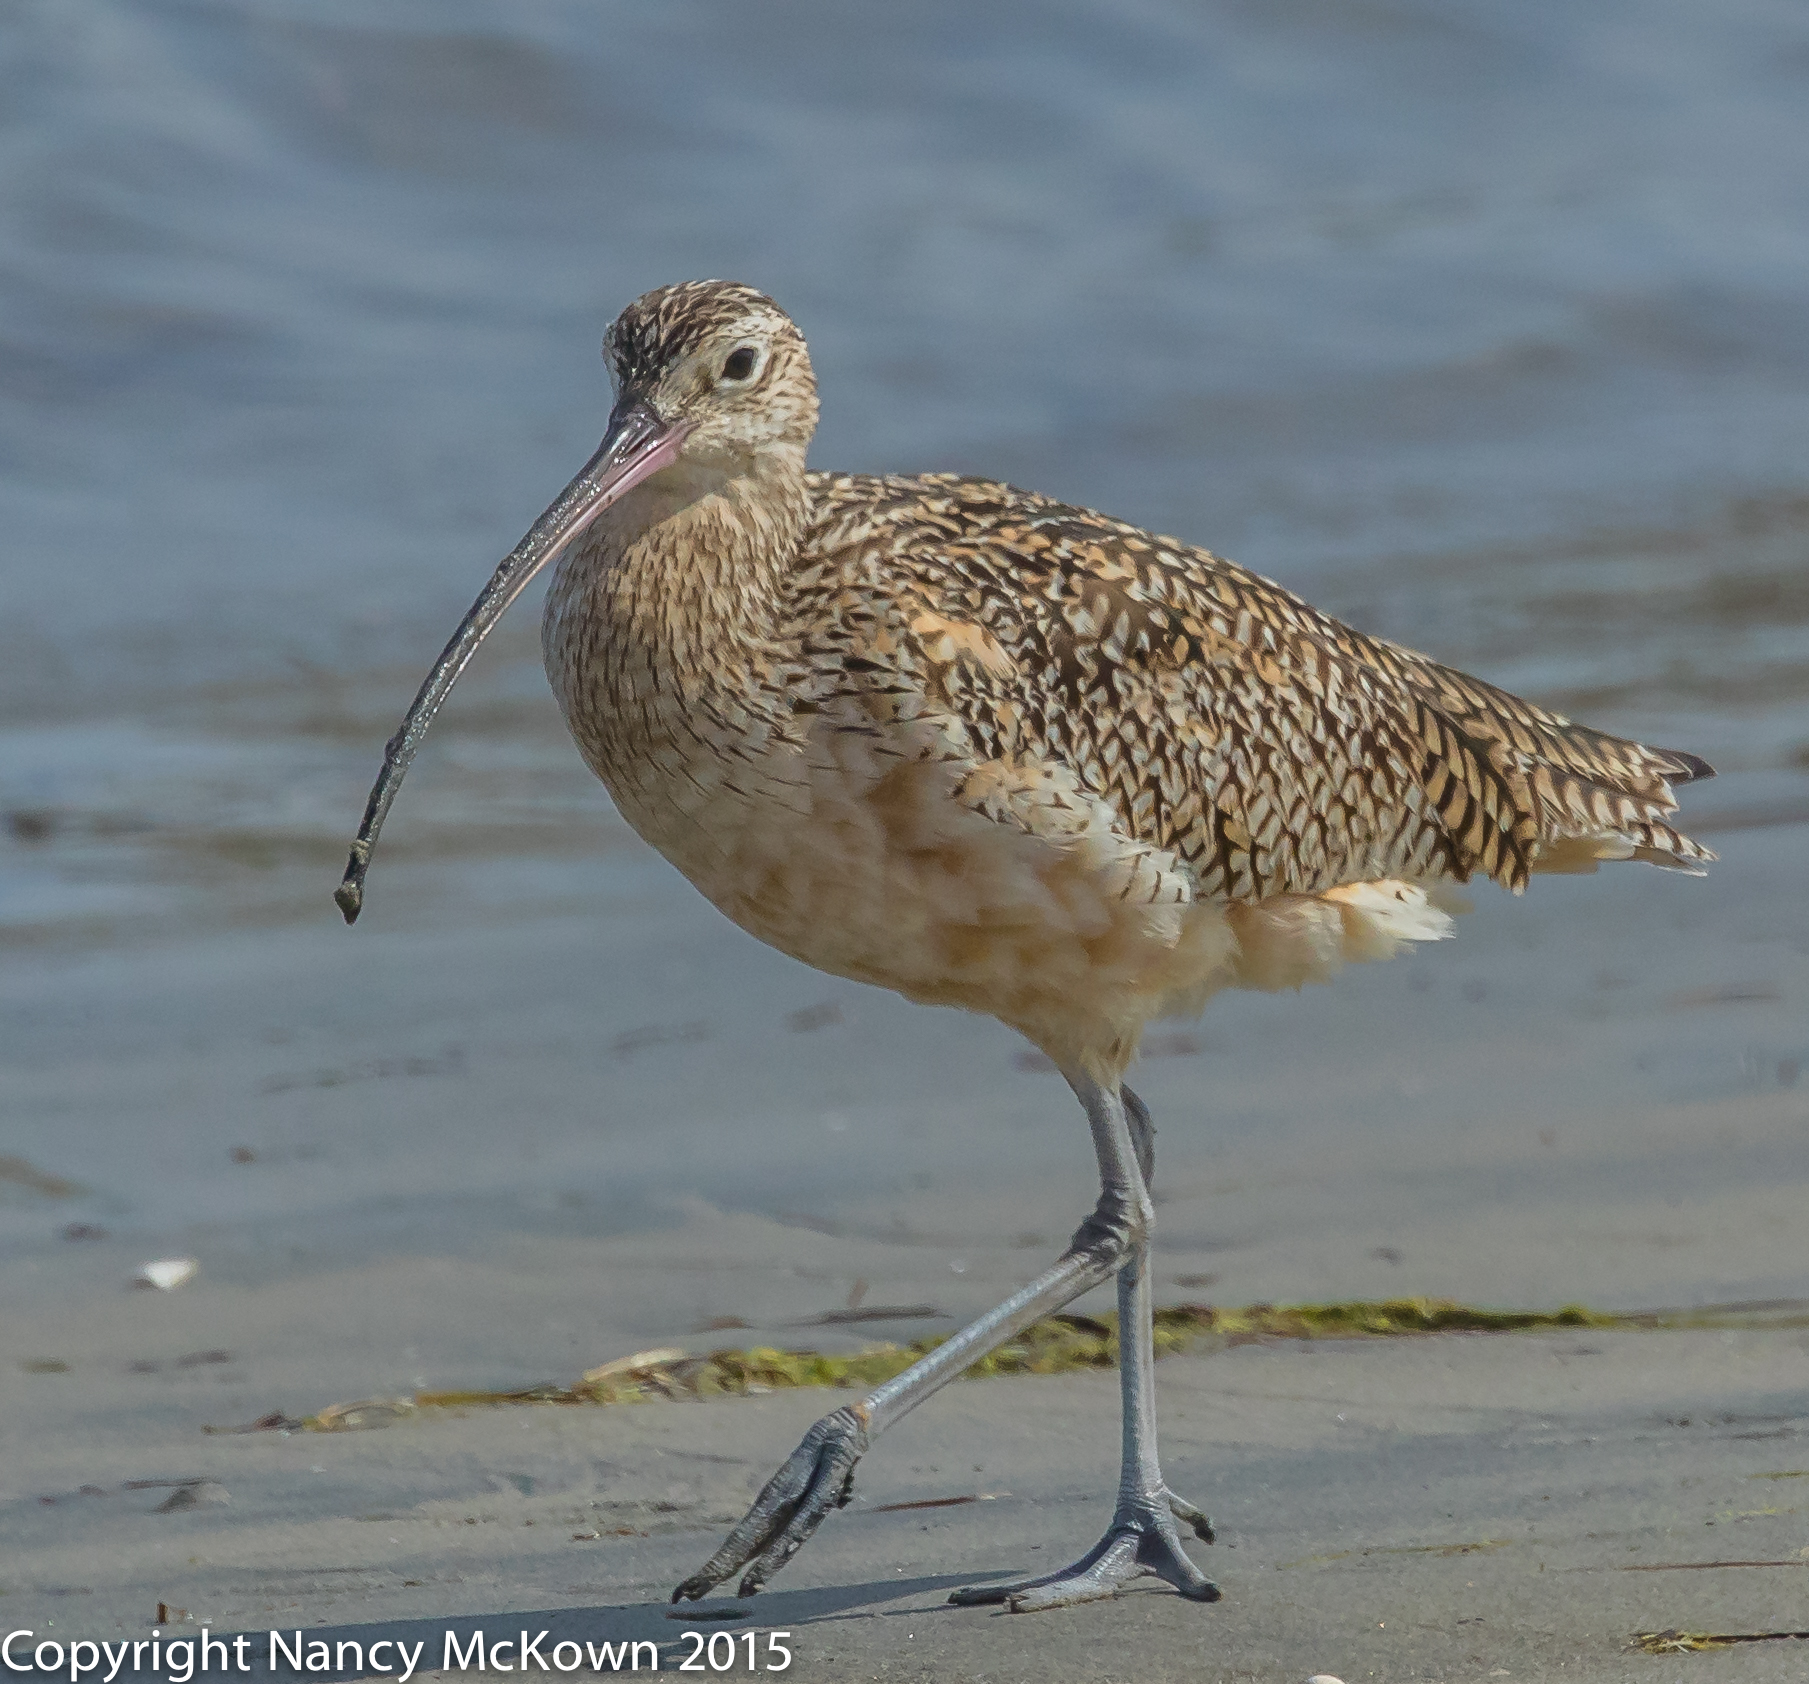
One of the first things I noticed when photographing the shorebirds foraging for food on the Mission Bay beach in San Diego was that so many of the different species seemed to get along. For the most part, it was a tranquil beach. That’s because physical and behavioral adaptations have made these shorebirds uniquely adept at feeding and nesting on the shoreline without the need for much competition between different species. These adaptations include beak size and shape, size and shape of body, legs and toes, plumage, habitat requirements, and migratory patterns.
Curlew with its Long Curvy Beak ISO500; f/8; 1/2000 Second
Form Aligning With Function
So godwits, plovers, willets, curlews and other shorebird species can work the same beach and rarely waste energy fighting over resources. They have adapted to depend on their highly specialized beaks and feeding behaviors to probe for the food that meets their dietary requirements.
Depending on the season and their location, they forage in mud, water, sand and grass for crustaceans, marine worms, crabs, insects (including flies and their larvae), small mollusks, small fish and plant material, including grass, fresh shoots, and seeds.
These shorebirds are a wonderful example of how nature aligns form with function.
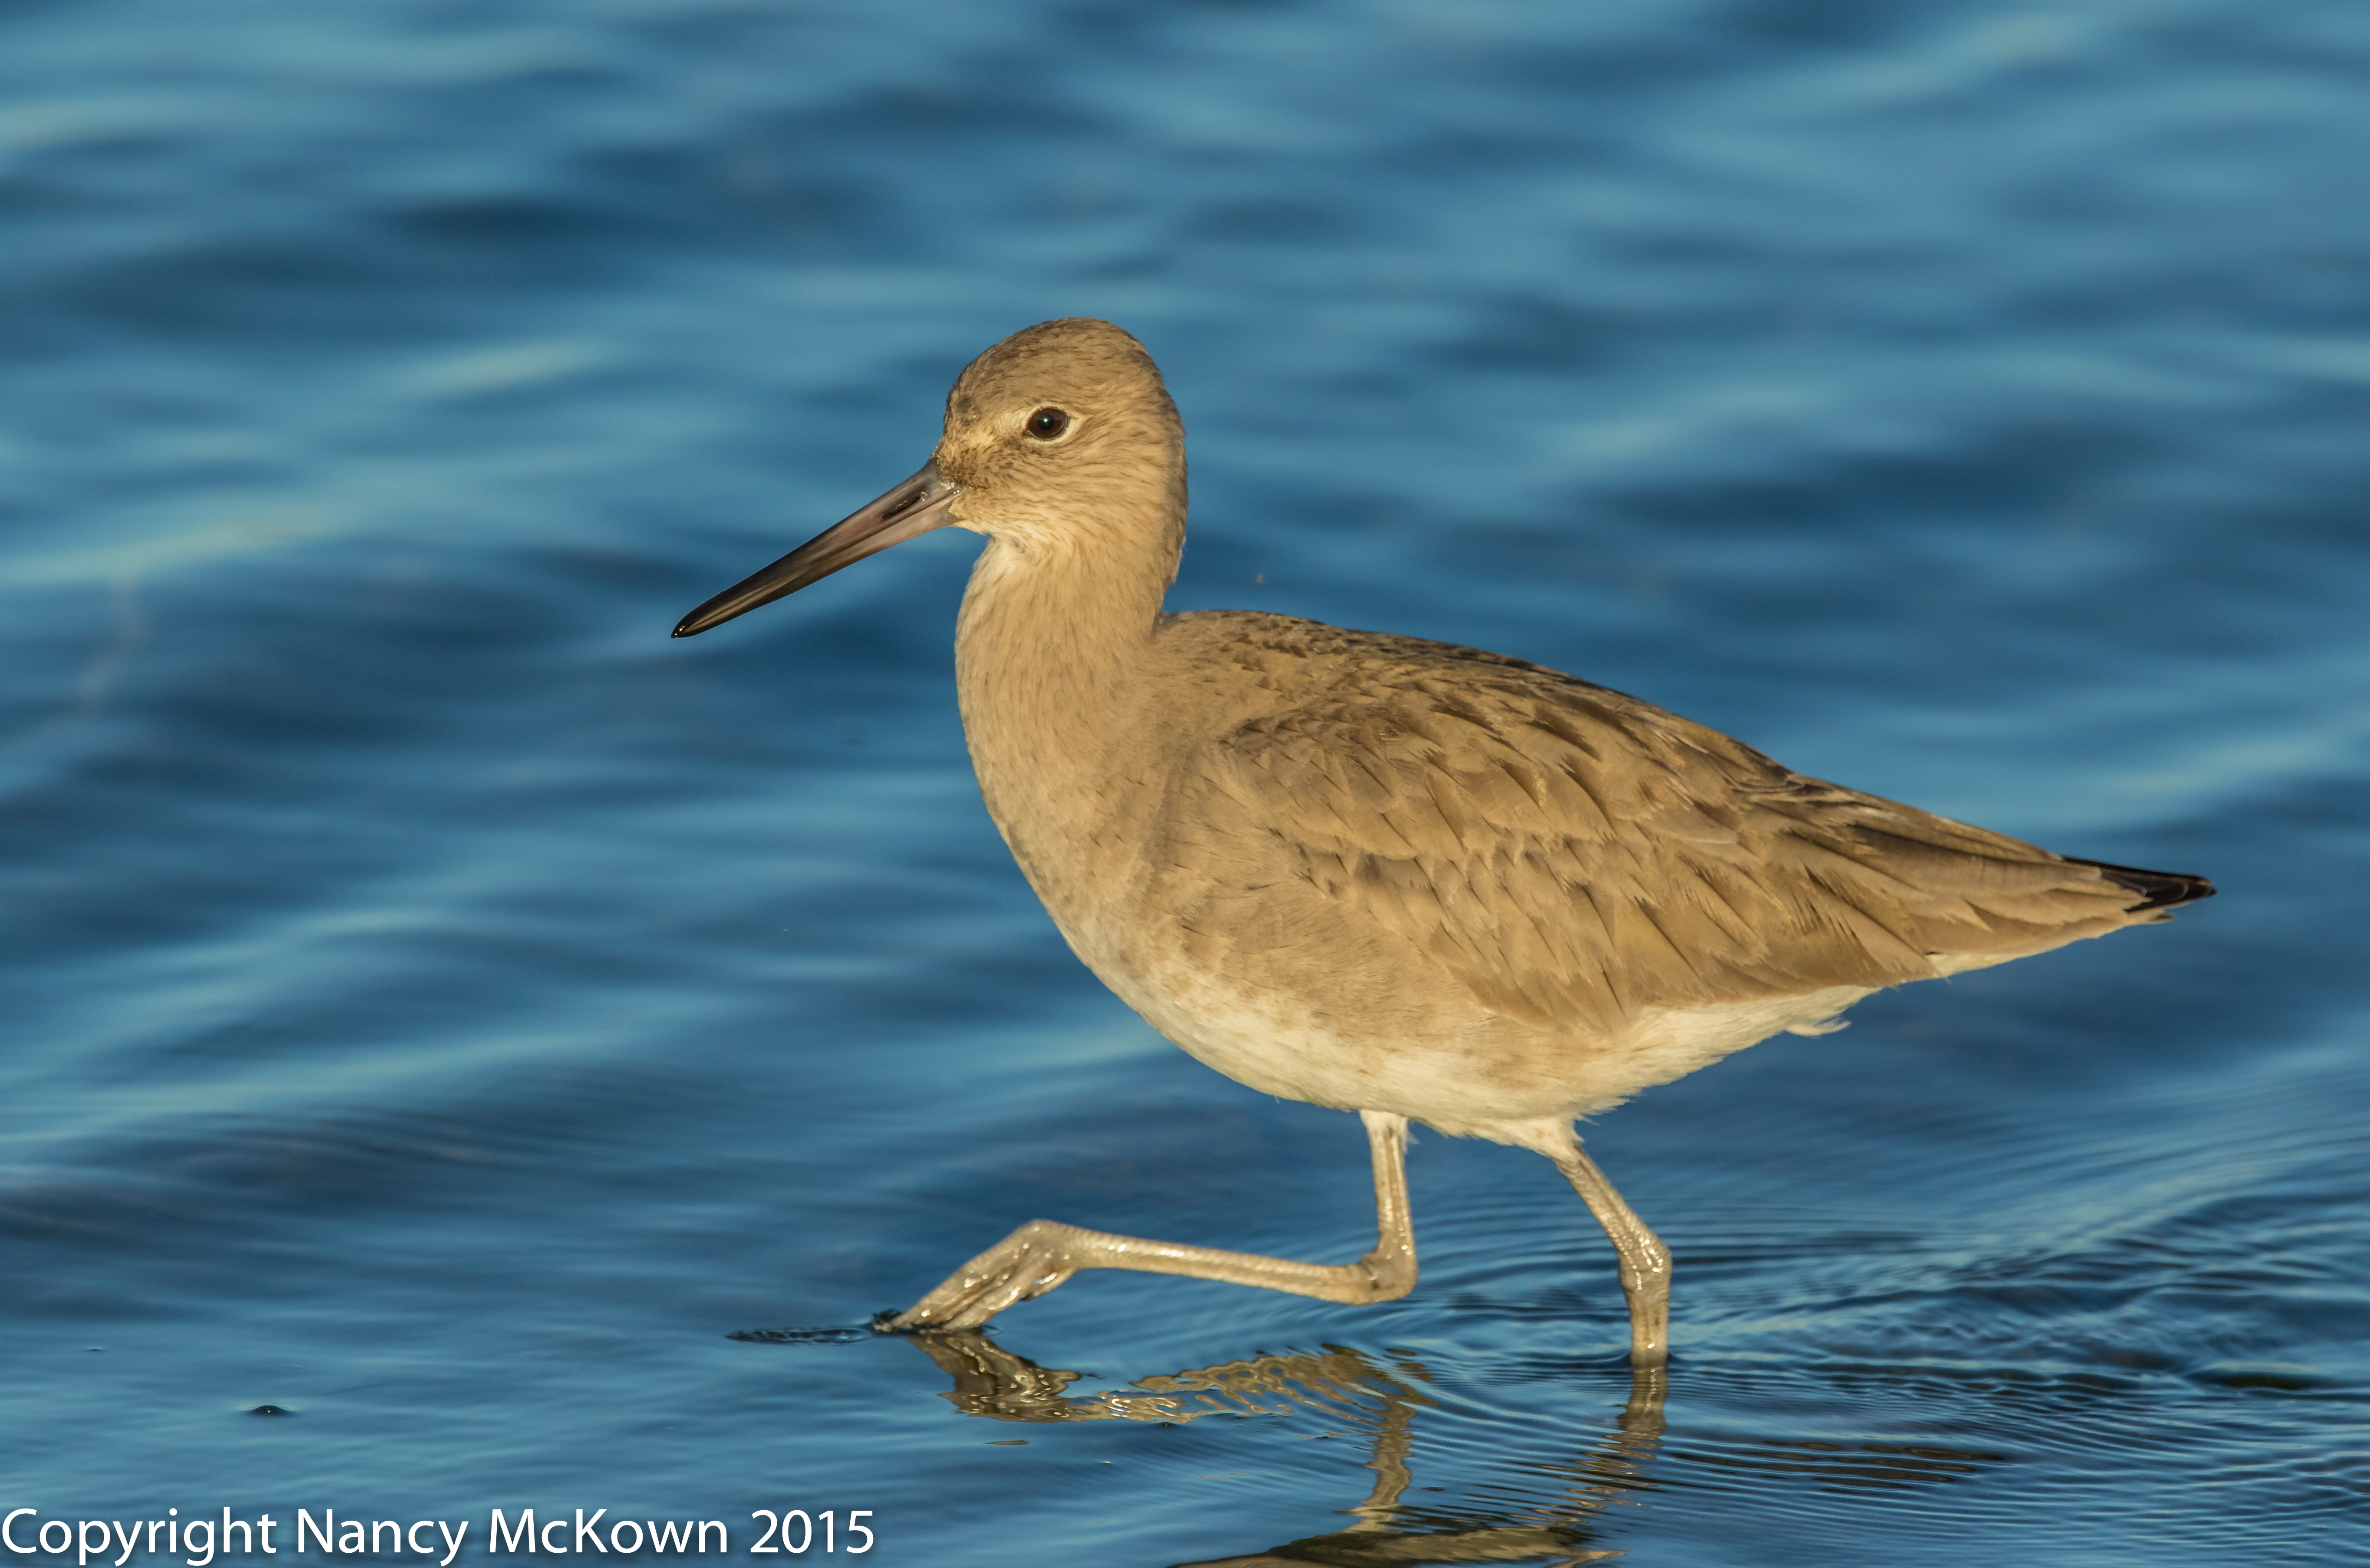
Marbled Godwit with its Long Beak, pointy and straight. ISO 320; f/6; 1/2000 SecondWillet With His Medium length Beak. ISO 500; f/6.3; 1/2000 Second
Tripod on the Beach
I walked a long way on this shorebird photographic adventure. I decided that my camera and lens were too heavy to hold without support, so I took my Manfrotto aluminum tripod and Gimbel head with me to help stabilize the equipment on the mucky sand. (I regretted not take my lighter, sturdier carbon fiber Manfrotto on this trip.) The sand was uneven, wet and squishy, but the tripod still steadied the camera much better than I could have without it. As I moved from place to place, the feet and lower end of the tripod legs were sinking more and more into the wet sand and grit. It didn’t take long for these tiny particles to get stuck in the leg locking mechanisms, so much so that function was impaired and wet sand had to be cleaned out before I was able to collapse the tripod legs.
Just like the camera and lens, tripods need routine care. It’s important to clean the dirt, dust and moisture off the tripod after each use, (especially when it’s been exposed to salt water and air) otherwise the mechanism gets sticky and uncooperative. Like most equipment essential in producing good photography, a tripod will let you down if you don’t take care of it.
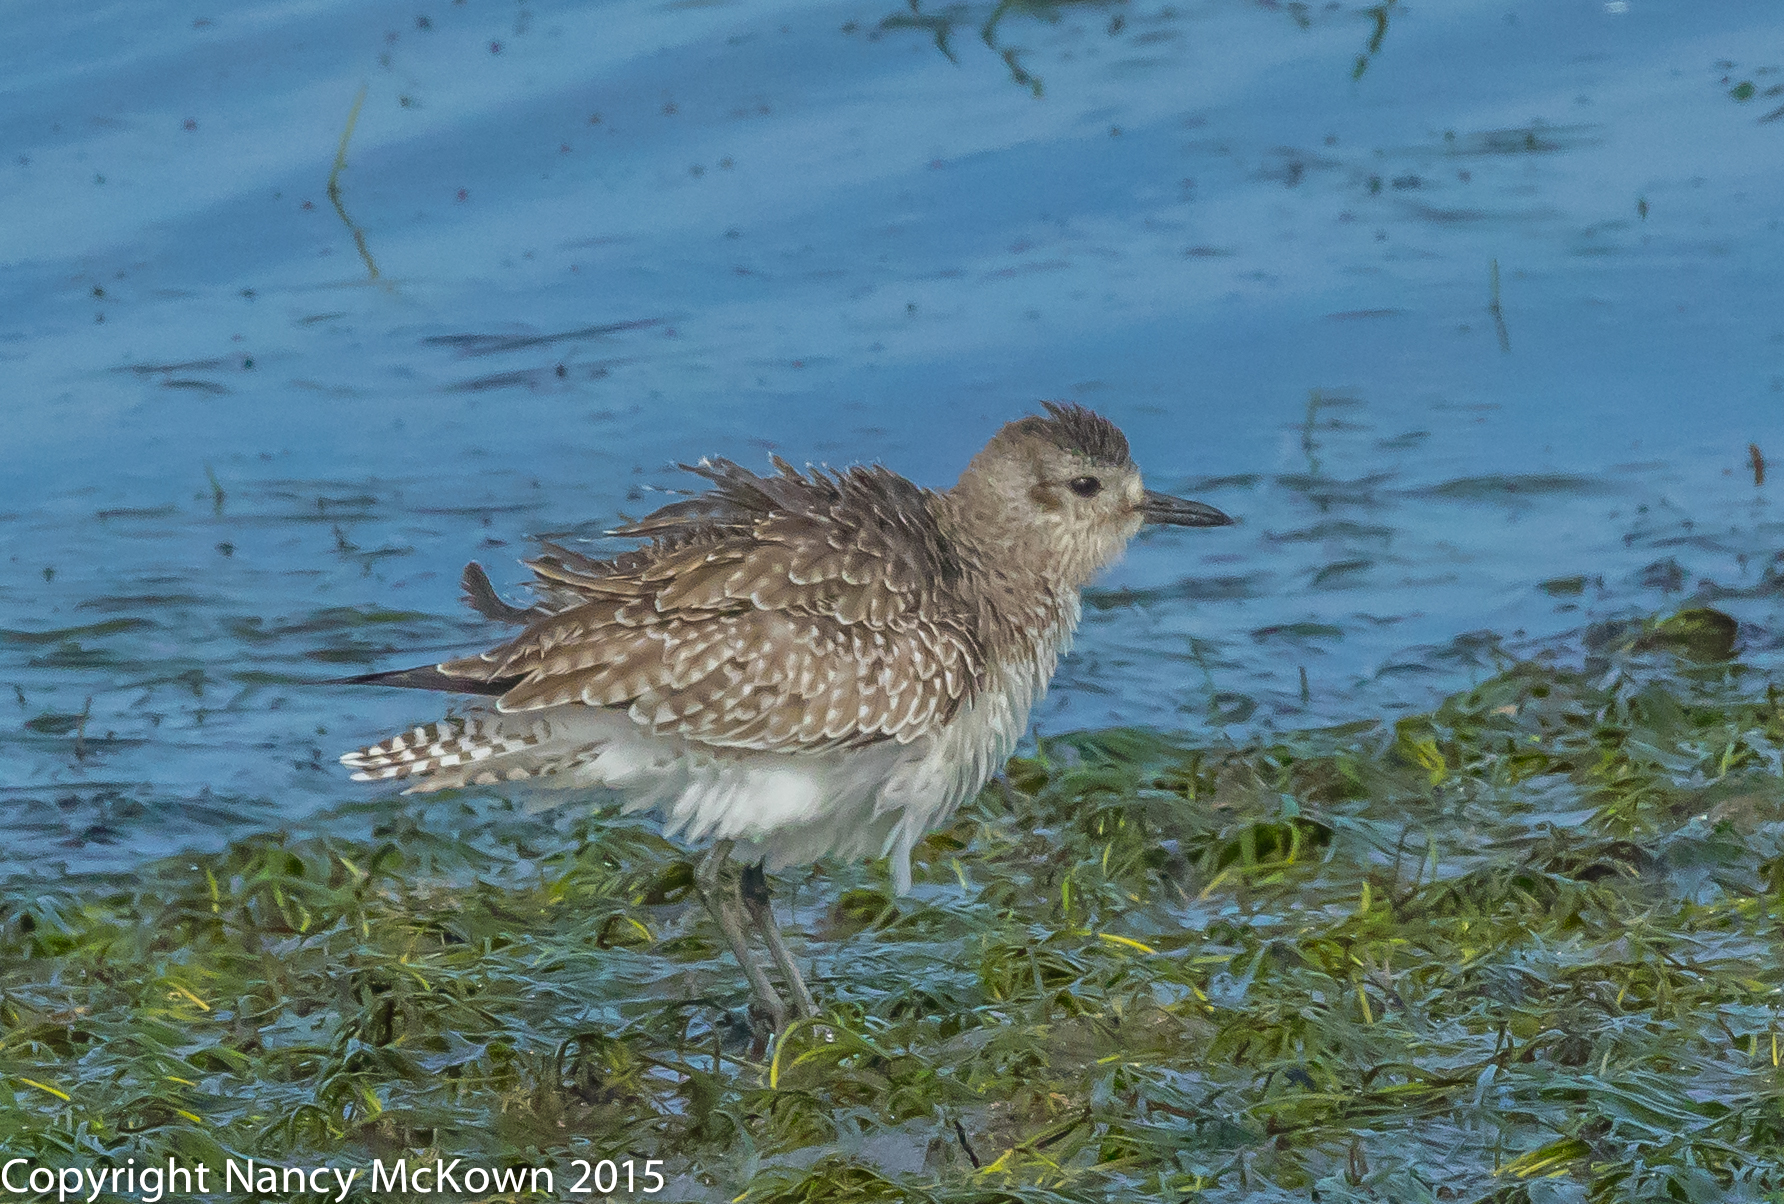
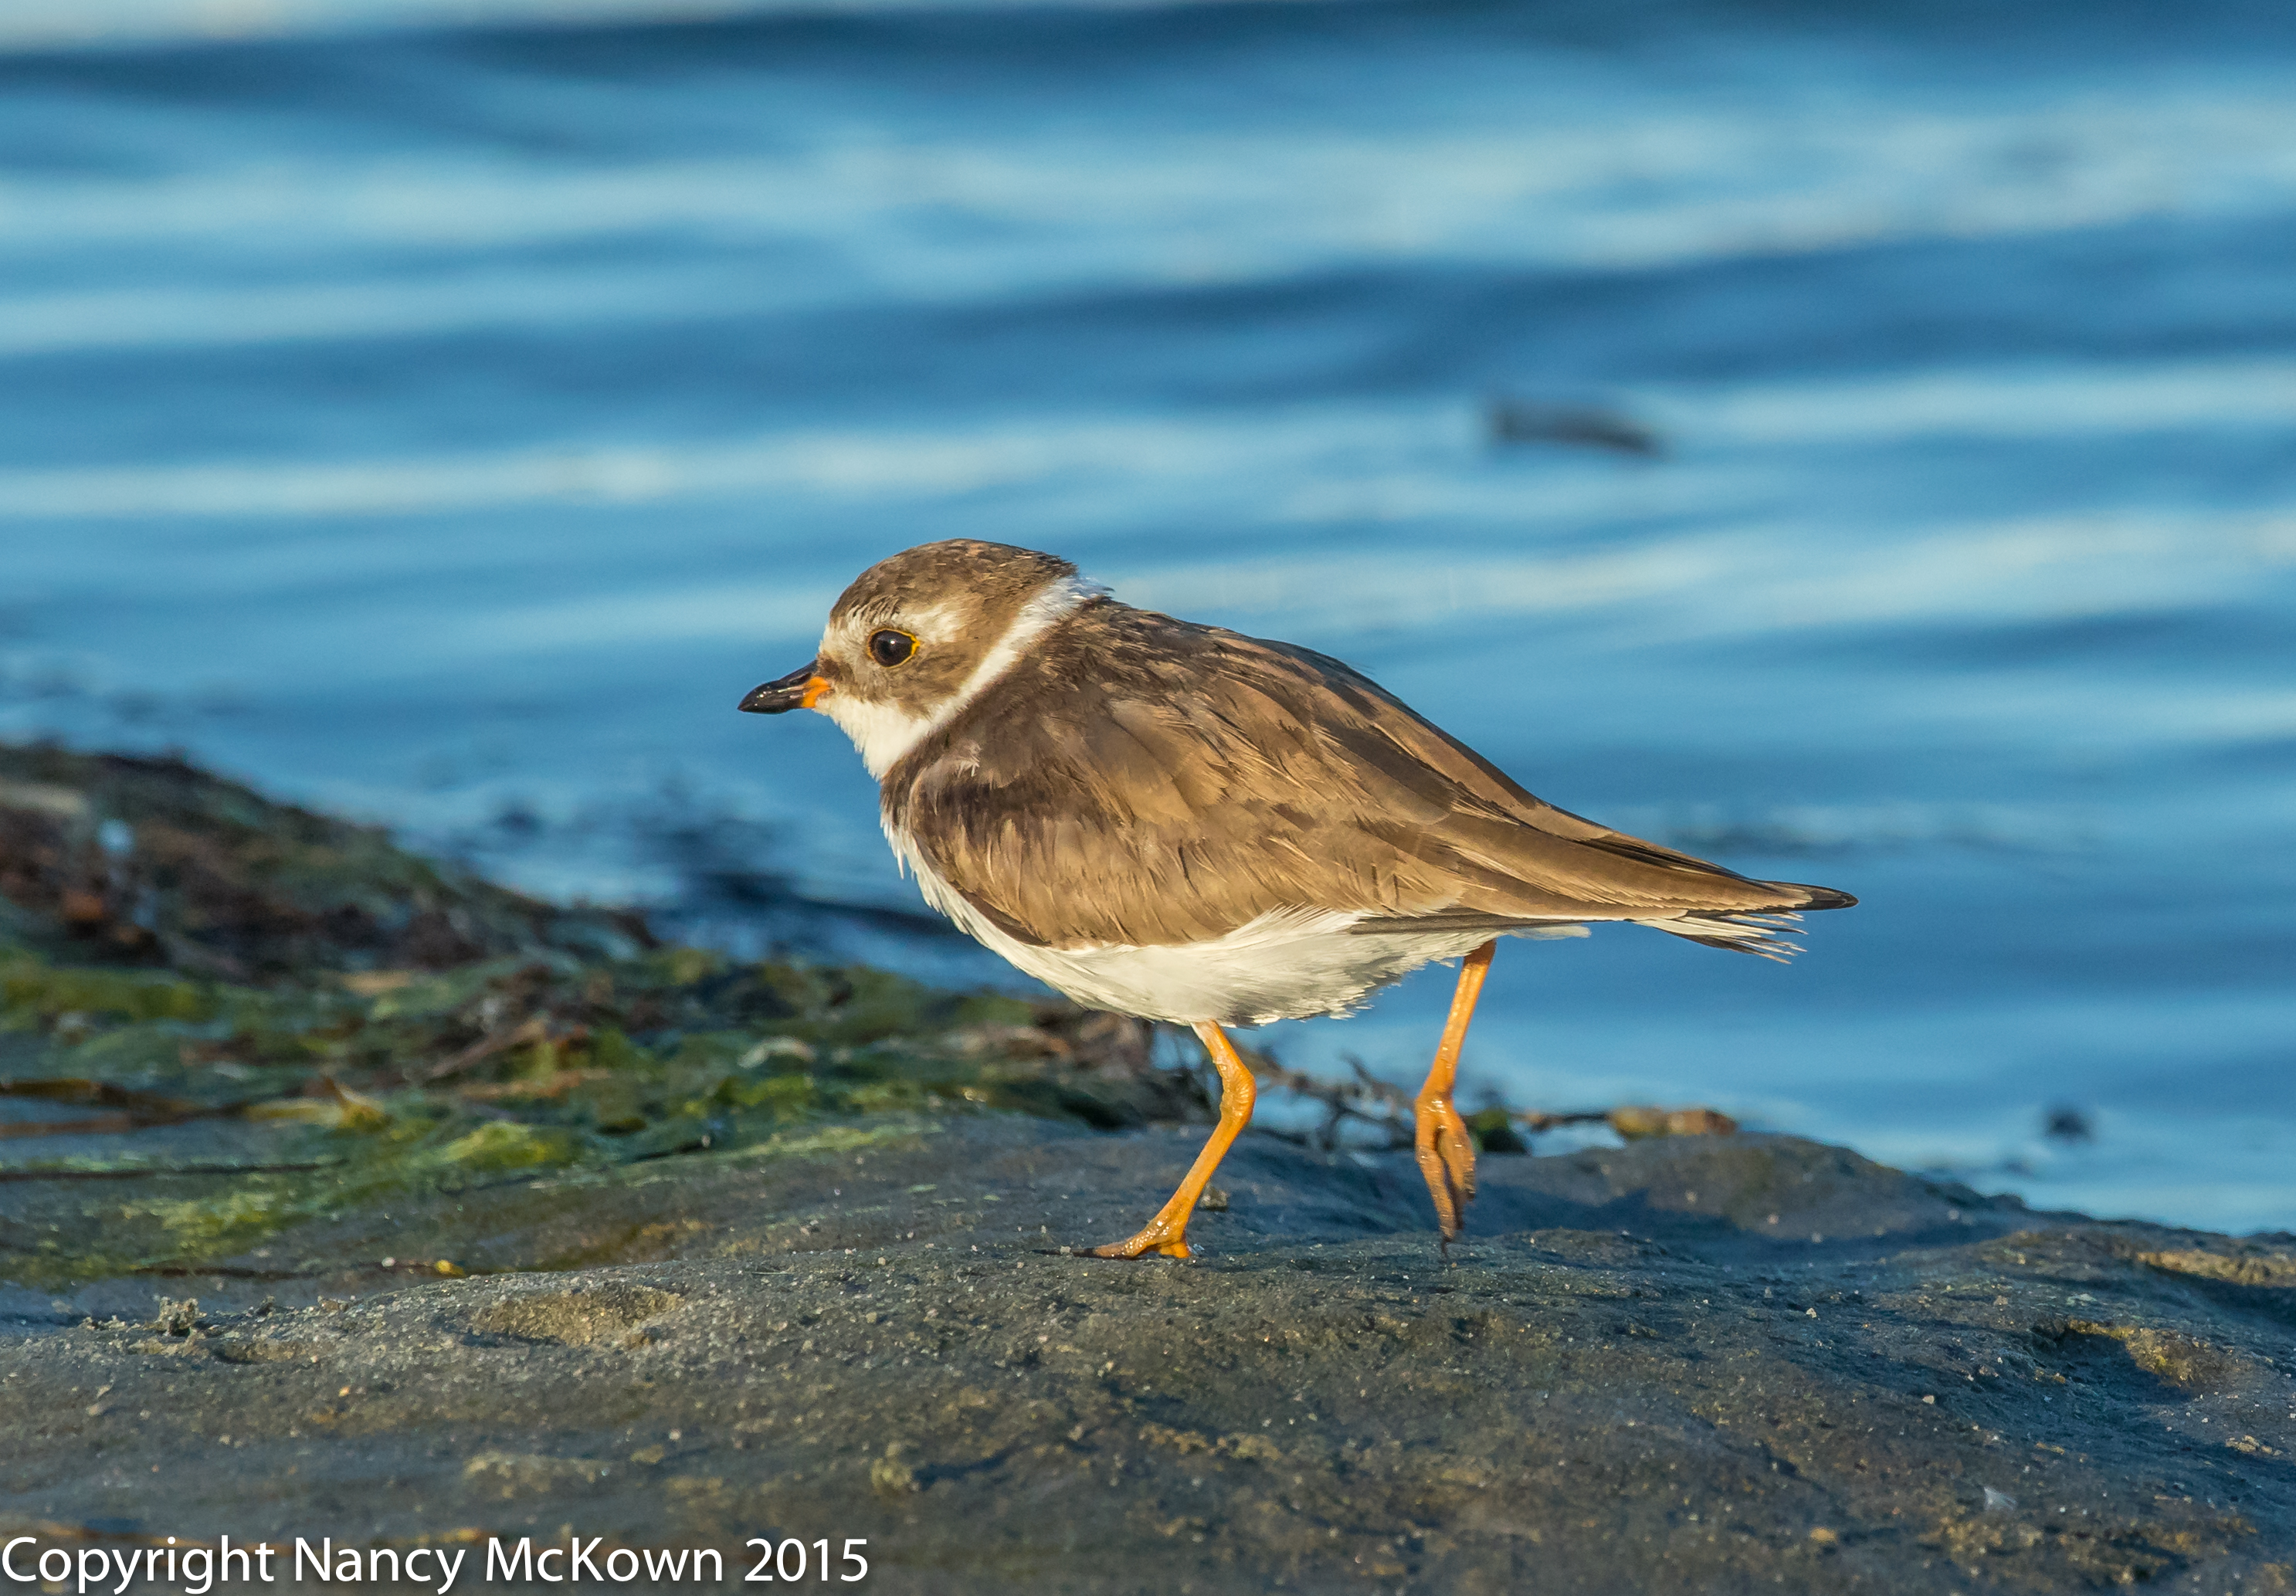
A Shorter Beak on this Black Bellied Plover; ISO 2000; f/13; 1/2000 SecondSemi Palmated Plover; the Smallest Shorebird I photographed. ISO 800; f/6.3; 1/2000 second
For more information on how to photograph Sandpipers on the Beach, press this blog link.
We’ve been birding almost exclusively in the western portion of the Allegan State Game Area this spring, hoping to find a wide assortment of migratory birds. We were not disappointed. The Todd Farm, a designated wildlife refuge in the game area, consists of fields, forests, ponds and prairie habitats that are maintained by the DNR. 136 bird species are known to nest in the Allegan SGA. Countless others that do not nest in Michigan use the wildlife refuge as a stopping point on their migratory journey. In early spring, the Allegan SGA is a welcoming place for migratory birds and bird photographers.
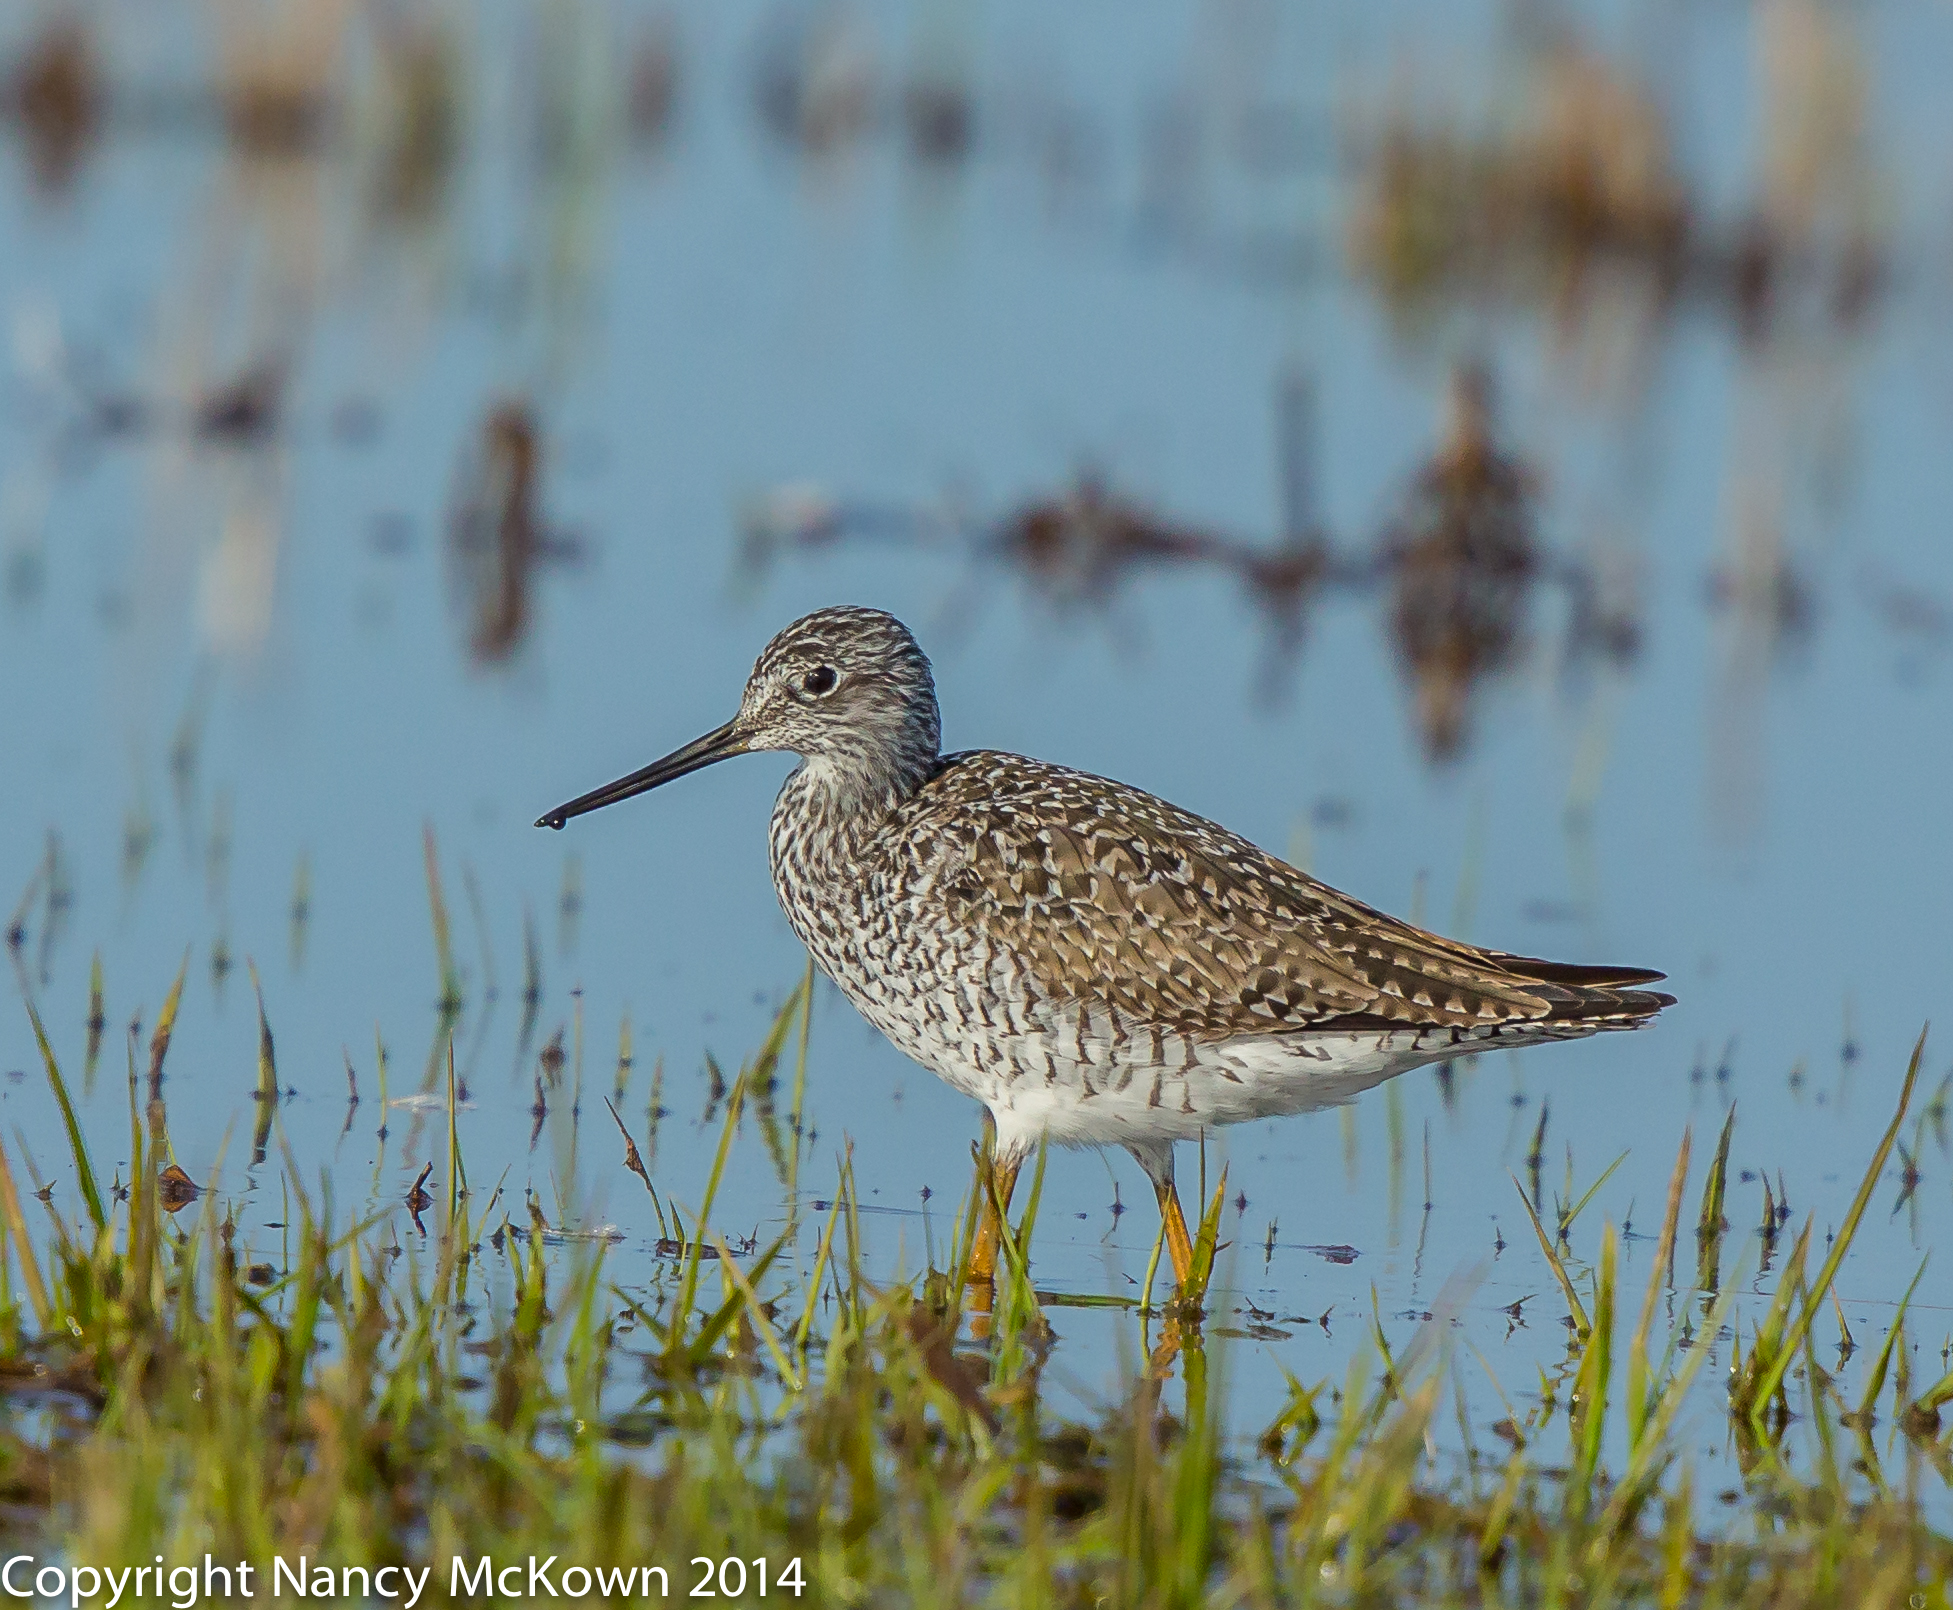
Greater Yellow Legged Sandpiper Leaping Into His Liftoff. ISO 800; f/9.0; 1/2000 Second
Sandpiper Passing Through
The Greater Yellow Legged Sandpiper is one breed of wading birds that stops to rest and replenish at the Allegan SGA’s many ponds. They breed in Alaska and Canada and winter along both the Atlantic and Pacific coasts and throughout Mexico and the Caribbean. Quite a long migration path.
Bursting to Capture Action
I am always pleased when I am able to photograph a bird lifting off into flight. It’s a rare capture, at least for me. Birds are unpredictable in their movements. When I sense that critical action is imminent, I hold down that shutter, continuously shooting in an effort to capture action at its peak. But then, the camera stops. Why?
It works like this. After the shutter is pressed, it takes only seconds before the file is transferred from the sensor to the holding buffer and then to the memory card. If multiple photos are taken in rapid succession, the pipeline between the sensor, holding buffer and memory card will soon reach capacity. The camera will then shut down temporarily until the memory card has time to load all the data from the buffer.
Photographers should be aware of the “burst rate” of their cameras, or how many frames per second the camera can successfully shoot in rapid succession. The burst rate of your camera depends primarily on 3 things.
Factors that Affect Burst Rate of Your Camera
The processing power of your camera. (Modern DSLR cameras are sophisticated computers – and a faster processor costs more money.)
File size (how much data is transferring). If you set your camera to shoot and then store large RAW files, or RAW files and JPG files simultaneously, it will not take long to overload the camera. The burst rate on my camera is 6-7 RAW images. After that, it will shut down temporarily to give the storage process time to catch up.
Writing speed of your memory cards as data is being transferred in the camera.
Overall, you will get more shots in and possibly avoid a camera shutdown if you configure the camera to take smaller size RAW files or JPG files and if you buy high quality memory cards with faster writing speeds.
Greater Yellow Legged Sandpiper, Foraging In Shallow Water ISO 800; f/8.0; 1/2000 Second
Birds Migrating Through the Allegan SGA
Besides the Greater Yellow Legged Sandpiper, we’ve seen and sometimes photographed the following migratory birds just passing through the Allegan State Game Area, bound for their nesting grounds.
Northern Shrike (Nesting grounds in the Canadian Tundra)
Snow Bunting (Nesting grounds in the Canadian Tundra)
Horned Lark (Nesting grounds in Northwest U.S)
Lapland Longspur (Nesting grounds in the Canadian Tundra)
Rough Legged Hawk (Nesting grounds in the Canadian Tundra)
Northern Shoveler (Nesting grounds in Western US and Western Canada and Alaska)
Bufflehead (Nesting grounds in Canada)
Common GoldenEye (Nesting grounds in UP, Alaska and Canada)
Ringneck Duck (Nesting grounds in Canada and Alaska)
RedBreasted Merganser (Nesting grounds in UP, Canada and Alaska)
Snowy Owls (Nesting grounds in the Arctic Circle)
American Wigeon (Nesting grounds in Canada and Alaska)
Brown Creeper (Nesting grounds Northern MI, Canada and New England)
Hopefully we will be lucky enough to find and photograph more bird species this Spring as they pass through Michigan.
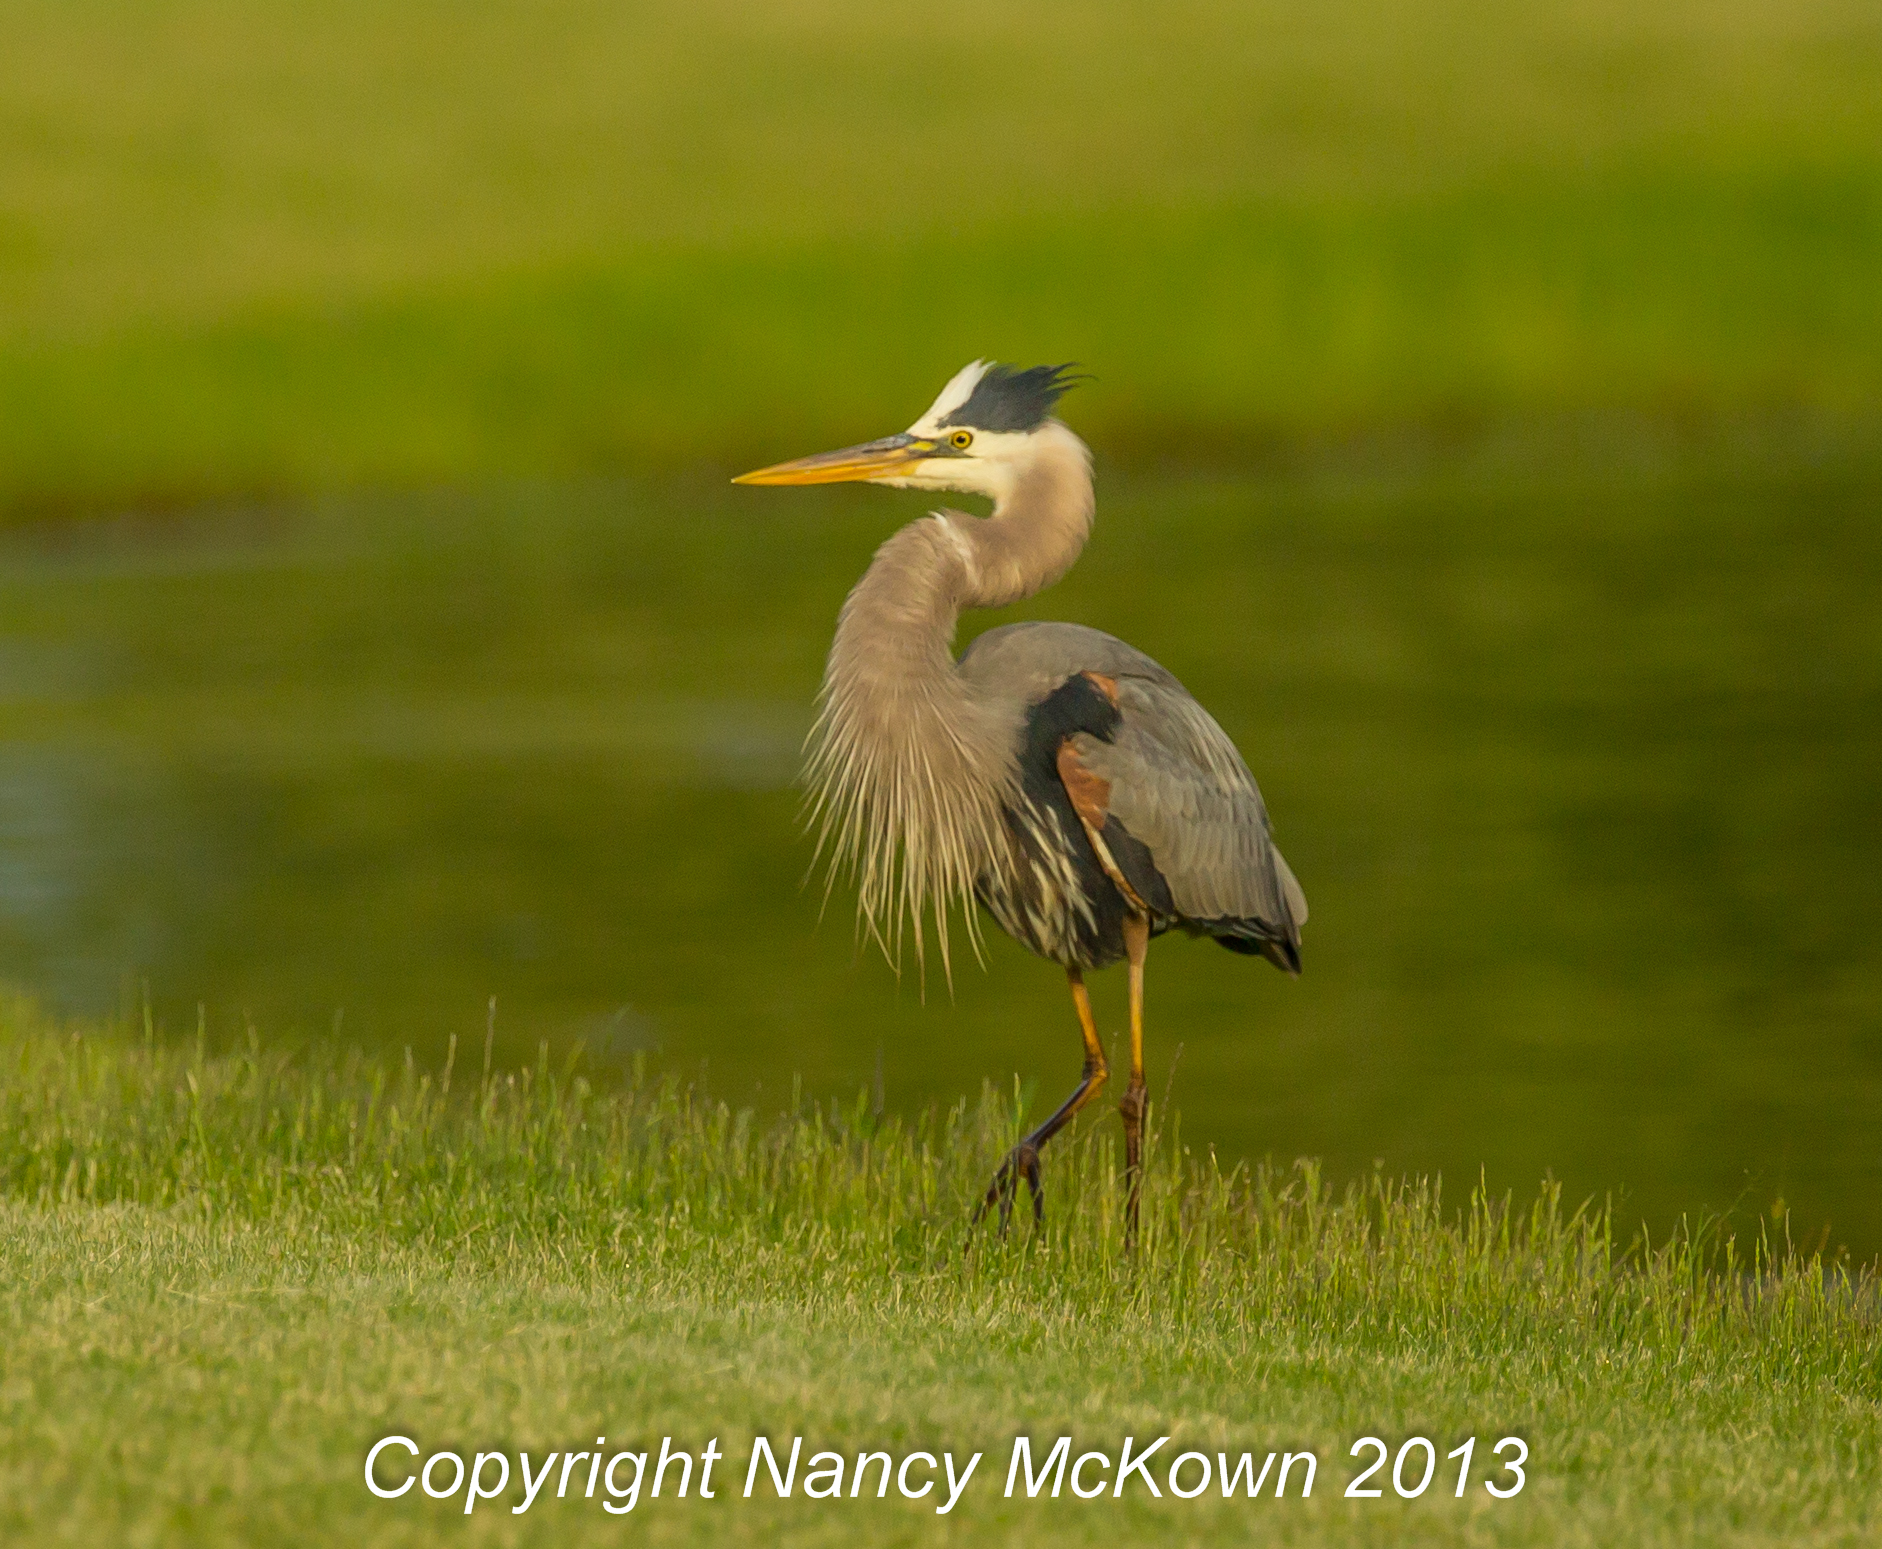
We were driving on the backroads in Allegan County searching for birds in the corn fields when we came across a very large bird that was not only out of its natural element, but strangely unafraid of moving cars and humans.
The Great Blue Heron is a long legged, wading bird usually found near water. Its long neck and sharp beak make it highly adept at fishing.
We came across this heron on a very dry looking country road. He was “fishing” for insects in the rows of corn.
When A Bird Lets You Come Close With Your Camera
The strange part about this particular bird was that we were not only able to move in very close, but we were also able to get in and out of the car as needed. The heron was not about to come meet us, but he definitely wasn’t fearful and did not attempt to fly off. We were able to get so close that the 300 mm lens with 2x extender (600mm) was too long to get the entire bird in the view finder.
Instead of removing the 2x extender and using the 300mm focal length, I decided to leave it on and take advantage of the sharp, close-up possibilities that a telephoto lens can provide.
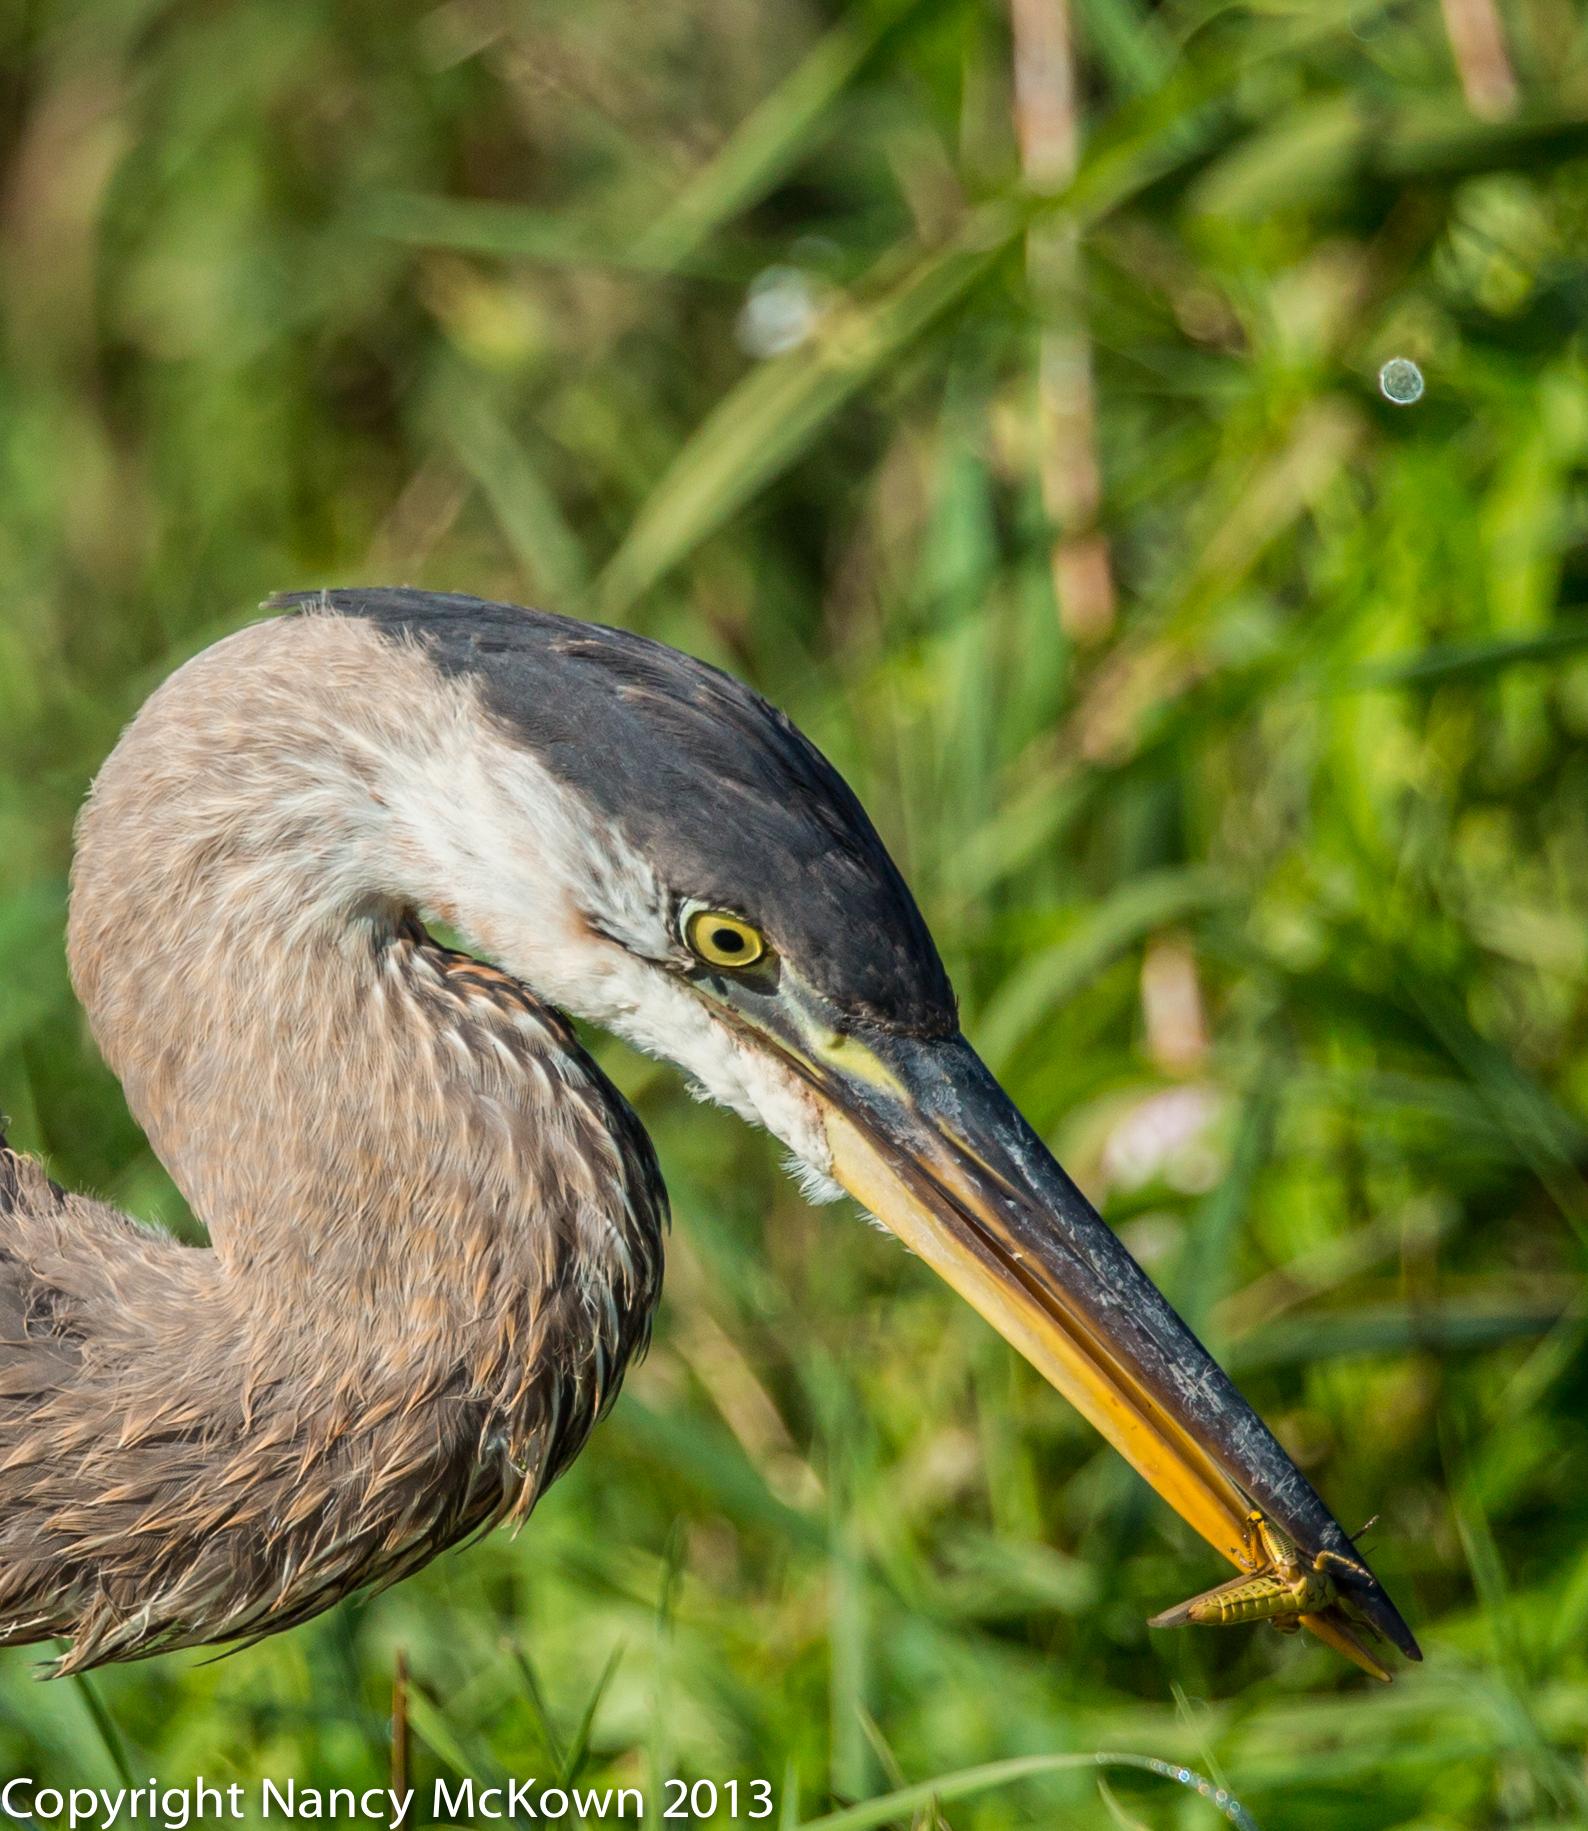
Close up of Great Blue Heron Out in a Corn Field, Feasting on a Large Grasshopper. f/6.3, 1/2500 second, ISO 640. 300 mm lens with 2x extender.
Macro Lenses Not Preferable for Bird Photography
I owned a Canon EF 100mm f/2.8L IS lens with macro. I used the macro for flowers and insects, but it never worked for photographing birds. I ended up selling it.
Even though macro lenses will let you capture incredible, close up detail, I found that it was not practical to use a macro lens in bird photography because it requires that you get as close as 2 inches away from a bird. When does that happen?
Telephoto Lenses Work Well for Close-Up Photography
If you want close-up photos of a bird, or bird parts, you can use your telephoto lens. This is especially true if you and your lens are able to get close enough to the bird to capture the details.
Close-up of Grasshopper Trapped in the Beak of A Great Blue Heron
Zooming In With Post-Processing Software
Close proximity to your subject is essential to get the tack sharp details. The less zooming you need to do in post processing, the clearer the close-up details will be.
Post processing software will help you to zoom in on any portion of a photo. As I wrote in my post labeled “How to Photograph a Great Blue Heron – Part 1”, digital images are made out of pixels/dots. You enlarge the dots when you zoom in to a relatively small component of the photo. The more you zoom in on a detail in the photo, the larger the dots become. As the pixels/dots enlarge, the image becomes less clear.
Photo Details
I like the long beak in the first photo. It’s all scuffed up; as if this crane has been in a lot of sword fights. And, of course, the details seen in the close-up of the poor, doomed grasshopper trapped in that razor sharp beak is fascinating. I would not have seen that detail if I was not able to get as close with my long lens.
So when a bird allows you to get close, take advantage of your long telephoto lens and focus in on details that interest you.
The Joy of Discovering and Photographing New Birds
One of the best parts of photographing birds is discovering new birds. I think it is very exciting when your camera is focused on a bird that you can not identify and have never photographed before. The first thought going through my head when this happens is that this new bird is a baby or juvenile of a bird I know and have already photographed? This is true quite often because the coloration of young birds is often very different than their parents.
Bird Identification Skills
Other birders out there always come to the rescue to help identify mystery birds. Also, bird identifier games, tools and apps are readily available on the web. You have to provide the size of the bird, where you saw it, identify the colors of the feathers, note the beak shape, observe what they are eating, how they move, etc. These are fun, if you have the time and information, but for photographers, it’s faster if you upload a photo of the mystery bird to your favorite bird share and ID site and ask other bird lovers to help. It takes only minutes before someone, or some computer, identifies the bird for you.
Mystery Bird Photograph
I was out with my camera midmorning, shooting near a small pond. There’s a limit to how close you can get to a bird before it flies away, even when you are in your car. I was in my car, with my back to the sun and had my long lens perched (and secured) on the car’s window ledge. In the distance, I saw flickers hopping about on the grass and one great blue heron fishing at the far end of the pond.
Suddenly a rather large bird circled the heron a couple times and landed in a dawn redwood tree on the edge of the pond. The great blue heron saw this newcomer before I did and tracked his movements in the sky. It looked to me as though the two birds were communicating; parent juvenile type communication, so I jumped to the conclusion that these birds were from the same nest. I was wrong.
Green Heron Well Within Reach of my 2.0 Lens Extender.
2.0 Telephoto Extender
To capture this far off action, I was lucky to have my 2.0 telephoto lens extender attached to my 300mm lens. This extender effectively changes the focal length on my 300mm lens into a 600mm lens. You can imagine the advantages of being able to get up that close to photograph a bird. This extender is light, easy to transport and attach to the lens, and doubles the effective focal length of my 300mm lens. And, it is so much cheaper and convenient than buying a 600mm quality lens.
So why not leave the extender attached and have this extra reach all the time when photographing birds? Because there are some very consequential drawbacks that may outweigh the advantages of that extra reach. It seems like a win win deal, until you understand what you are giving up.
It’s All About Light
First of all, attaching an extender usually means that you no longer have what is referred to as a “fast” lens. A “fast” lens is a lens with aperture opening of 2.8 or larger. Fast lenses of quality carry high price tags and are usually considerably heavier than the slower lenses. Why pay the price? It’s a lens that gives you more flexibility when light is low because at its maximum opening, it allows more light to hit your camera’s light sensor. That means you won’t miss as many shots due to poor light.
So if you put a 1.4 extender on a fast lens, and increase your focal length from a 300mm to a 420mm, you will reduce the amount of light getting to the sensor by one full stop. That’s 50% less light. If you put a 2.0 extender on your fast lens, and increase your focal length from a 300mm to a 600mm, you reduce the light to the sensor by 2 full stops. That’s 75% less light.
You must carefully weigh the advantages and disadvantages of attaching extenders to your lenses. Most times, it’s the only way that you can get close enough, but if light is low, the better choice might be to keep the extenders off. I usually carry the extenders with me and assess the distance and quality of light while in the field.
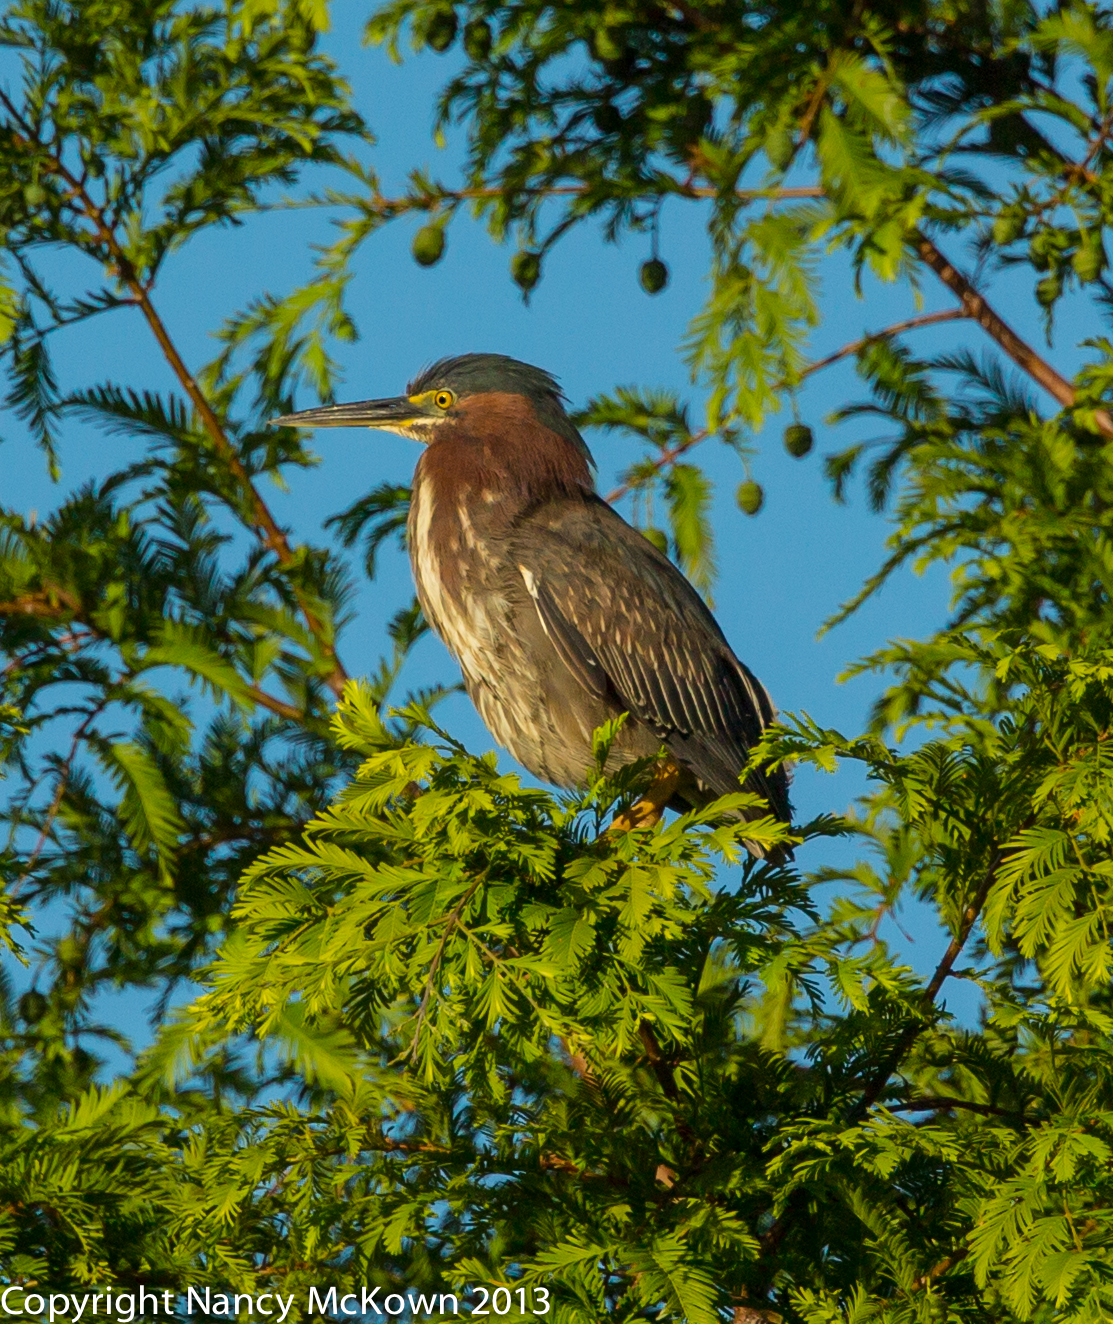
A Green Heron in a Dawn Redwood Tree. This photo clearly shows his black crest atop his head.
A Beautiful Green Heron
This mystery bird is a green heron, probably a juvenile, on a bad hair day. At first I did not see much green in this green heron, but after a while, the subtleties of the colors in the feathers did indeed show green. In fact, he is beautiful. Short and stocky when his neck is not extended, he has a chestnut body, velvety back feathers with green hues, a black crest atop his head and bright yellow eyes.
There are 3 types of herons that frequent Michigan ponds, marshes, and waterways. I have already photographed the great blue heron and the green heron. I am now on the lookout for the much less common “American Bittern” Heron. Stay tuned. I may be loading my equipment into a kayak soon in an effort to photograph this elusive bird.
New Photos of the Green Heron
A mature green heron graced my viewfinder recently when I was photographing kingfishers in a nearby Saugatuck pond. The kingfishers were too far off for a good photo, even with the 2.0 extender attached. The green heron is a much bigger bird, so distance mattered less. Still, distance and low light did impact clarity. On the positive side, the soft, clouded over morning light brought out vibrant blue colors in the feathers.
Here are a couple of those shots.
A Mature Green Heron, Looking Quite Blue, Captured in Flight. The ISO was Very High Because the Light was Low. I Lowered My Shutter Speed as Much As I Dared for a Bird In Flight . This Reduced the Noise Level from 12800 to 10000. Post Processing Helped Reduce the Noise, But It Also Reduced Some of the Details. ISO 10000 ! ; 1/1600 second; f/6.3
A Green Heron Waiting for His Next Meal. I was able to Lower the Shutter Quite a Bit Because He Was Not Moving Much. This Lowered the ISO Quite A Bit. ISO 4000; 1/640 second; f/5.6
In flight photos are easier with big birds because they don’t move as fast as the smaller birds and the there’s much more bird upon which to lock focus. Larger birds are also somewhat more predictable, especially if you are looking for an action shot. If you are watchful, you can tell by their movements when they are preparing to lift off. That’s when you start pressing your shutter, non stop.
The Subtleties of Light on Photographs of The Great Blue Heron
I’ve been photographing this particular Blue Heron for seven mornings now -same place, same time (at least I’m assuming it’s the same heron). What a study in light! The colors of the feathers, the variety and vibrancy recorded on the camera’s sensor, are not what I remember seeing when I took the photos. The camera’s digital sensor records light and color differently, depending on intensity of the sun, time of year, time of day, length of exposure, depth of field, reflection of background colors, aperture and probably countless other factors.
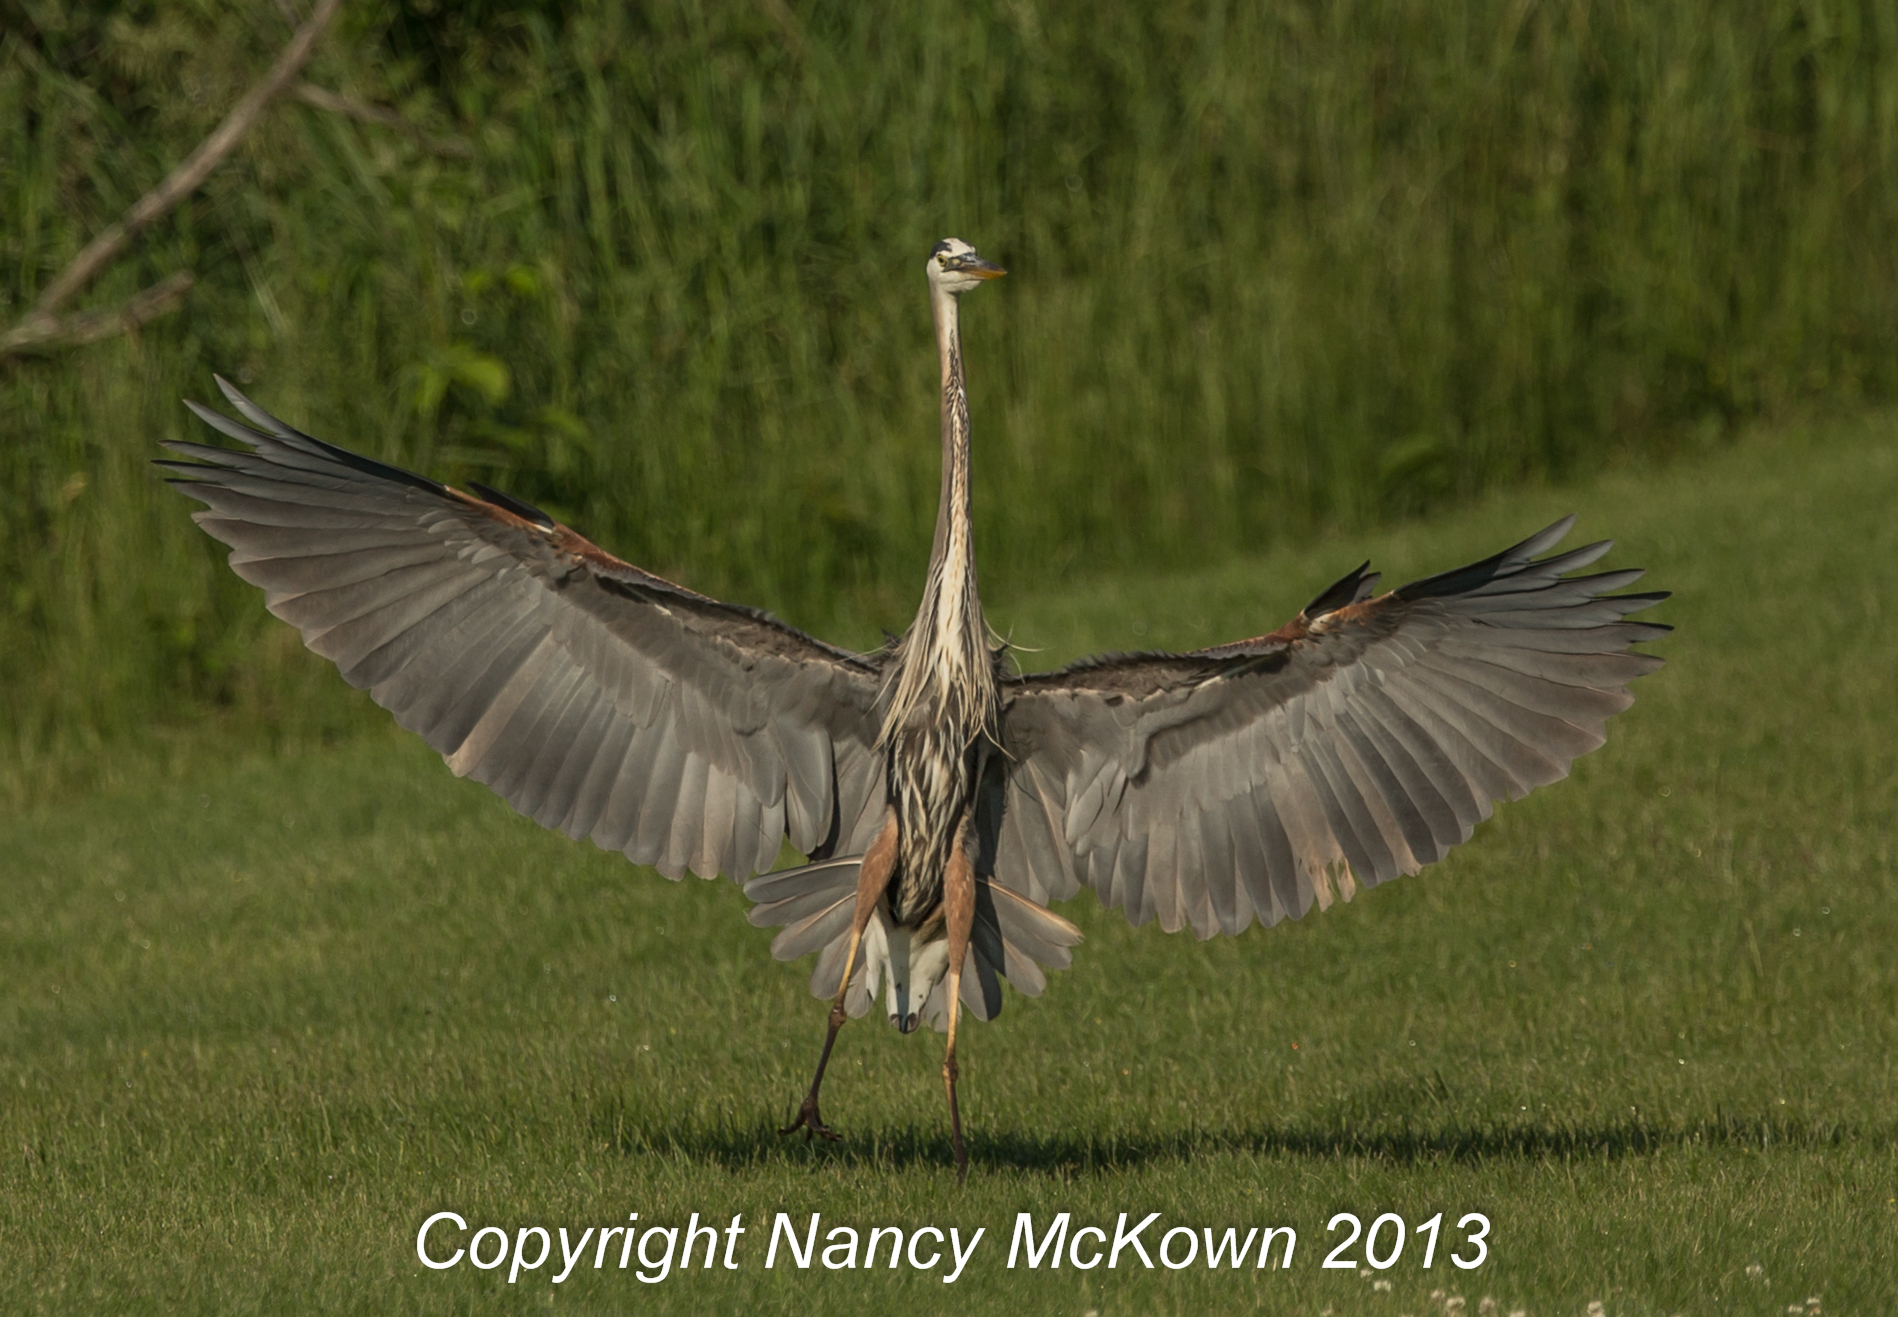
Below please find two photos of the Great Blue Heron flying plus a third photo showing this great bird readying for liftoff. An adult Blue Heron stands about 4 feet tall and its wingspan is an impressive 6 feet wide.
ISO 400; F4/0; 1/2000 second The sun is behind me, to my right as I pressed the shutter at around 8:00-8:30 am on June 7, 2013. The blue sky is the only blue I see in this photo of a Great Blue Heron. Lot’s of vibrant shades of yellow, gold, orange, brown, olives.
ISO 320; F4.5; 1/3200 second I’m parked in the same place, the sun is behind me, to my right, as I pressed the shutter at around 8:00-8:30 am on June 8, 2013 No sky light in the background this time, just water and grass- giving it almost a stained glass look. The blues on the wings are vivid. The darker green and blue background adds drama.Blue Heron preparing to Fly. Or Perhaps He is Just Flashing Me.
Last week, I ordered a Canon EF 1.4x Extender III for my 300mm lens. The 1.4x increases the focal length of a lens by a factor of 1.4x, thereby increasing the focal length from a 300mm to a 420mm on my camera. I ordered it because there have been way too many times that my subjects are just too far away to capture.
One major rule in photography is to get as close as you can. Most birds are not going to cooperate. It’s true that continually showing up and being quiet and persistent goes a long way towards getting a good shot, but you will have more luck seeing the birds in the first place if you are farther away. That means a longer lens or extenders that allow you to get as close as possible to distant and challenging subjects.
Photographing the Great Blue Heron
I was lucky. Around 7:30 am, I saw a Blue Heron fishing near a pond. I parked the car as close as I dared, powered down my window and stared. So far, so good, he noticed my arrival, but wasn’t spooked. I thought the ruckus of me opening my car door and getting out with my camera would scare him away, so I set my camera, with 300mm lens and 1.4 extender, to rest on the unopened car door.
Having a resting area in your car upon which to lean the camera helps a lot with camera shake and tired arms and hands, especially with long lenses. Before I was ready to take photographs, I had a lot more fiddling to do with the focus, shutter speed, ISO, etc, but there simply was not enough time because I saw the heron dunk his head under water. This critical action would be finished in seconds, and I would miss the shots if I didn’t start pressing that shutter button right then.
For the first photo, before I was “ready”, the camera was set at shutter speed preferred, at 1/1600 second. That speed simply wasn’t fast enough for the first few critical shots of the Blue Heron dunking his head into the water and pulling up a blue gill. The first 6-8 shots were interesting, but blurred due to the intense action and the relatively slow shutter speed. Good focus was not achieved until I cranked it up to 1/2500/second. I was able to capture a blue gill trapped in the bird’s beak while the bird was making his way out of the water and onto the grass.
Blue Heron exiting the Pond with Fish. Photo 1
Try Different Approaches When Photographing Birds
Success breeds success. Right? I nailed the Blue Heron catching a Blue Gill and I wanted more. So I went out again to shoot the same bird, but differently. Maybe get a little closer- try a different view at the same location, go out a little earlier – try different aperture and/or shutter setting – change how the camera locks focus. Do I dare try to get out of the car?
The Blue Heron is very shy. Rarely will this bird let you successfully approach him, let alone set up photo equipment. My kayaking friends tell me that they have had success getting pretty close by gliding toward the bird on a quiet pond. (Look for a future post about shooting birds in a boat.) But Herons seem less wary of a parked car, radio off, very little movement inside.
Is there a clamp that works to hold your camera and lens steady- and allowing you to pivot the camera while shooting from the inside of a car? Of course there is. $36 bucks. It’s only a clamp, you still have to attach the head unit from your tripod.
Most mornings, I arrived at the pond really early, but the heron did not. It was almost 7:00 am by the time he arrived. Not early early enough for the optimal light affects, but better than the 7:40 am time he arrived at my first shooting.
NOTE: The quality of spring/summer light changes quickly and drastically as the sun rises. With the sun low on the horizon, you can expect more subtle details, lush landscape, more luminous golds, and more drama!
Faster Shutter Speed for Clearer Photographs of the Blue Heron Fishing
The Heron landed at the far end of the pond, so I started shooting, hoping he would walk toward me and fill more of my viewfinder. The fishing heron can stand motionless for long periods of time and then strike lightning fast – so I was determined to shoot most of the time at 1/2500 second (as opposed to 1/1600 second the last shooting) capture the action – aperture at 4.0 The ISO shot up to 1000-2000 with these settings – too high for my taste for a subject so far away, but what can you do – you have to trade the noise to stop action.
(NOTE: This turned out to be too slow for the head dunks.. 1/2500 of a second stopped the action of the splashing water, but not the heron’s head. Next time, I’m cranking the shutter speed even higher).
Coming in Closer for a Better Photograph
Blue Heron Skewering Fish Photo 2
The Heron mostly stalked, slowly and methodically, looking for fish in the pond. I was excited because he was stalking closer to me. I played with the shutter speed and kept shooting, dialing it up and down – down as low as 1/800 second – to try to change the ISO, quality of bokeh, etc. Remember, you want to experiment with the camera settings, otherwise your photos all look the same.
Patience was rewarded with a photograph of a skewered fish on the Heron’s beak.
How to Eat Fish Live and Whole – Lessons from the Great Blue Heron
My husband said that the Blue Heron has to position the blue gill in his mouth so that the fish is head down before swallowing. The spiny dorsal fin would rip up the Heron’s throat if he tried to swallow tail first. Positioning the flopping fish with his beak and tongue took a few minutes, but soon enough the fish – head first, whole and alive,was swallowed while I watched the progress of the neck bump as the fish slid down the inside of the Heron’s long neck.
Changing Camera Settings Quickly While Photographing the Blue Heron
What did I learn? I need practice on changing shutter speed on the fly. My fingers know what to do, but I’m so excited about seeing the bird thru the lens that I don’t think about technical recalculations. Also, maybe the blurriness is a consequence of me heavily depressing the shutter – a remote shutter setup might be helpful here to avoid camera shake – although it takes the finger away from the camera and consequently changing the settings on the fly is not so convenient.
Zooming in to Photograph Wild Birds
It’s not just shutter speed that makes the better photo, but the distance between the bird and the camera. For tack sharp images, there’s no substitution for getting as close as possible to your subject. The farther away your subject, the more you have to zoom (during post processing) in order to see the shot clearly. The more you zoom, the more diluted the photo.
Digital images are made out of pixels/dots. You enlarge the dots when you zoom in because you are zooming in to a relatively small component of the photo. I’ve included the pre-zoomed photos on the bottom of this post so you can see how much farther away the heron was in the first shot compared to the second shot. Photo 1 is certainly usable after zooming in post processing, but I would not print it bigger than 5×7. There is insufficient photo resolution to go any larger. Photo 2 could be enlarged to a 16×20 print, quite a bit larger.
Photo 2 Blue Heron Much Closer to the Camera NO ZoomingPhoto 1. Blue Heron Photograph -No Zooming. Subject Much Farther from the Camera than Photo 2