What do you do when your camera keeps “searching” for a focus point?
Auto Focus in modern DSLR cameras is usually highly reliable and lightning fast. It’s easy to get spoiled using it. However, certain situations can confuse auto focus, causing the mechanism to continually search and struggle for a focus point. 3 examples are:
Some “thing” is close to and overlapping the front of your subject.
Wind, heavy rain and/or snow may be blowing, creating a chaotic scene on which to focus.
The light, texture, and/or contrast of the scene are such that it is difficult for the focusing mechanism to “see” and establish focus.
The camera will not activate the shutter if it can not achieve focus.
So if your automatic focus will not lock on your subject, you might want to consider switching your lens from (AF) Autofocus to (MF) Manual Focus.
Magnolia Warbler ISO400; f/8; 1/250 Second
Complete Control of Focus
I’m not a fan of manual focus for 3 reasons:
I can’t always tell when I’ve reached tack sharp focus on my subject.
Action shots require speed and precision.Unless you pre focus on a “spot” on which you hope your bird will land, you can not manually focus your lens as fast as the auto focus mechanism can. (See Post: How to Photograph Hummingbirds in Flight; 6-18-2013).
Even though the functionality is there, modern, quality DSLRs lenses are simply not made to use in manual focus mode. The auto focus technology is too good.
Try Out Manual Focus
I want to keep my photography skills sharp, even if I don’t like a particular function. Plus, there are times when the constant back and forth of auto focus hunting drives me crazy. So I set the 300mm lens to (MF) manual focus for some of the Magnolia Warbler shots.
Immediately, there was a problem. With my eyes, I couldn’t see well enough through the viewfinder to tell if I had sharp focus or not. How can I accurately set manual focus if I can’t see?
Dioptre To the Rescue
I have terrible distance vision without my glasses. A little knob on the top of most modern DSLRs (usually to the right of the viewfinder) called a dioptre can be adjusted to compensate for a photographer’s poor vision. It is a function that lets you clearly see your image through the viewfinder without your glasses on. To compensate for poor vision, I dialed the + or – on the dioptre until my eyes saw the focusing points in the viewfinder as sharp as possible.
The height of warbler migration has passed. Still hopeful, I have my 1DX Mark II, 500 mm lens with 1.4 tele extender and flash gear affixed to a tripod and set up half inside, half out on the deck, pointing toward the fountain. My other DSLR, the 5D Mark IV (attached to the 300 mm and flash) is setup in the library and peers through tall (2’x10′) and narrow windows. Those windows permit lots of vertical movement, but very limited maneuverability side to side. It is not unusual for me to miss a shot or to lock focus (based on focus point setup) on a bird and then afterwards see that some of the lens’ field of vision was obstructed by the wood moulding. For the most part, the image is ruined.
Hooded Warbler, Male Leaping Down to a Lower Branch. ISO400; f/7.1; 1/200 Second
Tipping the Tripod
The 300mm on the 5D Mark IV is by far the more manueverable of the two camera setups. The lighter weight allows me to lean the camera every which way by balancing the whole set up on one tripod leg.
When this little Hooded Warbler perched on a branch out of line with the camera’s field of view, I readjusted by tipping the tripod to a loose and shaky one legged position. My view was precarious and wobbly, but the entire frame was clear of the window moulding. It helped a lot that the warbler was patient and unafraid, giving me the time I needed to steady the camera rig and achieve focus.
Hooded Warbler, Male A Mostly Uncluttered Background. ISO400; f/7.1; 1/200 Second
The flash with extender delivered adequate light, despite the precarious angle of the tripod. I cropped and straightened in post processing in order to fix the perspective of the tilted image. I’m pleased with the results.
It was late July when we saw an out-of-place (for our nesting area) warbler. She was fairly high in the trees, but given her size, shape, color, the poses she assumed, and the distinctly warbler-ish feeding style, I would tentatively ID her as a Yellow Warbler.(Sadly, I was unable to get any ID images.) Was she just bopping about on the fringes of her nesting area, relieved to be free from parental duties, or could it be that she had actually begun her trek south to her wintering grounds?
It’s so easy to get adrenalized about Fall migration. Some of the species who nest in the Canadian north country show themselves in our yard by the first week in August. By mid month, it’s not too much to hope for a wide variety of transients. (NOTE: In the excitement, it’s not uncommon for me to confuse a migrating bird with a local immature bird. We saw what looked like an unfamiliar sparrow. I set up and readied the camera gear, all the while hoping I had spotted an off-course rare bird. I got a couple ID shots. It turned out to be a perfectly common immature Towhee.)
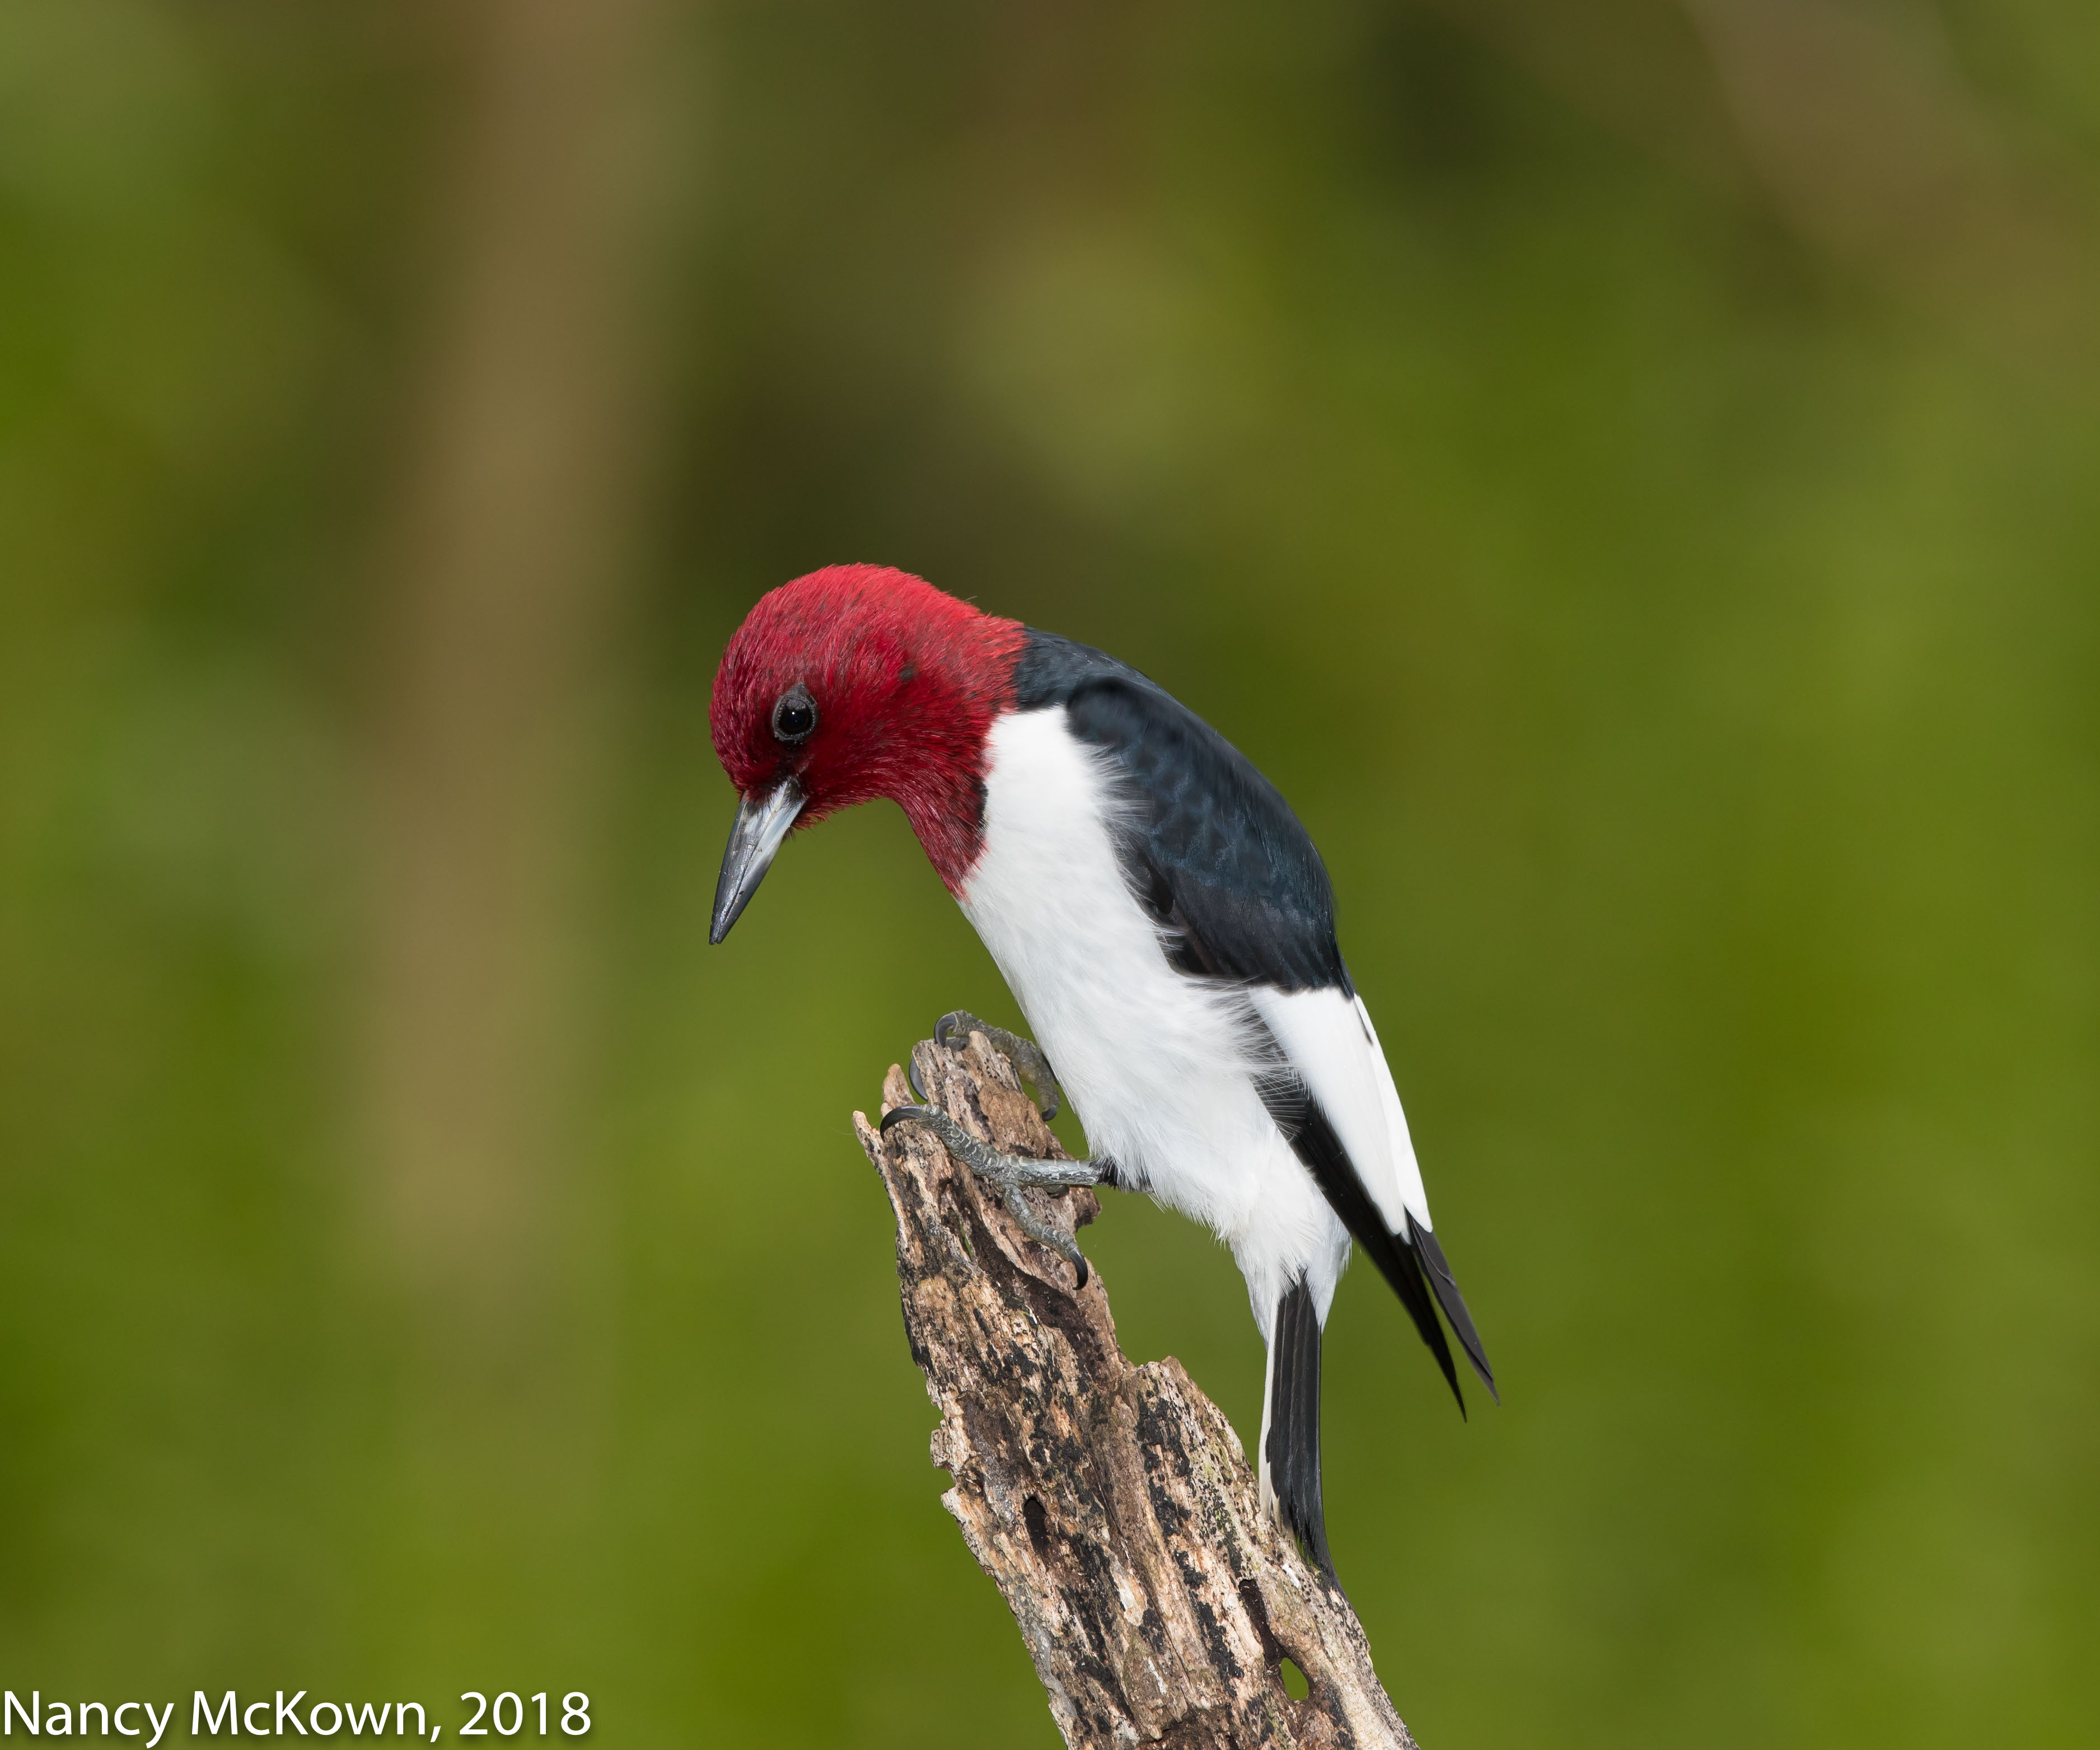
Photographing An Adult and Juvenile Red Headed Woodpecker
An Adult Red Headed Woodpecker Mid Morning Light ISO400; f/8; 1/250 Second
The Distance Factor
The distance factor is always an issue for bird photographers. Close is better, but if you want to photograph different species of birds, you should consider moving the camera a greater distance away from the subject. Earlier in the summer, I repositioned one of my favorite perches farther back, making sure that I still had a pleasing background of ostrich ferns and low lying branches. Previously, it had been much closer to the library windows and camera gear, and probably too near human activity for the more cautious birds like the Red Headed Woodpecker. This replanted perch did prove to be alluring to new birds, but the added distance also negatively impacted the effectiveness of the camera sensor and the flash extender. In addition, despite the larger Red Headed Woodpecker size, there was still too much frame around the subjects. I had to zoom-in more than usual in post processing.
Juvenile Red Headed Woodpecker. Early Evening Light ISO 400; f/8; 1/250 Second
Image Framing
My strategy appeared to work….or perhaps I was just lucky. Both a parent and a juvenile Red Headed Woodpecker took turns alighting on this relocated perch. They still acted cautiously, swooping in and out to look the suet feeder and me over. Mostly, they watched and waited high in the trees. To minimize movement, I aimed the lens to focus on the top of the perch and I had my remote controlled shutter release attached. When they did finally decide to watch me from the perch, I was ready. (NOTE: I also regularly repositioned the camera setup inside the house to take advantage of the transitioning light and the differently colored backgrounds behind the perch.)
Looking Forward to Fall Migration
These two Red Headed Woodpeckers will be heading south to their wintering grounds soon. I look forward to Fall migration. It’s not as hectic, not as rushed as in the Spring. With the biological imperative past, unobstructed delay is in the air. Both birds and birders can relax.
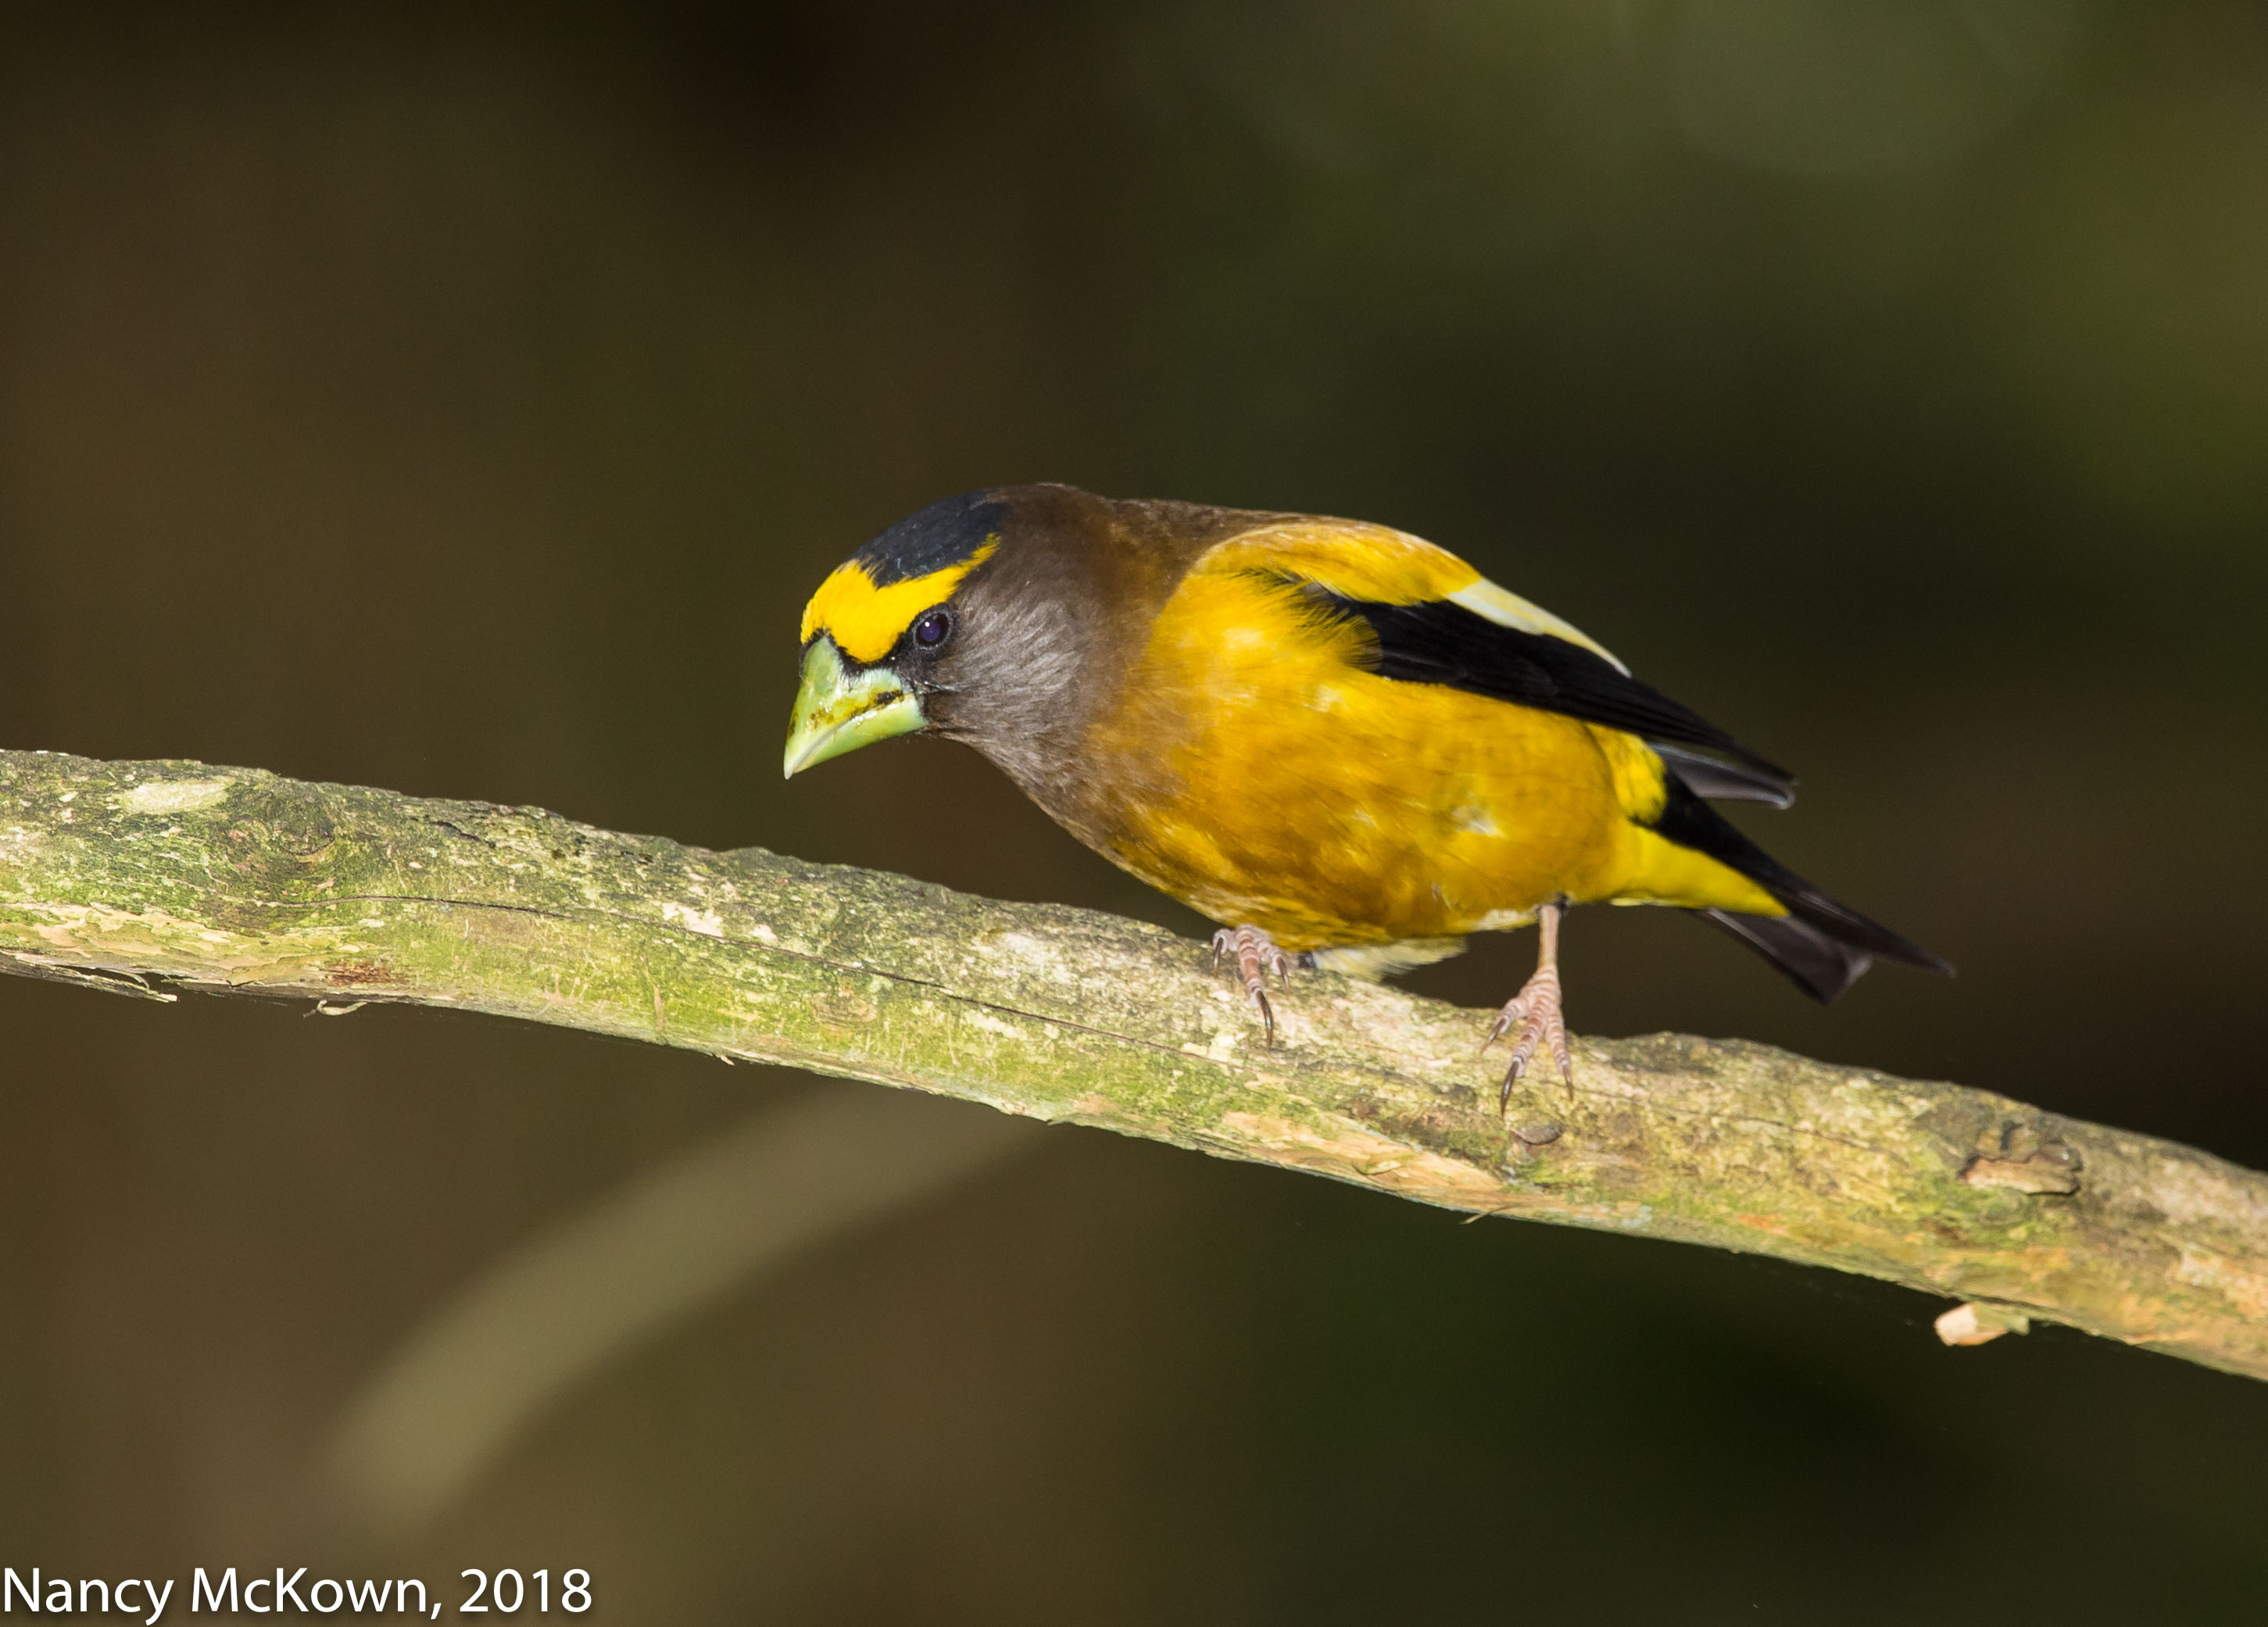
We were in the visitors’ center at Hartwick Pines State Park when this striking Evening Grosbeak with a resplendent yellow eye brow and greenish bill made an appearance at their feeders. I have never seen an Evening Grosbeak in SW Michigan, but according to the e-bird maps, this species makes bi annual visits through most of Michigan as it travels to and from its breeding grounds. (NOTE: That green pigment on his upper and lower mandibles appears in the breeding season. As the season progresses, the membranes on the beak peel away and by winter, reveal a bone-colored beak.)
Evening Grosbeak, ISO400; f/7.1; 1/200 Second with Flash
Soggy Weather
The camera was setup on the balcony of the visitors’ center. The thick cloud cover and saturating mist didn’t make for the best light conditions, so the flash gear was attached. While waiting for the Evening Grosbeaks to perch on something other than the feeders, I started wondering what I would do if the rain got heavier…and why I did not anticipate soggy weather.
Just how much rain and condensation can the camera, lens and flash gear safely endure?Canon professional equipment is suppose to be “weather sealed” and somewhat protected from mechanical and electronic damage caused by moisture and dust. That doesn’t mean that the tight rubber sealing around the various buttons, ports, joints and doors make them weather proof, especially for an extended period of time.
The rain continued unabated, so shortly after I photographed this male Evening Grosbeak, I picked up the tripod and moved inside to tear down and pack it away.
Rain Gear
I’m now in the market for a form-fitting, wind breaker type nylon jacket or camera cover that is flexible and easy to attach. (NOTE: It does not have to accommodate driving rain.) It should be designed to work with both tripods and hand holding, allow me to change long lenses and tele extenders on the fly, give me easy access to camera controls, and accommodate flash gear. Most of all it can not interfere with my picture taking habits and routines.
Too much to ask? Sounds like in order to get this kind of relief from the rain, I need a canopy– in which case, I might as well get out my blind and campy chair. I will, however check out the large or extra large Vortex Media Pro SLR Storm Jacket Camera Cover. It looks like it might fit most of my requirements for under $50.00
Resilience and Tenacity
Watching the birds interacting with their environment and visualizing possible scenarios to photograph constitute a lot of what bird photographers do. Then comes the strategizing and setting up to actualize those dreams. Rain or shine, there’s always a chance that you will be in the right place at the right time with the right equipment.. and you get the shot.
Have you ever been really good at something – a skill that you’ve worked hard at for years, and then, just because a new and different scenario presented itself, you abandon your serious study, experience, and calm, self assured practices only to misjudge your options and royally screw things up?
We drove up to Hartwick Pines State Park in Grayling, MI to the breeding grounds of the rare Kirtland’s Warbler. The MI DNR offers guided tours starting at 7:00am each morning during the first couple weeks of June. Around 30 “crazy birders” assembled at the visitors’ center for a quick information session and then we drove to one of the nesting areas approximately 20 miles away.
Kirtland’s Warbler, Note the slow shutter speed causing the image to be out of focus, Extreme closeup, ISO125; f/2.8; 1/80 Second
Kirtland’s Warbler Habitat Considerations
Like other warblers, the Kirtland’s are constantly on the move and careful to stay tucked behind the foliage, mostly near the bottom of the Jack Pine trees. (NOTE: I had imagined that I would have to point the camera way up to get shots of this bird, but the Kirtland’s Warblers are only attracted to a habitat consisting of 80+ acres of young, short Jack Pine trees (5 ft-20 ft. tall)).
#1 Kirtland’s Warbler Tour Rule: Stay on the designated path! No wandering off to follow the bird song. (NOTE: These warblers build their nests in the sandy soil under the Jack Pine trees. There’s a $10,000 fine for disturbing a nest.) Handheld cameras were allowed – no flash, no tripod. I opted to take the lighter 5D Mark IV and my fast 300mm 2.8 L lens. The morning was rainy, dark, cold and windy.
What Was I Thinking?
Before we got there, I reasoned (wrongly) that I needed to concentrate on tracking fast moving birds and, with no tripod, I would not have time to fumble with Manual (M) mode. Impusively, I set the camera to Program (P) mode. (NOTE: In this mode, the camera is basically on customizable autopilot. After quick and careful algorithmic considerations, it will automatically set the aperture and shutter—but also allow the photographer to take back some on-the-fly exposure control using “program shift”.)
Frustrating Moments
Bird song in the air brought excitement and anticipation. In hushed tones, birders around me were pointing their fingers and lifting their cameras. I became caught up in trying to follow their directions with both eyes and then (hand holding the tripod collar to keep the camera and lens steady) relocating that position with my 300mm lens.
NOTE: It is not uncommon for me to spend many frustrating moments trying to re-find a fast moving warbler that I saw with two eyes, but lost once I peered through the lens. I must direct the lens and quickly re-locate that spot while looking through the much narrower field of view of the lens, all in a highly charged instant. If the warbler is bouncing in and out of the viewfinder, and then gets lost in densely packed undergrowth, there is no choice but to lift my eye off of the viewfinder, search with two eyes until I am able to catch sight of it again and then redirect the lens. This is more easily done with a tripod and Gimbal tripod head.
The Kirtland’s Warbler finally did come out from behind the foliage…the lens locked focus and I got in 5 quick shots before he was gone. I looked at the LCD screen and was aghast at the exposure settings the camera chose. I quickly switched the camera to Manual mode (M) so I could better control the shutter speed.
Autopilot Algorithms
Apparently Canon cameras set to Program (P) mode will not necessarily incorporate (into the autopilot algorithm) the rule about how the shutter speed on a hand held camera should be set at least to the equivalent focal length of the lens. In this case, it appeared to “reason” exactly the opposite. After reviewing the paltry selection of exposure settings that might work on a dark damp day, the camera’s logic favored close to baseline ISO and consequently, sacrificed a fast shutter and tight aperture in the process.
So….Canon cameras’ complex autopilot algorithmic logic did not match my intentions or expectations about basic camera shake avoidance rules. Perhaps Canon camera designers, mathematicians and engineers just assume that they need not worry about associating auto pilot with camera shake on high-end DSLR cameras. They reason that an advanced user will no doubt take the easy way out, forego automation, and just directly choose the exposure settings that she knows will work.
Kirtland’s Warbler, Extreme closeup Out of focus due to hand holding and high winds and slow shutter speed ISO100; f/2.8; 1/80th second
Lesson Learned
Lesson learned… When a specific (fast) camera shutter speed is critical to the shot….don’t use Program (P) Mode, especially on a windy day. DUH! I did not see another Kirtland’s Warbler for the rest of the tour.
NOTE: This experience was an effort to get out of my comfort zone. I’m spoiled here in my private bird space even though we saw very few migrating warblers this Spring. I missed the convenience being able to direct the camera from the vantage of a tripod and Gimbal tripod head within the comfort of my own home.
Bottom line: As a bird photographer, I’m not going to be continually challenged and rewarded with anticipatory delight unless I get myself and my gear out there. So I will go and try to let experience be my guide.
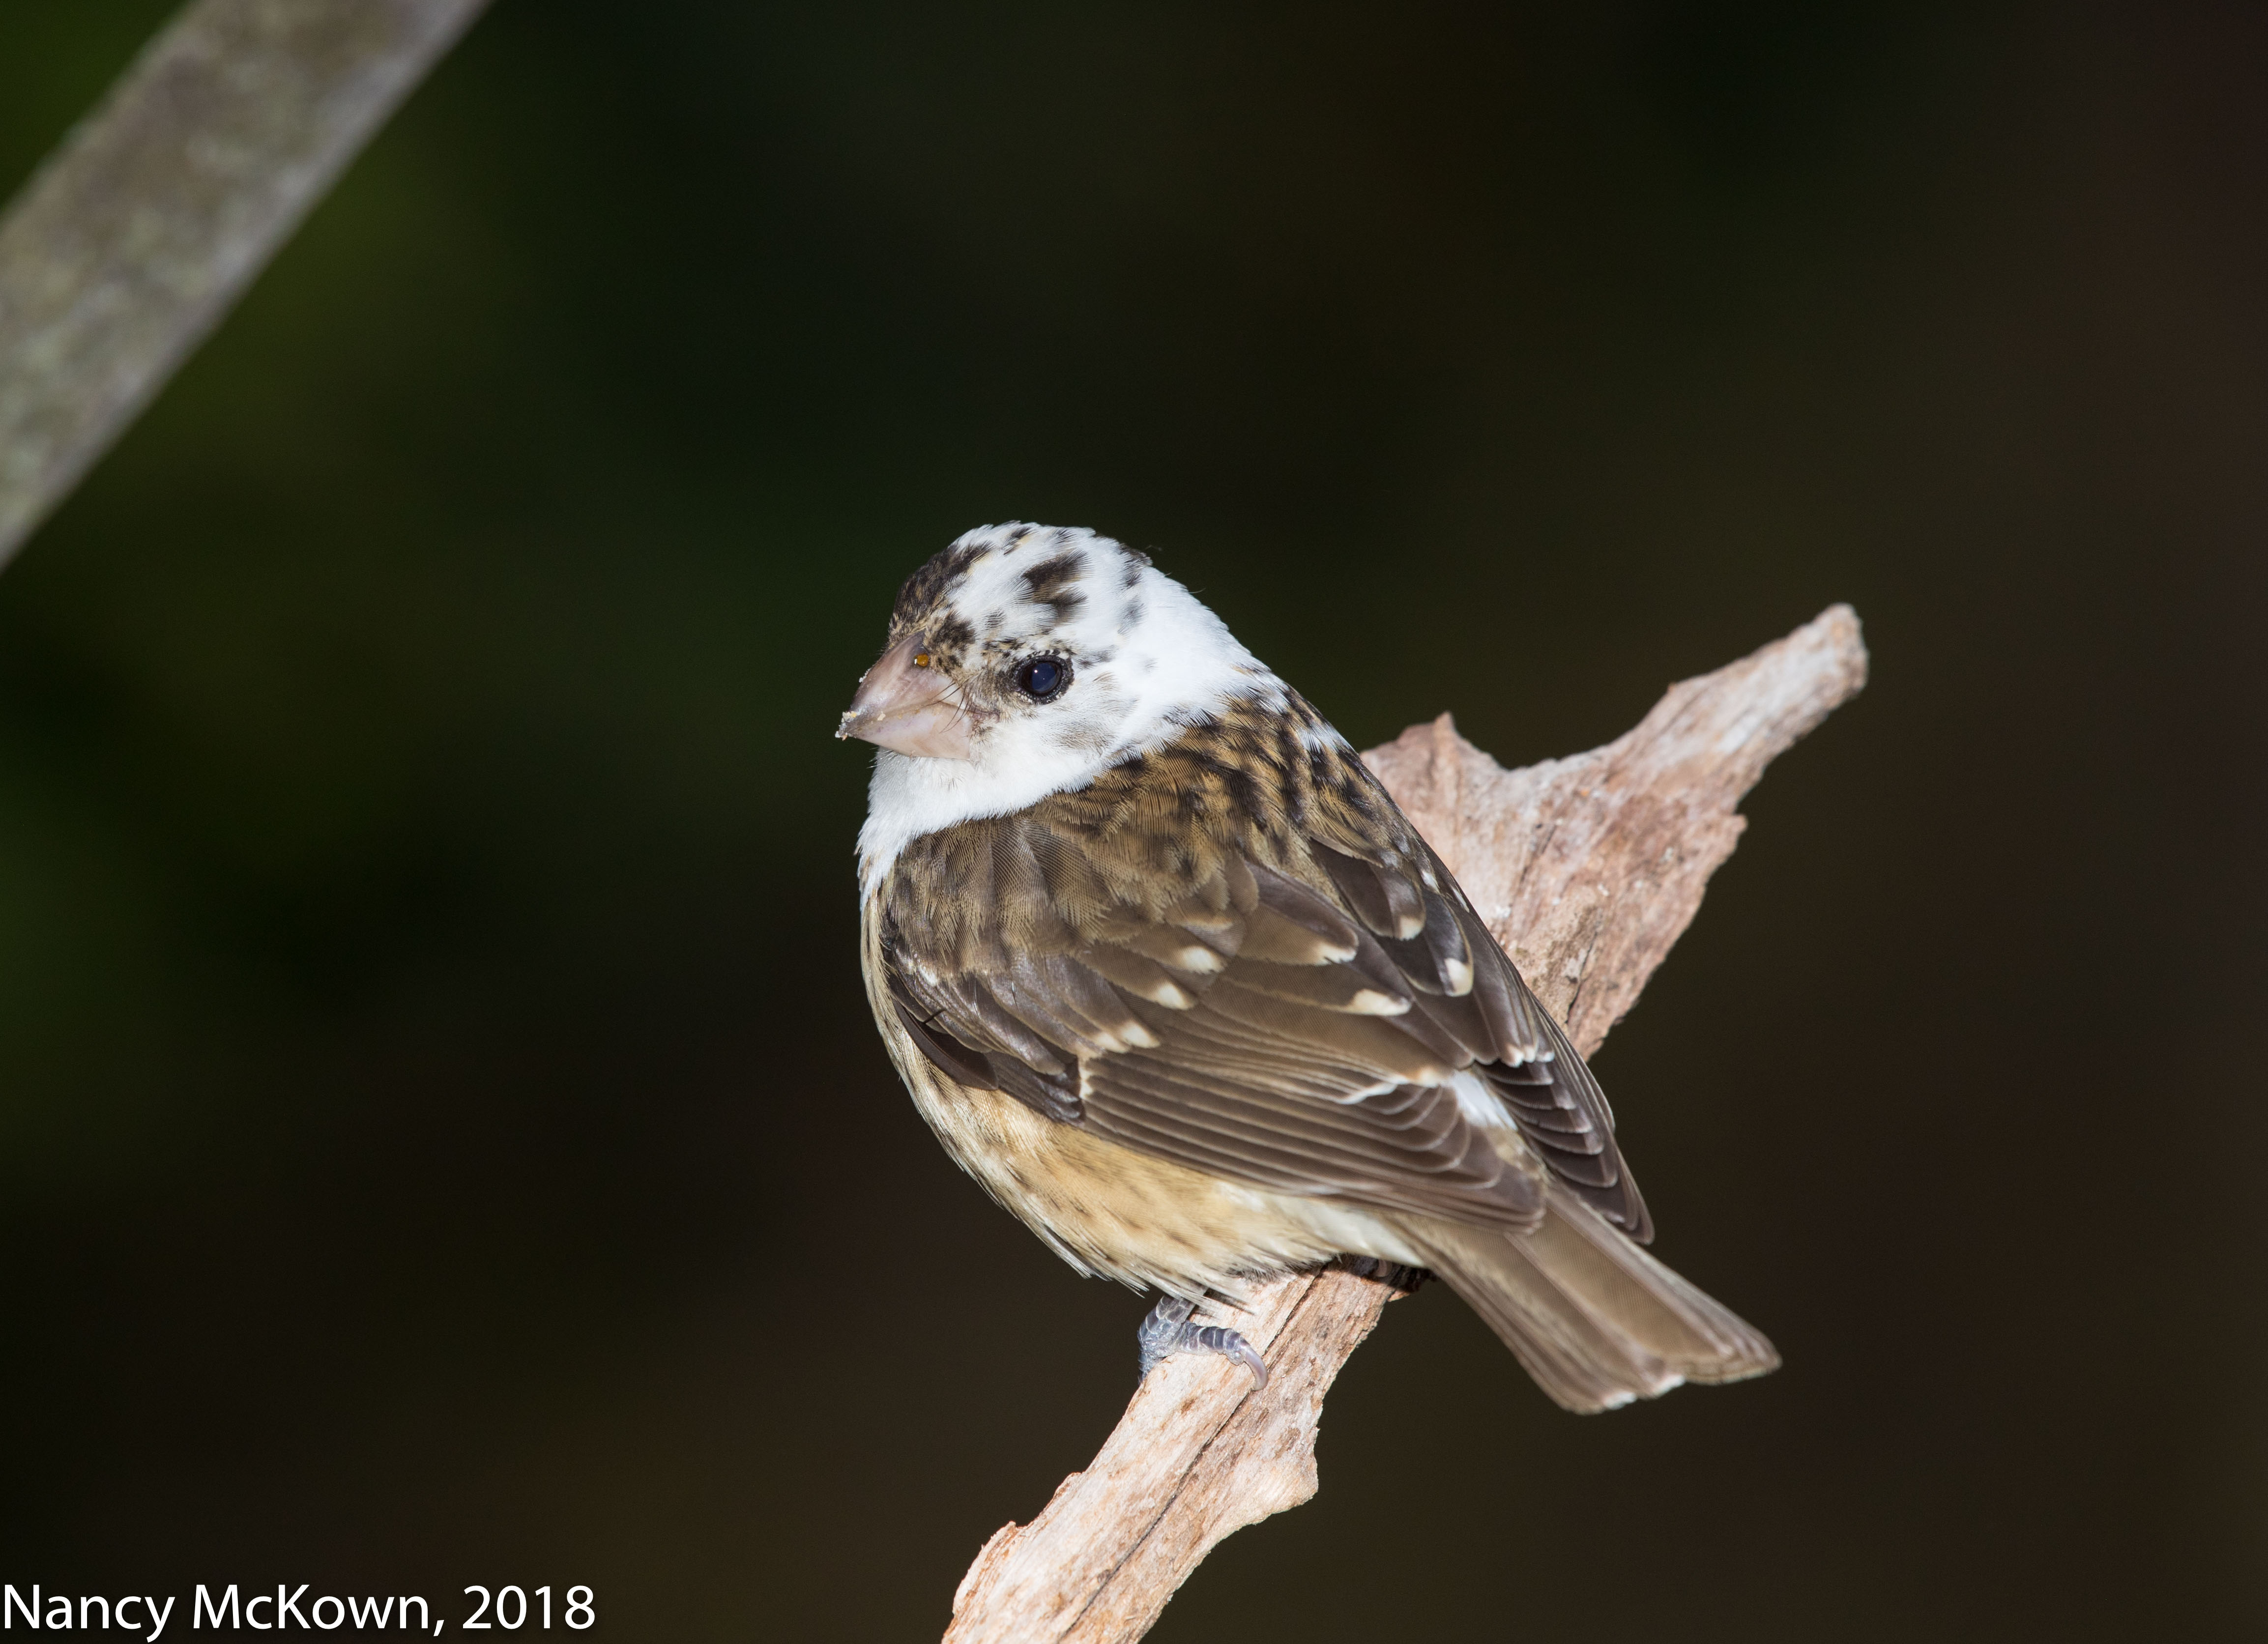
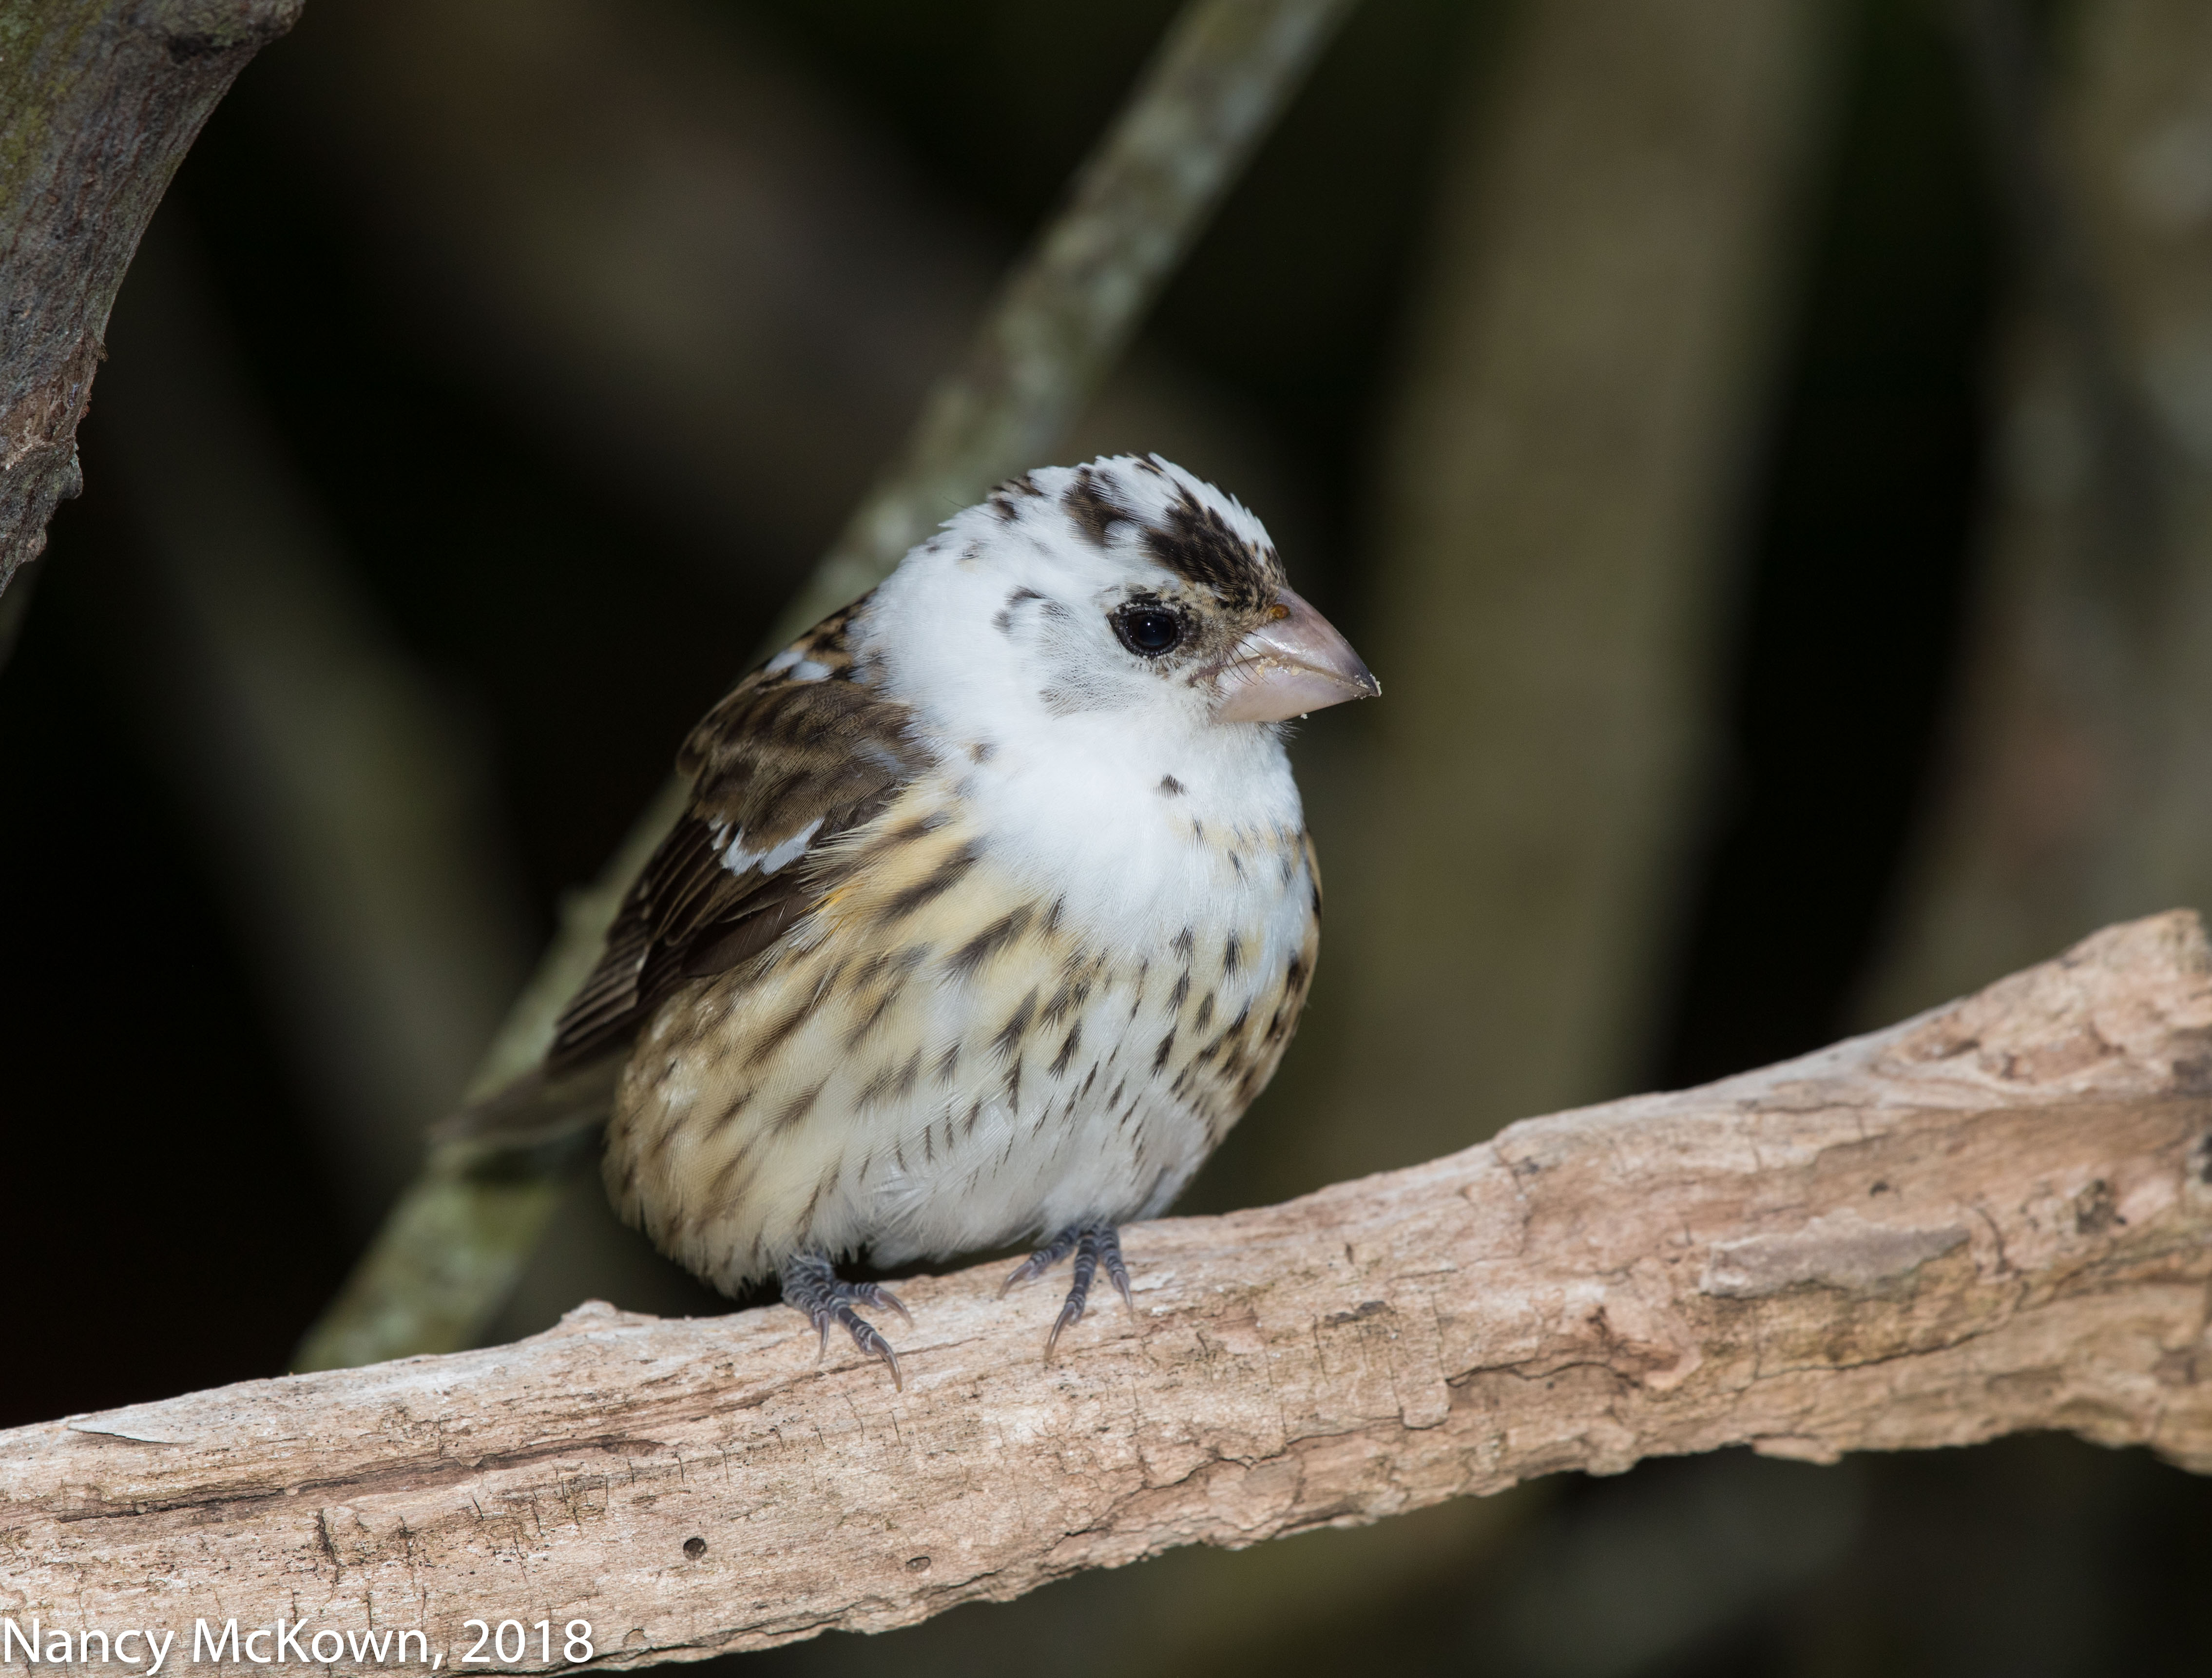
This partial Leucitic female Rose Breasted Grosbeak arrived at the feeders with 6-7 other Grosbeaks, but did not stay. I was taken back by those white plumage patches on her head and breast in an otherwise healthy-looking bird. Everything else appeared as it should…. the color pigment in her eyes and legs look the same as other females of her species, her breast had the typical orangy – yellow plumage and her wings and tail feathers were dark. The unusual coloration on her feathers, where some of the color pigment is simply not there, is called “partial leucism”.
Rose Breasted Grosbeak, Partial Leucistic female ISO400; f/8; 1/250 Second
Albinism is the systemic lack of pigment in the body. An albino bird lacks pigment melanin in all cells, and consequently would display all white feathers, pink legs and pink eyes. In a Leucitic bird, some of the plumage cells are damaged and consequently cannot make the pigment necessary for feather coloration. These individuals generally have the species appropriate color in their eyes and legs and much of the plumage.
It’s All About Light
Just got back from a wedding celebration last weekend, and, as usual, I spent most of my time watching the photographer. Lighting challenges abounded. The ceremony took place on the stage in the main auditorium of a turn-of-the-century Masonic Temple that showcased vaulted ceilings and tall narrow windows. The illumination in this space was mixture of natural, fluorescent, incandescent and spot lights. The photographer and one assistant added no other light…..anywhere in the room. No doubt the color temperature imbalances would throw off the camera’s ability to correctly assess white balance. (My camera’s ISO read ISO4000 – with the aperture wide open at 2.8 and shutter set for hand holding – 1/60th second).
The reception area was in the basement, ceilings around 12 ft high, fluorescent lights, no windows, and 12-15 bright purple uplighting units placed on the floor around the perimeter of the room to illuminate the walls and columns. This lighting concoction was topped off with a spinning disco ball. In this space, the photographer used one on-camera flash…. and bounced that light by pointing it straight up to the tall ceiling. The assistant had been sent home.
My main rule when observing other photographers is to stay the hell out of their way. I have to admit though that it’s hard not to make judgements and, given the lighting challenges and photographer’s choices, be predictive about how those images are going to turn out.
Rose Breasted Grosbeak, Partial Leucitic, ISO400; f/8; 1/250 second
Your skill level comes down to how quickly you deal with many light variables. I start with a couple go-to practices and settings that have worked in the past. #1) The flash gear (flash, extender, battery pack, bracket, and all related sync cables) is attached to my cameras at all times, though not necessarily on. #2) The flash is set to ETTL II… so it can automatically calculate how much extra light is needed. #3) DOF on long fixed telephoto lenses set to a tight aperture…. at least f/8 on my 500mm. ( NOTE: As the ambient light transitions, I rarely stay with these parameters. Also, I use the down time to take and review test shots.)
Perfect, complementary light is a rare luxury when photographing birds in MI. Photographers have to be able to make choices quickly in order to expose what’s hiding in the darkness or just uncover the underlying shadows. Figuring out the precise tweaking to make your images look good takes time and practice. You do have the instant feedback on your camera’s back LCD screen, but that takes your eye off the viewfinder and robs you of opportunities when photographing active and unpredictable birds.
The same is no doubt true for wedding celebrations.
It’s been a long gray winter and I feel long overdue for a revival. Migrating birds are close, I think, lots of birdsong in the air, but they are staying hidden. (A few bird photographers I know believe getting skunked is a good thing….and that you should embrace the time to re-evaluate what’s working. Feelings of entitlement and overconfidence accomplish nothing good.)
I set out to walk on Lakeshore Drive almost every morning, hoping to spot a few early Spring migrators. Lake Michigan seems restless this time of year… always pulsing, in turmoil, and galvanized by southerly winds. So far, Robins, Song Sparrows, Towhees, Northern Flickers, Pine Siskins, Hermit Thrushes, Red Winged Blackbirds, Brown Thrashers, House Wrens, Red Headed Woodpeckers, Cowbirds, and Brown Creepers have appeared.
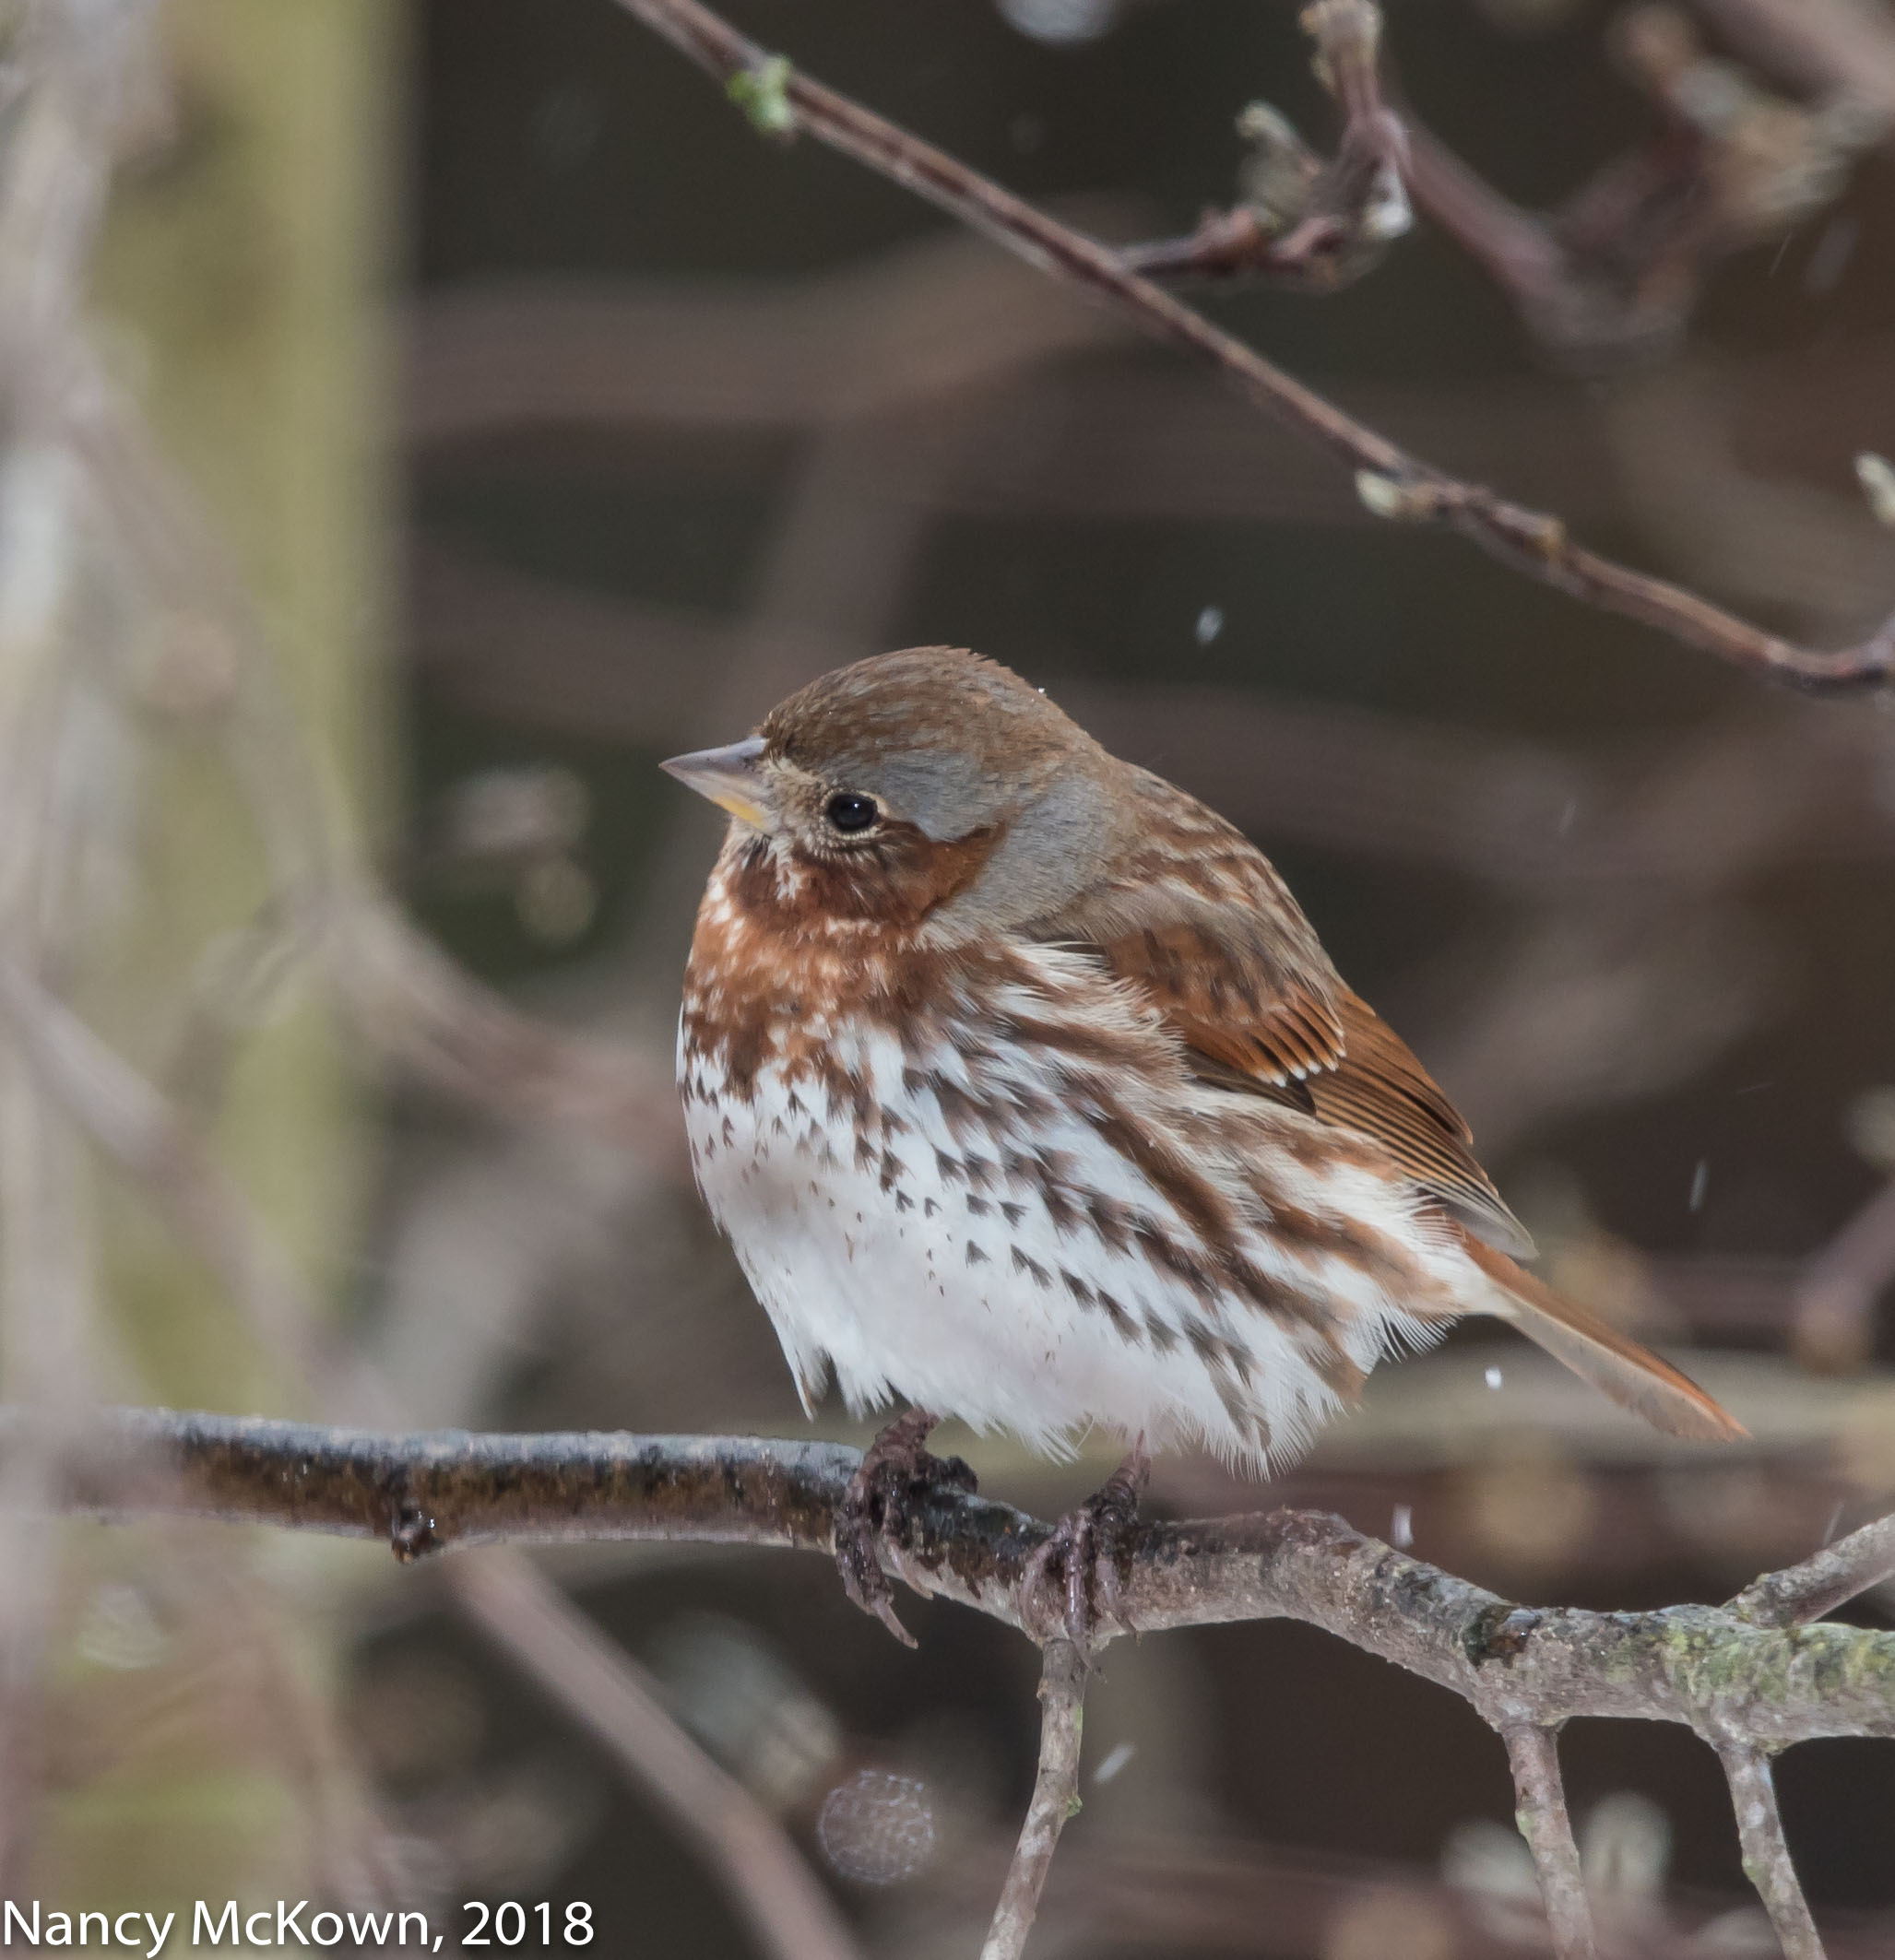
Fox Sparrow ISO400; f/9; 1/250 Second- with Flash
A New Sparrow
The Fox Sparrow is a new migrating bird for me. A quick web search indicates that there are four distinctively different subspecies of this sparrow, with plumage ranging from gray brown to chestnut red. (Red Fox, Sooty Fox, Slate Colored Fox, Thick Billed Fox). This chunky Red Fox Sparrow spent most of his time foraging on the ground near the feeders. After taking a dozen or so shots with the lens pointing down, I patiently waited until he flew up to one of the understory tree branches. This proved to be a much more attractive angle at which to photograph him. I discarded all of the ground photos.
Bird ID
Observing seasonal luster, behavioral and habitat clues can all lead to an accurate ID of a new bird. That said, I am always surprised at the capacity for variation (individual, age, seasonal and geographical) within a species. The more I look, the more it becomes obvious that no two individuals are identical. Of course there is a “normal” range of variation within a species, but there is also a point where the extent of those differences make me wonder if I am looking at a totally different bird species.
When it comes to bird ID, you can’t allow your perceptions to match your hopes. Bird images from a good camera give me the time I need to examine details – to study characteristics of plumage, size, age, sex and shape. I can also gauge how the light, (whether it be ambient and/or flash) impacted the the image. (NOTE: Fill flash helped to make these images pop, adding detail and clarity so the main subject could stand out from its rather cluttered background.
Fox Sparrow ISO400; f/9; 1/250 Second- with Flash
Hoping for Spring Warblers
As always, this Spring I’m hoping to see and photograph lots of warblers. Perhaps even a windfall of extreme vagrants blown way off course due to wind, weather, inexperience or some other aeronautical misstep. (Not likely for these masters of way-finding.) It’s not too early to plan and prepare. A visit to Magee Marsh is on the calendar as well as a guided Kirtland Warbler tour in Grayling. Mostly I’ll wait (and hope) for them to come down from their migratory flyways in my own back yard.
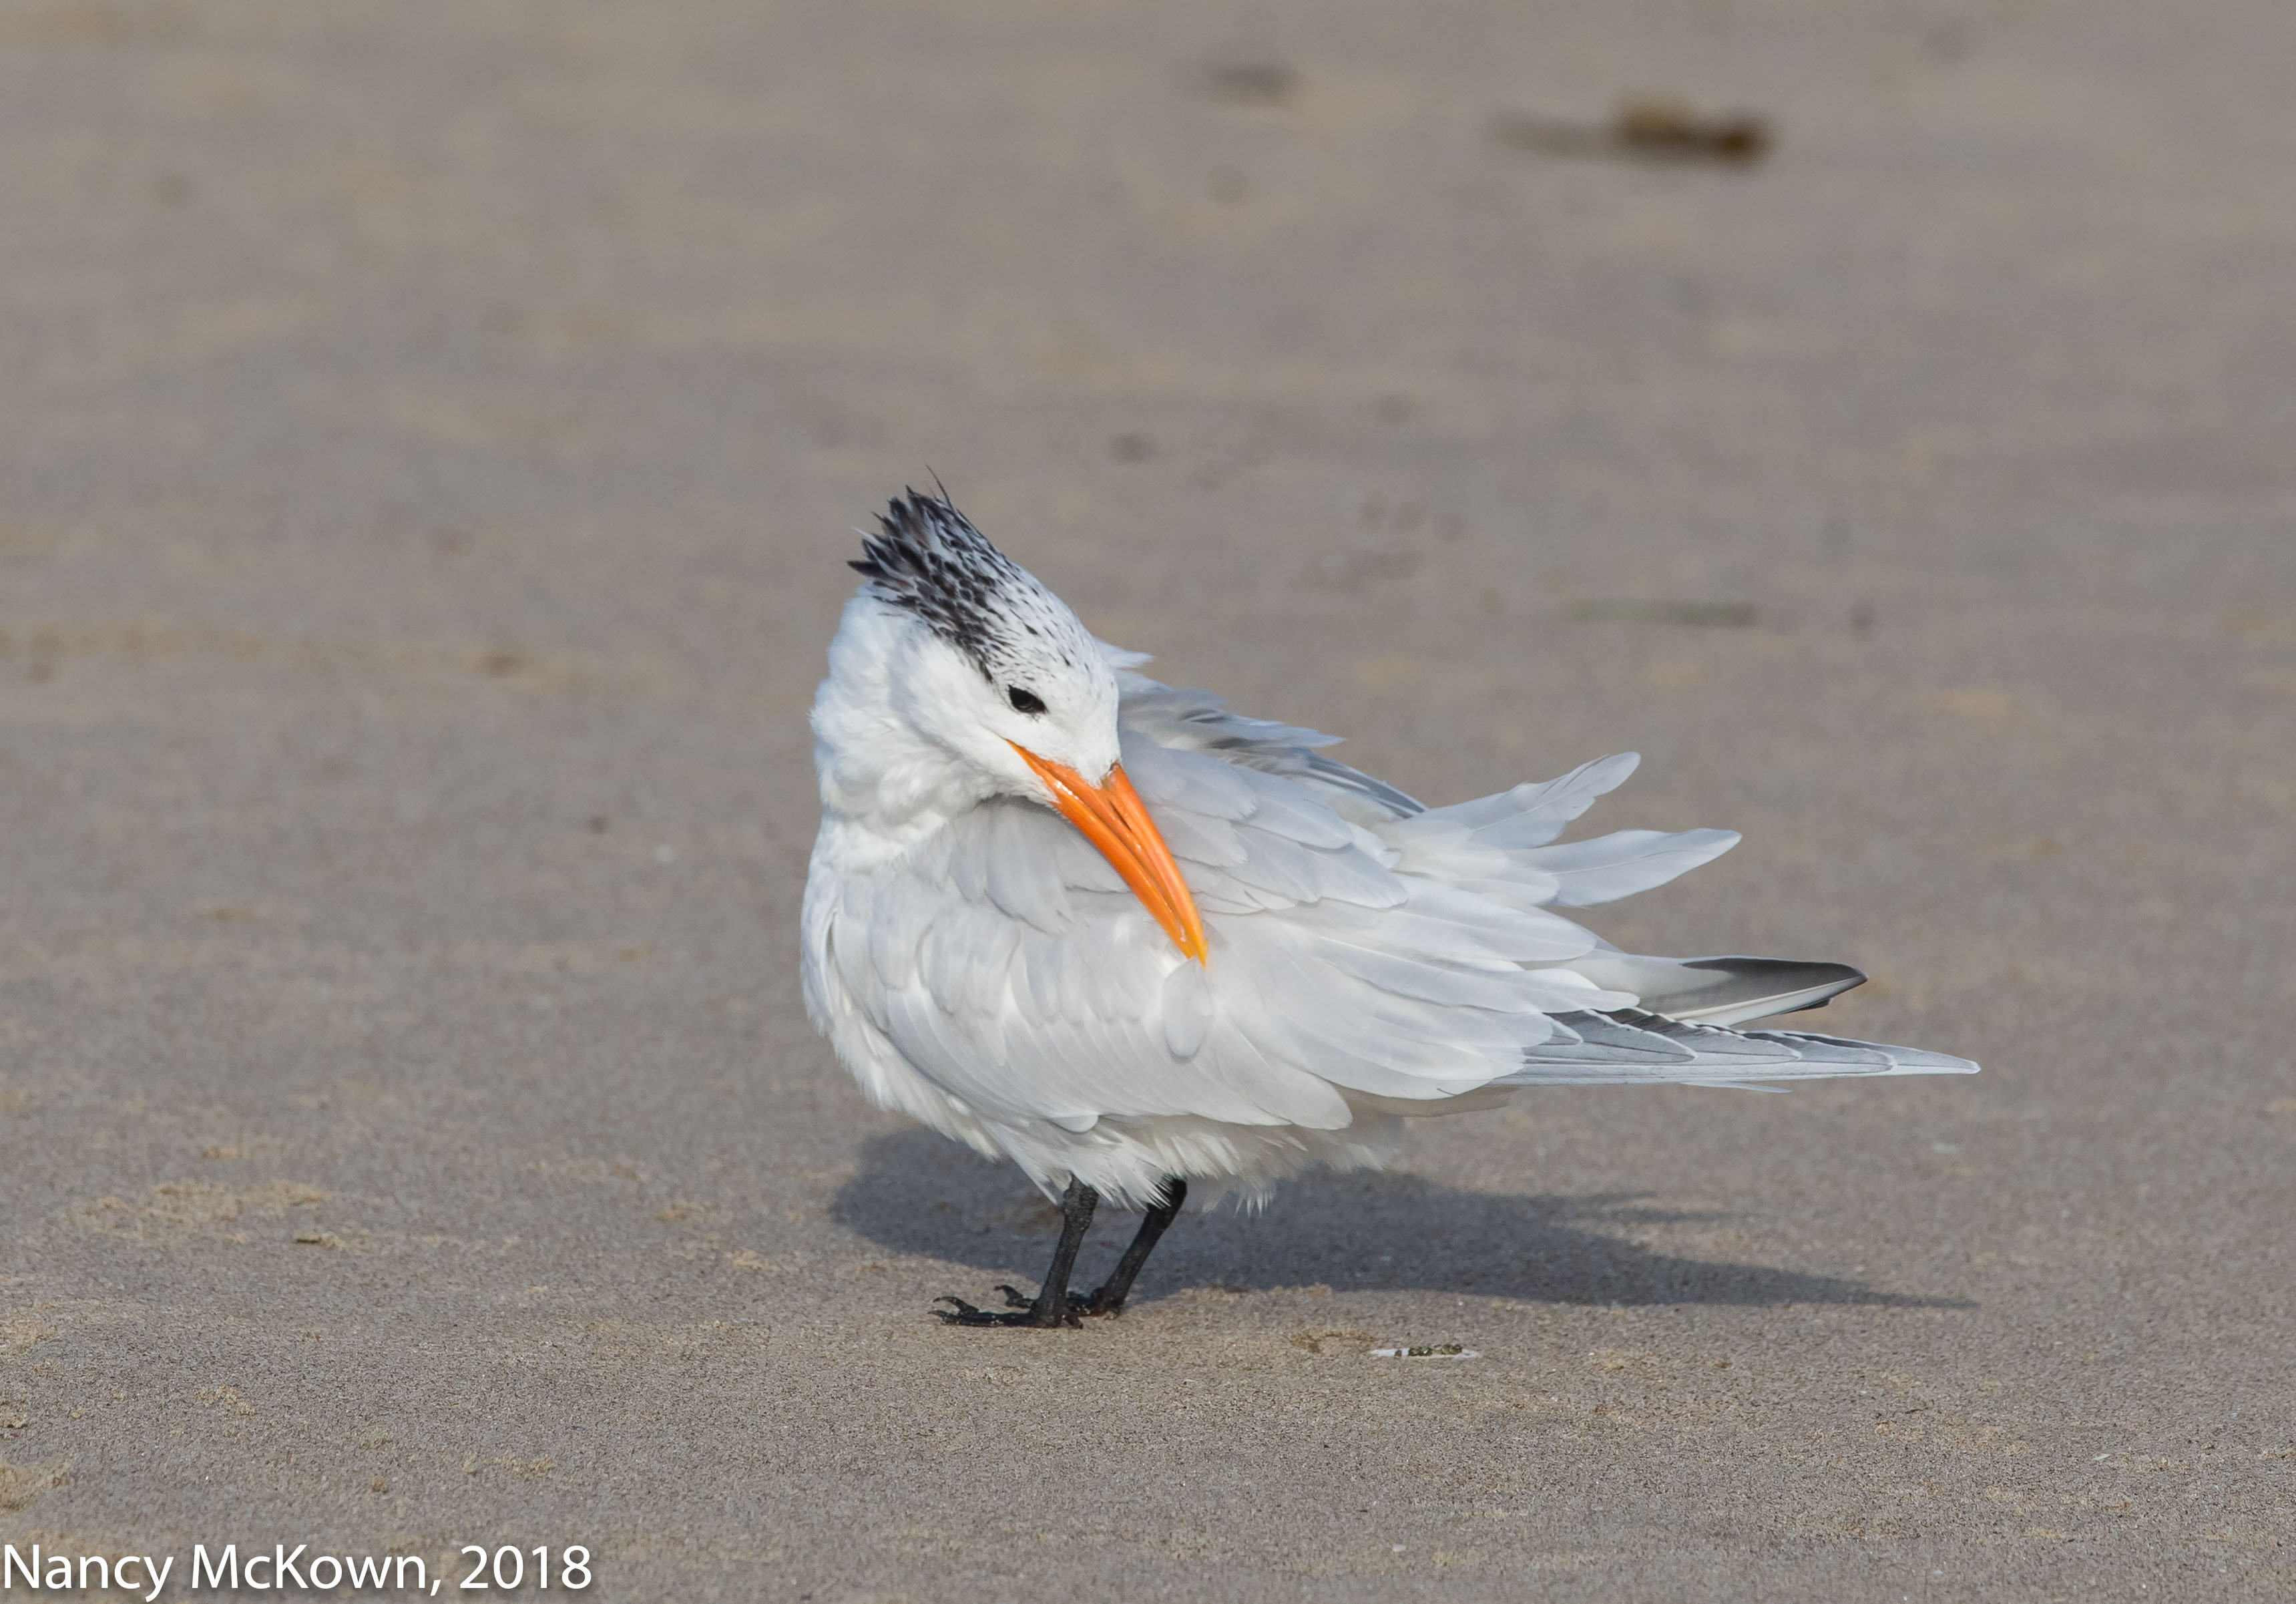
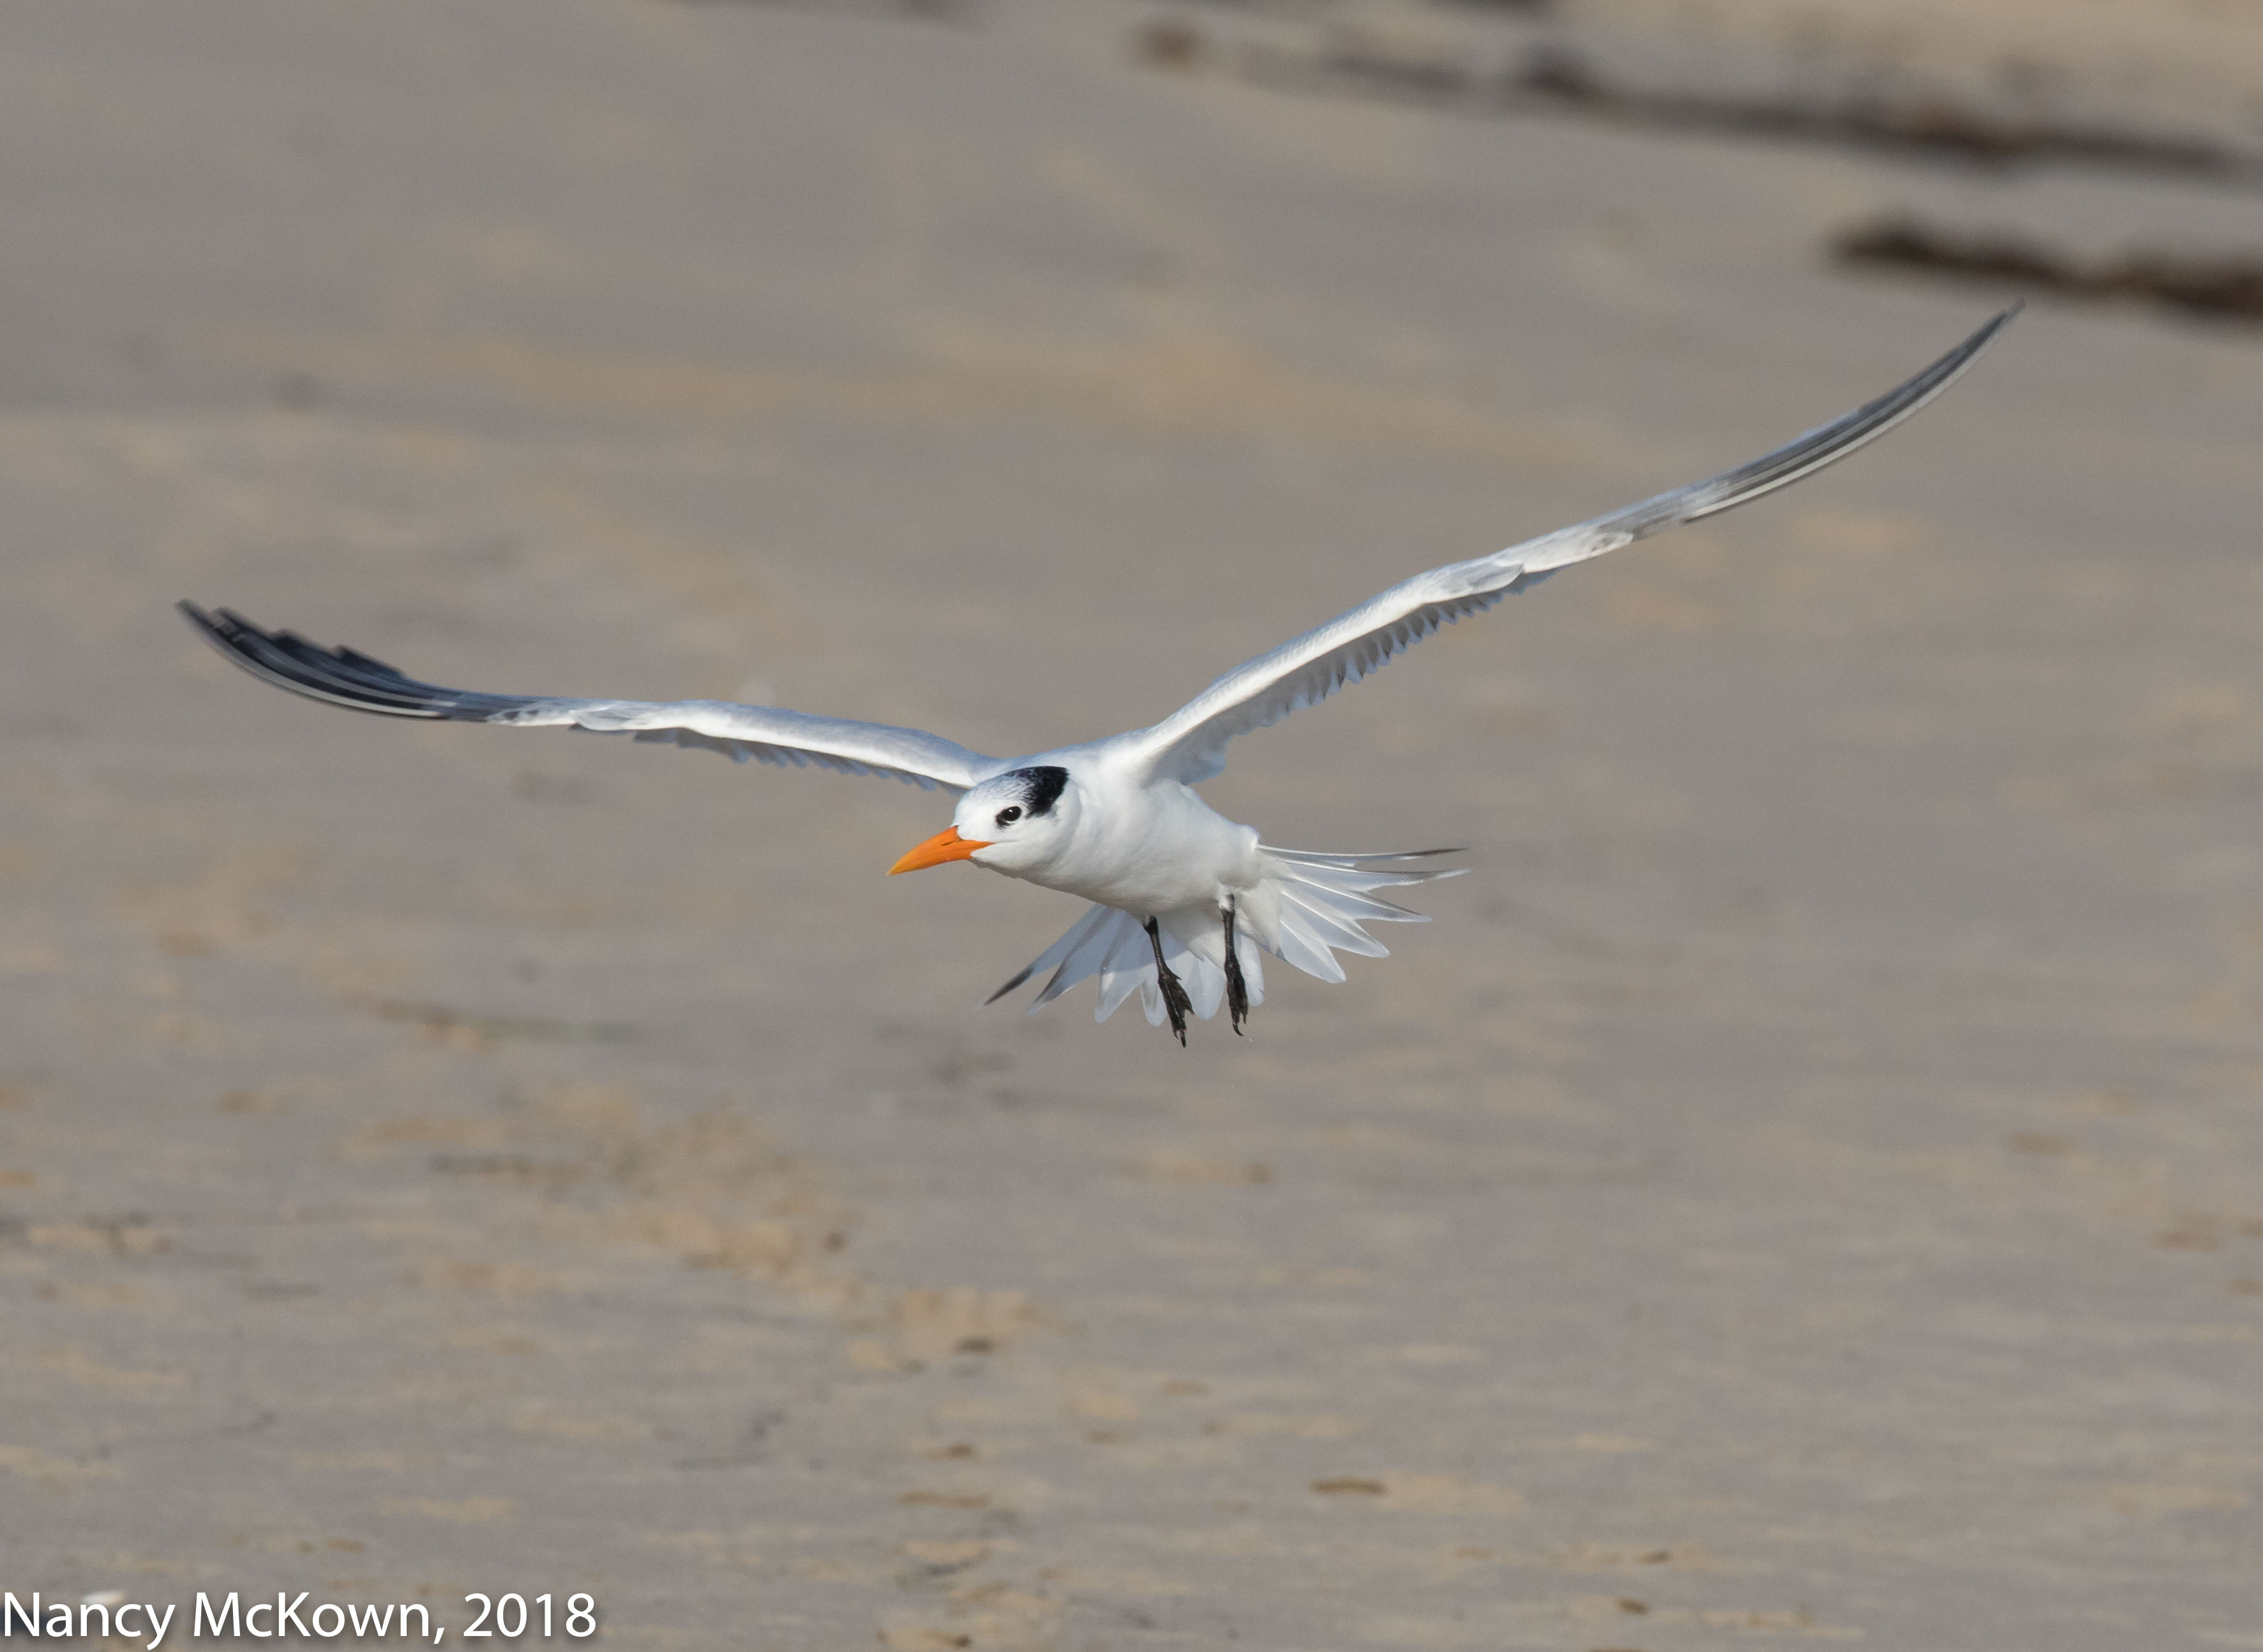
These photos were taken on a beach in sunny California. A group of Royal Terns was hobnobbing with multiple species of gulls and sandpipers, flocking in tightly packed crowds and moving in speedy synchrony.
For this shoot, my Canon 5D Mark IV was outfitted with a 300mm f/2.8 L lens and 1.4 tele extender. The morning sun and reflective sand were bright enough to allow a wide range of exposure settings. I played around with a deep aperture and relatively fast shutter for take off and landing shots. It was not difficult to keep the ISO at 800 or below. (NOTE: I sold my Canon 7D Mark II to purchase this relatively new Canon 5D Mark IV.)
Royal Tern, Preening Lots of Sunny, Beach Light. ISO500; f/9; 1/1250 Second
DSLR Sensor Quality
The image quality bird photographers hope for is in no small part related to the underlying building blocks (engineering and parts) that make up a modern dSLR camera. Before I made this purchase, I spent a lot of time reading and thinking about the complex techno details of dSLR camera functionality–those things that ultimately determine its cost and caliber. This was not an easy task because the camera industry confronts buyers with a myriad of interconnected tradeoffs and hype …not to mention the fanboys.
My goal was to better understand what is important to me as a photographer and what I want to achieve. The one thing that I kept coming back to was sensor quality as it relates to light sensitivity.
Royal Tern ISO800; f/13; 1/1000 Second
Pixel Count Matters
A digital image is made up of small squares of pixels (1 megapixel = one million pixels). The surface area of the full size sensor of my new Canon 5D Mark IV contains 30.1 million tiny light gathering squares per inch. By contrast, the sensor surface area of my 1 DX Mark II (Canon’s current flagship dSLR camera) contains 20.2 million tiny light gathering squares per inch on a full sized sensor. My new camera’s sensor has 49% higher pixel density and consequently, is much more tightly squeezed with pixels than the 1DX Mark II.
In an effort to better understand how and why pixel count matters, I began to explore how engineers incorporate LOW LIGHT sensitivity onto a sensor; i.e., the physics involved in photon counting. When thinking about sensor quality, 4 things matter:
–The generation or stage of development
The technology keeps changing….and getting better. Newer sensors tend to outperform their predecessors, and simply do not compare with older models. The average span of time for sensor generation = 2 years.
–Sensor size–the surface area (for pixels) of the sensor
Canon full size sensors are typically 2.57 times bigger than their cropped sensors. NOTE: Bigger is not necessarily better….depending on the generation. Also, a sensor may be identical in size but very different in other specifications.
–Pixel Pitch
The pixel “pitch” measures how closely situated the pixels are to each other….ie, the distance from the center of one pixel to the center of the next. If the pixel pitch on a sensor is larger, that means the pixels are larger and further apart from each other. Because they are not quite so tightly packed, each individual pixel can gather (absorb) more light (photons) and minimize unwanted data noise.
–Pixel density
Pixel density refers to how many millions of pixels are crammed into a one sq centimeter surface area of the sensor. (One megapixel = one million pixels) On a full sized sensor, high pixel density means smaller pixels; low pixel density means larger pixels.
NOTE: Squeezing more pixels onto a sensor is not necessarily a good thing with regard to light gathering. However, there are financial benefits for the manufacturers to cram many pixels onto a sensor–and mislead buyers into thinking that automatically equates to better image quality.
Bottom Line
I like my 5D Mark IV, but I LOVE my 1DX Mark II. Pixel count can help explain why.
The full sized sensor on the 1 DX Mark II contains a lot fewer pixels, however each pixel is 49% bigger. That makes a difference in low light situations… where you have to push the ISO up to get proper exposure. (NOTE: Better Image quality is even more noticeable in good light; when I’m able to shoot at lower ISO values (ISO 100-800).
The 30.1 MB 5D Mark IV dSLR camera delivers excellent image quality, especially when strong light is available. When there is sufficient light to keep the ISO low, the higher megapixel count can bring out more detail. The higher resolution would allow more zooming and cropping in post processing without denigrating the image too much. (NOTE: This assumes that you have a monitor capable of displaying these details and a large amount of storage and processing power to process the extra data.)
Caveats
It’s probably best NOT to look at sensor technology in isolation.
The direction of my research was influenced by how much equipment I am willing to lug around.
Sensors can’t do it all. Once the signal is read at the sensor level, the downstream electronics can be a limiting factor to image quality.
It is important to note that my observations about image quality will likely not knock-the-socks-off the typical fan of bird photography. In fact, I have learned NOT to expect people who are not photographers to notice or care.
We’re expecting warmer weather here in SW Michigan this week. Just an ambush, I’m sure, but it gets me thinking about my upcoming Spring migration bird photography adventures. The warm weather will be a nice respite, even though we know the brutal cold will be back. The migrating birds won’t be fooled.
Photographing An Eastern Phoebe
This little flycatcher is an Eastern Phoebe with a darkish bill and no wing bars. He sat on his zig-zaggy branch for quite a long while and varied his pose not at all. The camera and 500mm lens were tilted down toward his near ground level perch. The cluttered, deep woods backdrop was less than 3 feet away. The ambient light was sufficient to illuminate the perch and the wooded background equally. (NOTE: I used the camera’s DOF button to see if the background would appear darker compared to the subject.). To get more feather detail, I attached the flash with extender and played with flash intensity (FEC) to add some fill light on the subject. Given the close proximity of the subject with his background, I was quite surprised that, at F/8 aperture, the lens delivered such a pleasing bokeh.
Eastern Phoebe Rare Appearance Near the Feeders ISO800; f/8; 1/250 Second
Lenses are Not Eye Glasses
When I attach a tele-extender or swap lenses on my dSLR cameras, I often stand under a bright light to check out how much dust and lint have accumulated on the glass and contacts. There’s usually a lot.
I’ve seen photographers clean their lenses like they would their spectacles….breathe a mist and wipe it against their pant leg, or use their fingernails, or spray a couple pumps of windex directly onto the glass. They are asking for trouble.
Proper Lens Maintenance
It is perfectly normal for dust to attach to a lens and most dust does not impact the images. Once it is removed, more dust will reattach in short order. Professional lenses are designed (from the seals to the protective coatings) to stand up to all sorts of abuse, including dog slobber, ocean spray, chlorinated water mist, fine beach sand and wind debris.
The only tools I ever use on my lenses are a small blower (no brush attached) and a lens pen. I don’t use a cloth because it tends to just smear. (NOTE: Clear protective multi-coated glass filters that protect lenses from scratches, dust, moisture and fingerprints are not made for the front elements of large, telephoto lenses.)
The best way I’ve found to assess the extent of dust and debris on my lenses is to look for them on my images. I use Lightroom’s spot removal function, click on the visualize box and see if there are any suspicious spots. If spots are there, you can easily fix the images, but you most likely do not have the tools and knowledge to disassemble and clean the lens…. plus you risk voiding the warranty. It’s best to send it in to a certified lens maintenance shop and let them take care of it.
During one of my early morning walk/stair climbing regimens, I saw and heard a little bird I could not ID. I hurried home to pack up the camera rig and transport it down the dune stairs. It took only a minute to set it up on one of the lower decks near the water.
This was an impromptu effort where stealth was sacrificed for speed. It was probably too much to hope that when I returned with my gear, the mystery bird would still be there. Down there on the dune, I was alone. Not even the common birds made an appearance, . So as not to completely waste the time, I played with the camera’s light meter settings, focusing on dead sumac leaves and experimenting with the graduated neutral density filter to counter the overflow of harsh background light coming off the sky and Lake Michigan.
Still no birds. I imagined what I would do if a bird suddenly appeared and I had to capture well balanced images at midday with the lens facing the water. A dry practice run, if you will… setting up possible failure scenarios and intentionally mitigating the impact of harsh mid day light and fast moving birds. In my mind, I created a high tech, interactive bird action fantasy that ended with a detailed mental image of a highly desirable photo shoot outcome. A valuable work out…..the time just flew by.
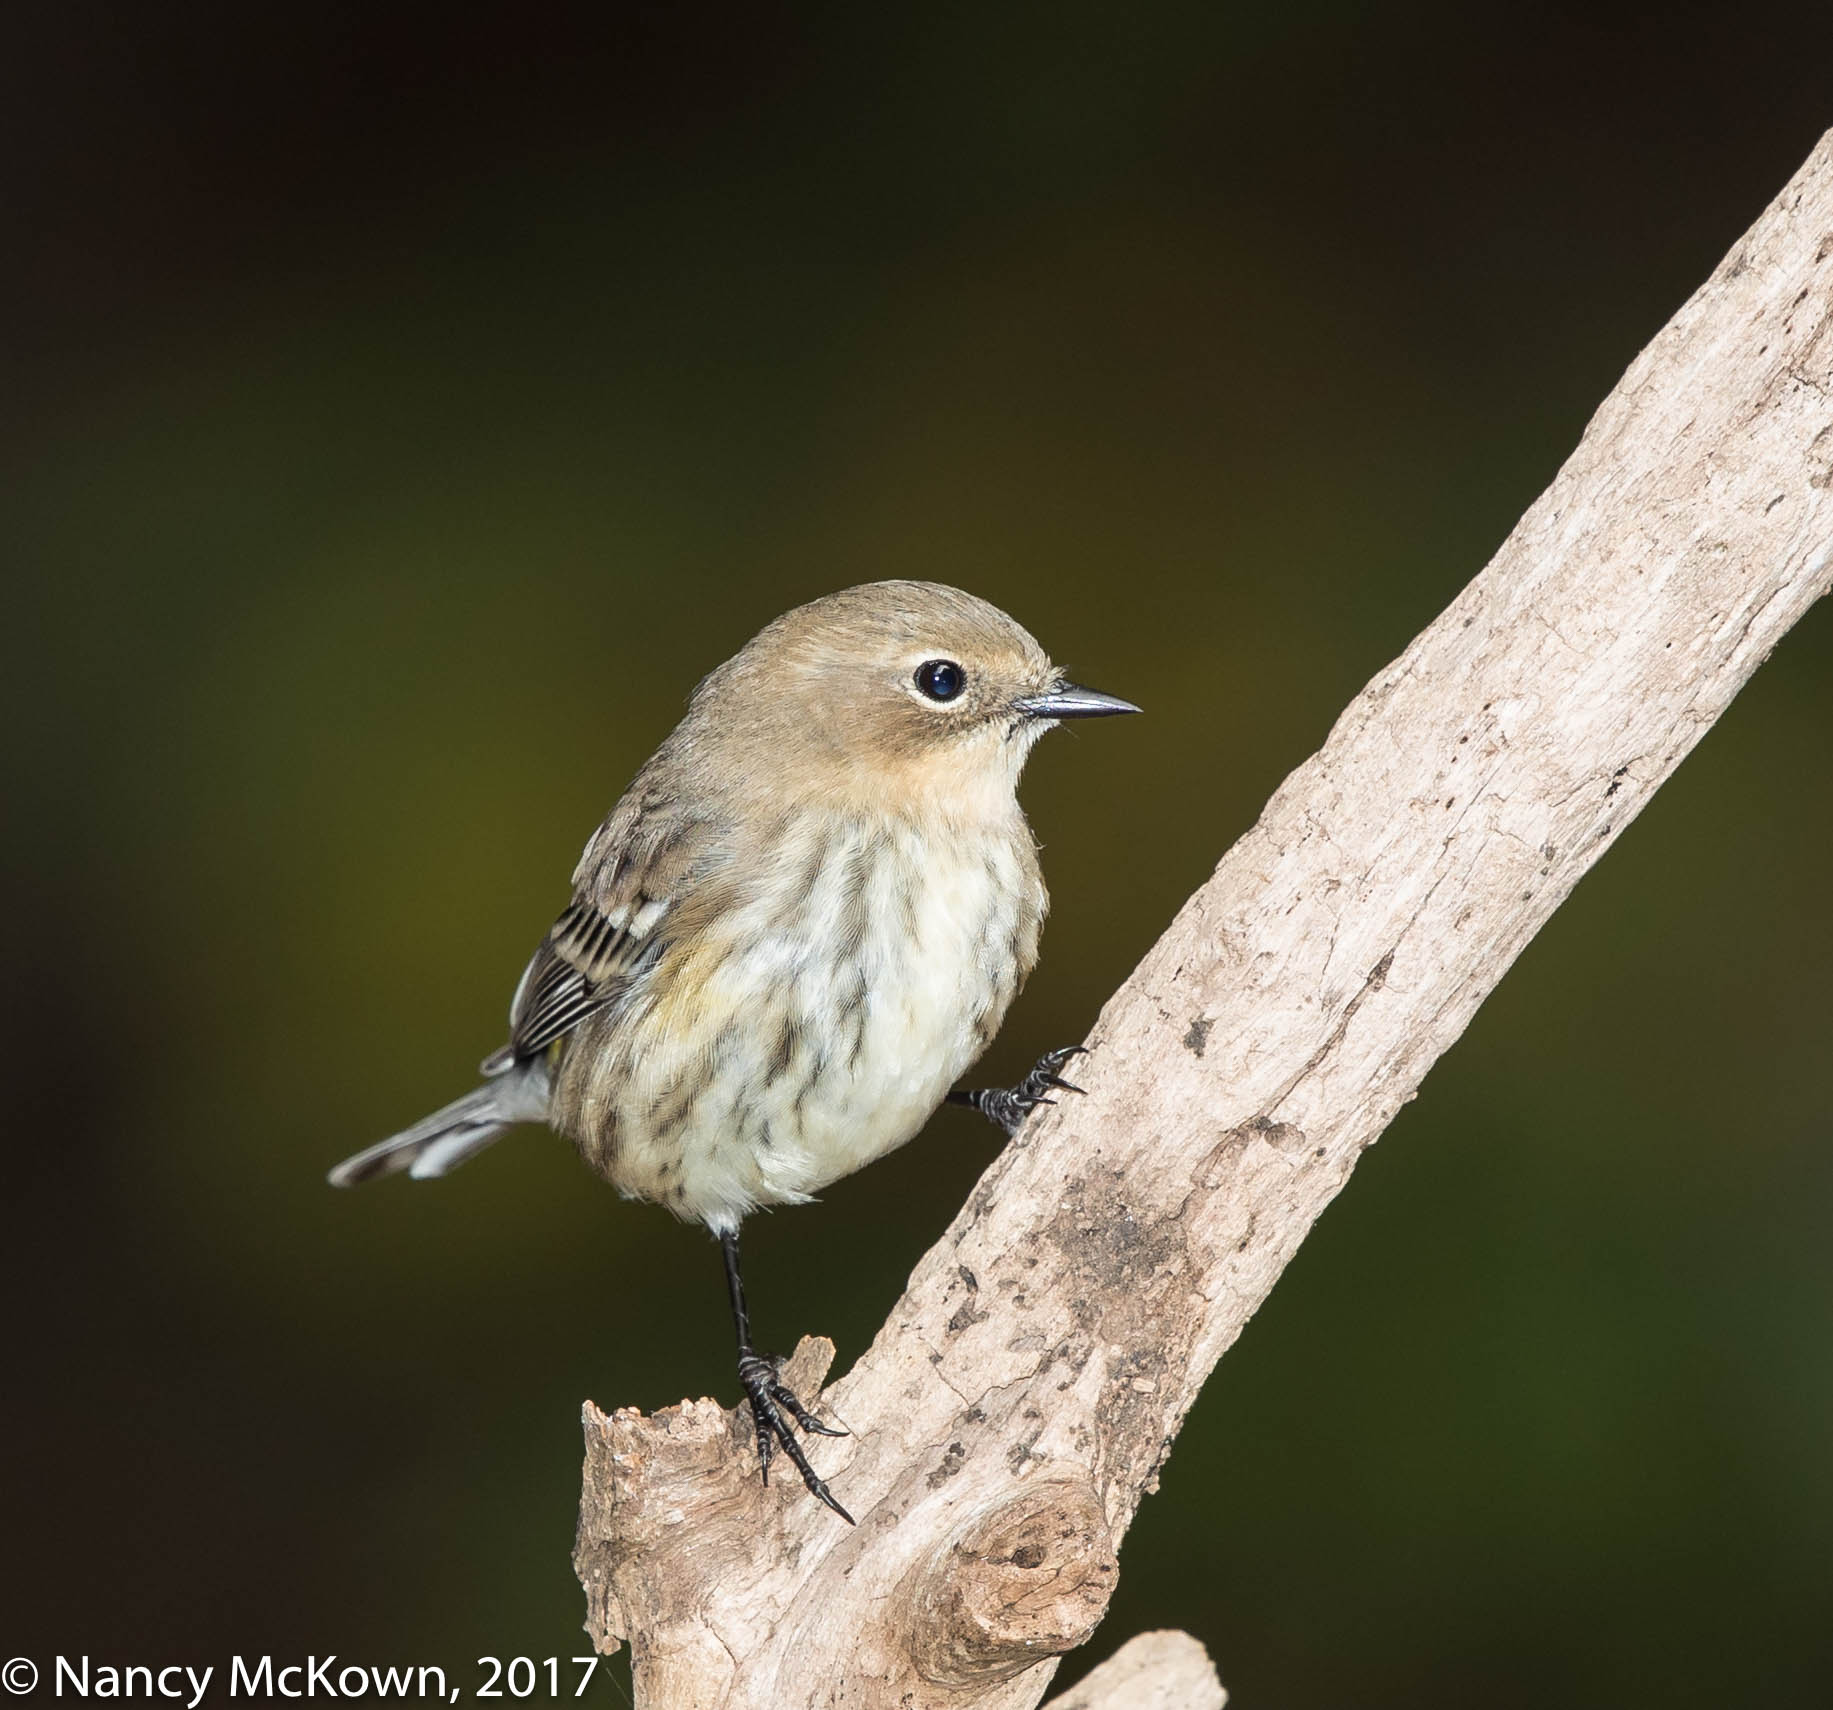
Yellow Rumped Warbler ISO800; f/8; 1/250 Second
After a couple hours, I dragged all my gear back up the steps and set up at home in the library. Two little Yellow Rumped Warblers were bouncing about, unafraid and not so far from the camera. I decided continue my experiments with light in a much different setting. I took off the flash extender on my Canon 600 EX-RT flash.
Yellow Rumped Warbler ISO400; f/8; 1/250 Second
Canon 600 EX RT Flash without Extender
Flash Extenders are intended to redirect the trajectory of the light output (more narrow and consequently brighter) to better match the angle of view of long lenses. In many cases, it provides the light to expose detail to shadow areas and catchlights to dark eyes. If I get it right, the color quality is enhanced, especially in a natural forest environment so common to a lot of birds in my area.
The Canon 600 EX RT flash has better than average light focusing capability and does a fine job calculating lens-to-subject distance. When the flash senses a long lens on the camera, it focuses its beam of light so a higher percentage of that light covers the len’s angle of view–up to 200mm. (NOTE: Without a flash extender, the 200mm flash beam can not match the reach and angle of view of the 500mm with 1.4 extender (700mm lens equivalency)).
If the subject is close, the flash output with extender attached can look like a spotlight with a circle of darkness at the perimeters. Take the fresnel lens off (MagMod or Better Beamer Flash Modifier System) and the flash will no longer direct the blast in a lighthouse beam sort of way.
Know How to Use Light In Bird Photography
These small warblers were in close proximity-(within 13′-15′) to the camera. I did not need the tight, concentrated beam that a fresnel extender would provide. Proximity of flash to subject matters. So does giving some thought to ISO levels, E-TTL II evaluative metering and flash compensation (FEC). Luckily, the two warblers stuck around and let me experiment.