Some days, all I can manage on my photography adventures are shots of tail feathers and bellies.
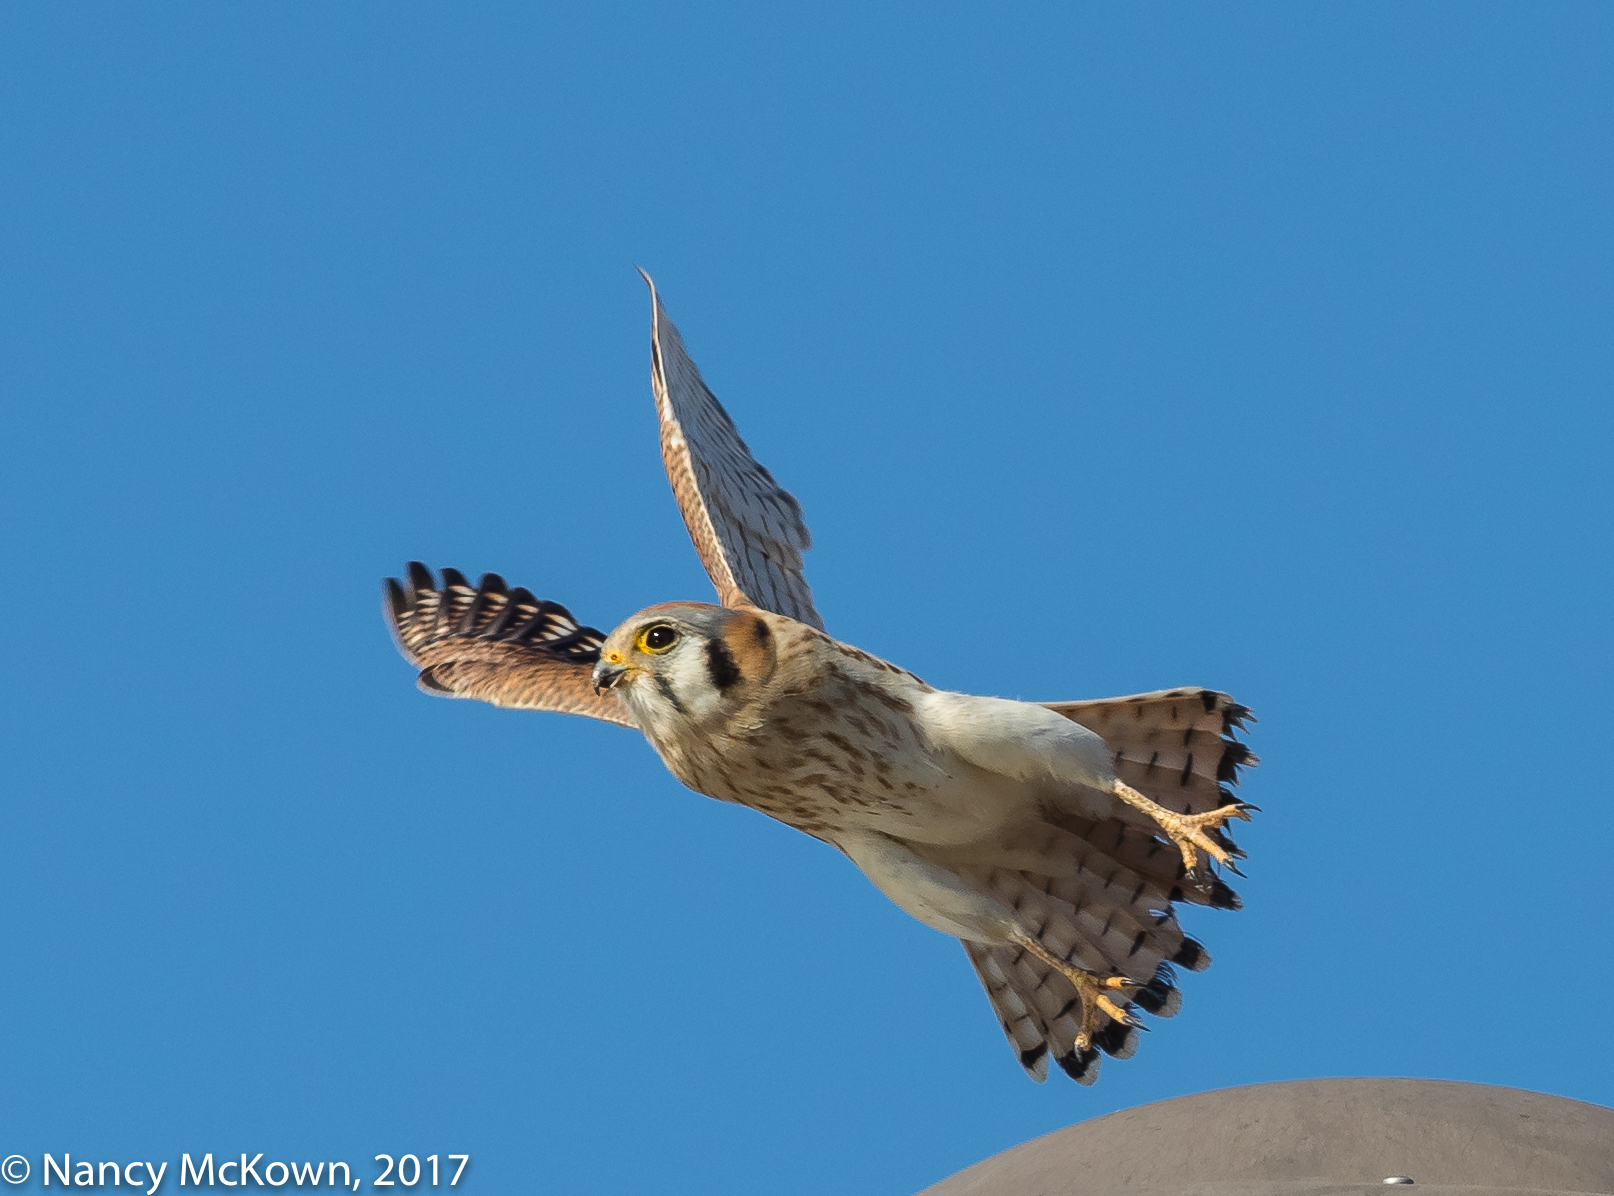
We saw very few American Kestrels last year, though we visited all their usual open territory hangouts. Kestrels in the northern most range (like MI) migrate, so it’s always a joy to see them in the Spring. They usually perch on poles and utility lines near country roadways that give them a clear view of movement within the low lying vegetation. If I’m lucky and they are unconcerned with the camera, it’s a good opportunity to practice my birds-in-flight photography skills as they swoop down to pounce on insects and small rodents, then fly upward to their perch to feast.
NOTE: These little falcons are close to the size of Mourning Doves, a species that also likes to perch on utility lines. (I often have to look twice to ID them correctly.)
NOTE: The nest box that we bought for Easter Screech Owls is also designated for cavity dwelling Kestrels. We knew when we erected the box that our wooded backyard would not be suitable for Falcons.
American Kestrel A Belly Shot. ISO640; f/8; 1/2000 Second
Depending on Readiness and Luck
Being lucky is oh-so-important in bird photography, but it’s not enough. You’ve got to be prepared. I was ready to photograph this falcon during her hunting ritual. (Low sun at my back, background not cluttered, fast bursting shutter, al servo focus, plenty of focus point sensors engaged, Gimbal tripod head set to efficiently track). The Kestrel’s perch was high- so much so that I had to dramatically tilt the lens upward and dip my knees in order to keep my eye on her in the viewfinder. I hoped that I could track her as she swooped down to pounce on a ground spider and then flew up again to her perch. Not surprisingly she was too suspicious of my behavior to indulge me.
Best capture I could manage was a clean belly shot showing off her lean and muscular underparts. I caught her right when she leaped from the light post. Her angle allowed the camera to catch a good view of her face, her fanned tail feathers and her splayed toes. She then banked her strong, lithe body and flew away in the opposite direction. (NOTE: Rufous streaking upon white on her underside indicates that this is a female Kestrel – males are white with black spotting.)
My neck ached from looking up so much. Feeling that my luck for the day was spent, I packed my gear and went home.
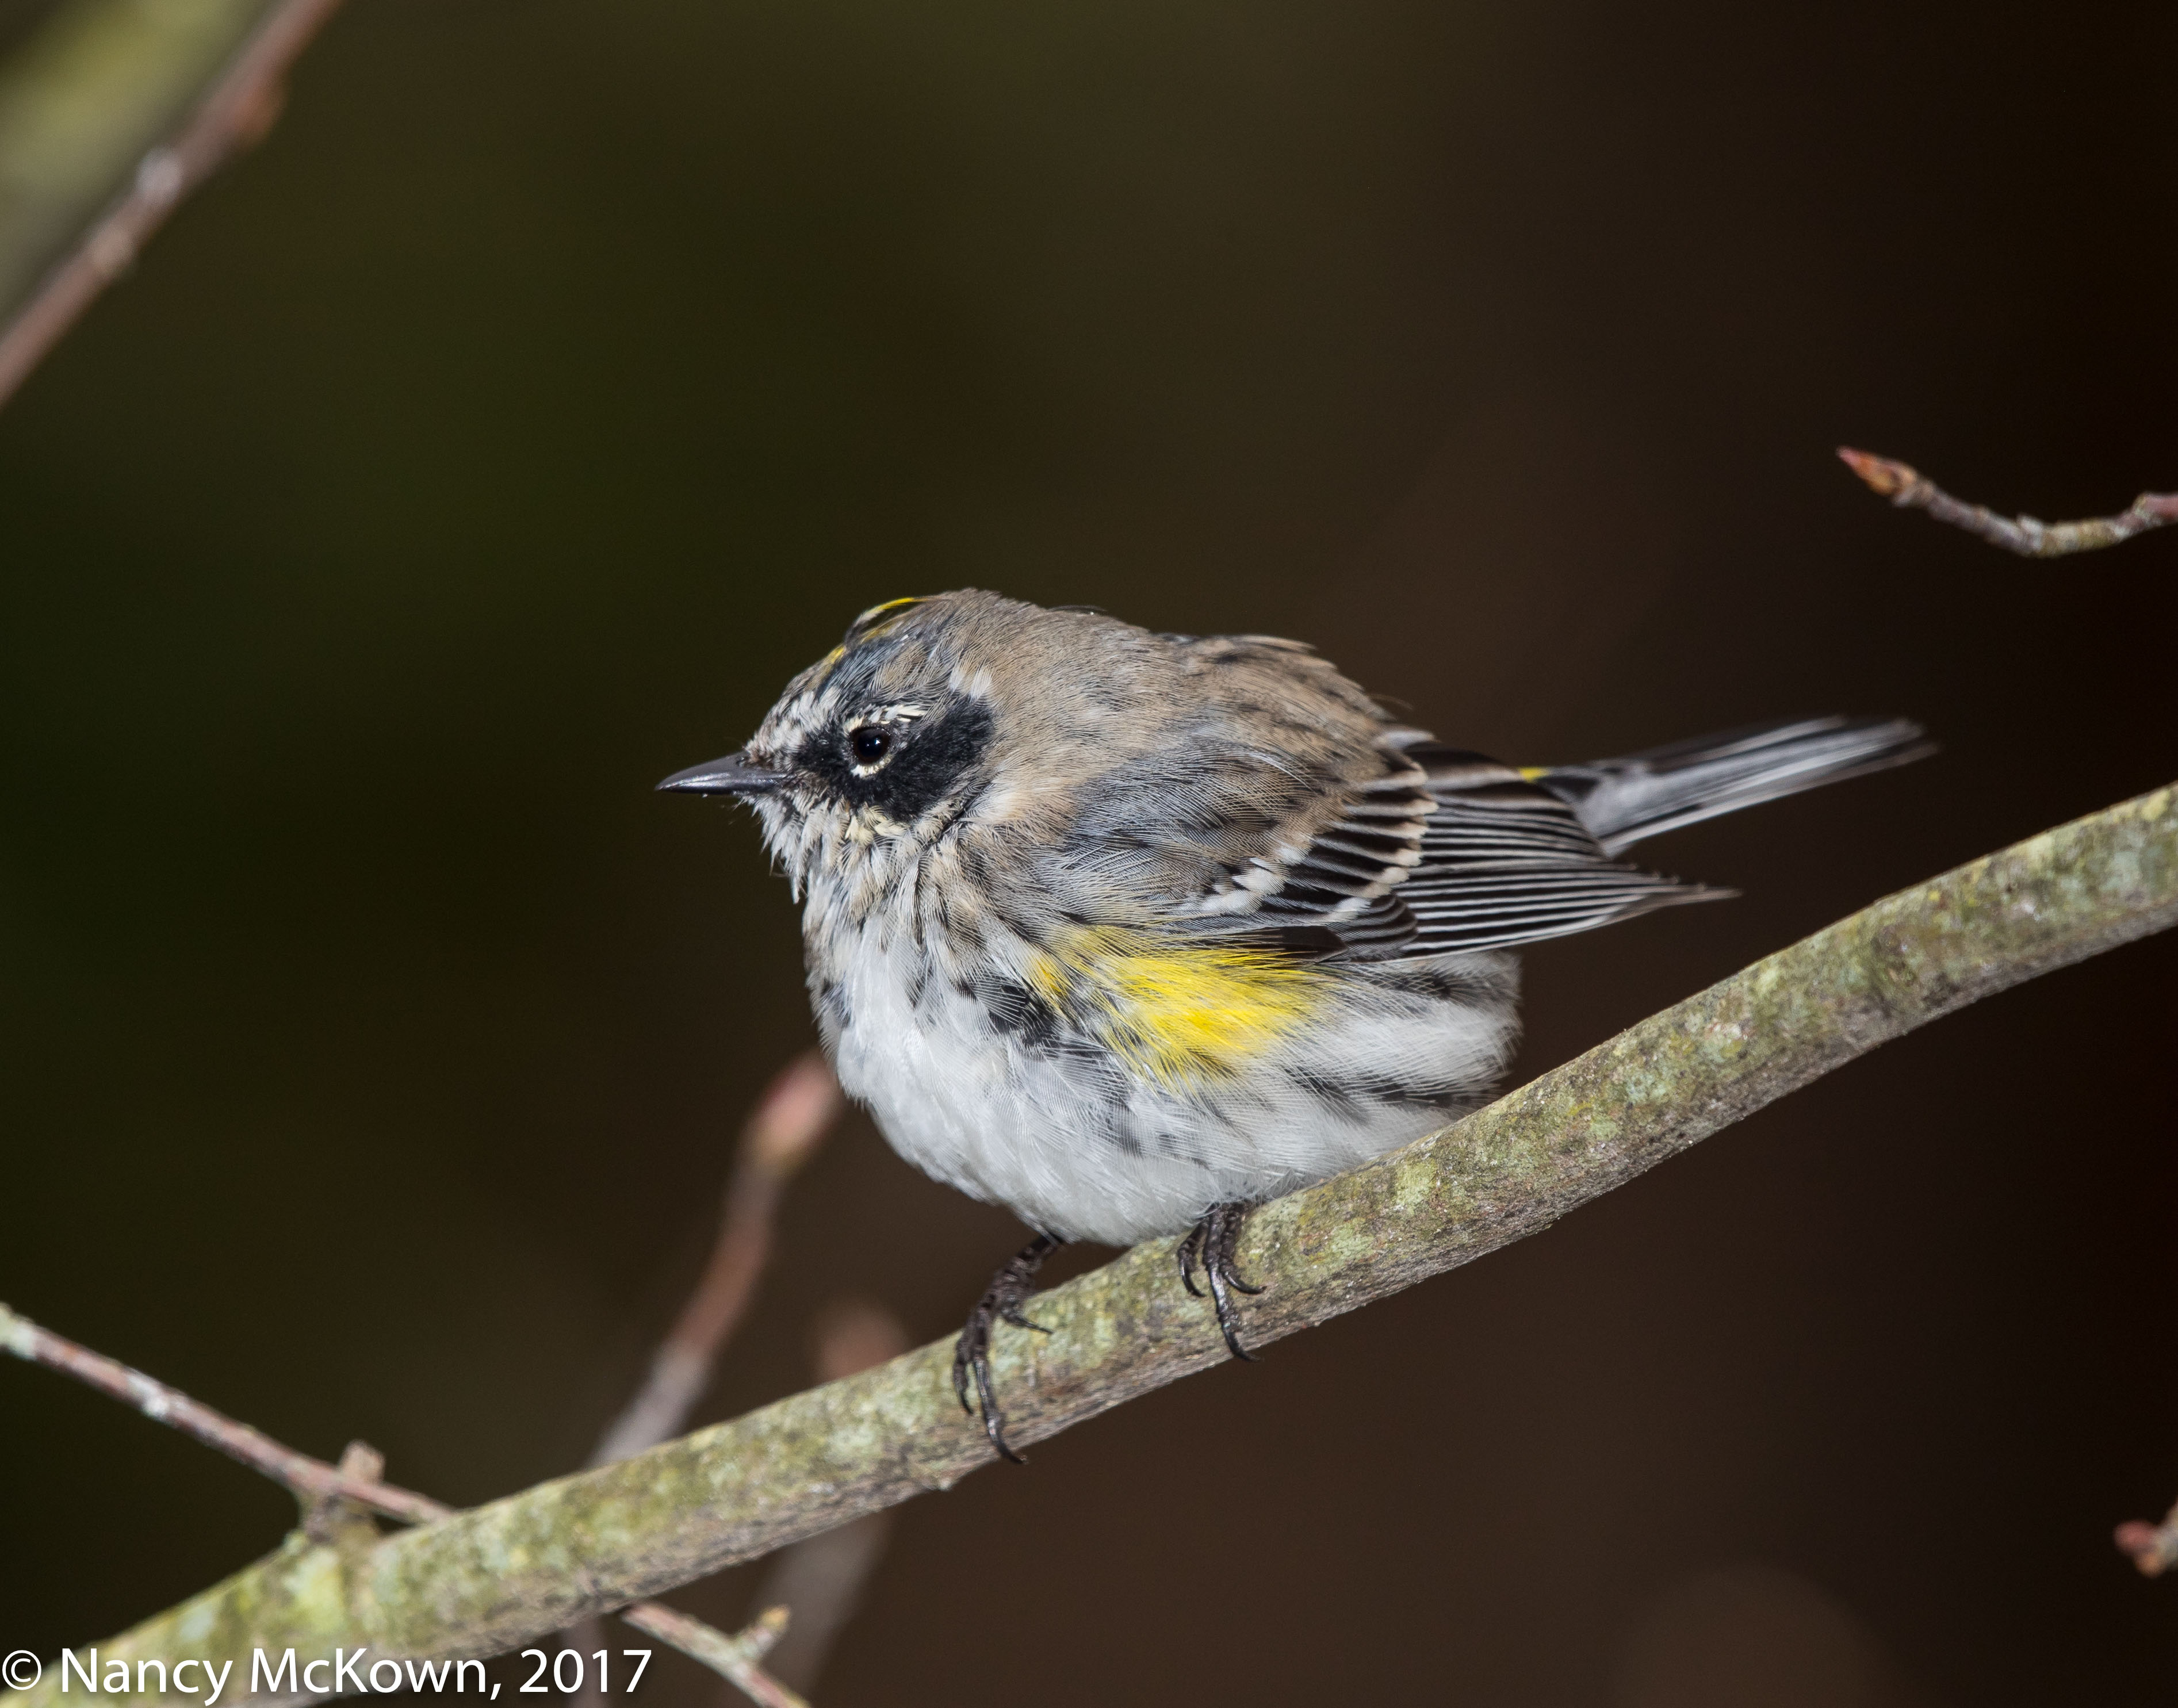
Warblers are on the move…. just two sightings in our yard so far, but they have set free within me an outpouring of hope and expectation. On March 30, a pair of Yellow Rumped Warblers descended into our yard to rest and replenish before continuing on their migration path. NOTE: This species is known to be one of the first to migrate in the Spring and last to depart in the Fall.
Spring Migration is always a compelling time for me, though we see far more migrating birds in the Fall. In Spring, all the transients (especially the males) seem to be in a rush to get on with the business of perpetuating their species. I look harder and longer for warblers during March, April, May and June… and see fewer birds compared with Fall counts. This highly adorned male (plumage in shades of brown, gray, black and white accented with bursts of yellow) is the first Spring Yellow Rumped Warbler that I have ever been able to photograph.
Male Yellow Rumped Warbler In his Spring Finery ISO400; f/9; 1/250 Second
Deep, Demanding Blood Lines
Spring male warblers are decked out in spectacular fashion– displaying outwardly to better compete. Size, color and strength are all on display. They struggle to be first at the best sites, traveling long distances through dangerous conditions. When male warblers at last arrive at their destination, they must prove that they are more than just eye candy…fighting off competitors, predators, and interlopers, all the while continuing to mate, hunt, and help rear their young.
For this shoot, I used the Canon 1 DX Mark II DSLR camera with the Canon 500mm L II Lens. I wanted close up shots of both Butter Butts, but especially the male. I attached the 1.4 tele extender to the 500mm lens to give the lens that extra reach. (1.4 x 500=700mm). The day was dark and drizzly, sending my ISO readings above the 10,000 point and convincing me to attach the flash and fresnel extender. The warblers stayed only a few hours, but were patient and curious subjects, intent on recharging themselves for another long flight.
Male Yellow Rumped Warbler. ISO400; f/9; 1/250 Second
The phenomenon that is Spring migration fills me with curiosity and awe. How enchanting these elusive feather pots…. so unconcerned with me. Every March, I plan to be out there, hoping to capture a small sliver of the intricate and perplexing beauty that is Spring renewal.
“Hope is the thing with feathers That perches in the soul, And sings the tune without the words, And never stops at all, And sweetest in the gale is heard; And sore must be the storm That could abash the little bird That kept so many warm.” —Emily Dickinson
Factors that Trigger Bird Migration
An interesting Audubon article (March 22, 2017, author: Ken Kaufman) about the external circumstances and biologically determined factors that trigger bird migration can be found at this link.
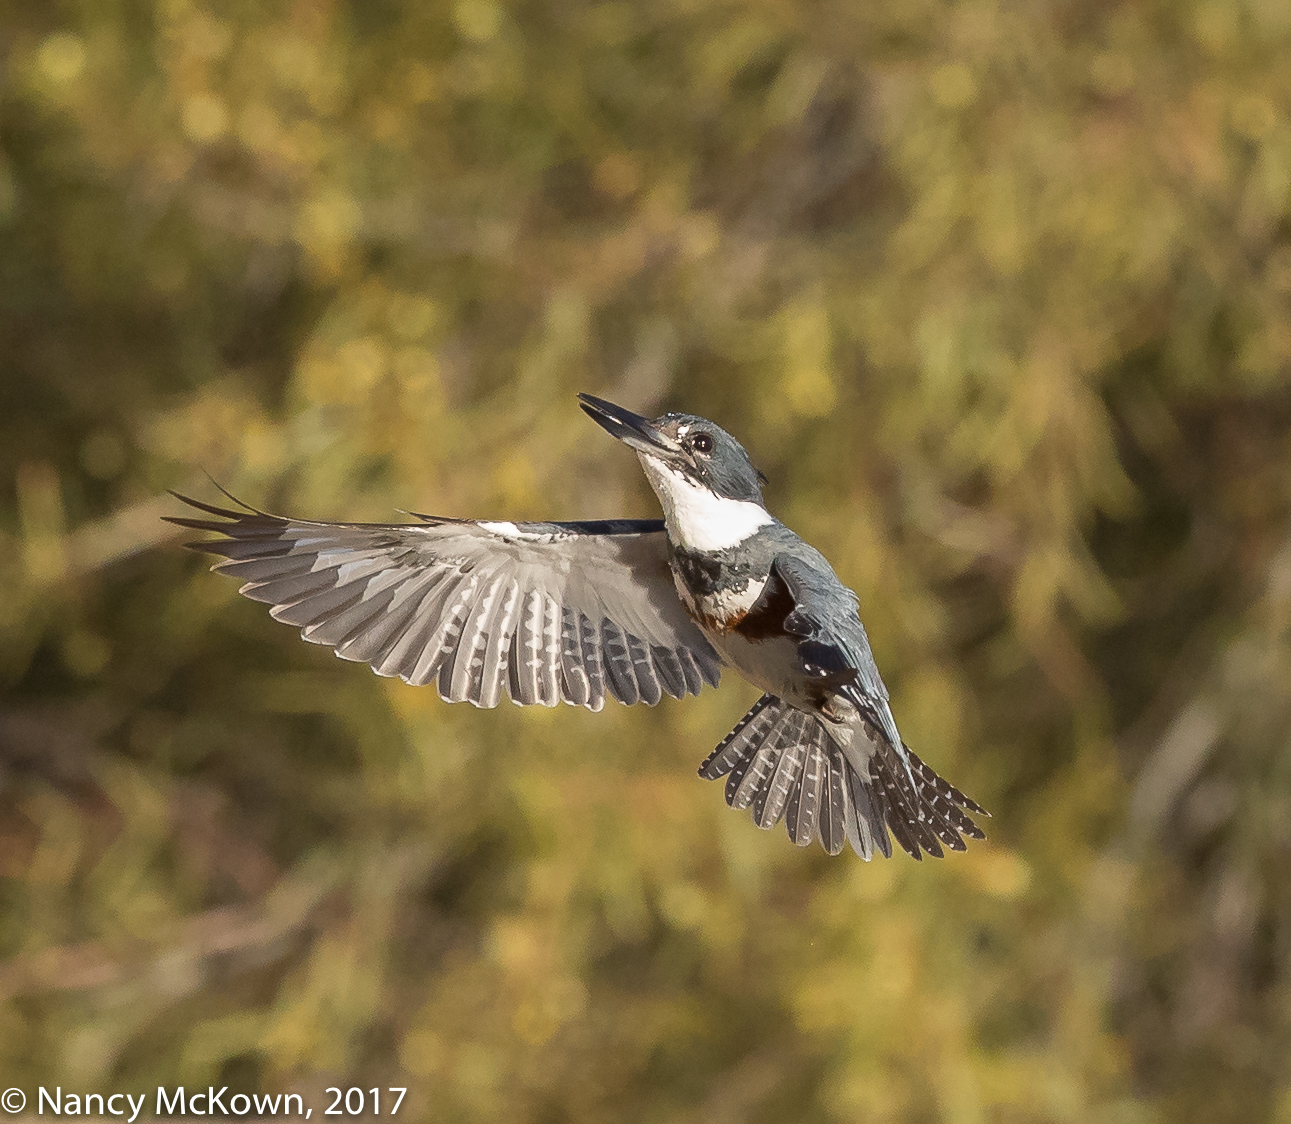
Kingfishers hunt from above, intently watching the water in search of a wide assortment of aquatic creatures. Avian predators with oversized heads, they hover above their unaware prey seconds before commencing a beak-first precisely controlled dive. These images of a Kingfisher were taken as she transitioned from water to air and rose up (with prey) to her waterside perch. Traveling much slower than when she made her missile-like descent, it was easier to anticipate and capture her flight with the camera.
On this shoot, the autofocus system was set to the predictive Al Servo. Because the bird was not close, I restricted the auto focus to a cluster of 6 central points, hoping that I could effectively track and frame her.
Kingfisher Heading Up After Her Successful Dive. ISO2500; f/8; 1/3200 Second
Optimal Sharpness
Flying birds are a challenge to photograph. To achieve optimal sharpness, the photographer has to take into consideration:
Photographing birds in flight also requires consideration of a host of complex interacting circumstances, some of which will be beyond the photographer’s control. One such uncontrollable is the bird’s flight path and how it aligns with the camera’s focal plane.
When focus is soft on one or more parts of the image, I check and recheck my settings. If these settings appear to be optimal for the shoot, I try to figure out if the bird’s flight trajectory is alignedwith the camera’s focal plane.
All long telephoto lenses inherently deliver a very shallow depth of field. If your subject is not flying on a path with the camera’s focal plane, parts of the bird (depending on your aperture setting) will be captured while they are outside the optimal depth of field range. The larger this discrepancy, the more softly focused your subject will be. (NOTE: To get an idea of how thin your depth of field can be on long lenses and wide open apertures, see this DOF calculator. If you want this information readily available in the field, there are DOF calculator apps available for iPhones and Droids. )
Kingfisher ISO1000; ISO1000; f/8; 1/3200 Second
Lightroom Plugin
In your search to discover why an image is not tack sharp, you might investigate a Lightroom add-on tool that can pinpoint exactly which focus points the camera selected when you captured the image. It’s a free and easy to use plugin available at lightroomfocuspointsplugin.com. It works best with RAW data. In addition, if you have a Canon system, the software included with the camera (Digital Photo Professional) will also indicate which focus points were active.
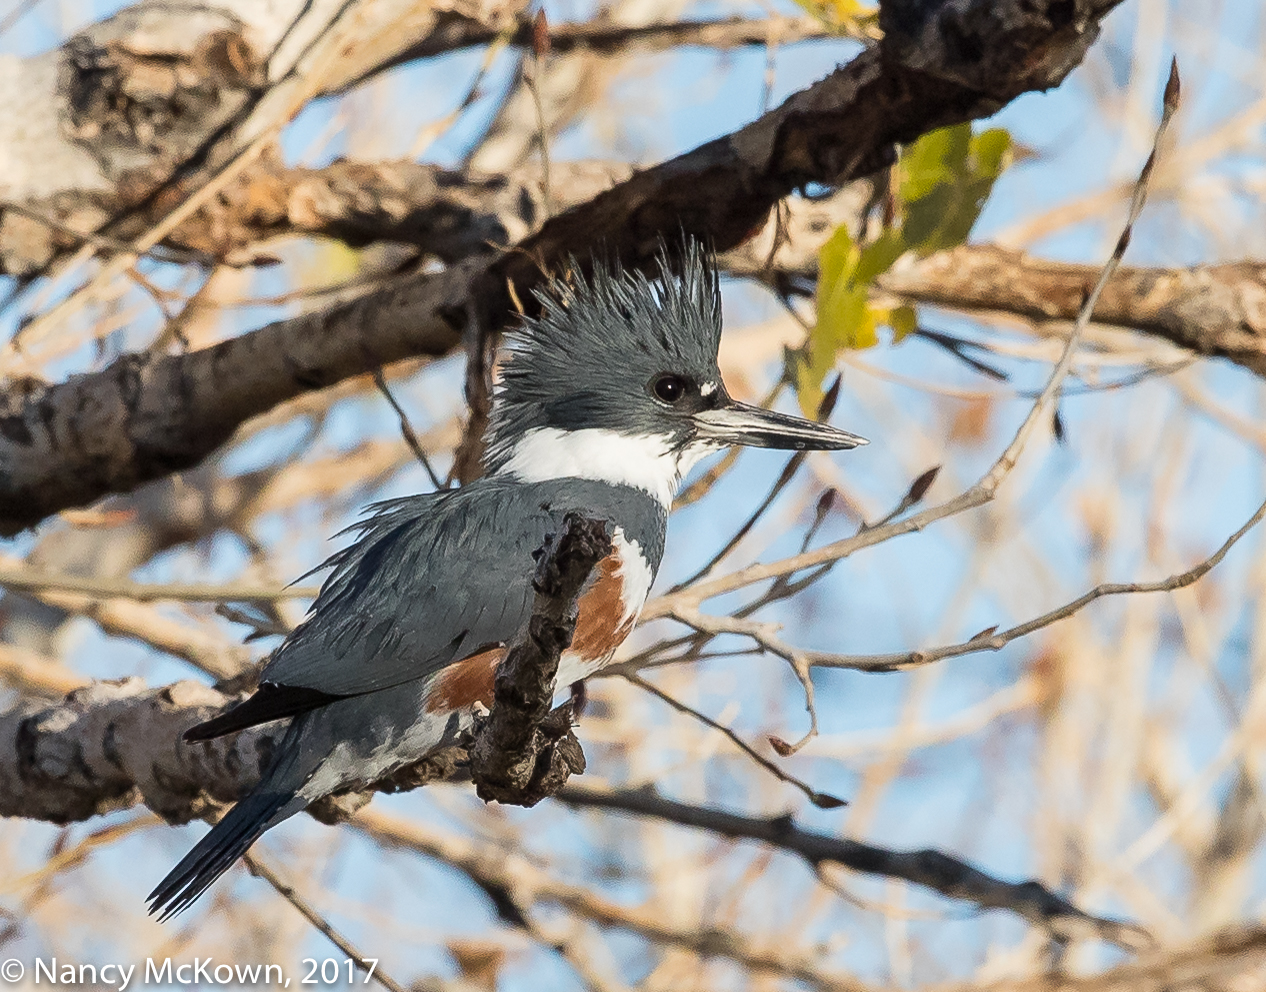
Kingfisher Dripping Wet and Readying for her Next Strike Ragged Crest Held High ISO1000; f/8; 1/2500 Second
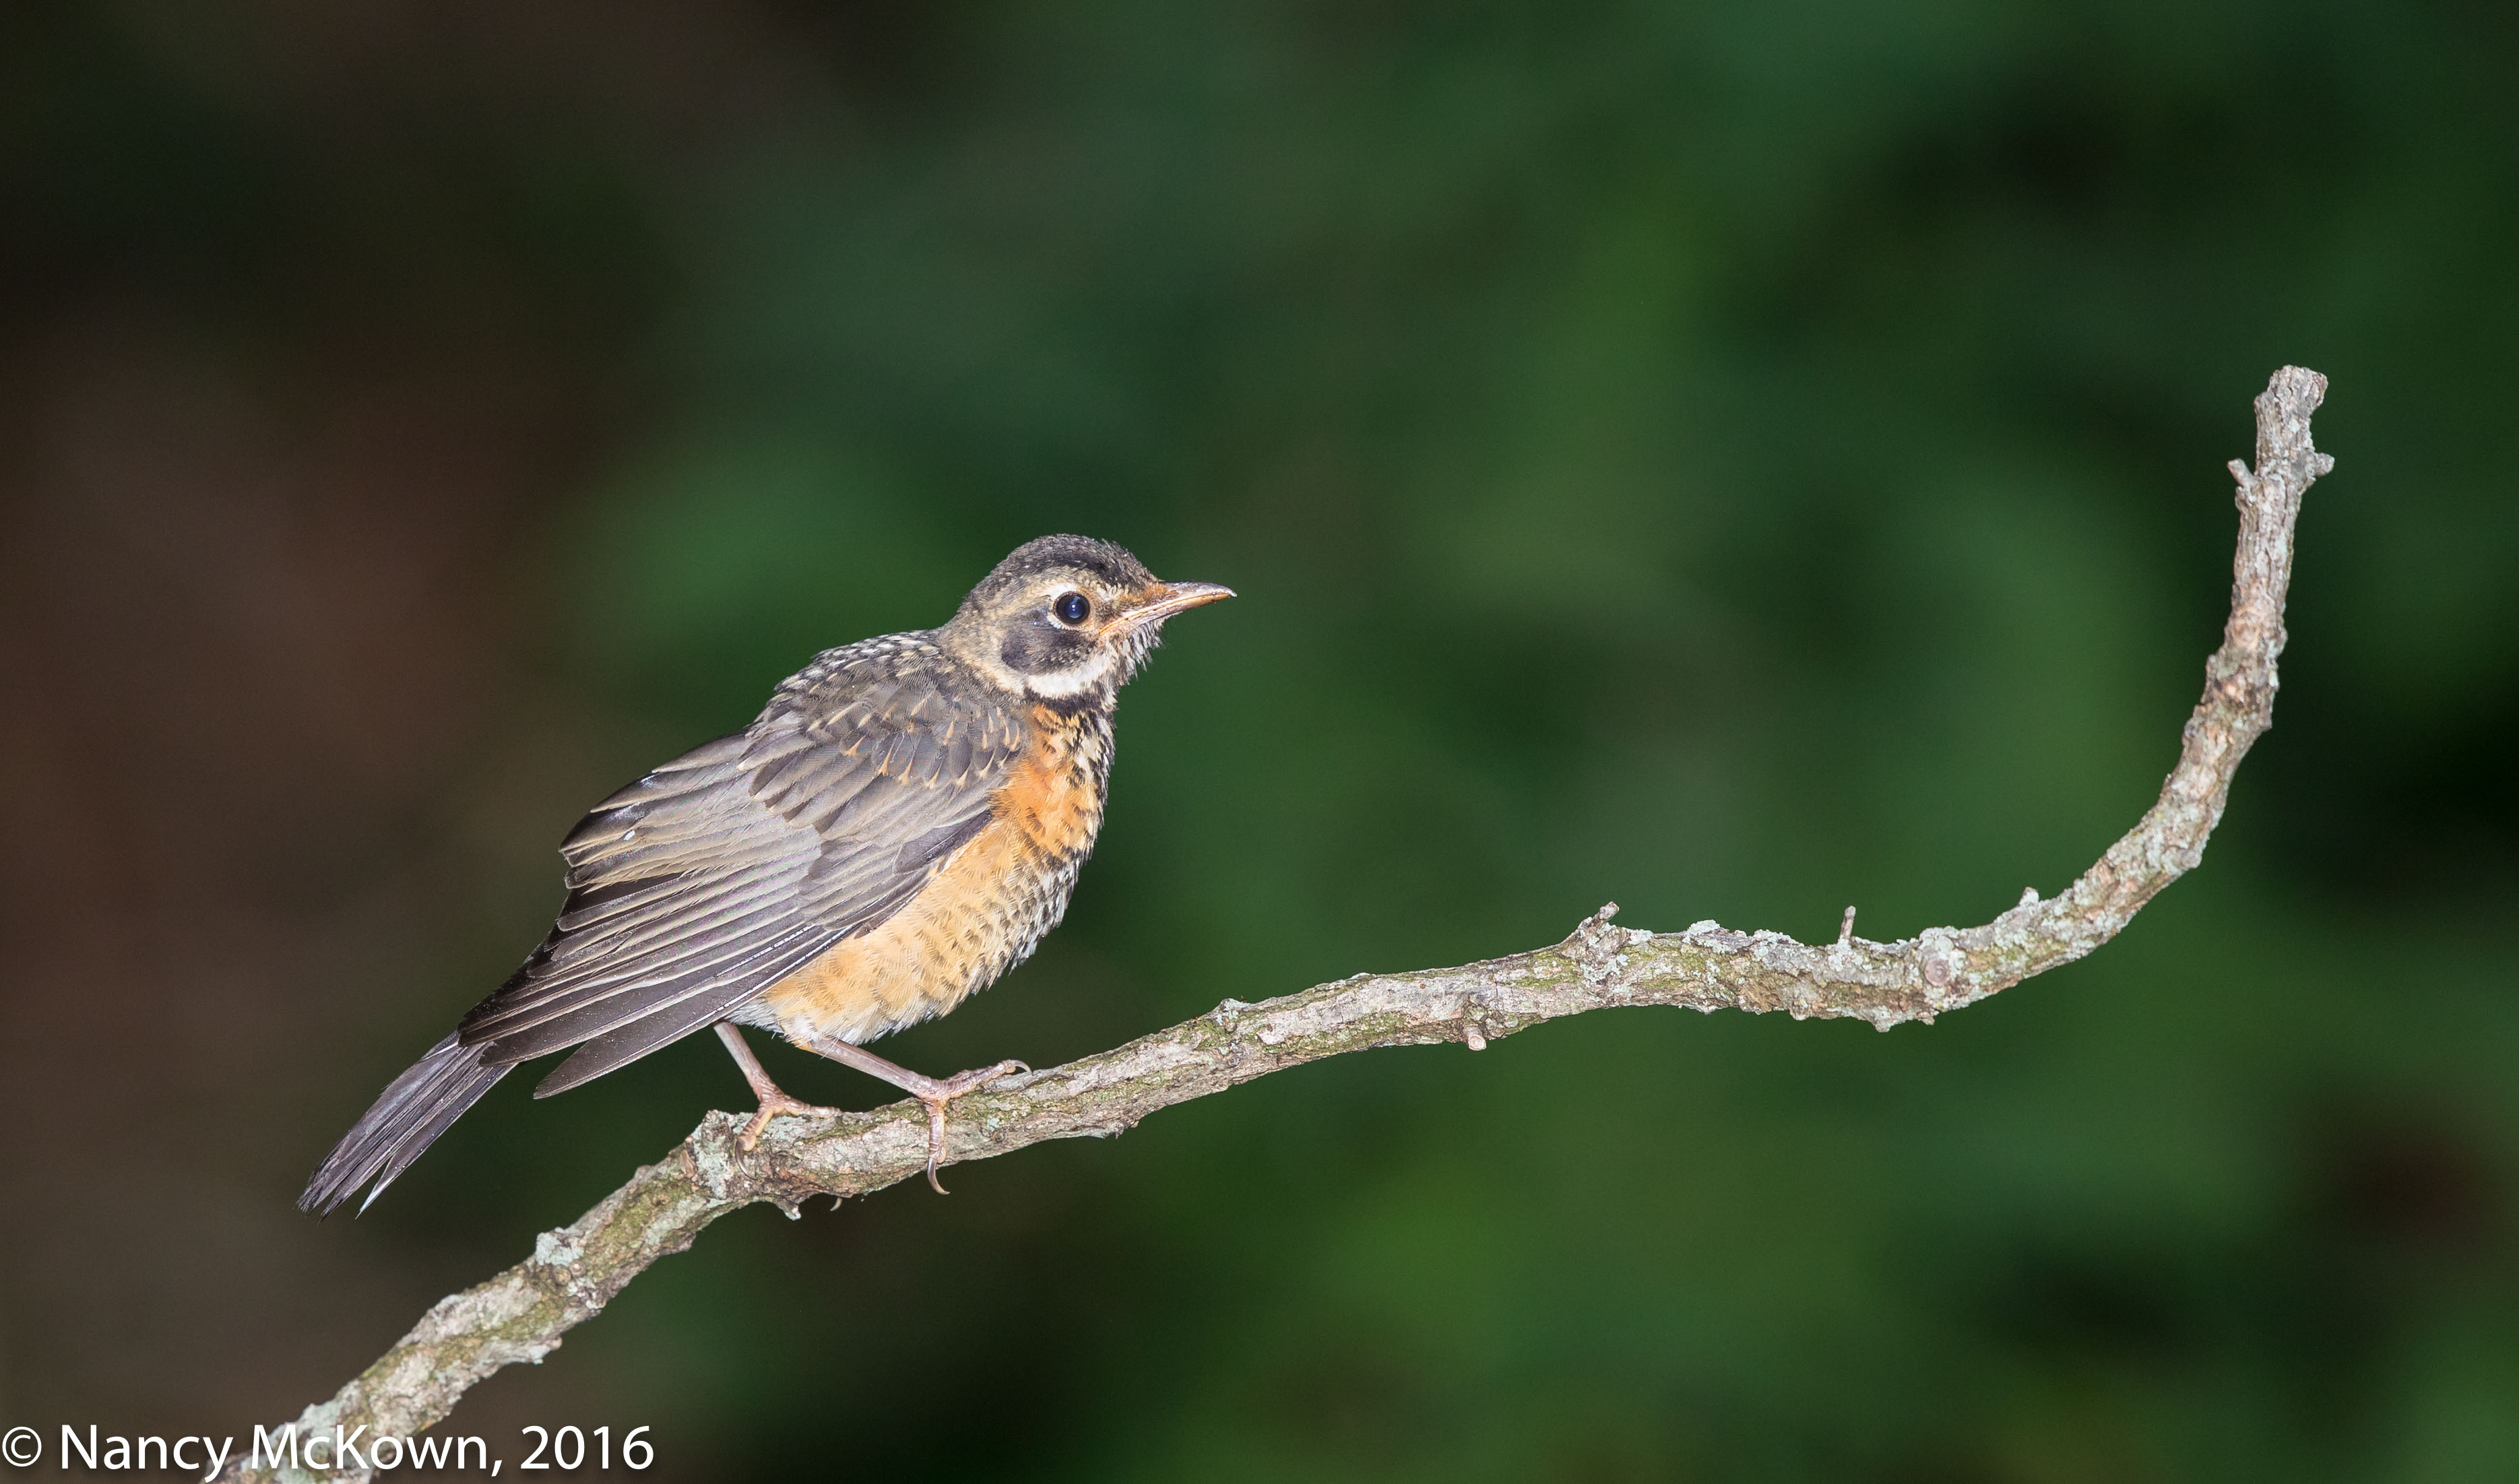
Autumn leaves were falling when I took these shots. Many species of fledglings were bravely taking to flight to test their new wings. This immature American Robin clumsily touched down on a perch near the fountain, no parent or other means of support in sight. While I photographed him, he scooted down to the end of the branch, testing his balance. He felt secure enough to direct a warning call at a smaller female Scarlet Tanager on the same branch.
American Robin – Immature ISO400; f/5.6; 1/250 Second
Red Eye/Blue Eye Effect
We live on a densely wooded lot in SW Michigan onto which summer’s light filters down rather sparsely. When I photograph birds in this environment, it’s best to amplify the ambient light with fill light from a flash. One of the most frustrating things about using a flash for bird photography is the annoying red eye/blue eye effect.
That red or blue glow smack dab in the center of the subject’s eyes only happens when a flashgun is used. The lightning-fast burst floods the eyes with intense light and gives the subject’s unprepared dilated pupils no time to constrict. The light ricochets off some of the blood vessels at the back of the eyeball(s) and is recorded by the camera’s sensor. (NOTE: Birds sometime show a blue glow instead of red because the camera is picking up other reflective surfaces in their retinas.)
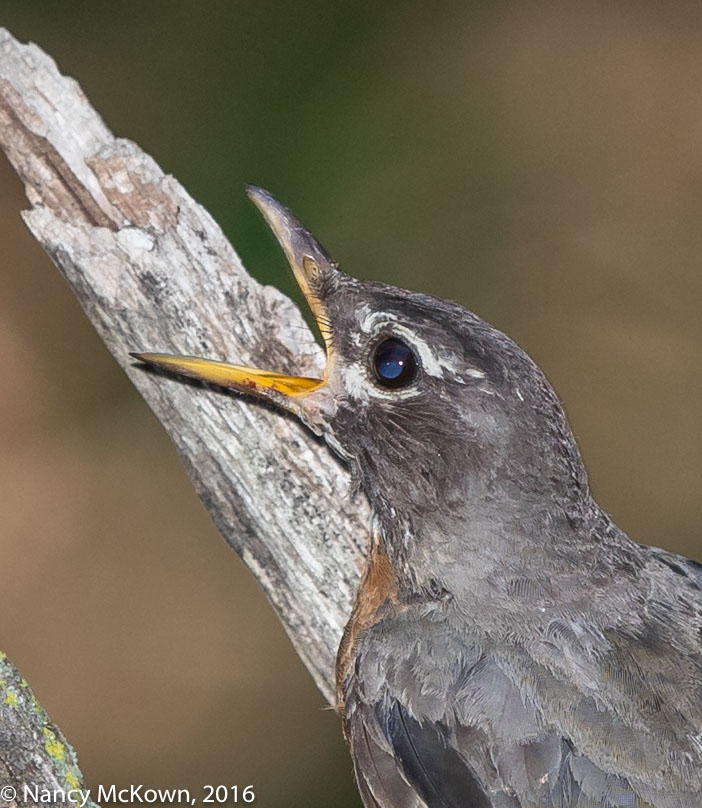
Extreme Zoom of American Robin – Slight but Noticable Blue Eye Caused by Flash
Preventing Red Eye/Blue Eye
Some cameras – especially those with built-in flashes, have a two flash system. First a pre-flash is emitted forcing the subject’s eyes to contract immediately before the burst of the main flash. This gives the pupils time to react before the photograph is taken. (NOTE: DSLR built-in flashes do not have the range or intensity needed for bird photography.)
Photographing birds looking away from the camera does help to substantially reduced the effect of blue eye, but not completely. (NOTE: See above photo…even though the American Robin was not looking directly at the camera, blue-eye is still evident.)
I’ve done the obvious flash fix to avoid the blue eye problem by hoisting the flash off of the hot shoe and positioning it higher above the camera body and nearer to the front of the long lens. This strategy does help, but not consistently. (NOTE: Raising the flash above the camera requires a modest investment in flash accessories. 1) Camera flash bracket made for telephoto lenses that will raise the flash off of the camera; and 2) an TTL off-camera flash cord so you can sync the flash’s E-TTL II functions to the camera.)
Repositioning the flash completely off of the camera and to the side would eliminate red eye/blue eye. However, doing this would necessitate photographing birds in more of a studio setting. I much prefer the freedom of situating the flash so it can follow the lens as I track birds.
The angle formed by the flash head, the bird’s retina and the camera lens has to be just right to produce red eye/blue eye. If you expand the angle at which the light enters the eye, there is less of a chance that the light will ricochet straight back through the lens. This angle adjustment can be made by repositioning the direction of the movable flash head or by changing the height of the tripod (up or down) so that the camera’s lens is not at eye level with your subject.
Bouncing the flash blast off of a wall or other surface widens and diffuses the impact of the light and eliminates red eye/blue eye. This strategy does not work for bird photography unless the subject is very close. Instead of diffusing brightness, a fresnel extender acts as a spot light in order to illuminate distant birds. Bird photographers who use flash need that spotlight effect to sharply capture distant images.
American Robin Extreme Close up As He Squawks at a Nearby Tanager. Blue Eye very evident. ISO400; f/5.6; 1/250 Second
Post Processing Image Correction
Avoidance is preferable, but sometimes it just doesn’t work out that way. Imaging software like Lightroom or Photoshop have tools that will easily cover up the effects of both red eye and blue eye effectively and efficiently in post and go so far as to provide an option to insert a little catchlight within the repair. It is a correction I use often.
The last time I photographed a Ring Necked Pheasant it was early Spring. At that time of year, these flamboyant birds have reason to be out-and-about to conspicuously flaunt their stuff. In the Fall, they’re still highly adorned and colorful, but they seem a bit more cautious.
Ring Necked Pheasants. ISO800; f/9; 1/1250
How do Modern Cameras Acquire Focus So Fast?
I came across this stunning male pheasant while driving in the Allegan State Game Area. He wasn’t especially close, but I knew that I would spook him if I got out of the car to get closer. I rested the camera and lens on the car door and prepared to shoot. The lens (500mm f/4 L II –always well behaved) rested comfortably with no obstacles in its trajectory. The camera was set to Al Servo focus mode and high speed continuous shooting. When I half pressed the shutter button, the len’s quiet ultrasonic focusing motors immediately activated, shuffling just a touch to lock focus. I took a few shots to test the area of focus (DOF), then waited hopefully for the bird to move closer to the camera.
Passive Auto Focus Systems
The most common modern DSLR focusing system is referred to as “passive”. A passive auto focus system waits until light information passes through the lens to the sensor and light meter – and then makes its calculations to determine focus. Precisions systems on modern cameras are capable of achieving a near instantaneous and accurate fix on focusing even in low light by using sensor based sharpness detecting/gauging tools, referred to in the literature as “phase detection” and “contrast measurement”. For more details on these systems, press this link.
Light is key. As the light dims, the camera’s sensors have more difficulty seeing edges and contrasting tones. Auto focus takes longer and becomes less accurate.
Active Auto Focus Systems
Active systems don’t wait for light to pass through the lens to determine focus. Instead these devices emit (infrared or visable) light or sound and then measure it when it bounces back. This DSLR camera auto focus technology is considered old school. (NOTE: Auto focus assist lamps that throw light to help cameras focus are not considered to be Active systems, but instead serve as a “second opinion” for a Passive focusing system.)
Ring Necked Pheasant Alert and Tail High ISO 800; f/9; 1/1250 Second
Circumstances That Impact Passive AutoFocus
Some cameras include a “focus beam emitter” which facilitates focusing. Canon cameras do NOT, so I either carry around a flashlight to help the lens see, or heaven forbid, switch to manual focusing and rely on my eyes to accurately focus.
A focus assist beam on an external flash device can shed more light and thus assist the autofocusing system. This assumes that the subject is stationary and close enough to the camera to be affected by the beam. (NOTE: Canon cameras utilize flash based focus assist beams only when the camera is set to one-shot autofocus mode.)
High quality, expensive lenses are designed for speed and precision and are more likely to deliver tack sharp results. I’ve purchased mediocre lenses (Canon and third party) and had to deal with tight max apertures, slow autofocus and subpar image quality, not to mention distortions and chromatic aberrations.
Lenses on which the aperture opens wide (greater than f/2.8) are referred to as “fast” lenses. The wider an aperture opens to allow maximum light on the focal plane, the “faster” and more accurately the lens can focus. The more light transmitting through the lens, the more flexibility the photographer has with exposure parameters. (NOTE: A DSLR camera always auto focuses with the lens set on its widest aperture. It immediately switches to the aperture set for proper exposure when the shutter is depressed.)
Auto Focus Magic
It is nothing short of remarkable how fast and precise high end DSLR lenses acquire focus, no matter what auto focusing mode is set. It’s easy to forget how much bird photographers depend on this technology to get their shots. If you need a reminder, just try switching it off and depending on manual focus for a while.
Bird photography opportunities rarely come at times when the light is optimal.
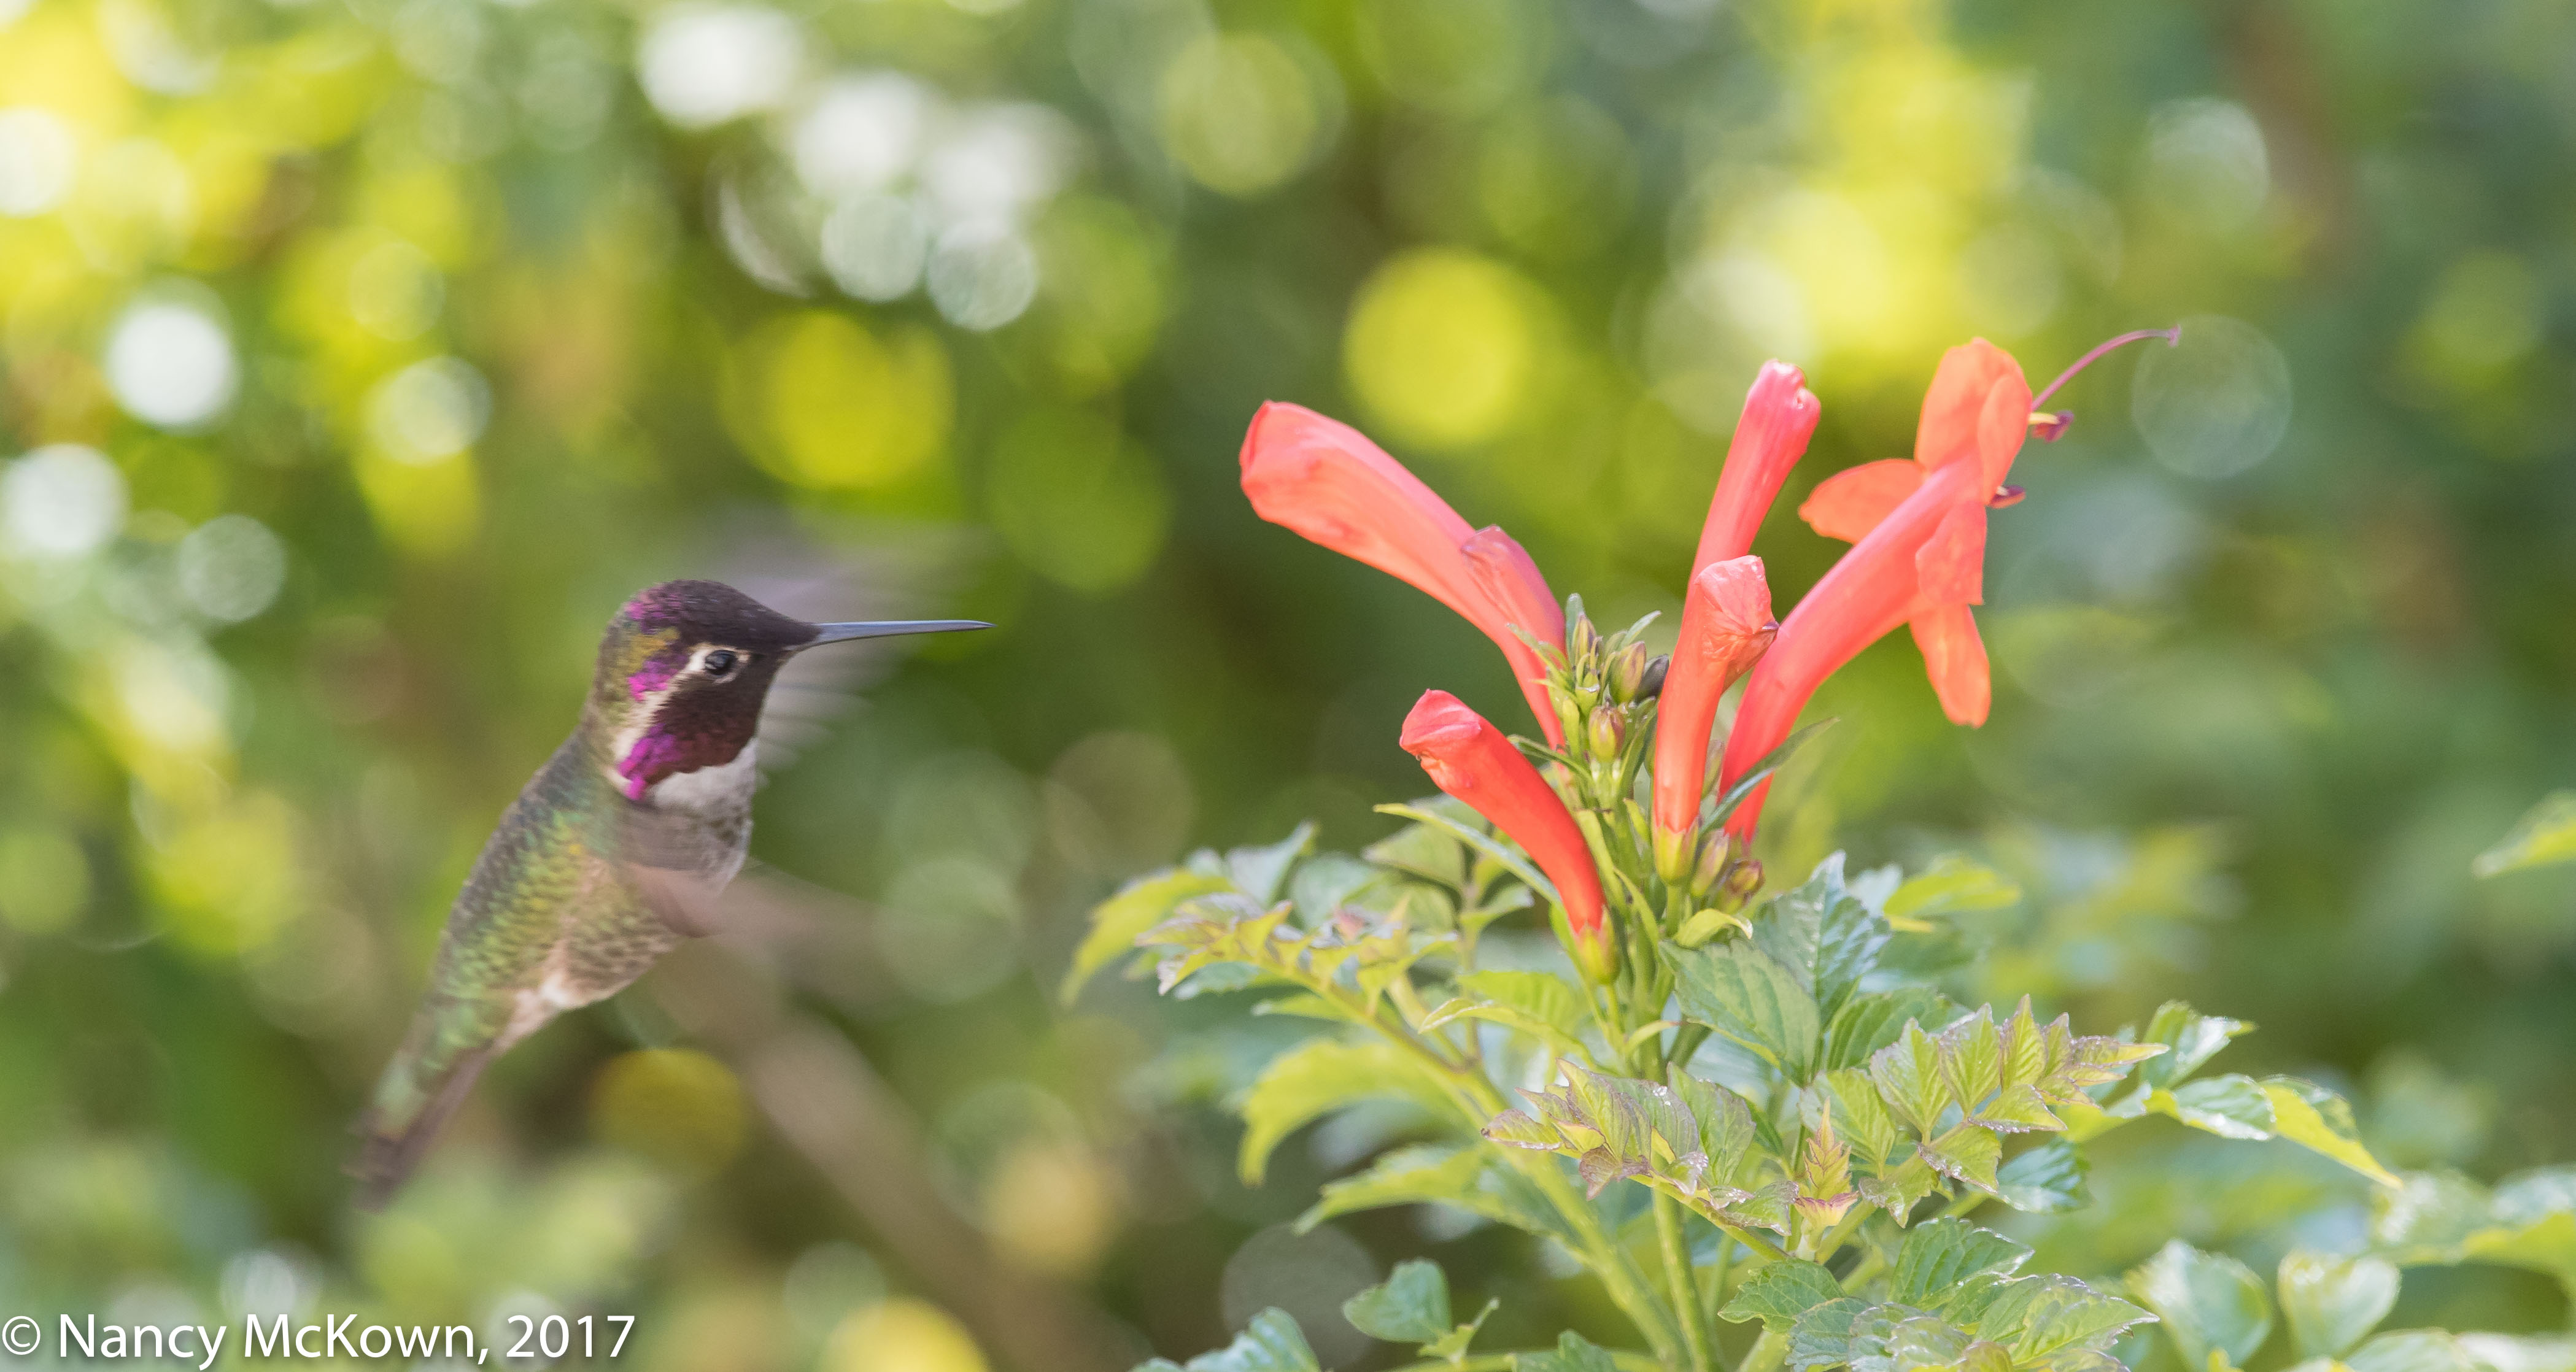
These images of an Anna’s Hummingbird were captured in sunny San Diego at mid-day. The camera and 300mm lens with 1.4 extender were pointing downward toward a row of flowering bushes. I took a few shots using only the drop-in gelatin filter that came with the lens. (See image directly below.) I then removed the gelatin filter and dropped in Canon Circular Polarizing Filter (PL-C52). It took a while for my hands to get used to positioning the filter with the external control rotation wheel. Eventually I got the hang of it.
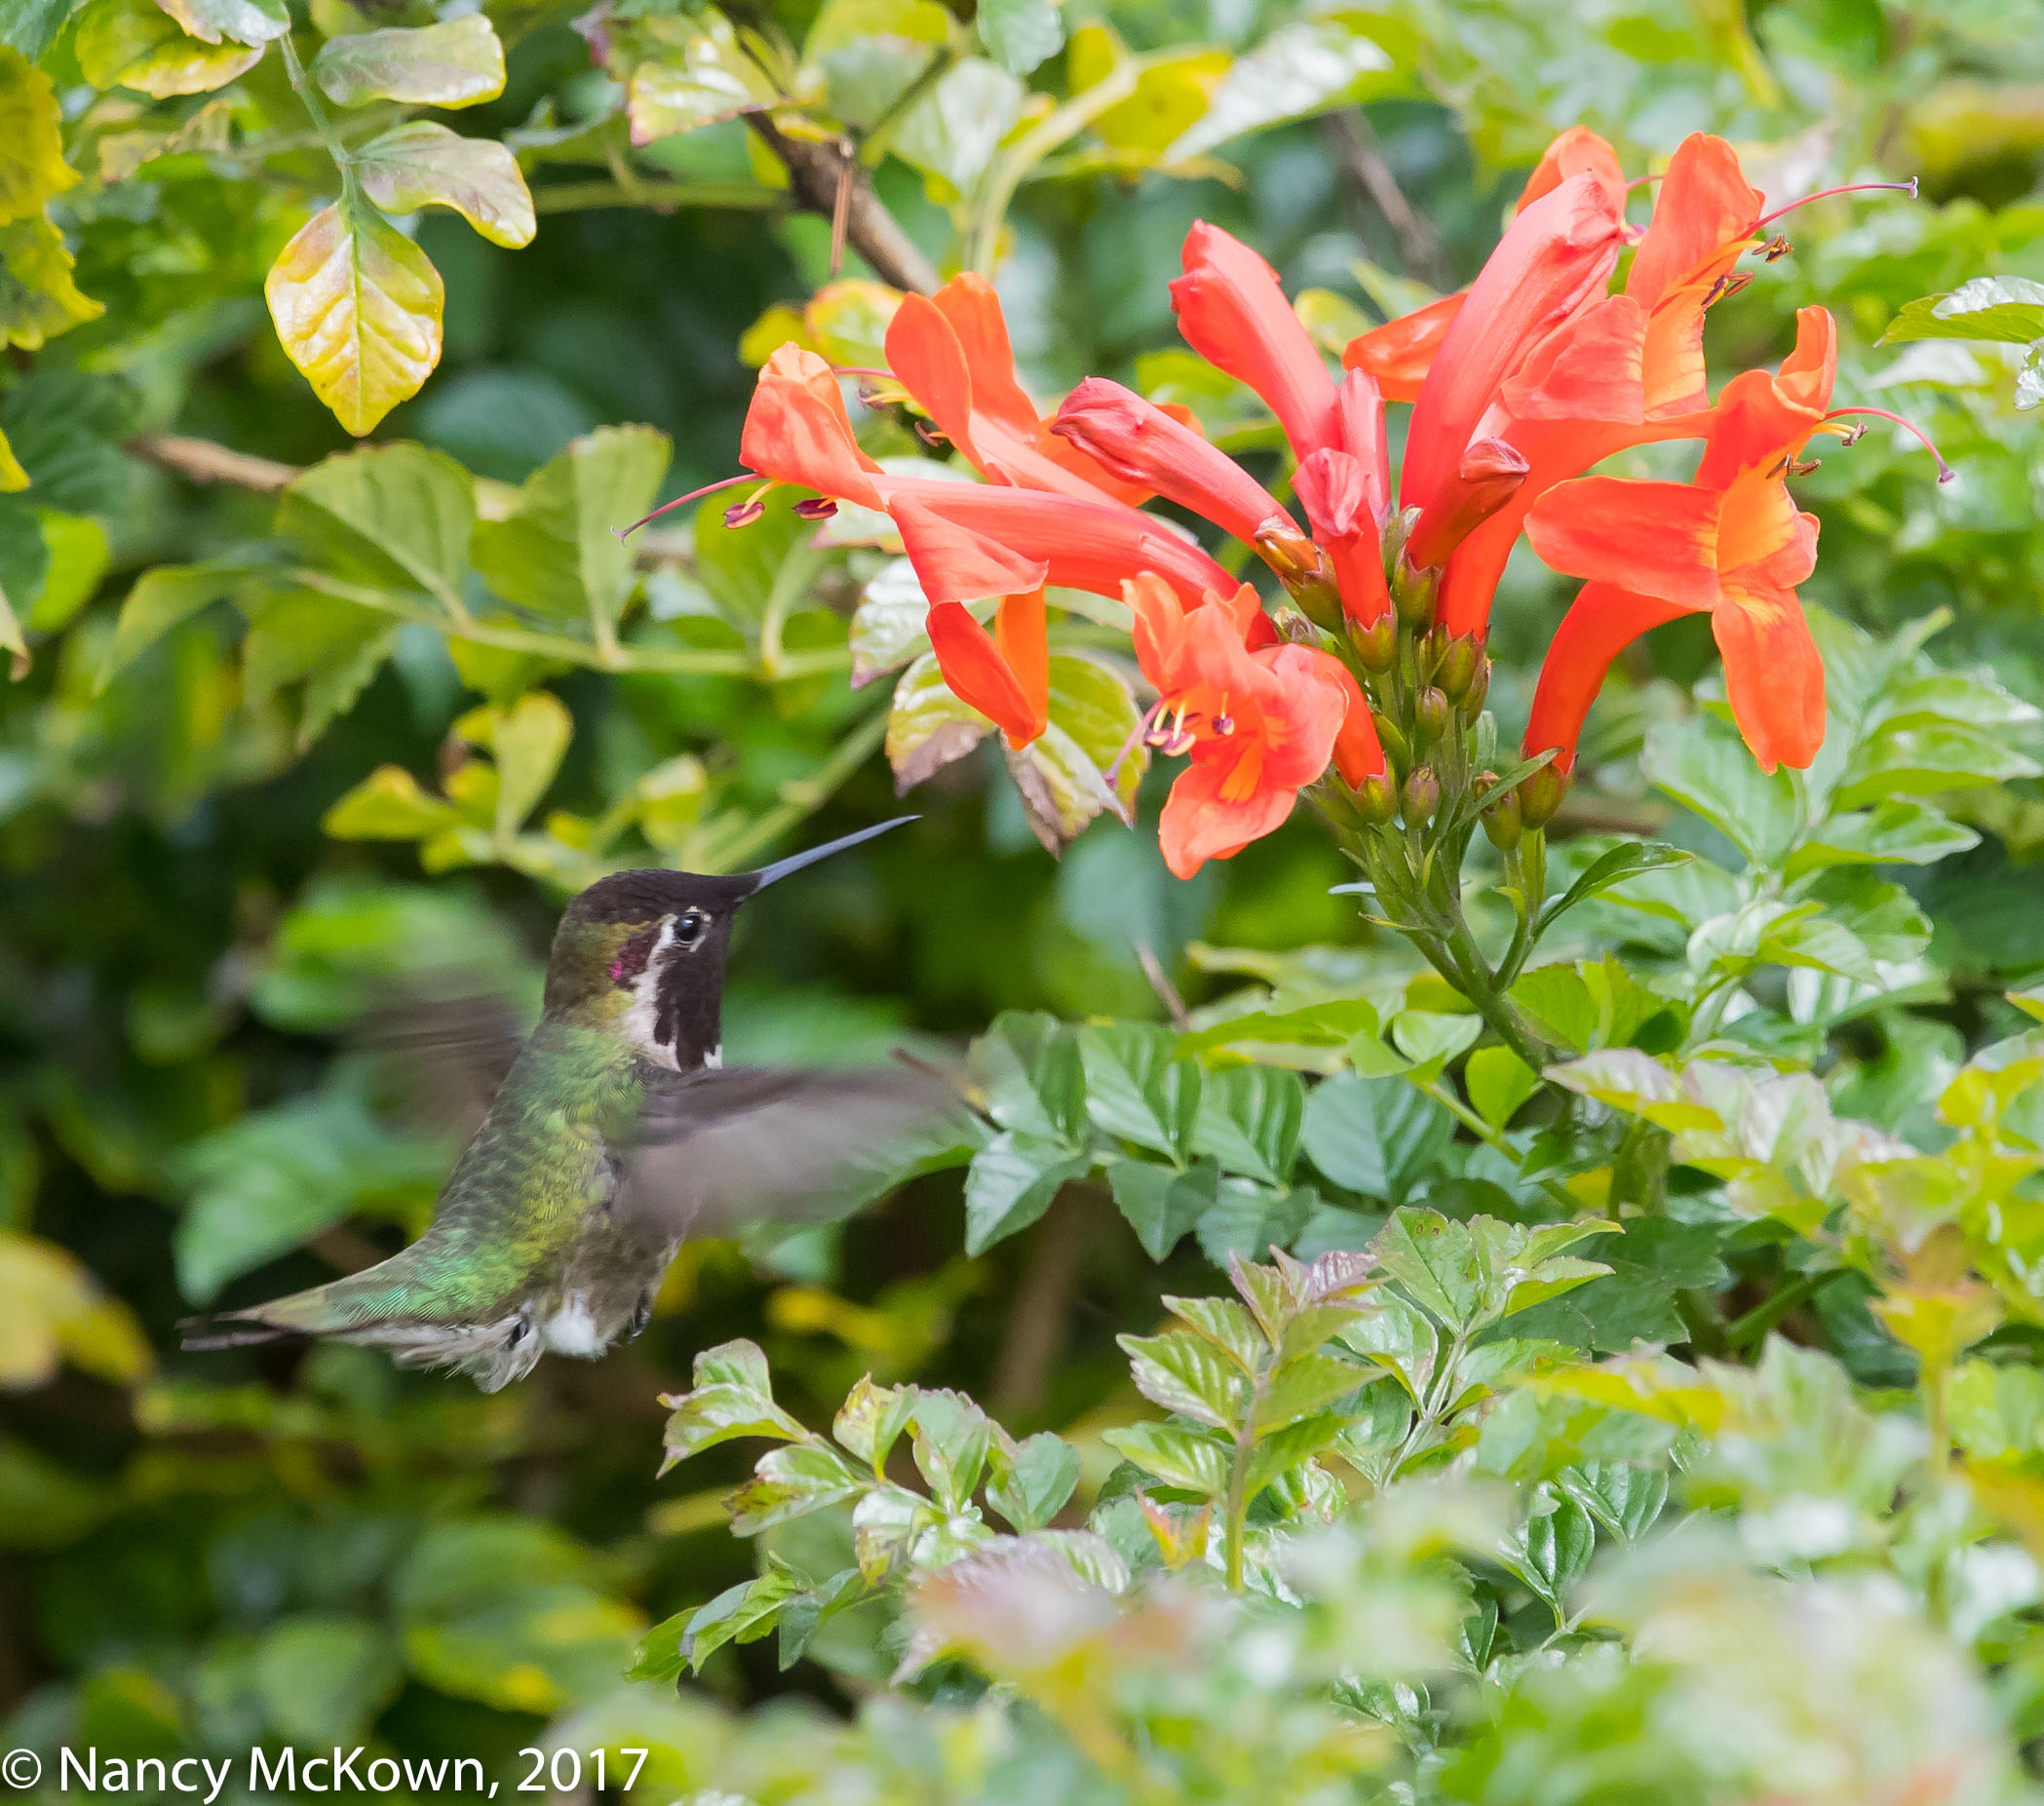
What a difference! (See second image below.)
Anna’s Hummingbird Mid day Sun Overhead. No Polarizer on Lens. Colors are Muted. Image Looks Washed Out. Lots of Flare and Glare on the leaves ISO1000; f/6.3; 1/500 Second
(NOTE: This drop-in circular polarizing filter will fit in both of my telephoto lenses – the EF300 f/2.8 L IS II and the EF500mm f/4L IS II.)
Long Lens Circular Polarizers
A polarizer manages reflections and cuts glare in much the same way as polarizing sunglasses do.
A polarizer will reduce the amount of light reaching the sensor and impact your exposure settings (from 1-3 stops).
Circular polarizers have dials which must be rotated to optimally cut glare. As you rotate the polarizer, your goal is to dial-in the best color saturation and contrast and dial out reflection and glare. The end result should be more balanced light on the scene. (NOTE: You simply can’t do this much glare reduction in post processing).
If a bird flies to a shady spot– a no glare zone– the polarizer does not negatively impact the image, except for light loss.
Wearing polarized sunglasses while using a circular polarizer on your lens will prevent you from seeing all the leafy glare and rotating the filter optimally. In addition, polarized sunglasses on top of polarized drop-in filter make for dark and difficult viewing.
Polarizers are most effective when the lens is pointed at a right angle to the sun. Depending on the location of the bird and the angle of your lens, the polarizing impact may not be uniform across the whole image.
Because you must dial in the best position for optimal glare control, composing may take longer. (NOTE: Repositioning the polarizer was a constant battle as this hummer flitted up and down forcing me to change the len’s trajectory and re-rotate the polarizer’s dial.)
Linear polarizers are cheaper, but won’t work with auto exposure and auto focusing functions– making them pretty useless for bird photography.
Anna’s Hummer 300 mm lens with 1.4 extender and Circular Polarizer Inserted. Did Not Remove All Reflections But the Image Looks Much Better. ISO1600; f/7.1; 1/1000 Second
Lens Flare and Lens Glare
Lens flare is no more than stray light (usually unintentional and undesirable) sneaking in and bouncing around the inside of a camera lens and leaving on your images an assortment of light specters, streaks, fogging and ghost images shaped like the diaphragm of the lens. Lens Flare is almost always a consequence of backlighting coming into the lens. To control or otherwise reduce flare, you either move the lens or attempt to shield it, using a hood on the lens barrel, your hand, your hat, or a polarizing filter.
Glare is reflected and scattered light on the surface of water, leaves, flowers, glass, bald heads, etc that does not necessarily originate from the lens.
Filters On A Long Lens
In all my long years as a photographer, I never purchased a polarizer or any kind of filter for my lenses, until now. I assumed that these tools were better suited for landscape photographers even though I often found unbalanced light and shimmery glare on my bird images. I should have known better.
You can’t purchase filters large enough to put on the end of Canon’s big telephoto lenses. Most of Canon’s longer telephoto lenses come equipped (close to the base of the lens) with a drop-in gel filter holder (with a clear glass filter installed). Quality drop-in circular polarizers are expensive, and only useful on longer lenses.
Bottom line, the best quality of light for bird photography is still sun rise or sun set. However, opportunities abound for bird photography at mid day. A polarizing filter is a good light weight solution to tame the sun.
We spent some time in sunny Arizona recently. (NOTE: This excursion took place before it became so unseasonably sunny and warm in SW Michigan.) I don’t mind the cold Michigan winters so much, but this year’s dreary cloud packed skies were just too much. Just had to get away, so we packed our bags and camera equipment (Traveling light with the 300mm lens and 1.4 extender. No flash unit) and took off.
We rented a condo for a week in Scottsdale, AZ with the 71 acre Vista Del Camino Park as our back yard. The park includes 3 small lakes and attracts a wide variety of waterbirds.
Green Heron, Sedate and Watchful. ISO1250; f/9 1/2500 Second
Photographing A Rather Sedate Green Heron
Green Herons are usually solitary and secretive birds. This stocky specimen, obviously acclimated to humans, let us get closer with the camera than I expected he would. He stood motionless, alert and hunched, not bothering to watch me. As I slowly moved the camera closer, he descended the steep bank and eventually rested on a partially submerged rocky perch. I moved my rig down the bank as well, trying to get the camera closer and at eye level.
It was early morning and the bird’s glossy plumage blended appealingly with his dappled surroundings. His back shimmered with rich multi-layered contoured feathers in tones of green, teal, gray, black, and olive. Yellow streaks above his beak pointed to his striking gold eyes and black crest. The large rock in the back ground had burnt umber earth pigment tones, (possibly iron and magenese contained within the rock), with some light colored organic deposit on the sides closest to the water. Illuminated by soft, warm, dimensional light, the umber tones perfectly matched the feathers on the heron’s face, neck and breast. (NOTE: I was hoping he would extend his bushy crest, but no luck.)
Green Heron Just Before Lift Off. ISO1250; f/9 1/2500 Second
I had to reposition the rig multiple times, trying to level the tripod on the steep incline of the bank. Eventually one leg of the tripod dropped into the goopy mud- so there I stood, sinking with my tripod and taking lopsided photos of this beautiful bird. (NOTE: The lopsided images were easily remedied in post processing by using the Crop and Straighten image rotation tool in Lightroom.)
Clever Water Birds
A quick read of the literature about Green Herons reveals that these are very clever tool wielding birds. Multiple videos on the web show that these herons will drop a bait-like object onto the water’s surface and wait for an unsuspecting creature to nibble at it. The heron will continually reposition his lure to keep it within his grabbing reach. He is quick to snatch anything that takes the bait. This heron did not exhibit this behavior, but it was exciting none-the-less to observe and photograph such an engaging bird.
Ultra Zoom-Green Heron -Extending his Body Slowly to Reach Something in the Water. ISO1250; f/9; 1/2500 Second
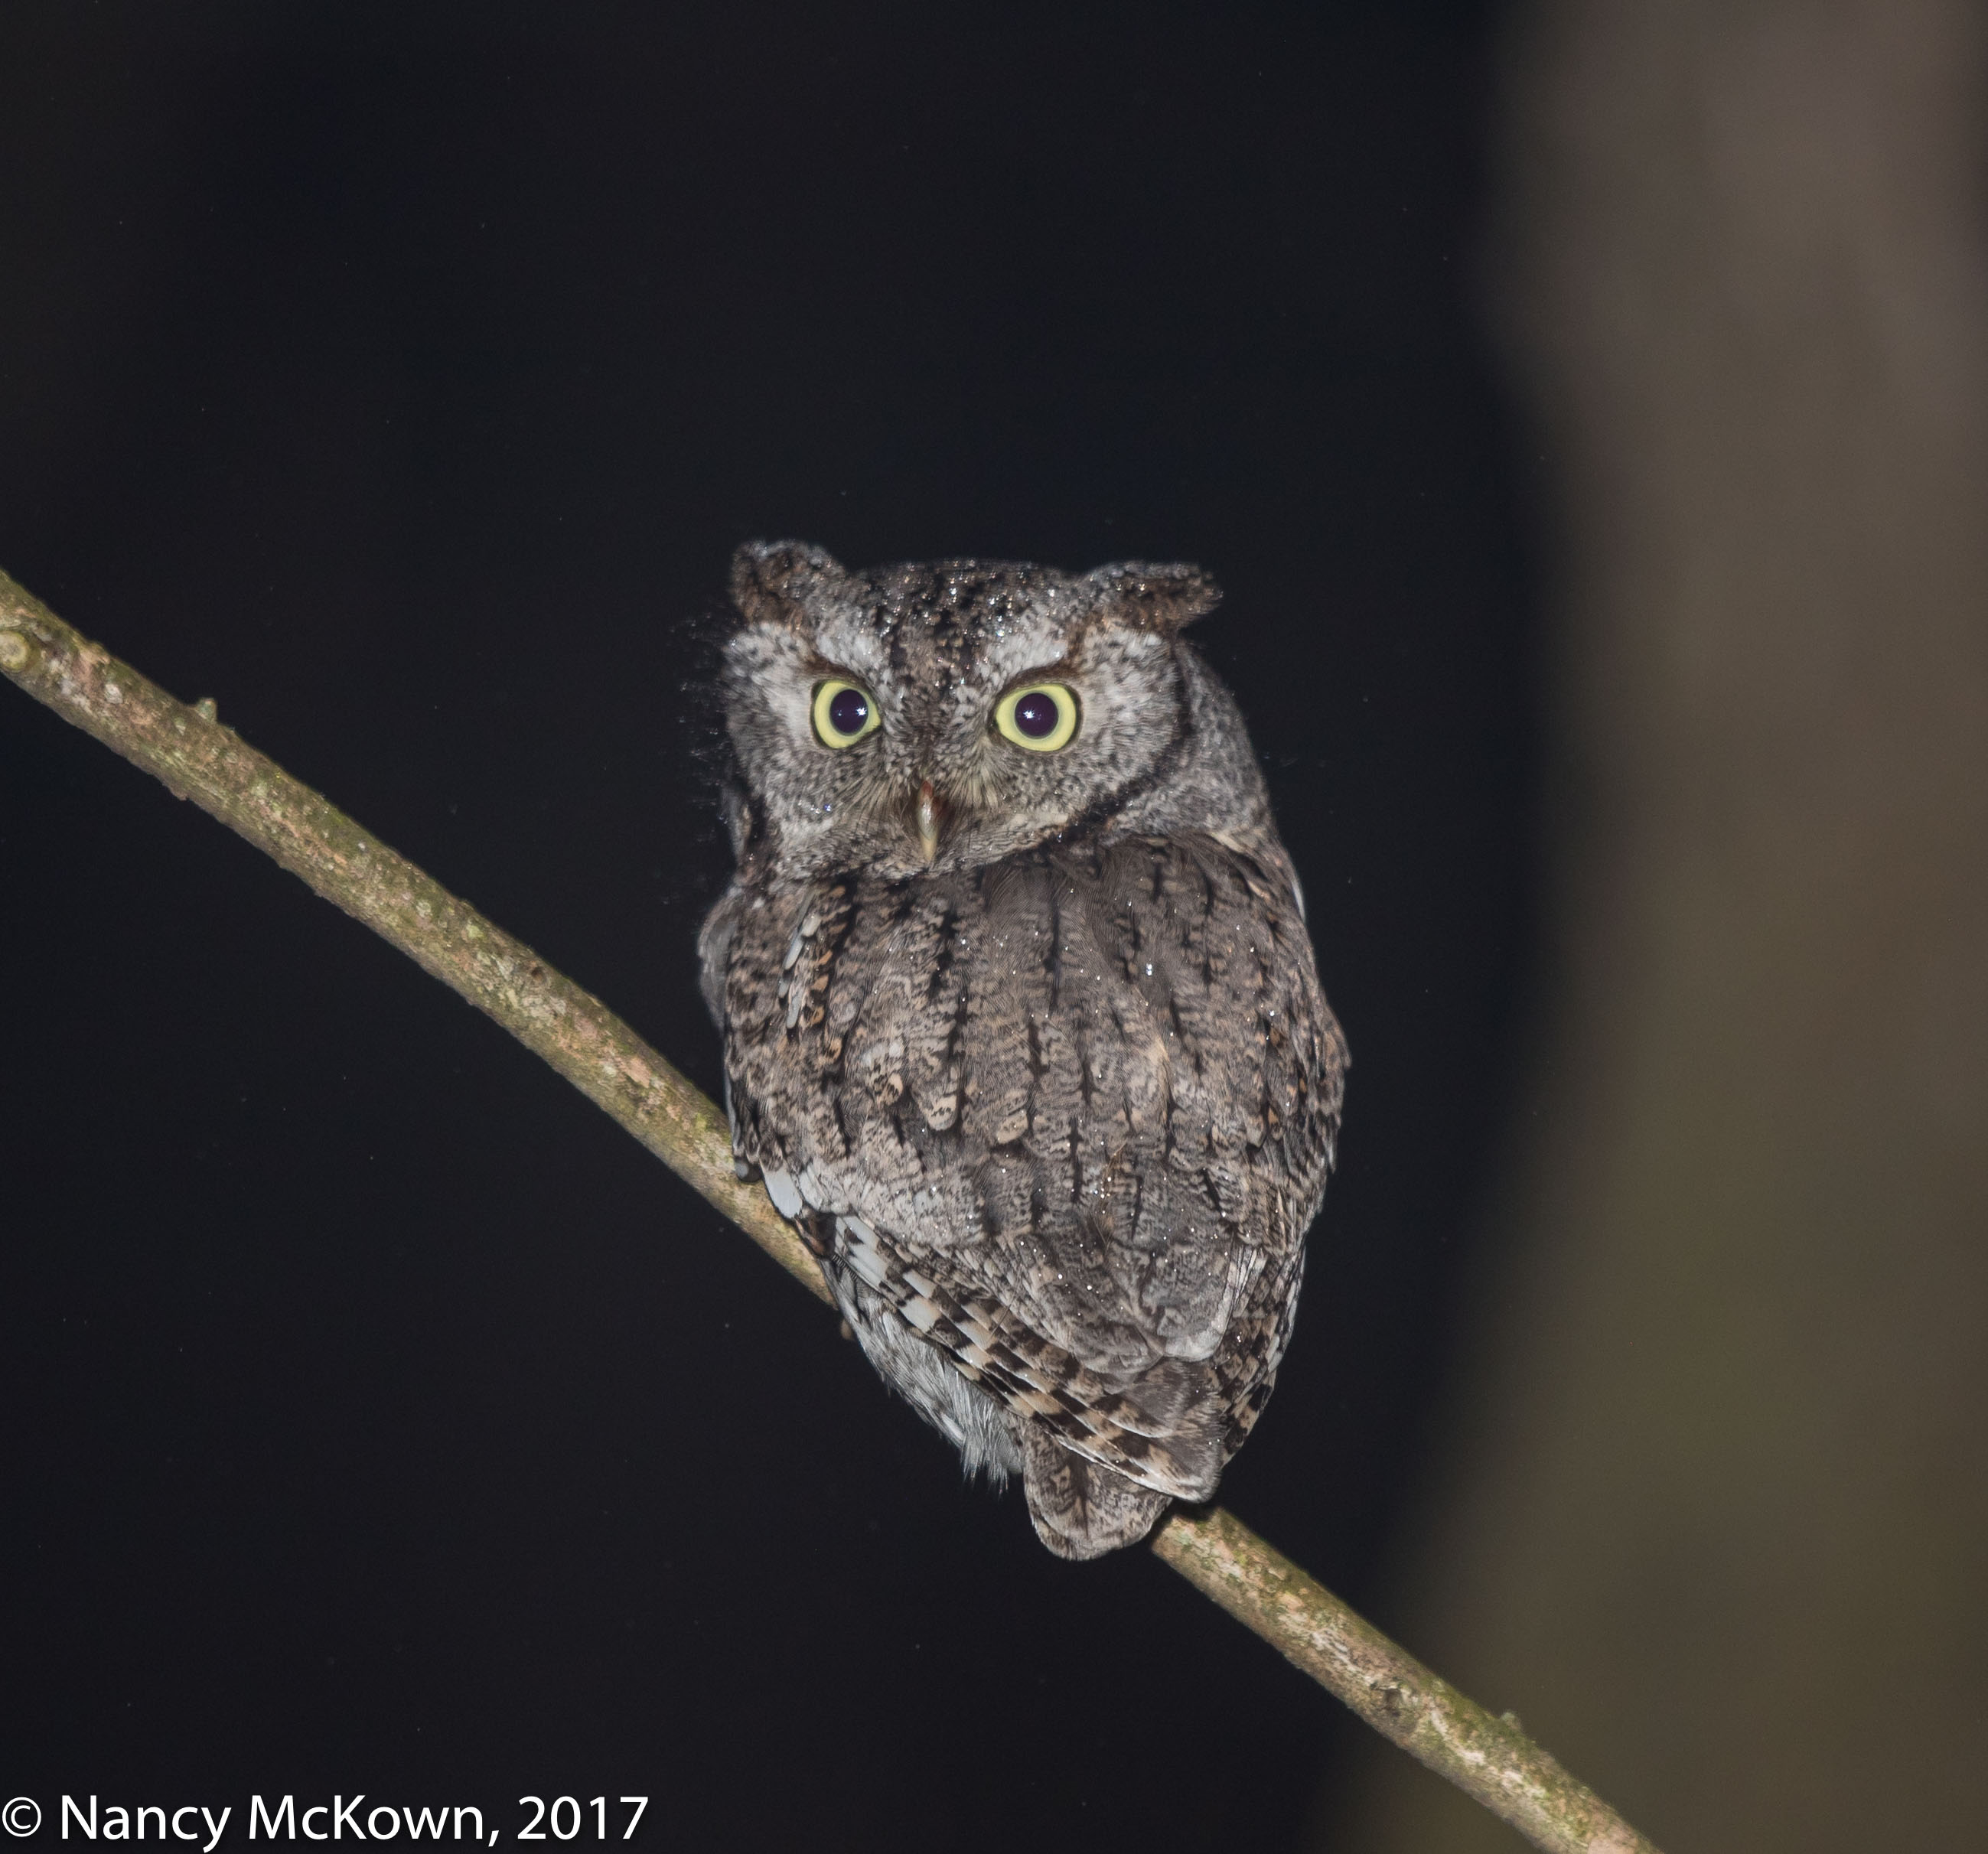
I have been photographing this little Eastern Screech Owl on and off for more than 4 weeks now and have been unable to capture him as he flies out of his box for his evening hunting excursions.
He exits his box at twilight, quickly, unpredictably, and without fanfare. I ready the camera and 500mm lens by connecting the shutter remote and locking focus. The flash is the main source of light, with some ambient light enhancement.
At the ready with the shutter half pressed, I’ve tried over and over to anticipate when he will make his speedy departure. No luck. I end up with images showing a whole body motion blur, streaking from the 3″ entrance/exit hole to the edge of the frame.
Eastern Screech Owl, Looking Back At Me In the Misty Rain. Is That Blood on his Upper Beak? Camera set to Program Autoexposure Mode (P). Please Note Program Mode’s Unaltered Exposure Settings ISO400; f/4; 1/60th second
What if I was to video the Screech Owl exiting his box and then slow down the video in post processing? From there, it might be possible to extract a single captured frame from within that video file.
The video functions on both of my DSLR cameras are unexplored territory for me. Time to learn something new.
Video and Program (P) Auto Exposure Mode
Rather than experimenting with the DSLR video function in Manual (M) mode, I set the camera to Program (P) autoexposure mode. In Program mode, the camera automatically makes all the exposure decisions, like it does in Auto (A) mode, but it doesn’t prevent the photographer from changing those settings. If the photographer alters one of the many settings originally set by Program mode, (ISO, picture style, white balance, aperture, etc) the camera will compensate on-the-fly, re-metering light levels and making the necessary exposure adjustments. Program mode does this by changing the variables that the photographer did not change, taking into account all resources available, including flash settings (not useful in video) and type/focal length of lens. (NOTE: You can even influence how the camera changes exposure parameters in P mode by fiddling with AEC or changing the light metering mode.)
My First Videos
I started out my DSLR video training one evening by producing a couple 2-3 minute videos. (Seemed like an eternity when I was filming). Filming conditions: Cloud-covered twilight, steady rain, 40 degrees, a bit foggy, window open, portable heater going in the background. (NOTE: I do not own video or studio lights.)
As with most learning endeavors, the more I read the manual and the more I practice, the better I get. I found that one of the most useful controls for video was the Q button (Quick Control) on the back of Canon DSLR cameras. It gave me access (in real time) to all sorts of video related functions, including Auto Focus, Frame Rate/Image Size/Compression, Audio Input Control, Headphone Volume, White Balance, Picture Style, and Auto Lighting Optimization.
Watch the Owl Exit in Slo-Mo
The 34 second slow-motion video of the owl flying out of his owl house is below. I slowed down this video clip 50%. (NOTE: The original video was close to 3 minutes long, however, my web hosting server has file size limitations. I had to reduce the length, resolution and quality of this video and eliminate all sound in order to get the file size small enough to upload it to my website.)
Pre-video preparation included the following:
Load a fully charged battery.
Insert the fast, high capacity memory card.
Set the video mode. The camera manual advises that 120fps in 1080p mode is best for slow-mo playback, and it did do a good job, allowing me to see fairly sharp individual frames despite the low light. (NOTE: Be sure you understand the options available in your DSLR for max video size and max video time.)
Once I put the camera in video mode, the viewfinder shut down. I had to control the settings via Live View from the LCD screen. Live View on the new Canon 1 DX Mark II camera is crystal clear and very agile. I can pin-point focus by using the touch screen (even at the edge of the frame), dial to loop through exposure settings, white balance, etc., and watch the LCD screen to see how my changes impact the picture quality in real time.
Post video production was done with I-Movie on my Mac Pro. Thus far, I have been unable to grab what I consider to be a high quality frame from the videos I shot. I will continue to try.
There is so much more to learn. Next time I will experiment with video with the camera in Manual (M) Mode.
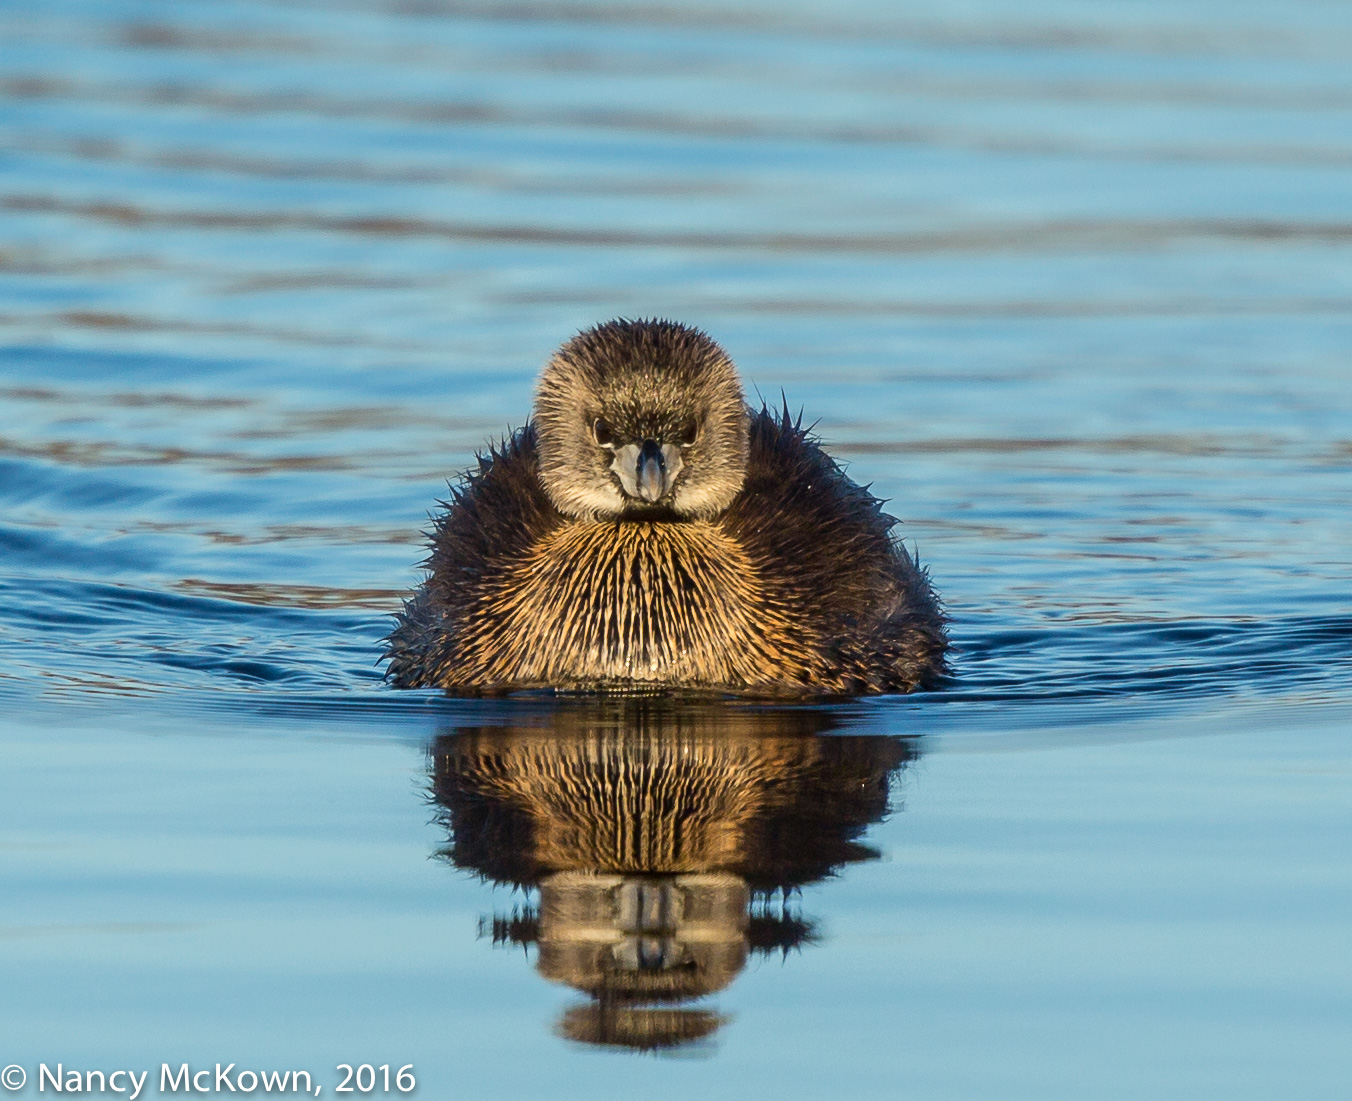
Pied Billed Grebes are water birds easily identifiable by their black chin and white, chicken-like, thick black ringed bills. Commonly referred to as little submarines, their quick and nimble diving behaviors allow them to rapidly disappear when threatened.
Pied billed Grebe ISO400; f/6.3; 1/800 Second
Elusive Diving Birds
I have never seen this bird flying, tending a nest, or venturing up on land. Last Spring, I found two promising locations near a local pond, visited both every day, and readied my camera whenever I spotted a Grebe. My goals were challenging: 1) Avoid the brown gunky look of dead vegetation floating in the pond water; 2) Capture a take off or landing shot of this water bird; and 3) Photograph one or two baby Grebe chicks with their parent(s).
Not much luck. When I did see a Grebe swimming toward the camera in open water, I was barely able to press the shutter (set for high speed continuous shooting mode) before he suddenly plunged under water, only to surface again clear across the pond.
Pied-billed Grebe ISO100; f/5.6; 1/500 Second
Intelligent Tracking and Recognition
Look at that face! I was surprised to see little square boxes in the camera’s viewfinder indicating that the camera had found and classified a round shape with 2 eyes as a face and was trying to prioritize focus and exposure by tracking that face. (NOTE: I had turned on facial detection for a family event I was photographing the week before.)
Face detection in DSLR cameras is mostly designed to recognize human faces, but many mammals and birds have faces that contain the same basic attributes as humans. This technology searches for facial key points like facial outlines, eyebrows, eyes, nose, ears, chin, and mouth.
Facial Detection Auto Mode
With facial detection engaged, Canon’s “intelligent focusing system” will search for face(s) and, once found, will track and prioritize certain focusing and metering functions on those face(s).
Some of the more advanced camera systems allow you to “confirm” the face rectangle(s) upon which focusing and metering will occur.
The need to use AE focus lock and AEC will probably be reduced since the camera will automatically meter and focus on the faces it finds.
Since the face detection system algorithms are programmed to follow the faces around, it is logical that the focus points previously set on the camera will not engage while facial recognition is operational.
Bird Recognition Built into Cameras
Face detection included in most modern smart phone and DSLR cameras is not face recognition. Face recognition goes beyond detecting by registering human face information and matching that info to a database of faces to specifically ID individuals.
The Merlin Bird ID app, published by the Cornell Lab of Ornithology, incorporates a bird ID process and a database of bird photos and characteristics to help the user identify birds. You simply upload a photo of the bird you want to ID and answer a few questions.
Bird recognition systems built right into the camera or lens can not be far away. 😎
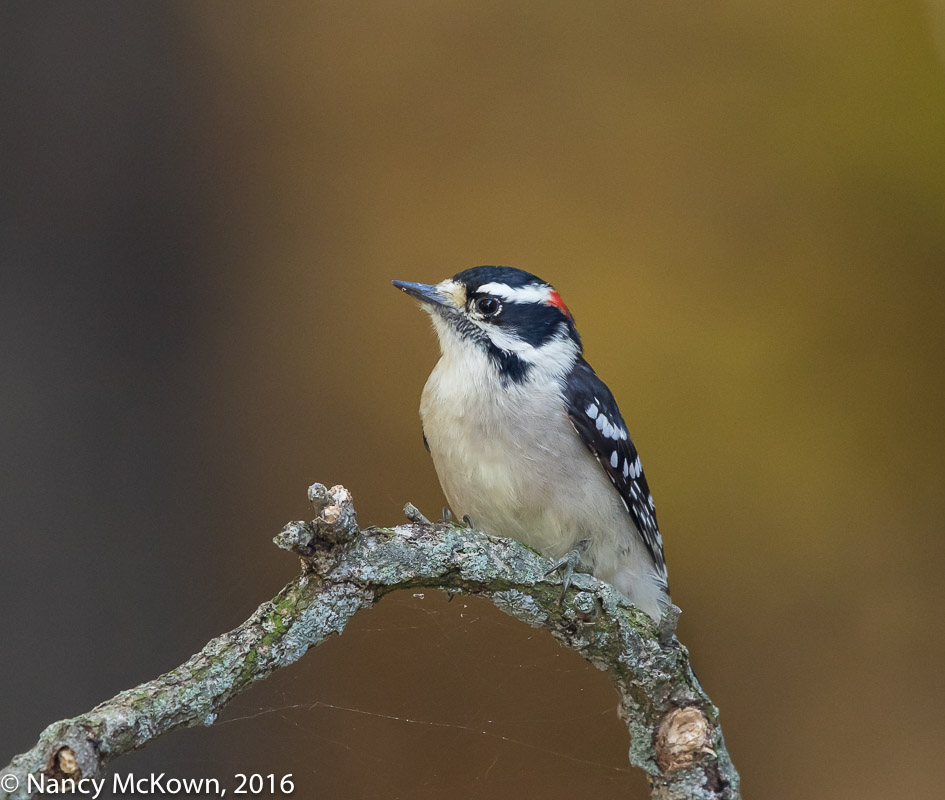
I think Downy Woodpeckers are one of the loveliest year-round residents in our yard. They are as numerous and predictable as Mourning Doves in Southwest Michigan. The ones around us have become acclimated to the camera and appear tolerant and watchful when I come around.
Like most birds, Downy Woodpeckers spend more time looking up toward the skies in search of predators than they do watching me. When they sense danger, most other birds quickly scatter, but Downy Woodpeckers often hide in what appears to be plain sight, hoping to camouflage themselves by being silent and motionless until the danger passes.
Downy Woodpecker ISO1600; f/7.1; 1/250 Second
Little Drummers
Downy Woodpeckers are not much bigger than the other familiar song birds at the feeders (titmice, chickadees, nuthatches). A small patch of red on the back of the head distinguishes the Downy male from the female. Their bills are straight and sharp, but do not look oversized on their faces like the beaks on larger woodpeckers do. In the winter you can often hear them excavating tree trunks and branches probing for deeply embedded insects and larvae. As Spring approaches they will drum more to communicate and entice partners.
Sharing Bird Photos
I love the challenge of photographing birds and publishing my experiences on a weekly web blog. Where else can photographers connect and share their work with so many people all over the world? Best of all, it gets me out to explore nature with my camera.
Anyone who maintains a blog knows that concealed naysayers and marauders come with the web publishing territory. Putting my images (good and bad) out there also makes me vulnerable to everything from condescending feedback to outright thievery.
Downy Woodpecker ISO1600; f/71; 1/250 Second
Pilfering Images
The web is a treasure trove of art that is technically easy to snatch…and apparently lots of thieves do so without a care. I was not surprised to learn that some individuals are illegally stealing my images and posting them elsewhere on the web without permission.
Google Analytics has web diagnostic programs that provide a multitude of reports about how my site appeals to readers. It calculates how many people visit my site, for how long, and from whence they come. However, Google Analytics does not spotlight web pilfering. To find out if your web images are being used for unauthorized purposes, tools like “Google Image Search” and “TinEye.com” are available. You simply upload an image and these tools will point to where else that image can be found on the web.
What to Do
One of the the most logical ways to foil attempts of thieves to sell hard copies of copyrighted images is to reduce the size of the image file to 1020×800 pixels, at 200 PPI resolution. The photo still looks decently clear and large on the web, but can not be used to print images larger that 4″x4″ or 5″x4″. This also has the added benefit of reducing site load times. This strategy won’t do much to thwart those individuals who want to display your images on a website or use them as a model for their art work.
Note: I don’t actively market my photographs, so I always appreciate it when artists contact me to ask for permission to use one of my bird images. My fee for a one-time use non-exclusive license is $15.00 per image for reproduction up to 5″x 7″.