Photographing a Blackpoll Warbler and Transitioning With the Light

Photographing a Blackpoll Warbler

It’s high noon, and I think I can see warbler-ish movement on the tree branches. Might just be the discordant breezes. Overhead, winds are moving the clouds around every which way, reducing and scattering light. The clouds are numerous enough that my scene changes by the minute….mostly under lit, with some intermittent and dappled brightness. The small patches of light make for uneven, spotty illumination with distracting patterns of shadows and highlights. The ISO reads 8000+, and then a stray sunbeam will penetrate the scene and the ISO drops down to 3200.

A tiny spider flies on his silken trapeze and touches down softly on the lens. One is crawling on my LCD screen.  A puff of breath sends him flying.

Photo of Blackpoll Warbler
Blackpoll Warbler
with Fill flash
ISO400; f7.1; 1/250 Second the Focusing Field

Limiting the Focusing Field

When my bird tracking misses its mark, the lens pans back and tries to focus somewhere in the dim woodsy background.  I set the range limiter switch on the lens to restrict the field on which the lens can focus to the area within 3.7 m-10m (or 12.1 ft 32.8 ft.). Much better.  Doesn’t waste so much time trying to achieve focus in the dark woods. (NOTE: I usually set no limitation on the lens because I often forget to set it back. By the time I figure out why the lens won’t lock focus, the bird is gone.)

Windblown Cloud Cover

There is no predicting the where and when of windblown cloud cover so I’ve attached the telephoto flash extender. I’d like to move this camera setup completely on to the deck, just to get the lens a little closer to the fountain and the tree branches where a new bird might perch. It certainly would be better distance wise.  I’m a good 25 feet from where my tiny avian target might land. Risky though… the birds might consider me too near for comfort and I don’t want to jinx the possibilities.

photo of Blackpoll Warbler
Blackpoll Warbler,
ISO400; f/7.1; 1/250 Second

Transitioning With the Light

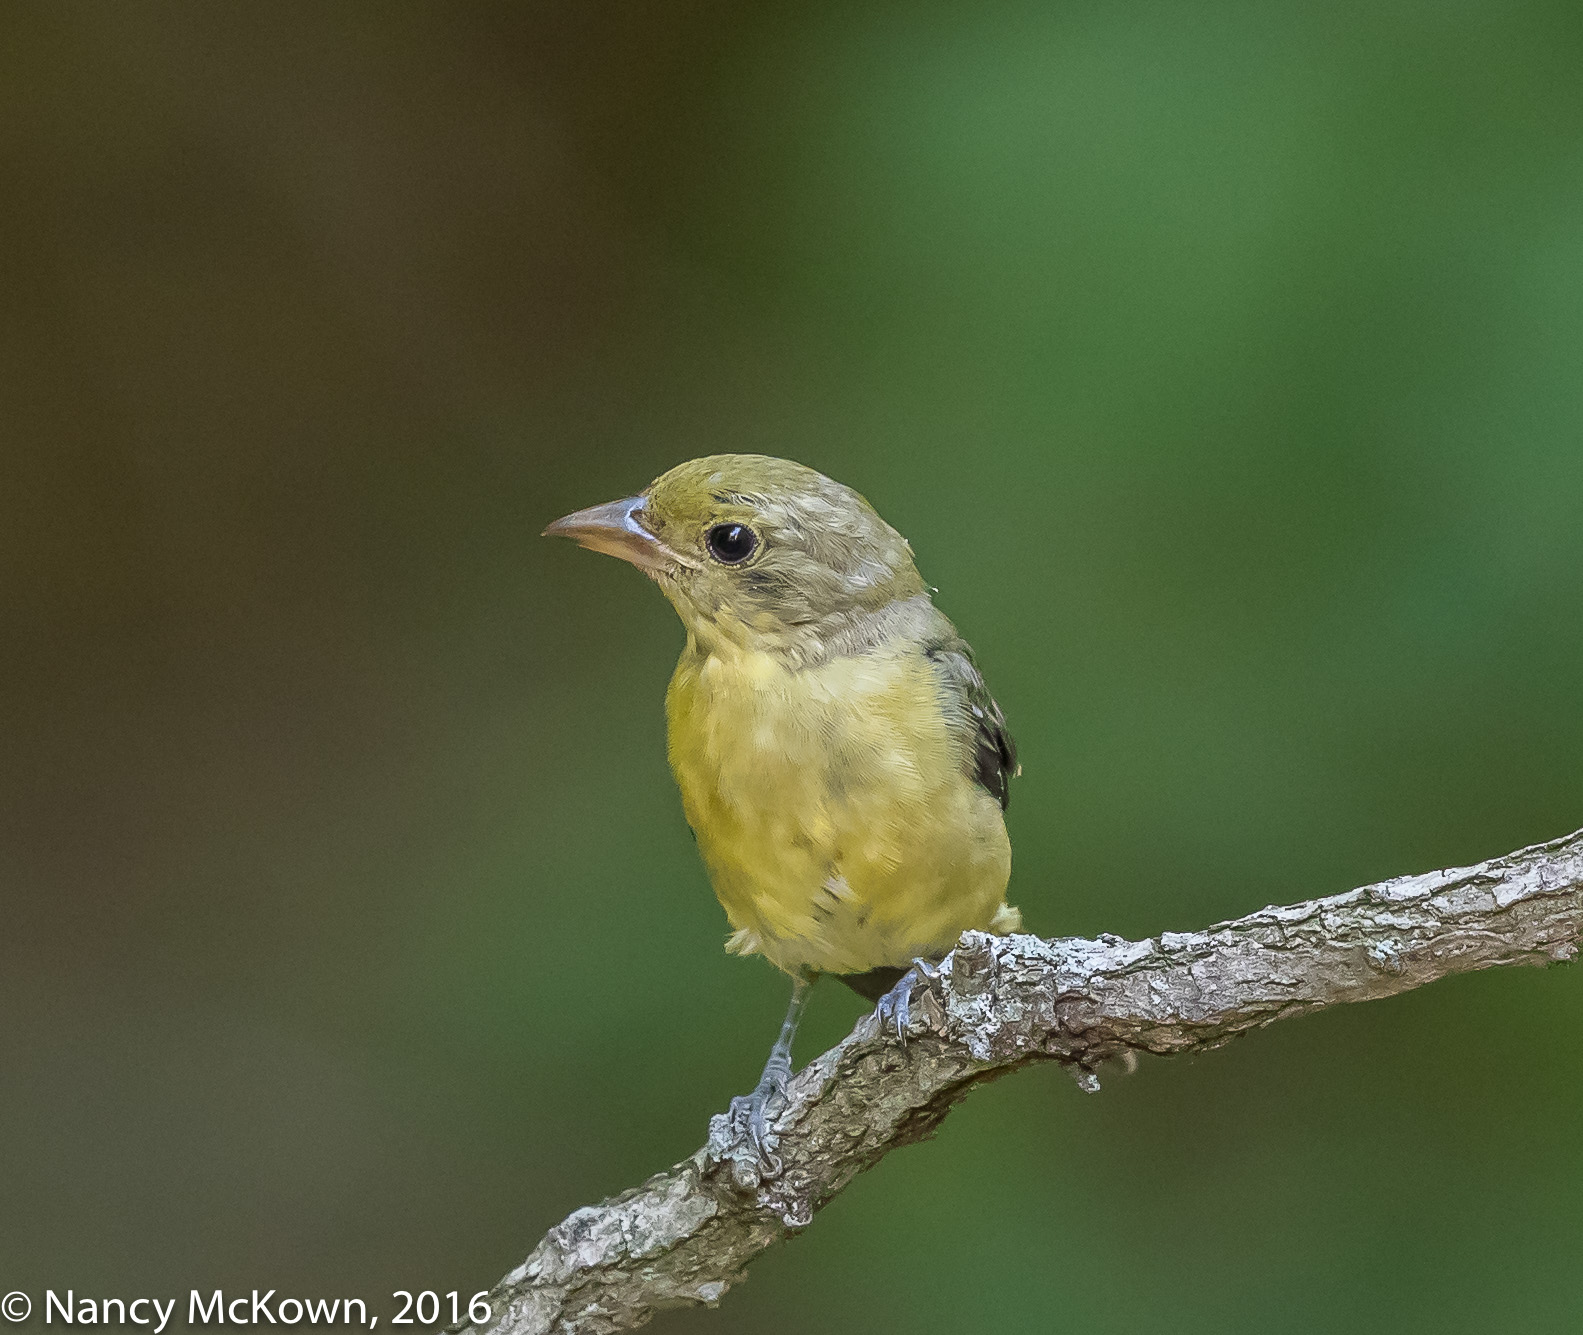
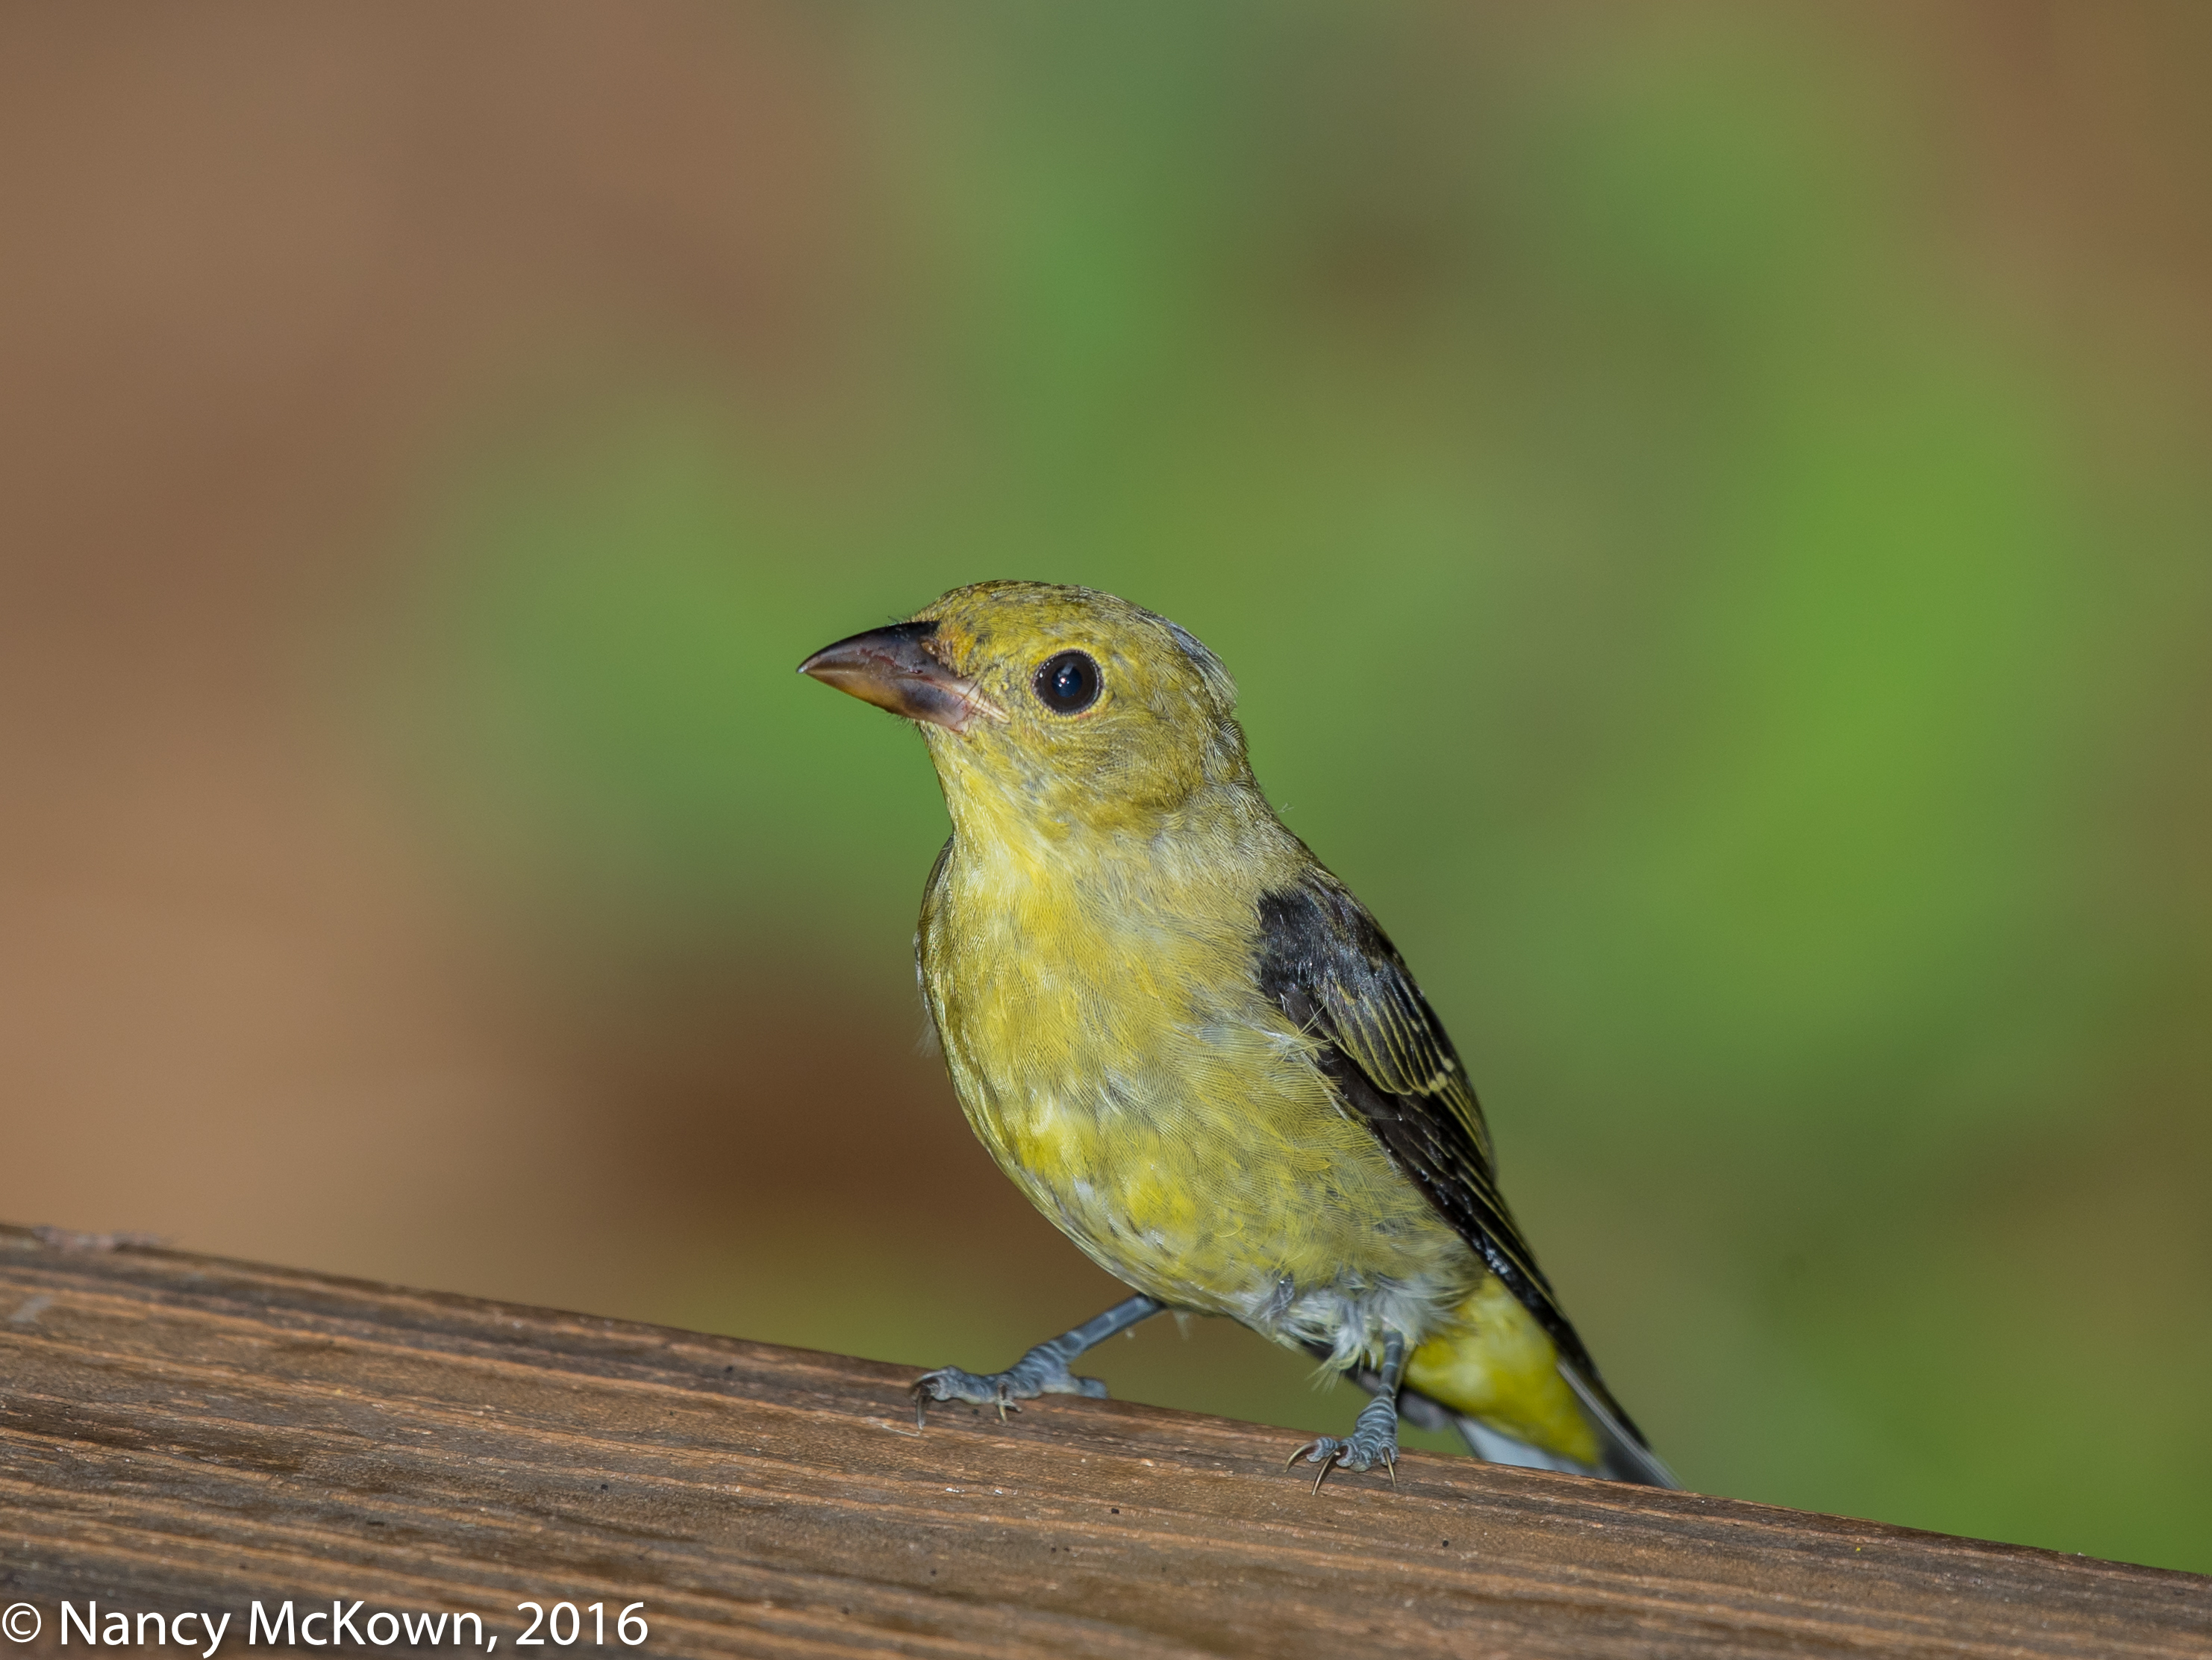
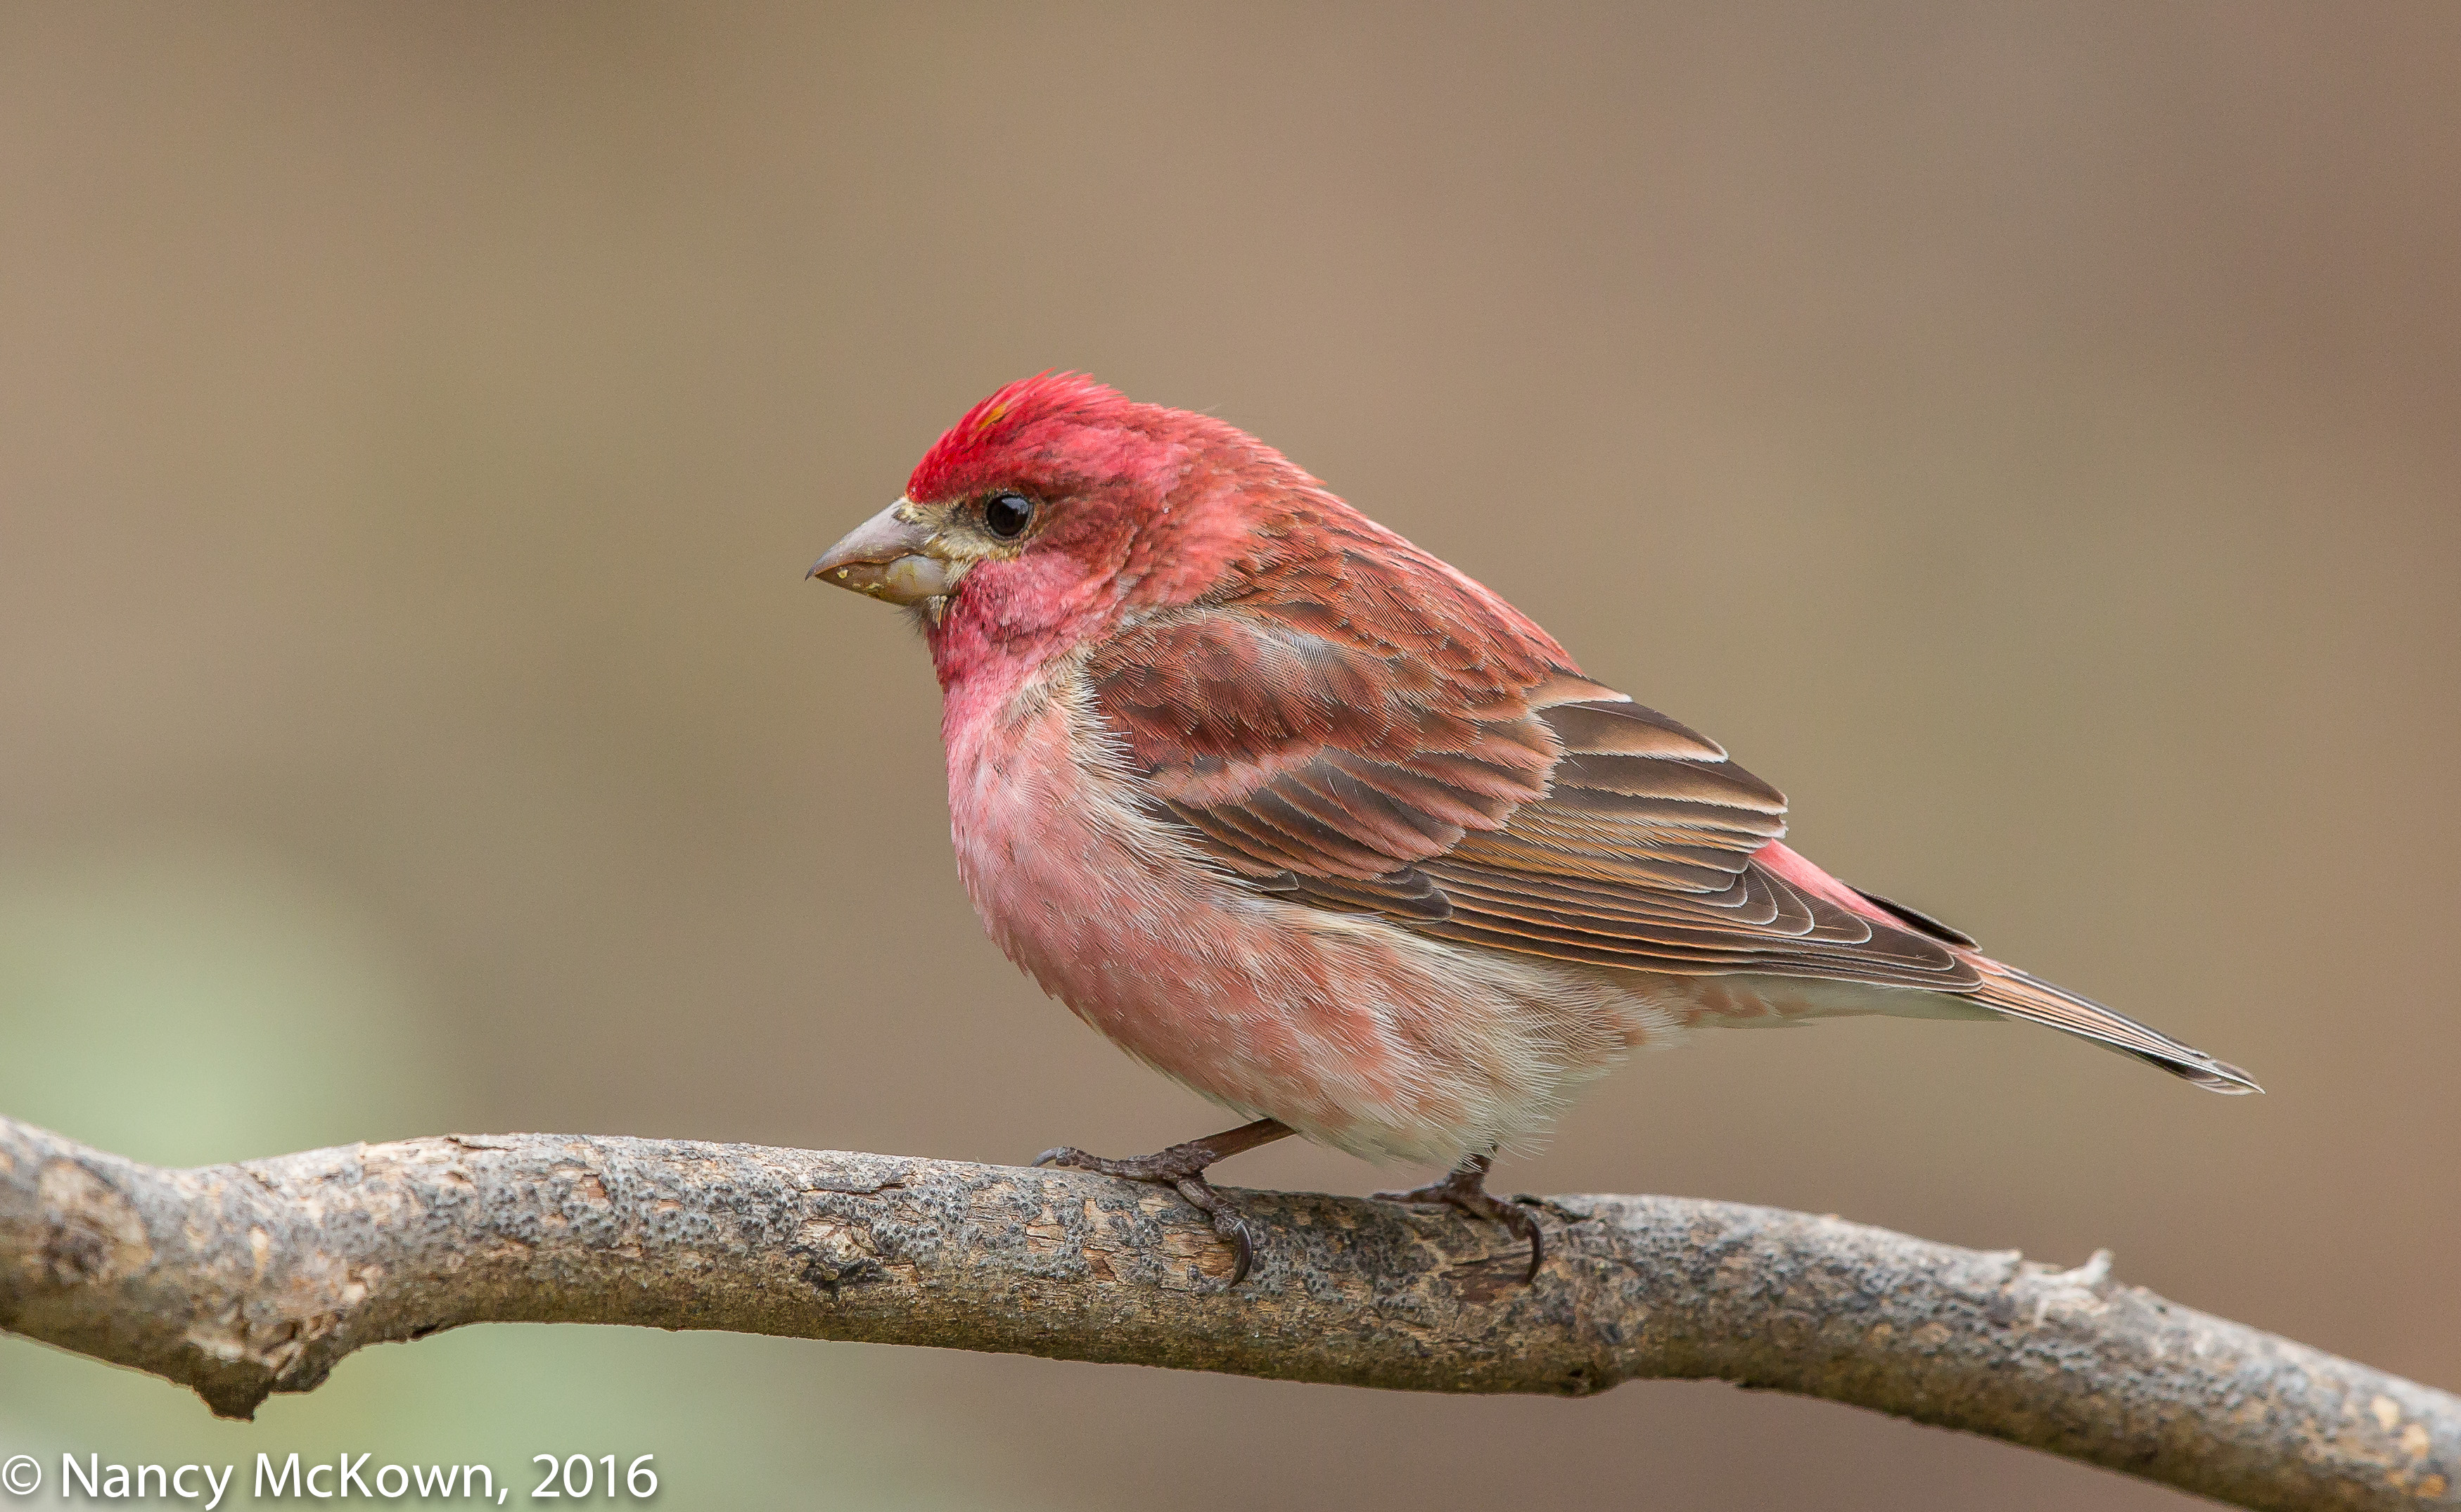
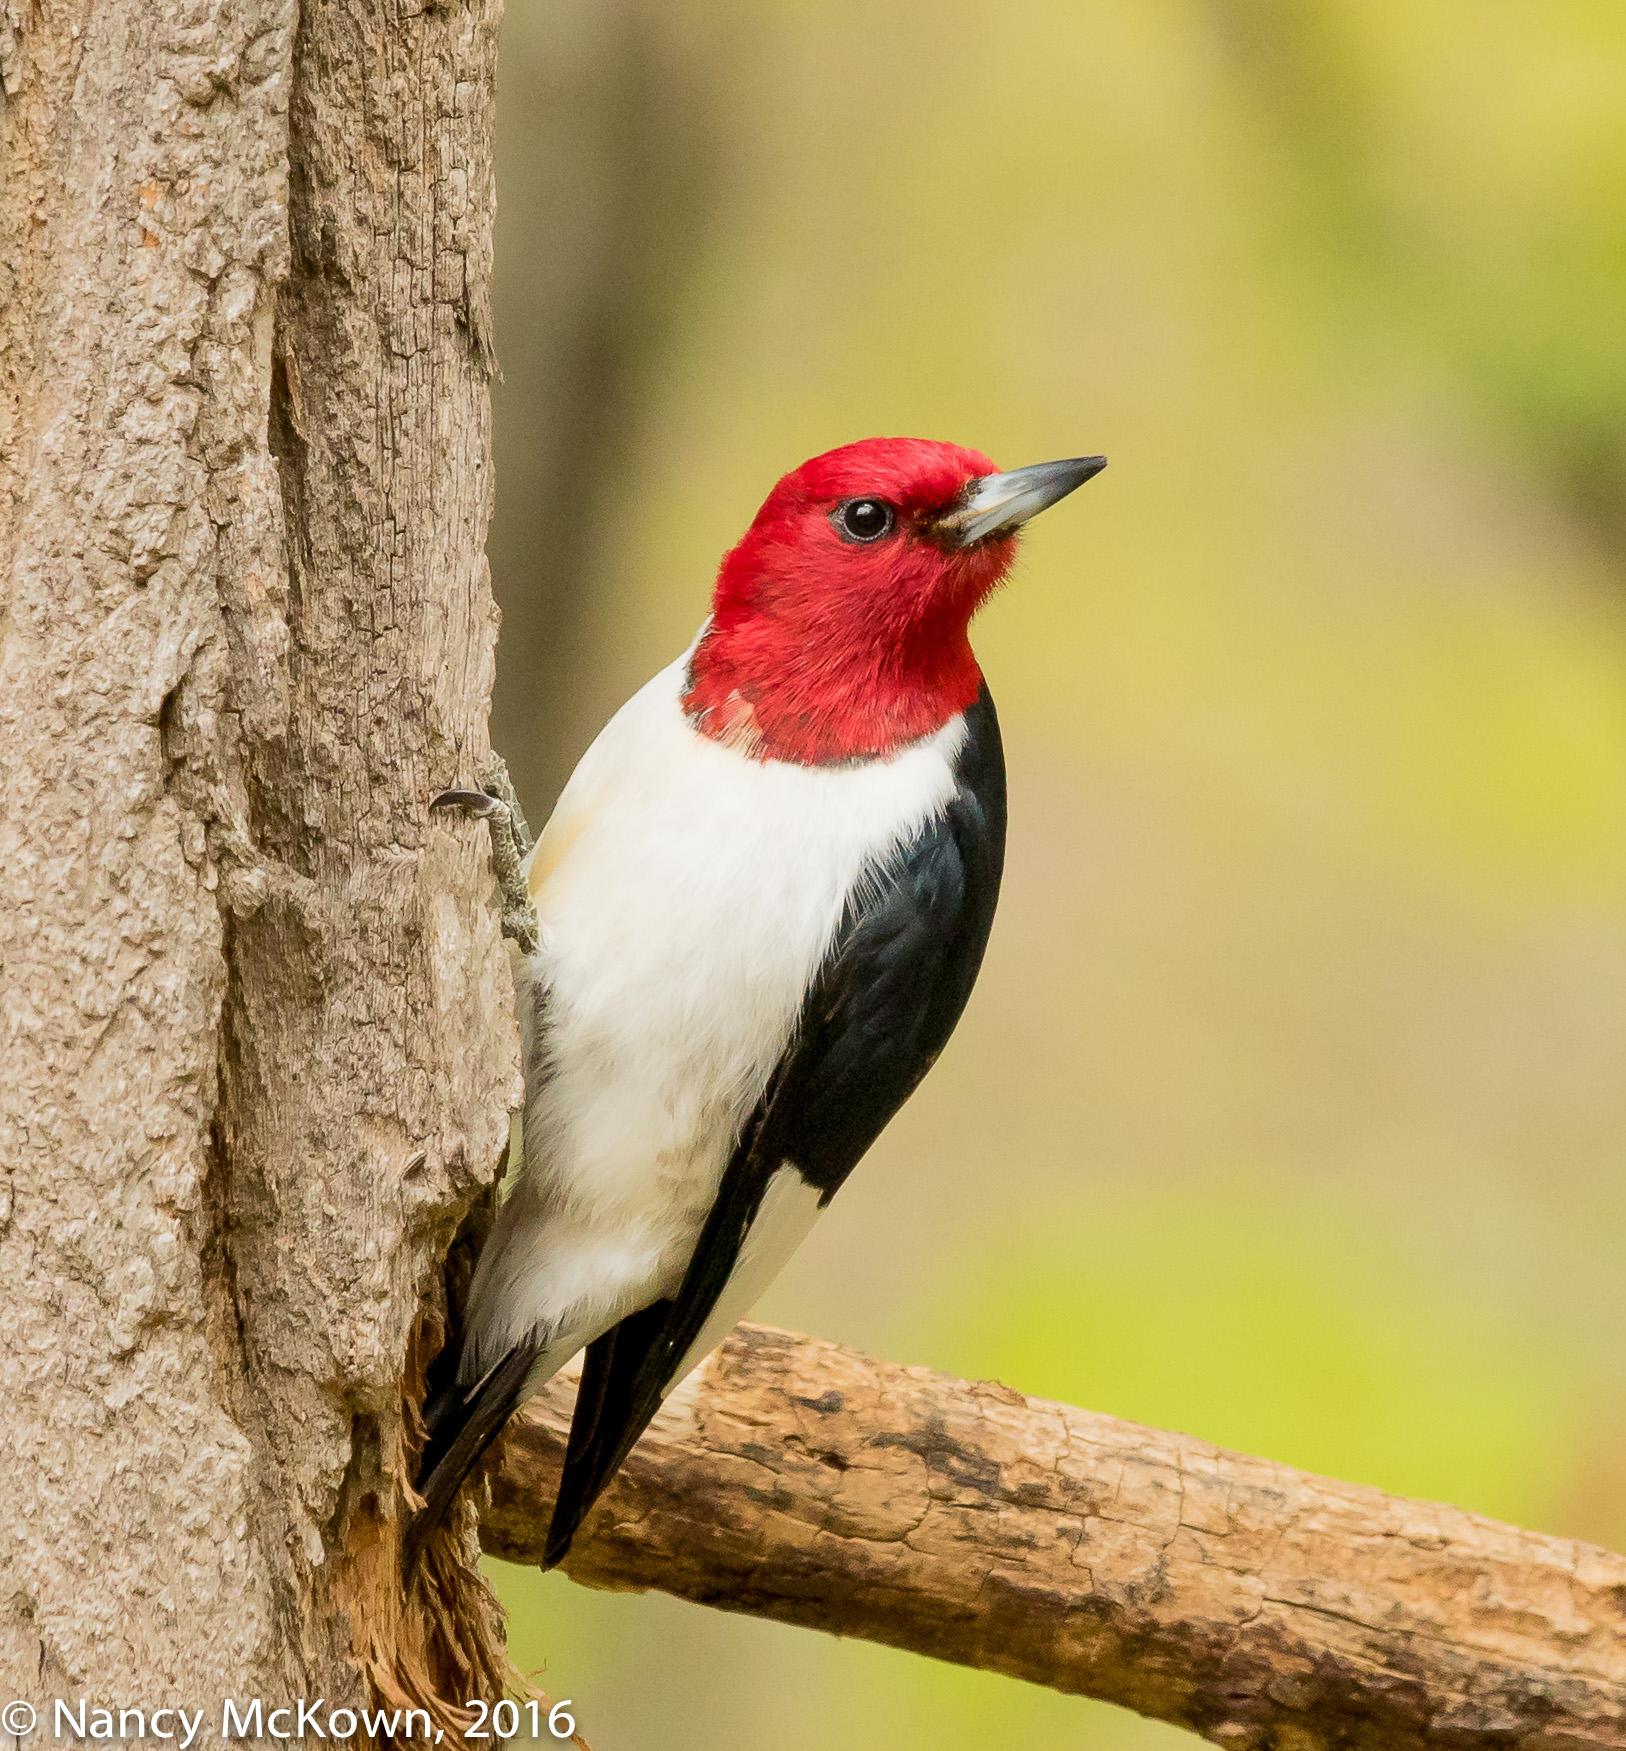
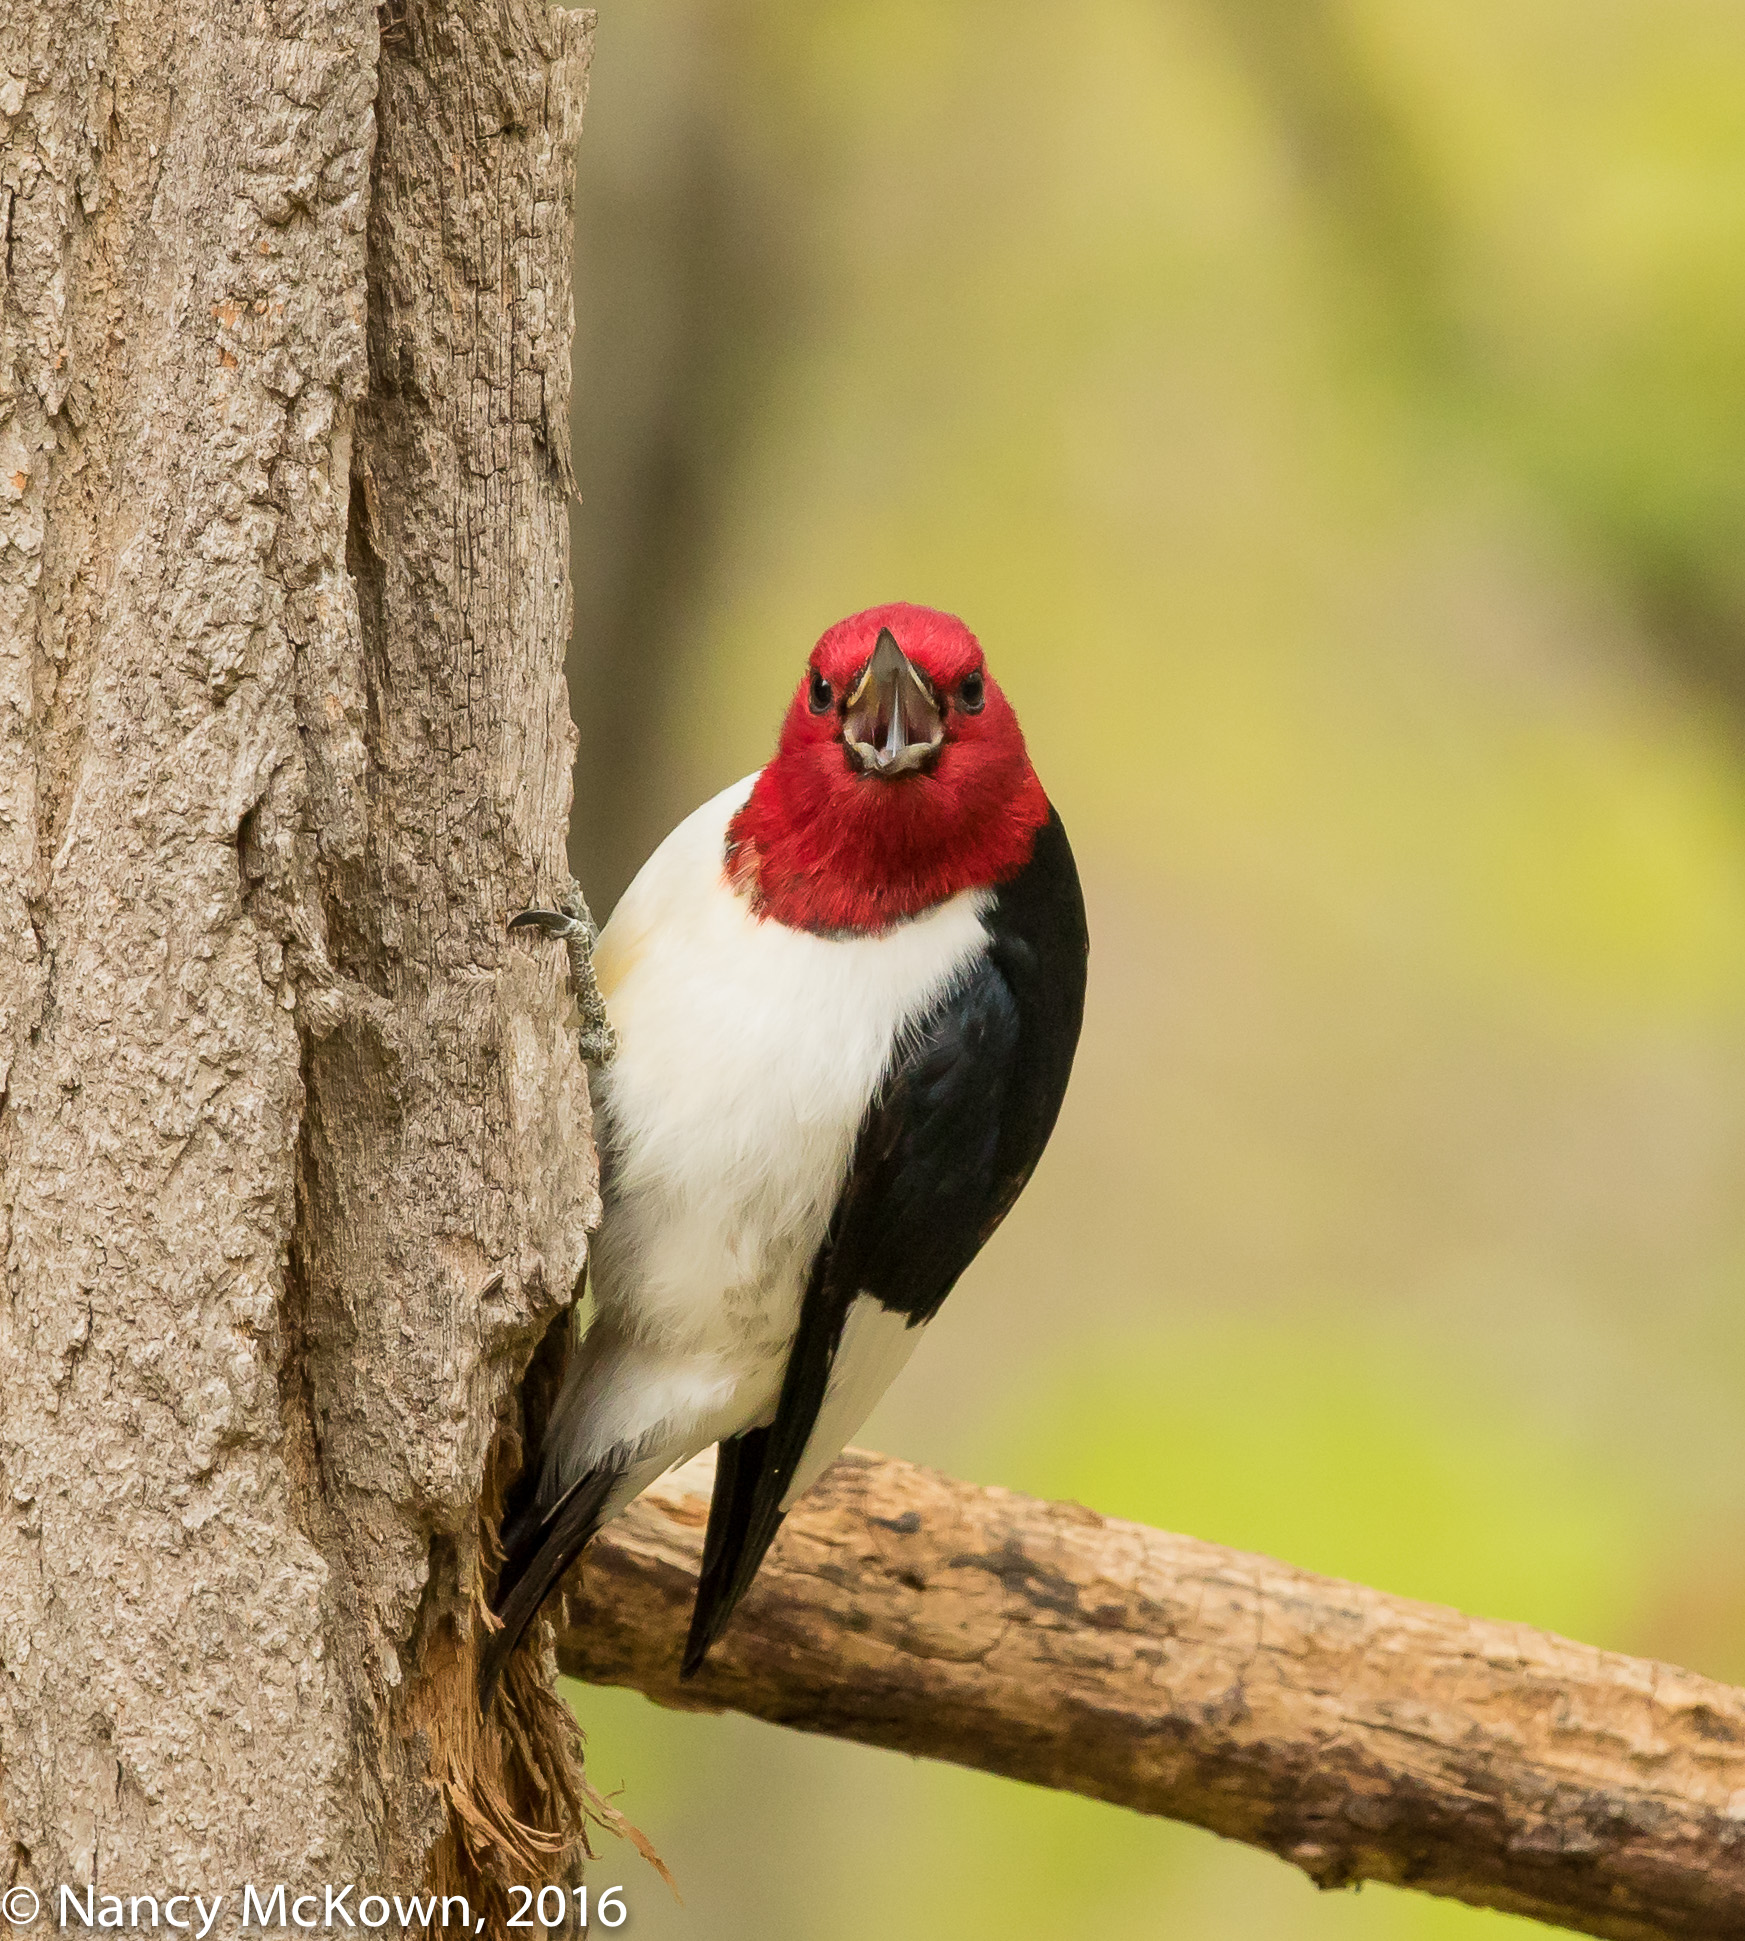
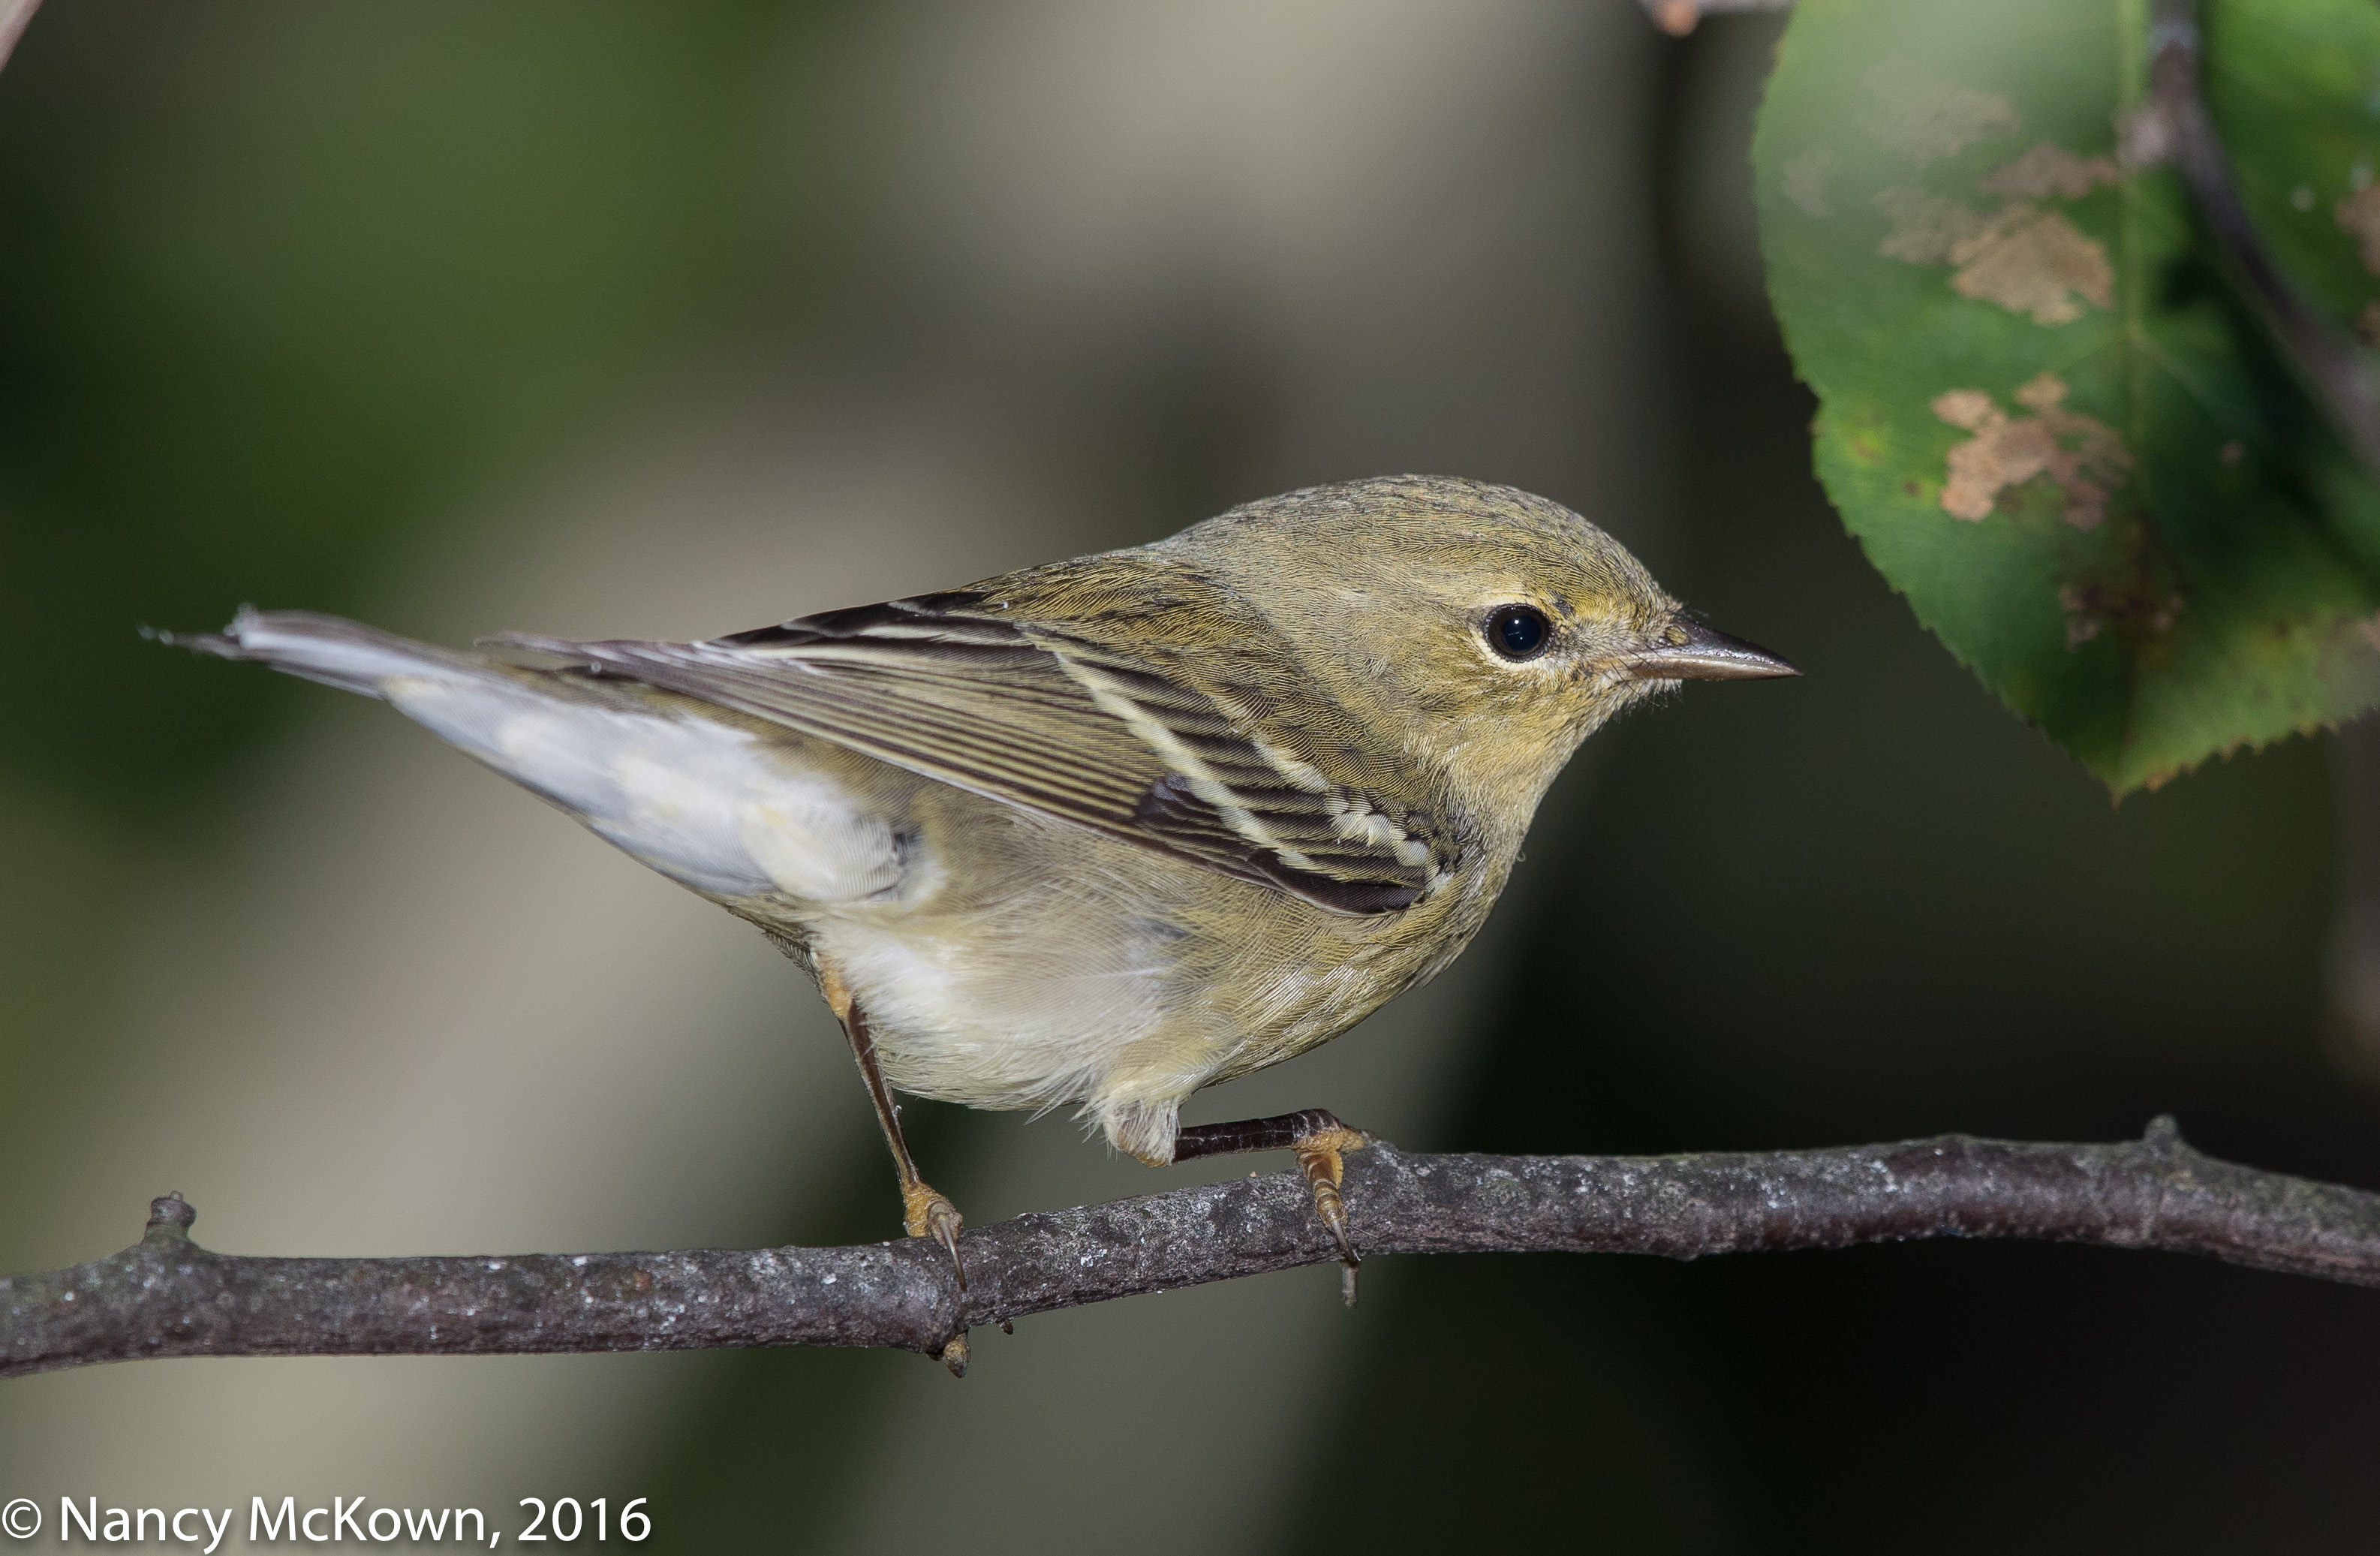
Photographing birds while dealing with extreme changes in lighting is manageable because I switch between telephoto flash when the scene is dark and Auto ISO when the sun’s rays filter through more. If the ISO reading is under 5000 I turn off the flash and shoot with available ambient light. (NOTE: Auto ISO and the previous shutter speed setting kick in the minute the camera does not sense the flash gun.)  If low light dominates, as it did when I photographed this Blackpoll Warbler, the flash remains on.

The flash provided ample light so that the camera’s sensor was able to capture the details of the highly branched feather patterns on this little bird. I especially like the first photo (posted above), showing the white downy fluff under the tail feathers.

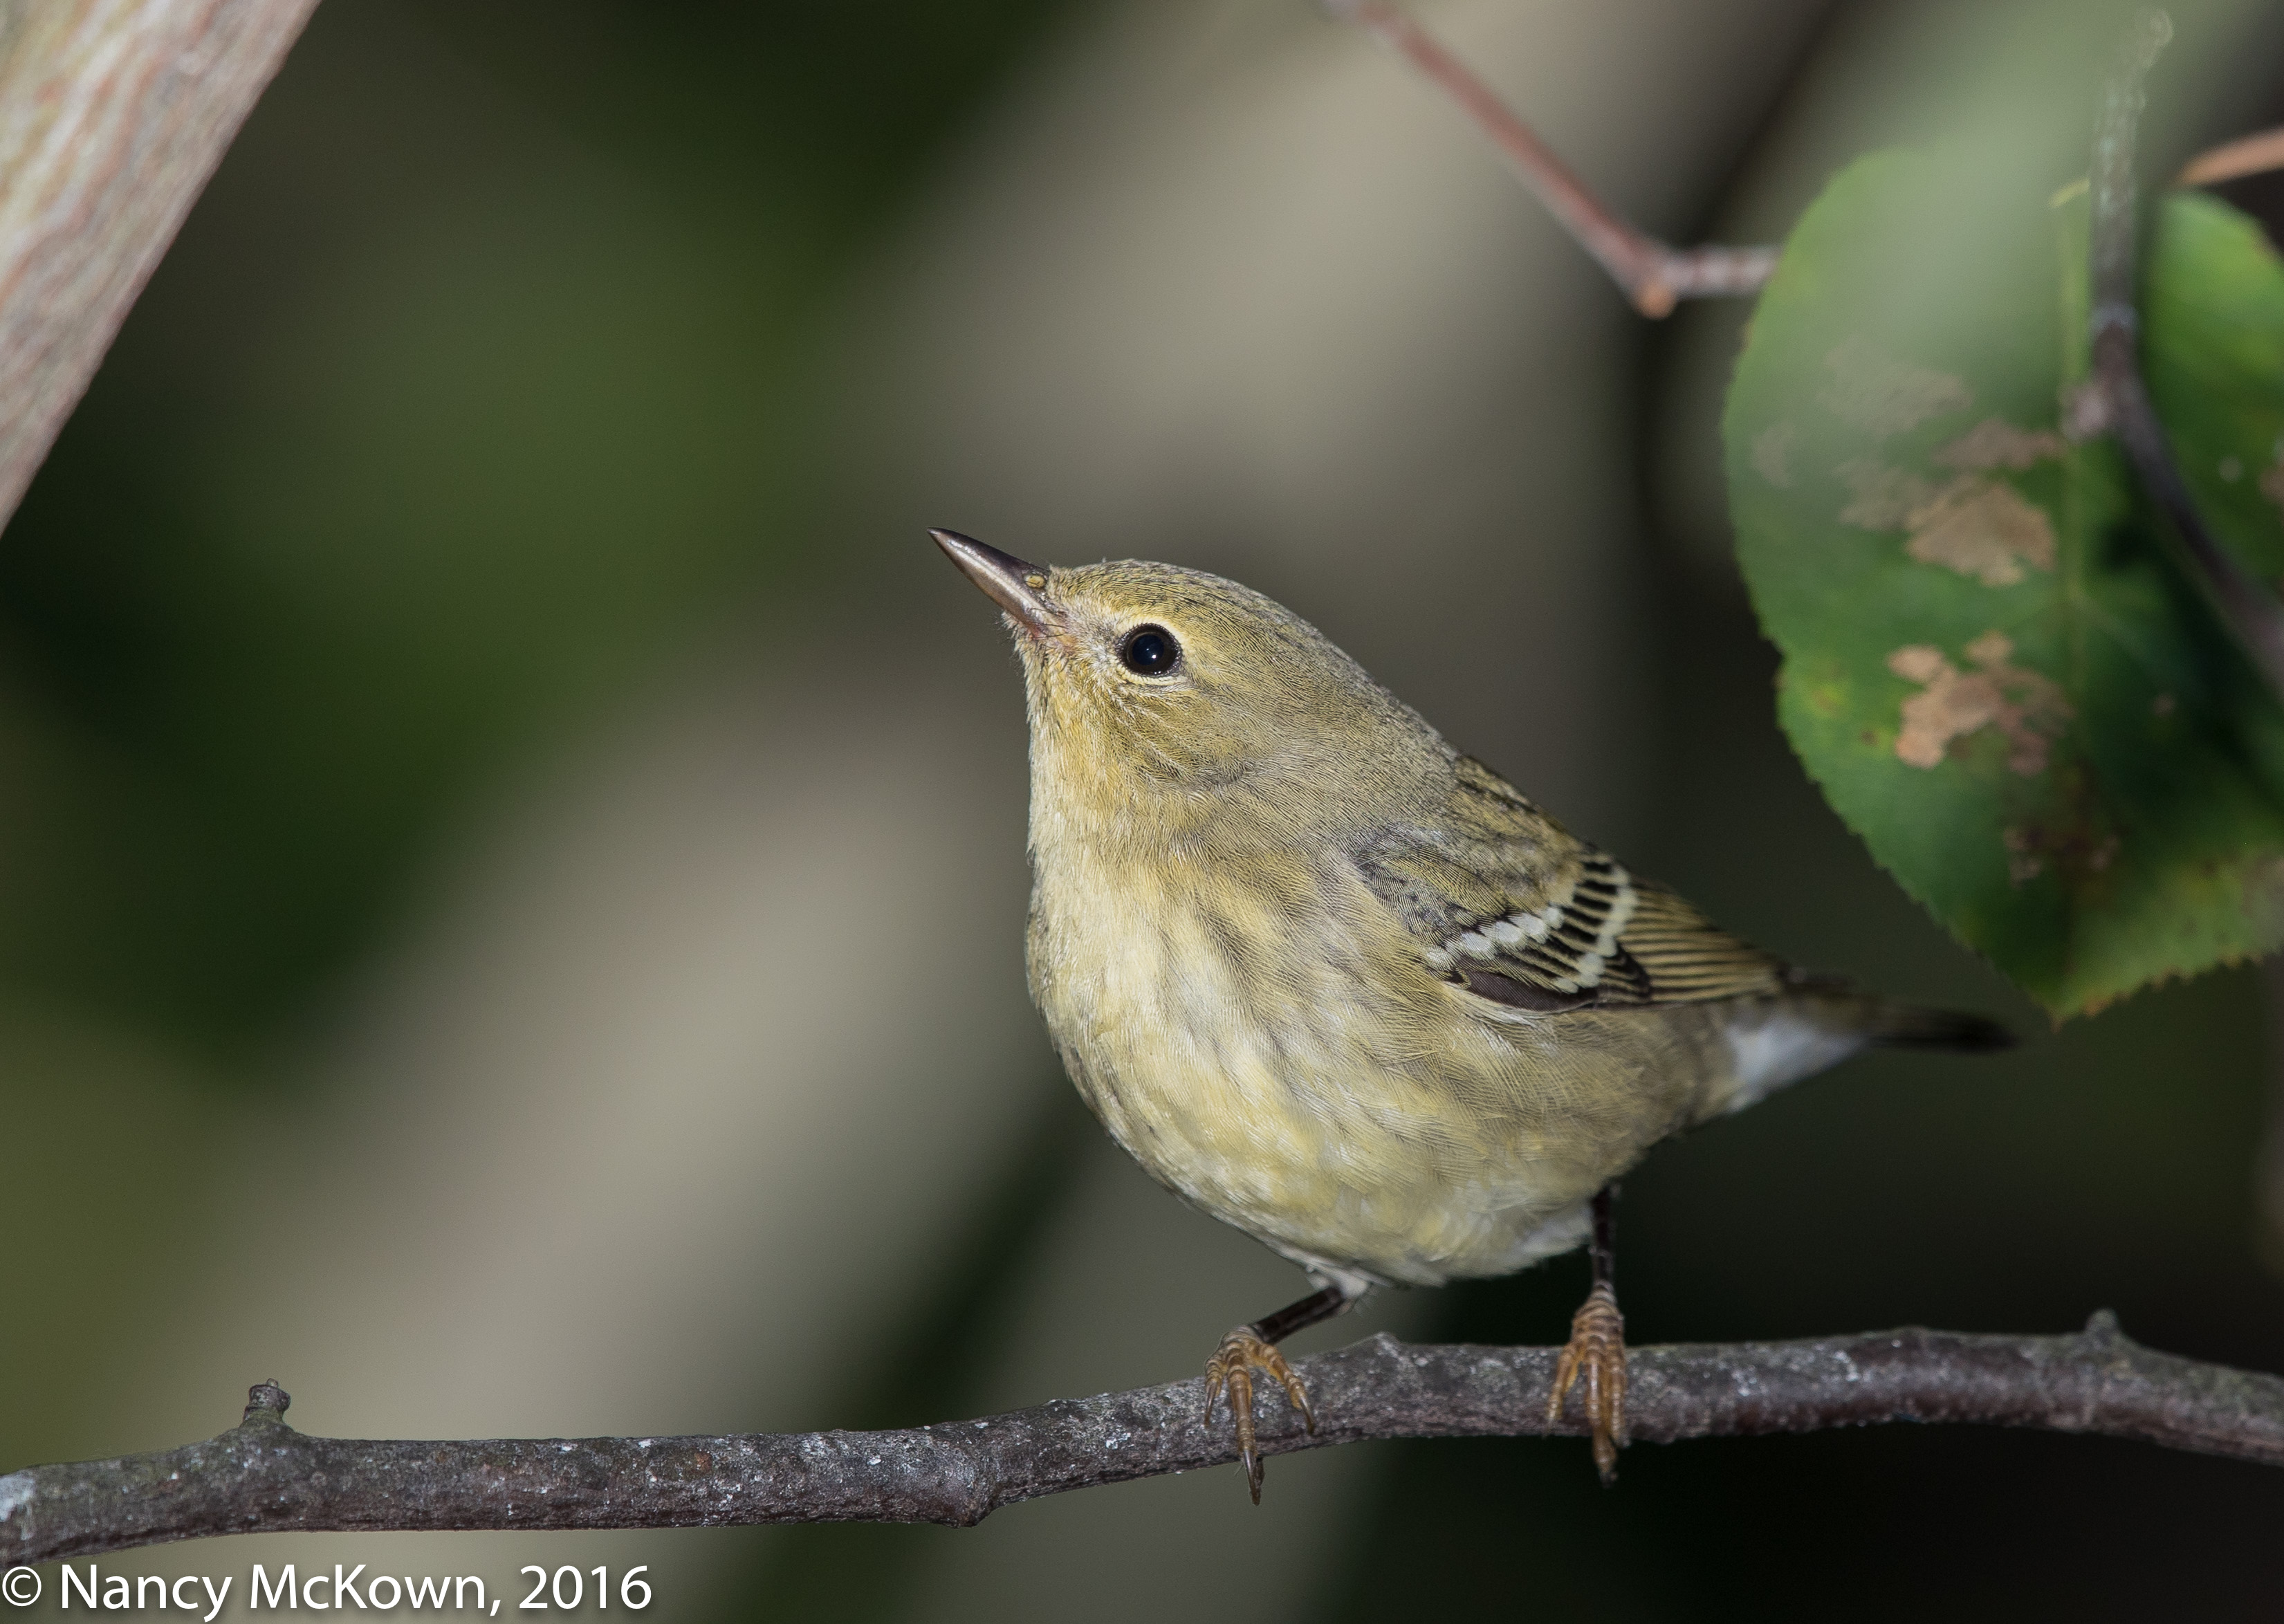
Avoiding the Look of Flat Light

It’s a simple matter to reach up and turn the flash on and off, as needed. What’s not simple is balancing the light from the flash so the image doesn’t look unnaturally bright in front and too dark in the background.

If the flash head angle is not right, the front lighting on the bird very often looks flat. Flat lighting means that the subject is so evenly illuminated that you see very little contrast and texture in your images. If the shadows and highlights lack variation, the details are less distinct- less alive. Think passport photo.

If you shoot in RAW, a little life can be coaxed into the image in post processing. You do this by boosting the saturation- or fiddling with the picture style to see if you can incorporate enough vibrancy to transform that flat light into something that looks more rounded and shows a broader dynamic range on the histogram.

As always, it’s more productive, creative and satisfying to get the light right in-camera rather then trying to fix problems in post processing.

Photographing a Female Scarlet Tanager with A Flash Extender –Part II

Better Beamer Telephoto Flash Photography

The purpose of attaching a telephoto flash extender to your flash is to narrow and extend direct illumination– farther than the usual flash blast can provide and powerful enough to brighten subjects at a distance and within the restricted field of vision range of a 300mm-500 mm lens.

Experimenting with Telephoto Flash Photography

For most of  my telephoto flash experiments, I set the camera to Manual Mode (M) and my flash to E-TTL. My Canon flashgun has an auto zoom feature. Better Beamer documentation suggests that if you have a zoom feature on your flashgun, set it manually to 50mm focal length.

In E-TTL mode, my Canon 580EX Speedlight flash with Better Beamer attached will work with any auto mode (P, Av, Tv,) or Manual (M)on a Canon DSLR camera to make exposure calculations. The quality of light and the distance between lens and subject change often in bird photography, so I let E-TTL and the camera do the exposure calculations and adjust the flash exposure compensation (FEC) accordingly. NOTE: My Canon DSLR cameras are often set to Auto ISO. When I attach a flash and turn it on, the ISO resets from Auto ISO to ISO 400.

Photo of Female Scarlet Tanager
Female Scarlet Tanager
With Flash Enhancement.
Light not well balanced.
Foreground effectively illuminated, but
Background somewhat underexposed
ISO400; f/5.6; 1/250 Second

Observations

Fine Tuning the Light From A Telephoto Flash

Depending on the ambient light, the flash can send a powerful blast or just enough to fill the shadows. The photographer controls the intensity and distribution of the blast by adjusting the flash exposure compensation dial (FEC) on either the flash unit or the DSLR camera. If the distance between the bird and the lens is close, it is often necessary to tone down the flash output to avoid the look of a harsh blast. If the distance between the lens and bird is farther away, I compensate by setting the FEC (+) to deliver a more powerful surge.  If backlighting is excessive, a flash can help compensate to make the light look more evenly distributed.

Most often, I begin with -1 FEC. Finding the sweet spot (the look of well balanced light in foreground and background) for birds perched at different distances from the lens takes time.

Photo of Scarlet Tanager
Female Scarlet Tanager.
ISO5000; f/5.6; 1/250 Second. Flash did NOT fire

Pupil Catchlight and Red Eye

Red eye/blue eye (light of flash reflecting back from the subject’s pupils) is a problem in flash photography. I do try to depress the shutter only when the bird is not looking directly at the camera, but often there is evidence of blue eye that has to be corrected in post processing. (NOTE: This is true even with the bracket lifting the flash above the camera.) In addition, I occasionally have to spend time in post processing making  the catchlight in the birds’ eyes look more natural.

Histogram When Using a Flash

One of the most helpful tools to measure the impact of the flash adjustment is the histogram on the camera’s LCD screen. The histogram is an information graph that maps dark to light…and lets you see how the camera is reading exposure. You will be able to check for brightness values and have a visual of whether you are underexposing (left side of histogram) or overexposing (right side of histogram).

photo of female Scarlet Tanager
Female Scarlet Tanager, with
well balanced telephoto flash
ISO400; f/6.3; 1/250 Second

ISO Considerations

I often have to make a quick assessment of available ambient light and the camera sensor’s ability to deliver a sharp image-without the help of a flash. To keep the ISO lower, I could underexpose and then artificially brighten in post processing, but this tactic introduces more noise resulting in less detail, especially in the darker areas. When the light is very low (as is often the case in a shaded yard) and the ISO is reading in the 8000+ ISO range, taking the shot using a Better Beamer telephoto flash extender is often the only acceptable alternative.

The second photo (above) of the female Scarlet Tanager was taken without flash…using a much wider aperture (f/5.6) and slower shutter speed (1/250 second) than I normally use in bird photography. The 5000 ISO shows some noise, but after post processing, I think the clarity and noise levels are acceptable.

Proper Depth of Field

In low light, I often have to widen the aperture to get proper exposure readings. With a flash attached to the camera, I have much more control over how I set the aperture and consequently, am able to achieve enough depth of field to get all of my image in focus.

Color Differences

The color and quality of light is ever changing… depending on the light source (or combination of light sources) atmospheric conditions, time of day, diffusive impact of clouds, rain and fog, and most importantly, the potency and the directionality of the light. Combining flash with ambient light often introduces unnatural tones of color in all or part of the image. If you shoot in RAW, this can be corrected in post processing.

In low light situations, a telephoto flash will most certainly bring out more detail and color information in the bird images.

Flash Power Recycling Requirements

I take a lot of shots when I am photographing birds and both my cameras react quickly and efficiently. However, bursting is not practical with a flash attached because the flash unit can not keep up.  My Canon 580 EX automatically shuts down if it gets too hot to prevent damage to the unit. This often means a lot fewer photos and possible lost opportunities.

NOTE: The recycle time was so slow on my Canon 580 EX flash gun that I had to attach an additional compact battery pack (adds 8 batteries) to speed up flash recycling.

NOTE: If the flash does not have sufficient time to recycle (or goes into auto shutdown mode) before the next shot, I often keep shooting. The shutter will revert out of max flash sync speed to the shutter speed previously set on the camera. I preset the shutter to 1/350 second in Manual mode just in case the flash does not fire. I consider this to be a more reliable bird photography shutter speed for sharp photos (on a tripod) then the 1/250 second max flash sync speed.

Warning!

Sometimes you just need to take a break and walk away from your tripod mounted gear.   Please be aware that flash gun with a fresnel extender set up on a tripod and pointed toward direct sunlight will get very hot, very quickly and may damage the flash unit and the camera (and possibly much more).

Flash as A Necessary Tool

Overall, I was reminded of how gratifying and comparatively effortless it is to work with adequate natural light. I’m also thankful for a responsive light sensor on my DSLRs that delivers quality images in relatively low light.

The goal of attaching a speed light with flash extender is to shed directed, intense and metered light on your distant subject and still maintain a natural look in low light environments. For the longest time, I have snobbishly shunned telephoto flash bird photography.  But I was too hasty and missed far too many bird photographs, especially those warblers who so commonly hide in the shadows or under foliage. It is time for me to forget the arrogance and figure out how in low light situations I am going to balance ambient and flash light to get the best natural looking bird photos that I can.

At least now when I get up on a dark dreary morning, there’s hope.  8-}


Photographing an American Redstart with a Flash Extender – Part 1

More Light!

It’s mid summer and the trees are lush with light blocking foliage. The three tiered fountain near our deck is attracting lots of Robins and a few new visitors. We are on the Lake Michigan migration corridor, so I expect (and desperately hope) that a lot avian transients will pass through our yard as it gets colder.

As the sunlight filters down through the branches in our back yard, it creates only a few sparsely placed patches of light. More often than not (and depending on the time of day) I can expect uneven light, high (8000+) ISOs, marginally sharp focus, and unappealing dark blotchy backgrounds.

Somehow I’ve got to introduce some more light, hopefully before Fall migration starts.

Photo of American Redstart Warbler
Male American Redstart Warbler
Underexposed…Taken with Flash Extender
Black feathers on this Male Redstart
Complicated Exposure.
ISO400; f5.6; 1/250 Second

Modern Camera Sensors

In low light, attaining correct exposure without flash often means taking the ISO high. High ISO numbers indicate that the subject was not adequately lit (after calculating shutter, ISO and aperture values) and the camera’s sensor had to increased its sensitivity in order to attain adequate exposure. The tradeoff to achieving correct exposure in low light is added noise.

It must be said that modern digital camera sensors need much less light than ever before to produce very good image quality (IQ) at relatively high ISOs.  But IQ is so much better on these modern cameras at base (or close to base) ISO.

The goal of introducing artificial light is to improve image quality by lowering the ISO.  (NOTE: All light does not look the same to a camera’s sensor. A color temperature guide for photographers is available at this link.)

Continuous Lighting

Plug in strobes provide powerful light sources and enough of them can make your photos look like you used only natural light. These tools are expensive and cumbersome…more for studio lighting. Other types of continuous (or steady) lighting…like LED lights are not as efficient for illuminating the scene outdoors. Power requirements and light output are very low for LED, substantially lower compared to a flash gun where you can stop action and achieve close to base ISOs.

Flash Extenders

For a long time, bird photographers have attached a “flash extender” to their long lenses. The purpose of flash extenders is to more precisely direct and (more importantly) extend the illumination reach of a concentrated flash blast onto a distant subject and (hopefully) keep the look of natural light.

The most prevalent device on the market for telephoto flash photography is the “Better Beamer Fresnal Extender.” This inexpensive contrivance uses a plastic fresnel lens to redirect the burst of the flash so it is not wasting light by lluminating a wide area. Instead it and narrows and extends its reach. Think lighthouse!

Photo of Male American Redstart
Male American Redstart
Taken with Flash Extender.
ISO400; f/5.6; 1/250 Second

Considerations

  • Attaching a fresnel extender does indeed extend the reach of your flash  The operation is fairly easy, and you can control the amount and angle of light. Most importantly, the flash beam does not appear to bother the birds.
  • More light = faster and more precise focusing.
  • The E-TTL function (on most advanced DSLR flashes) allows the camera and flash to work together to automatically meter exposure. I usually set the camera to manual mode “M” and the flash unit to E-TTL mode. (NOTE: If I set the flash unit to manual, I would be giving up the benefit of letting the camera and flash do the math for exposure calculations.)
  • Attaching a flash unit directly to the camera’s hot shoe and angling it so it is pointing directly at your subject can produce dark backgrounds, harsh shadows, overexposed subjects and red eye. This is less true with telephoto flash extenders because of the distance involved between the lens and the flash unit. Hoisting the flash higher so it is positioned above the camera body helps to avoid some of these problems. NOTE: Raising the flash above the camera requires a modest investment in flash accessories. 1) Camera flash bracket made for telephoto lenses that will raise the flash off of the camera; and  2) an TTL off-camera flash cord so you can sync the flash’s E-TTL functions to the camera.)
  • AF assist beam on the flash unit (helps to focus in low light and tighten the subject’s pupils so that red-eye is less noticeable) only works in single shooting mode- but since this assist beam is designed to work within an area of 10-12 feet, it is useless in telephoto flash photography.
  • Draining flash batteries produce lower flash output and longer recycling times. Flash recycle times can be improved dramatically by attaching an extra battery pack to the flash. This will allow the flash unit to tap into 12 (instead of 4) batteries for power.
  • Flash maximum sync shutter speed for flash photography for my Canon cameras is 1/250 second.  NOTE: For flashes to work properly, shutter timing must be within limits of the max flash “sync” speed. This is because there must be enough of a time interval between when the 1st and 2nd camera shutter curtain mechanisms move. If the flash is not able to burst in this space when the whole sensor frame is lit, your camera will capture a portion of one or the other shutter curtain bar.
  • If High Speed Sync Flash is an option on your flash gun, you can set your shutter speed higher than the max flash sync speed and the flash will synchronize to the higher shutter speed. The flash duration for the High Speed Sync Flash is longer but the burst is less powerful. The faster your shutter speed, the more your flash power decreases. More battery power is used in this mode. I did not use this function because flash at the camera’s maximum sync shutter speed does a good job of freezing the action.
  • My flashgun automatically sets the Auto ISO to 400, so noise is not an issue.
  • The sparkling pinpoint of catch light in the subject’s eyes that is so attractive in natural light photography is not as impressive when photographing birds using a flash. NOTE: To avoid dead-eye, the catchlights must often be inserted in post processing.
  • It takes a little time to adjust the tilt of the off-camera flash so it is aimed correctly at your subject.

Time to Experiment

Experimentation is critical in attaining the right balance of light. Too much or too little flash mean unnatural looking images and headaches in post processing. I need time to practice and experiment more.  Stay tuned for Part II of Flash Extender Bird Photography.

Photographing the Lapland Longspur and Thoughts About Composition

Photographing the Lapland Longspur

The Lapland Longspur is an uncommon winter visitor in SW Michigan. Come Spring, this species migrates north to colder climates. Finding a Lapland Longspur in early summer, interspersed with other ground feeders like Horned Larks and Vesper Sparrows is a real treat. These rare sightings put me on high alert. I do NOT want to miss the shot.

Photo of Lapland Longspur
Lapland Longspur
Head and Neck Framed in the Center.
ISO2000; f/8; 1/640 Second

Luxury of Composition

I found this avian treasure late one morning while driving on a deserted county road in the Allegan State Game Area. He was foraging in a spent corn field near the edge of the road ideally close to the camera. Warm earth tone colors dominated the scene; consisting of mostly dark, plowed chunky earth in umber and ochre colors. A few dried golden stalks from last year’s corn lay in the field, reflecting the morning sunlight and complementing the bird’s plumage.

Before I brought the car to a full stop, I lifted the camera, 500mm lens and 1.4 tele extender from my lap and rested it on the bean bag cushion protecting the car door window. The Lapland Longspur noticed me immediately and stayed less than a minute, but it was enough time to get off a couple quick bursts.

That’s often the way it goes. The bird is long gone before I have a chance to think about the compositional options available to me.

Compositional Guides

I feel less pressure when an uncommon bird is unafraid and lingers within close view of the camera’s lens. I find myself taking more time to compose thoughtfully and precisely.

DSLR camera composing guidelines (available via the menu system) are customized to help the photographer visually arrange what she sees through the viewfinder. They serve as a starting point by overlaying a 9-part grid intended to help compose more artistically.

This framework allows you to mentally apply the “Rule of Thirds” by compartmentalizing the image into equal parts, horizontally and vertically. You then compose the scene by positioning the subject(s) in the frame in or around those intersecting lines, thus leading your viewer’s eyes to your subject(s).

Photo of Lapland Longspur
Lapland Longspur
Framed with Guidance from the Camera’s Viewfinder Grid.
ISO1250; f/8; 1/640 Second

Compositional Food for Thought

I find that applying the Rule of Thirds helps me pull together and balance elements when I’m composing — to accentuate the subject in a more pleasing and/or stimulating way. It also helps me visualize a square frame through the viewfinder, instead of the usual rectangular frame. (NOTE: To read more about image composition, press this link.)

Judicious cropping in post processing becomes easier when I pay attention to the rule of thirds while composing. So often my images have the bird positioned smack dab in the middle. That’s OK, but sometimes it’s compositionally prudent to shift your subject away from the middle point and accentuate other parts of the scene that may reveal a more complete story.

Of course, it helps when there is something captivating within the scene of my viewing screen to pull together.

Setting the Scene

Although I mentally apply the Rule of Thirds when photographing birds, I do not activate the viewfinder gridlines in my DSLR cameras because I find them distracting. I am more likely to use the grids when photographing people or places… where I have the time physically manipulate the camera and/or the subjects before I start shooting.

Being Prepared Only Goes So Far

Ultimately, being prepared only goes so far in bird photography. If I stumble upon unexpected bird activity, the primary objective is to deal with the limitations of light and location and capture the moment quickly. There’s rarely time to stop everything to indulge in the lavish luxury of setting the scene.

That said, I like to think that my quick GET THAT SHOT response to bird photography also includes a spark of compositional creativity.   😎


Photographing Purple Finches and Thoughts About the Groundwork of Nature Photography

Photographing Purple Finches

While I watch for birds to photograph around our home, I often see a fox, thin and young, with a shaggy tail and reddish coat blotchy with mud. I think of foxes as being wiley….clever, stealthy, patient and quick, but this one just comes ambling through the backyard in broad daylight, looking around for an easy opportunity (perhaps a sleeping squirrel?) as she passes through. She does manage to displace some of the birds – though they don’t look especially worried about her presence.

The Purple Finches photographed here were watchful of the fox, but did not scatter as she came trotting through the area where we keep our feeders. I did not expect any threatening encounters as the finches rarely hop down to forage at ground level, nor can that fox climb trees.

Photo of Male Purple Finch
Male Purple Finch
ISO1000; f/6.3; 1/640 Second

A Different Approach

Early one morning I watched this fox gingerly carry her small, helpless baby kit in her jaws. That started me thinking about workable camera/tripod layouts for a different sort of photo.

The camera setup (as it is situated in my library) offers an eye-level view of birds in the nearby understory trees. It is targeted to capture up-close shots of song birds; on this day, Purple Finches. The minimum lens focusing distance of a Canon f/4 L II 500mm lens = 12′ 14″. The feeders are closer to the library window than that, but the tree branches nearest to the feeders upon which birds alight are between 13 and 18 feet from the windows. Lots of interfering branches and leaves near this foliage and in the immediate background, but with the camera and long lens positioned so close, it’s not hard to isolate the subject.

As comfy and convenient as my indoor set up is, it would not work for my new imaginary scenario. I would have relocate outside at ground level within my heavily wooded yard and close to where the fox regularly visits.

Photo of Female Purple Finch
Female Purple Finch
ISO2000; f/7.1; 1/800 Second

Steps to Actualize Dreams

Fabulous bird photos don’t just land in front of your camera lens. Once you become inspired, well thought out plans and actions are required.

  • Setup must not interfere with my bird friendly environment.
  • Setup arrangement would have to have enough clearance for the lens to successfully track moving subjects, at least minimally.
  • Stealth is necessary. Must determine the best spot to set up blind, taking into consideration background, light, time of day, telephoto lens (see field of vision post), wind and weather.
  • Within the blind, I must adjust the tripod legs so they are as low to the ground as possible – 12″. (Tripod center columns removed.)
  • I will be in the blind for long periods, so I insert my campy chair. (The Crazy Creek Chair, light weight nylon, adjustable, light, padded, low to the ground, with back support.)
  • Watch attentively, wait and hope.

Preparation Does Not Always Lead to Opportunity

It took a couple days, but I successfully re-created this dream scenario into an actionable setup. I have watched and waited for many hours in that blind. So far, lots of resident song birds, squirrels, chipmunks, mice and deer roaming about, but no fox; at least none that I saw within the confines of my blind.

Perhaps this fox is more deft than I thought.

Resilience and Tenacity

Watching the birds interacting with their environment and visualizing possible scenarios to photograph constitute a lot of what nature photographers do. Then comes the strategizing and setting up to actualize those dreams. Often nothing comes of it, but there’s always a chance that you will be in the right place at the right time with the right equipment.. and you get the shot.

If something serendipitous happens while you’re out there, all the better.

Photographing an Immature Red Bellied Woodpecker- LCD Screen Glare

Photographing a Young Woodpecker

The perching bird looked like a newly fledged Red Bellied Woodpecker….innocent, very shaky, possibly on her maiden voyage out into the wild. No trace yet of the red tinted feathers that will soon appear on her head and belly. (For a moment I wondered if this bird was another species of woodpecker but the black and white streak patterns on her wings were very distinctive.) She used her oversized clutching zygodactyl feet to latch onto a cracked and decayed tree bough that had been pock-marked with dozens of woodpecker holes. It was an ideal perch for bird photography- one that we had erected between two trees in front of a lush green background and away from distracting branches.

The fledgling looked around for a moment, spotted her parent, then began her harsh rattling call to be fed.

Photo of Juvenile Red Bellied Woodpecker
Fledgling Red Bellied Woodpecker.
Notice the Motion Blur– This Young Bird is
Fluttering her Wings To Signal Her Parents.
ISO1250; f/7.1; 1/500 Second

LCD Screen Glare

My camera was setup on a tripod with the low morning sun behind me. I positioned the lens to capture (as the bird’s background) a multilayered forest of feathery ferns huddling at far end of the driveway. I adjusted the aperture a little wider than usual to transform those individual fronds into lush, polished buttery green swirls-  picture perfect bokeh.

At first when I magnified the camera’s LCD screen to take a look at the images, I saw only a harsh glare. I could not review the quality of the background or see any detail on the woodpecker’s feathers. Hoping for more bird action, I stayed in that location until the light was no longer appealing and then went into the house to review my images.

Photo of Juvenile Red Bellied Woodpecker
Juvenile Red Bellied Woodpecker Calling for Food.
ISO1250; f/7.1; 1/500 Second

Anti-Glare LCD Viewfinders

It’s not uncommon to have the DSLR camera’s LCD viewing monitor compromised by reflection and glare. LCD protectors (for phones, computers, cameras) are available to help alleviate this problem. They purportedly let you closely inspect your images outdoors without the distractions of reflections or shadows. An added benefit is the claim that these anti glare covers help prevent scratches on the camera’s LCD screen.

My experience has been that these covers do work to reduce glare, but the additional layer of plastic or glass on the LCD screen make the images less sharp and colors less vibrant -especially when I attempt to closely inspect with magnification. I don’t apply them to my DSLR cameras, phone or computer.

These days, DSLR camera LCD screens are engineered to be resilient. They can still be scratched if the camera is crammed into a bag along with piercing keys, zippers or anything sharp. The scarred LCD screen will most likely still display your images – but who wants to look at surface scratch marks every time you review your images?  Professional level DSLR cameras are constructed to be ruggedly handled, but it’s best to treat them with deliberate care.

See more photos of summertime fledglings in this post.

Photographing An Orchard Oriole – Dealing with Impatience and Glare Control

Photographing An Orchard Oriole

It was only 8:30 a.m., a couple days before summer solstice, when I spotted my first adult male Orchard Oriole. The male Orchard Oriole looks very different from the female with his velvety black head and glossy russet colored breast and lower back. True to their name, this species are found in semi-open spaces like orchards (and rarely at feeders like Baltimore Orioles). Most E-bird maps classify Orchard Orioles as uncommon breeders in Michigan.

(Note: I saw and photographed a female or fledgling Orchard Oriole last year.)

Photo of Orchard Oriole
Male Orchard Oriole
ISO1600; f/9; 1/1000 Second

Glare Control

On this morning, sunrise was 6:10 am, at which time we were at another location. That sublime early morning light that adorns birds with a soft golden glow had long past.

Even though the sun was not that high in the sky, I had a terrible time (while in the car) dealing with distracting glare coming from the many reflective maple leaves. (NOTE: Sadly, I can not coax a bird to move into a shaded environment. I can better control these uneven bits of radiance when photographing people. The glare caused by bald heads and eye-glasses are a piece of cake to remedy because you can tell people how to pose, where to stand and, if necessary, move the camera.)

Polarizers

For this shoot, it would have helped if I had taken off my polarized sunglasses. If I had, I would have been able to see the brassiness of the maple leaves …so blatant that it competed with my subject for viewer attention.

Harsh light creates strong contrasts. To cut the glare, photographers in more manageable outdoor environments use a circular polarizing filter on their lenses. To use circular polarizing filters optimally, you must position your camera correctly… (preferably 90 degrees to the bird) and rotate the filter until you block certain wavelengths of light. (NOTE: Filters cut down available light considerably – from 1-2 stops.)

Circular Polarizers aren’t practical for long telephoto lens wildlife photography – and especially for birds as restless and unpredictable as this Orchard Oriole. Consequently, no filter threads are provided on the ends of most monster 500mm lenses. Instead a drop-in gel filter holder is provided near the base of the lens .

Photo of Orchard Oriole
Male Orchard Oriole
Much less Leaf Glare; but Branches are Distracting.
ISO1250; f/9; 1/1250 Second

Impatience Takes Over

Tracking a bird with your eyes is easy…..even within the limitations of a car.  Not so easy is tracking a lively bird with a cumbersome camera and 500mm lens while in a car.

This male Orchard Oriole was flying low, bopping between the glare filled Maple leaves on the north side of the road and a Cyprus tree on the south. The camera was resting on the door window pointing toward the Maple tree. I was hoping that the bird would cross the road and perch in front of the camera. He eventually did, but not right away. Impatience got the best of me.

For some reason, I decided that to successfully photograph this bird, I needed to reposition the camera to face the opposite direction. My husband was in the driver’s seat, making it impossible to secure the lens on that door window. With the oriole watching me, I opened my car door, threw a towel on the roof of the car, lugged my camera out and rested it on the towel, and then re-situated the unwieldy lens to point in the direction of the bird. (Whew!)

Before I could get off a shot, the Orchard Oriole dashed across the road again —to the very perch on which the lens was trained before I hauled it out of the car. He didn’t stay there long. With a big sigh, I got back in the car.

Actions that rise from frustration and exasperation are neither practical nor productive in bird photography. For unexpected bird sightings, patience is key.

I stayed in the car, rested the camera on the car door window ledge, watched, waited, and tried to calm down. Eventually the Oriole did return to the maple tree allowing me to successfully burst away.

Birds Don’t Wait for the Photographer

Turning the car around to face the opposite direction would have created too much of a disturbance. Getting out of the car to set up the tripod would also have chased the bird off. I’ve tried both of these strategies often enough- and no bird has ever waited for me to get situated. I can be quick and efficient.. but all that movement is neither quiet nor covert, especially when it happens at the spur of the moment. It is simply too much human activity for a bird to endure.

Patience

Patience is the mother of all virtue in bird photography. It is the key to help you let go of your expectations and drop those feelings of frustration. Most important of all, patience helps you rise above the feelings of urgency and optimally use your experience, enthusiasm and talent. Chances are you won’t miss out on anything.

Photographing Grasshopper Sparrows Singing their Hearts Out

Just Birdsong

On my way to the Allegan State Game Area, I always stop to admire a little patch of coreopsis established in a grassy field. These vigorous yellow flowers, all dewy and intermixed with a few showy purple pea flowers, are luxuriously tucked in with the tall looping grasses. Their gleaming and peaceful countenance always gives me pause. On this particular morning, the sky is cloudless, and looking west above the coreopsis, a partial moon sits illuminated in the daylight sky. Every time I go, I hope that I will see some bird, any bird, bobbing in and around this lovely scenario. Just birdsong so far.  Perhaps I’ll have better luck when the flowers go to seed.

Photo of Grasshopper Sparrow
Grasshopper Sparrow in Full View,
ISO320; f/9; 1/800 Second

Photographing Grasshopper Sparrows

Other more productive bird photography locations awaited. When I took these photos in late May, 2016, Grasshopper Sparrows were singing their little hearts out in the tall gold prairie grasses. The males were tirelessly on task and not about to be diverted from their mating rituals.

And thank goodness for that! Despite the easy photographic pickings right in front of my eyes, I was momentarily captivated. The birdsong, the caressing breezes, the rhythmic motion of the golden grasses, and the sublime morning light came together to form a breathtaking convergence of shape, sound, color, and form. So soothing….easy to drift away and get lost in the moment.

The Grasshopper Sparrows no doubt would have continued their songs, but the soft early morning light would not stay for long. I captured a dozen or so images and then sat back to enjoy.

Territorial Songbirds

Spring brings many rewards for bird photographers. Once these Grasshopper Sparrows reach their nesting destinations, the males sing with great enthusiasm, in full view, especially in the early morning. They defend their nesting territories robustly with song, threats, dive-bombing – whatever it takes. If a weaker/younger male bird is forced out by a more powerful bird of the same species, he will try again in another territory or simply wait until the following year when he is stronger and more vigorously appealing.

Bonding with Song

By mid-June, fewer birds are out in the open. The nestlings and even the fledglings are tucked away, listening and learning. Survival depends on the young being able to bond with parents.  At some time, very early in their lives, these young birds learn to recognize, imitate and then replicate their species’ song.

Grasshopper Sparrow
Grasshopper Sparrow Quivering his Feathers between Songs.
ISO320; f/9; 1/800 Second.

Learning v Genetic Predisposition

Research out of Australia – and associated with the Cornell Lab of Ornithology- suggests that some song birds are capable of learning their mother’s special calls during the embryonic stage of development and then reproducing those calls as nestlings begging for food. Included in this fascinating research is how ornithologists were able to discover and analyze these embryonic voiceprints using spectrographs and computer analysis. Visit this link to learn more.

Vocal Gymnasts

Every morning whether I’m out in the field or in our yard, I hear breathtakingly sonorous bursts of bird song carried in the wind. The musical vocalizations of song birds are much more complex than any other species can produce. Two sets of vocal organs (called the syrinx) have evolved to allow birds to sing multi-layered, acoustically diverse songs (with region specific dialects). In addition to bird song, many species of birds use non acoustical sounds (like hums made with beating wings or tails, or drumming made with chiseling beaks-or enticing dancing and quivering.) to increase their chances of being noticed and successfully reproducing.

Life Affirming Repertoire

It’s an enduring and life affirming repertoire that I love to listen to. Makes bird photography a most enticing and calming endeavor.


Photographing Sedge Wrens Hiding in the Grasses

Photographing the Sedge Wrens

We first saw these Sedge Wrens foraging in a grassy field on one of those secluded service roads where parking is not permitted by the DNR. All visitors must park in a designated and wildly overgrown lot that is neither convenient nor close. This is because some of the public land in the Allegan State Game Area is leased out and cultivated by farmers who do not want to be bothered by photographers in the road while driving their wide monster combines. Once the planting is done, you don’t see the farmers again until harvest time, but you do see the DNR officers making their rounds and enforcing the parking rules.

Despite the “no stopping to photograph birds from the car” rule, I could not help but be mutinous. I saw a curious Sedge Wren tucked in the tall grasses very close to the road and lifted my camera.

Sedge Wren
Sedge Wren in Early Morning Golden Light.
ISO800; f/8; 1/1000 Second

The first two photos included in this post came from the initial car window shoot. The Sedge Wren came in so close to the edge of the grasses that the 500mm lens was able to isolate his little body from his surroundings and lock focus almost immediately.

Camera Setup in the Sedges

We returned to this location three more times to try to photograph these little birds. Dutifully parking in the lot each time, we hauled the equipment down the road and forged a path through the grasses as close to the road as possible. The gear was stabilized on a matted-down oval shaped impression – most likely deer bedding.

These photo shoots turned out to be unproductive and exasperating. Instead of landing on the taller stalks like they did when we were photographing from the car, the wrens stayed camouflaged within the grasses. Once in a while, they peeked their little heads up or flew to a new location, but for the most part they would not rise above the dense low growth of the sedges. With any camera movement, they dove deeper into their lush domain. We could hear them calling and see the wispy grass bend as they maneuvered around us, but they rarely rose into the golden light.

Photo of Sedge Wren
Sedge Wren in the Early Morning Light.
ISO800; f/8; 1/1000 Second

Trouble Locking Focus

My 500mm lens motor and stabilizer patiently whined softly back and forth…desperately trying to lock focus on a bird tucked in dense grass. The only clear photo I have from the later shoots (showing the Sedge Wren adeptly couched into his element) is posted below.

Photo of Sedge Wren
Sedge Wren, Hiding in the Sedge.
No Golden Light Here.
This photo was typical of the wren’s hiding
maneuvers. It was taken in the third shoot.
ISO1600; f/8; 1/640 Second

Nomadic yet Territorial

Sedge Wrens are pugnacious little birds that are known to puncture the eggs of other bird species’ who venture into their territories. Considered to have erratic and transitory breeding behaviors, it is not always predictable as to where they will nest from one year to the next. This nomadic (yet territorial) behavior makes them hard to find.

I plan to go back…. and try my luck again photographing them from the car.

Photographing Red Headed Woodpeckers and Controlling the Vivid Colors

Photographing Red Headed Woodpeckers

This spring, we spotted a pair of Red Headed Woodpeckers in our yard. (It’s hard to mis-identify this bird species.) They stayed for a couple weeks, long enough for me to wishfully assume that they had chosen a towering dead oak in our yard to set up housekeeping. But then one morning, they were just gone.

Red Headed Woodpeckers are very skittish around humans and quick to pick a fight with other species of birds, especially other woodpeckers. They consume a wide variety of seeds, fruits, nuts and any insect they come across while foraging in trees and tree bark. Unlike most of the year-round woodpecker residents in our yard, Red Headed Woodpeckers will head south in the Fall to escape the harsh Michigan winter.

This species of woodpecker is considered uncommon, and according to the “IUCN Redlist of Threatened Species” is on the decline to the point where they are listed as “near threatened”.

Red Headed Woodpecker
ISO800; f/7.1; 1/640 Second.

Controlling Color Intensity

The head on this Red Headed Woodpecker is vividly red. How the camera captures the color intensity of that red (and other colors) will vary from camera to camera, depending on the camera’s settings. Most DSLR and point and shoot cameras allow you to express your color preferences by configuring the “picture style” settings in the camera menu. You can choose neutral tones or vivid, knock-your-socks-off color renditions. It’s all about artistic preference.

NOTE: Other camera settings also impact color rendition. For this shoot, the camera was set to Canon’s “Evaluative Mode” which I think does a nice job of rendering colors in nature.

Photo of Red Headed Woodpecker
Red Headed Woodpecker
Objecting to the Camera.
ISO640; f/7.1; 1/640 Second

Managing In-Camera Color

In Canon cameras, you can manage in-camera color and contrast by adjusting “Picture Styles” settings. Your menu choices are: Standard, Portrait, Landscape, Neutral, Faithful, and Monochrome. Once the appropriate picture style has been selected, you can further customize that choice by refining attributes like sharpness, contrast, saturation and color tone.

If the presets offered by the in-camera menu are not to your liking and you wish to customize and save your own favorite interpretations of color, Canon cameras allow you to “register” three of your color preferences. For more information, press this link to review Canon’s Publication “Quick Guide to Picture Style Settings and Customizations”.

Photo of Red Headed Woodpecker
Red Headed Woodpecker.
A Very Long Tongue.
ISO1000; f/6.3; 1/640 Second

Balance

My camera (set to “standard” picture style) did a good job balancing the intense black, white and red colors. Once I loaded the images into Lightroom, almost no adjustment was needed to improve on the hue, saturation and luminosity.  I moved the “white” slider a touch to bring out more detail in the breast feathers. The histogram showed no overly exposed bright spots.

RAW format

Setting and refining Picture Styles can be a very creative undertaking, but it is important to remember that as long as your camera is set to RAW format, the camera will NOT apply the picture style settings to your images. You may see the impact of your picture style choice in the camera’s LCD screen, but only because you are seeing a JPEG rendition through that screen. I always shoot in RAW format, consequently, I make all picture style adjustments in post processing. (NOTE:  RAW format produces a huge image file that is processed minimally by the camera.  Further processing is done once the files are loaded into your post processing software.)

NOTE: Canon includes post processing software with all its DSLR cameras. If you shoot in RAW, you can easily apply the in-camera picture style settings you chose if you use this software.