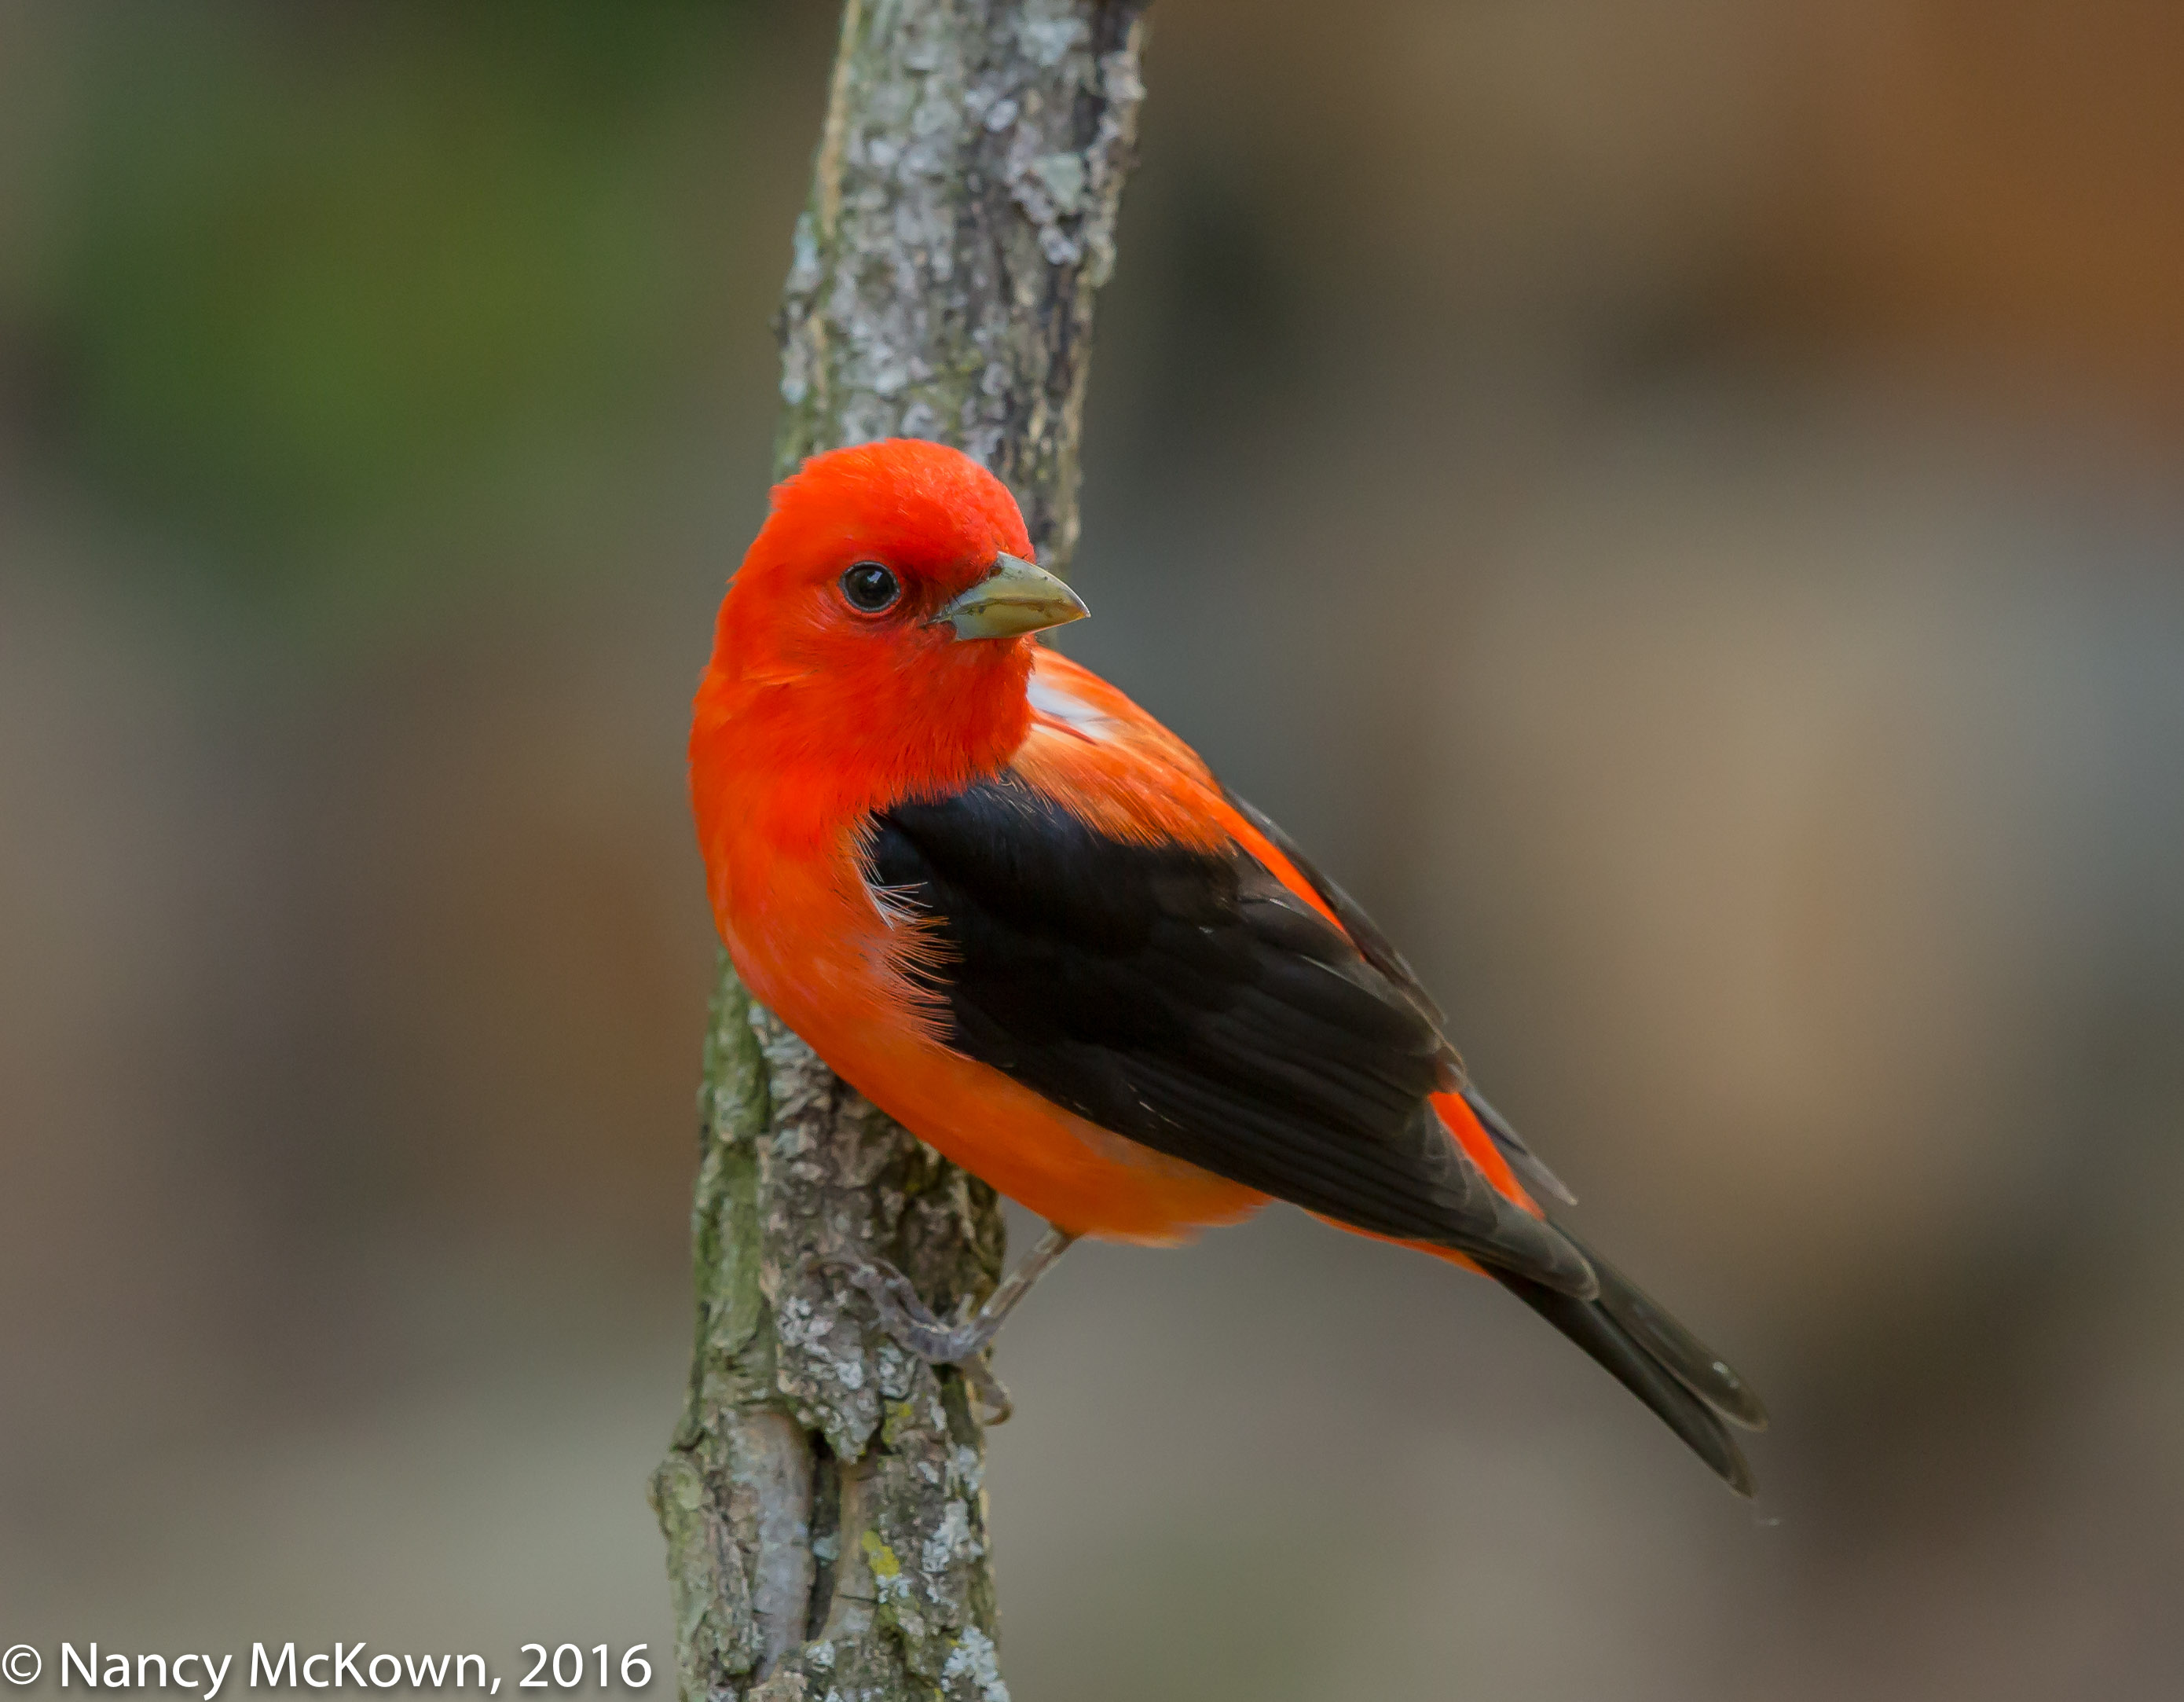
Not long ago, I complained that I only was able to find and photograph distant and sky high female Scarlet Tanagers. Now I am thrilled to report that a male Scarlet Tanager came into our yard and perched on an isolated limb at camera level close to our fountain. It was a heavily clouded morning, so the ISO for these images shot right up, but regardless, I was ready. Well, mostly ready.
Scarlet Tanager ISO2000; f/6.3; 1/400 Second
Not Quite Ready
The Scarlet Tanager’s plumage startled me at first. Lustrous and exotic, the radiant red feathers covering most of his body contrasted strongly with his pitch black wings.
When I’m out in the field with my camera, I’m usually the one who does the startling. However, at that juncture in bird photography time…in that short space between stimulus and response when I am ordinarily able to quickly react, I was instead dumbfounded, mouth hanging open, and experiencing one of those I-can’t-believe-this-bird-is-right-in-front-of-my-camera moments. Luckily something snapped inside me and I was able to rally all my forces to take a couple photos before this astonishing bird flew away.
Male Scarlet Tanager. ISO3200; f/6.3; 1/400 Second
Whew!
I’ll have to come up with a new nemesis now, possibly the ever illusive Prothonotary Warbler.
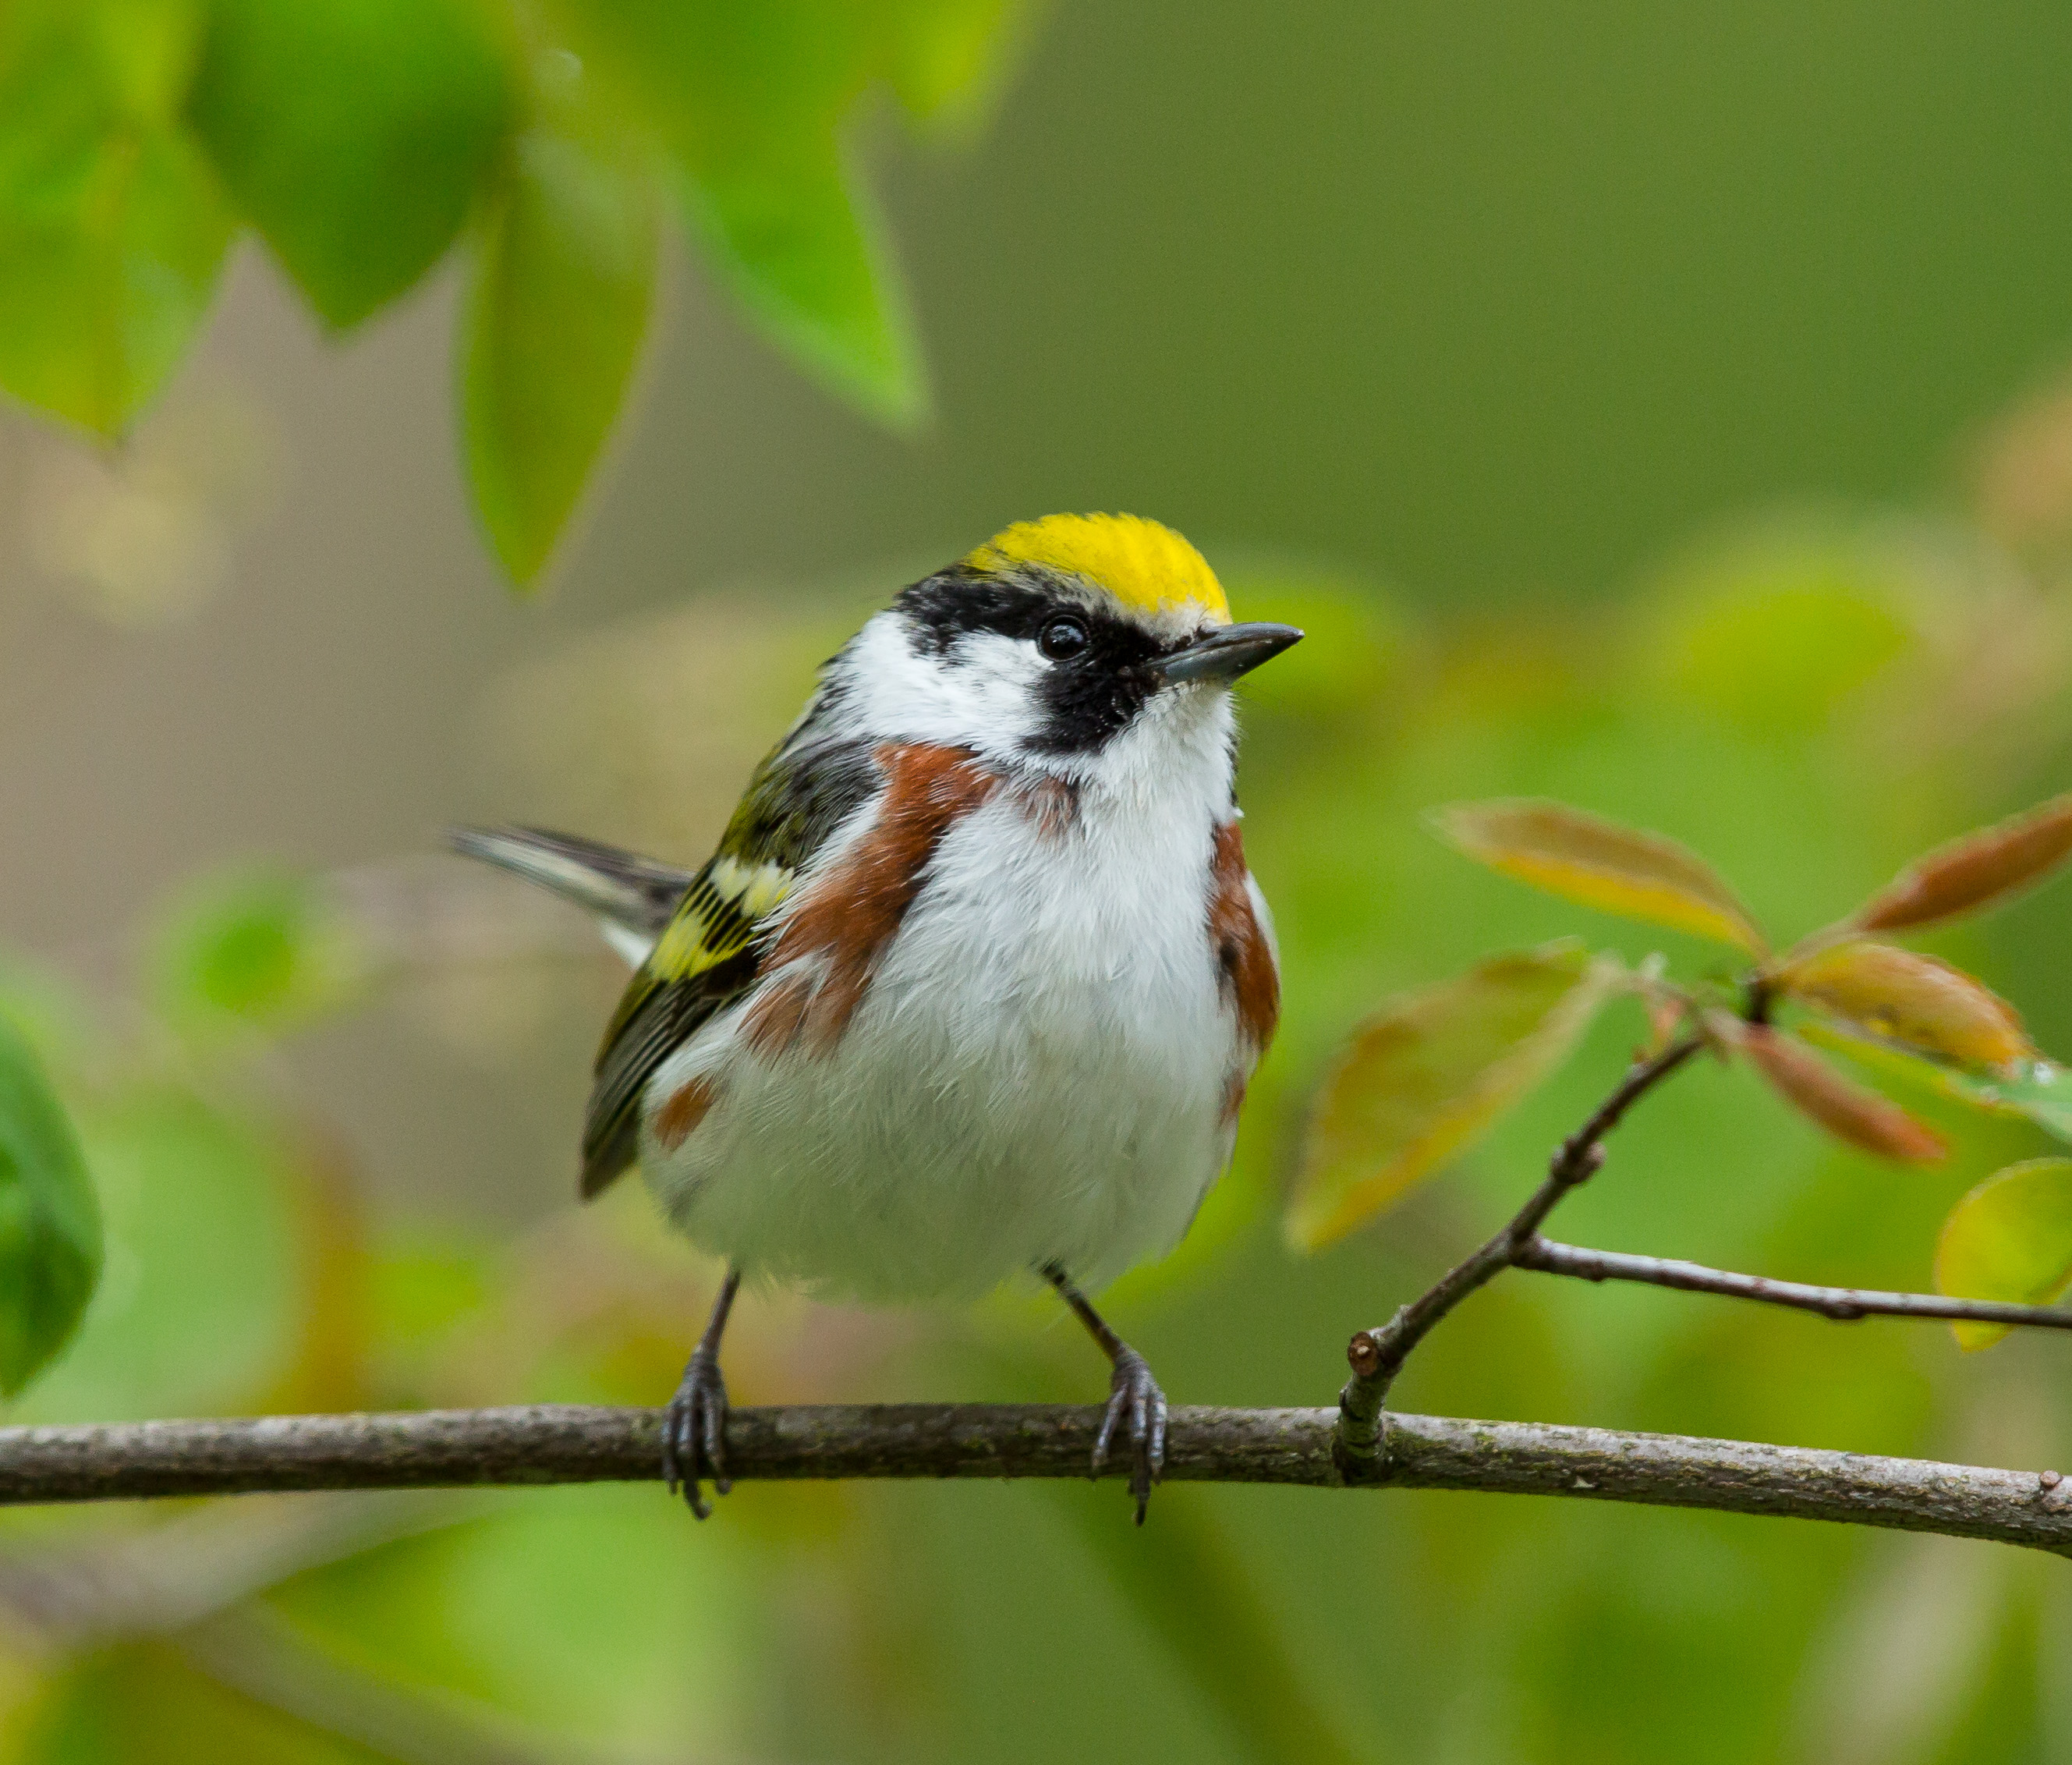
This fetching male Chestnut Sided Warbler arrived one late morning to the Service Berry tree in our yard. Lots of bird activity draws even more birds, I believe, and there was partying going on at the feeders.
The light was just right. The histogram revealed a nice balance of dark and light variation. The 1/400 shutter speed captured the moment sharply thanks in part to the relatively low ISO.
What a beauty! This spring specimen flaunts a bright yellow cap, black elongated eye stripes atop a white face, glossy chestnut colored streaks on its flanks and a complementing touch of yellow on the wing bars.
I photographed the female Chestnut Sided Warbler last Fall. I was not so lucky in proximity for that shoot and had to use a 2.0 extender on my 500mm lens to get the magnification I needed.
Chestnut Sided Warbler ISO800; f/6.3; 1/400 Second
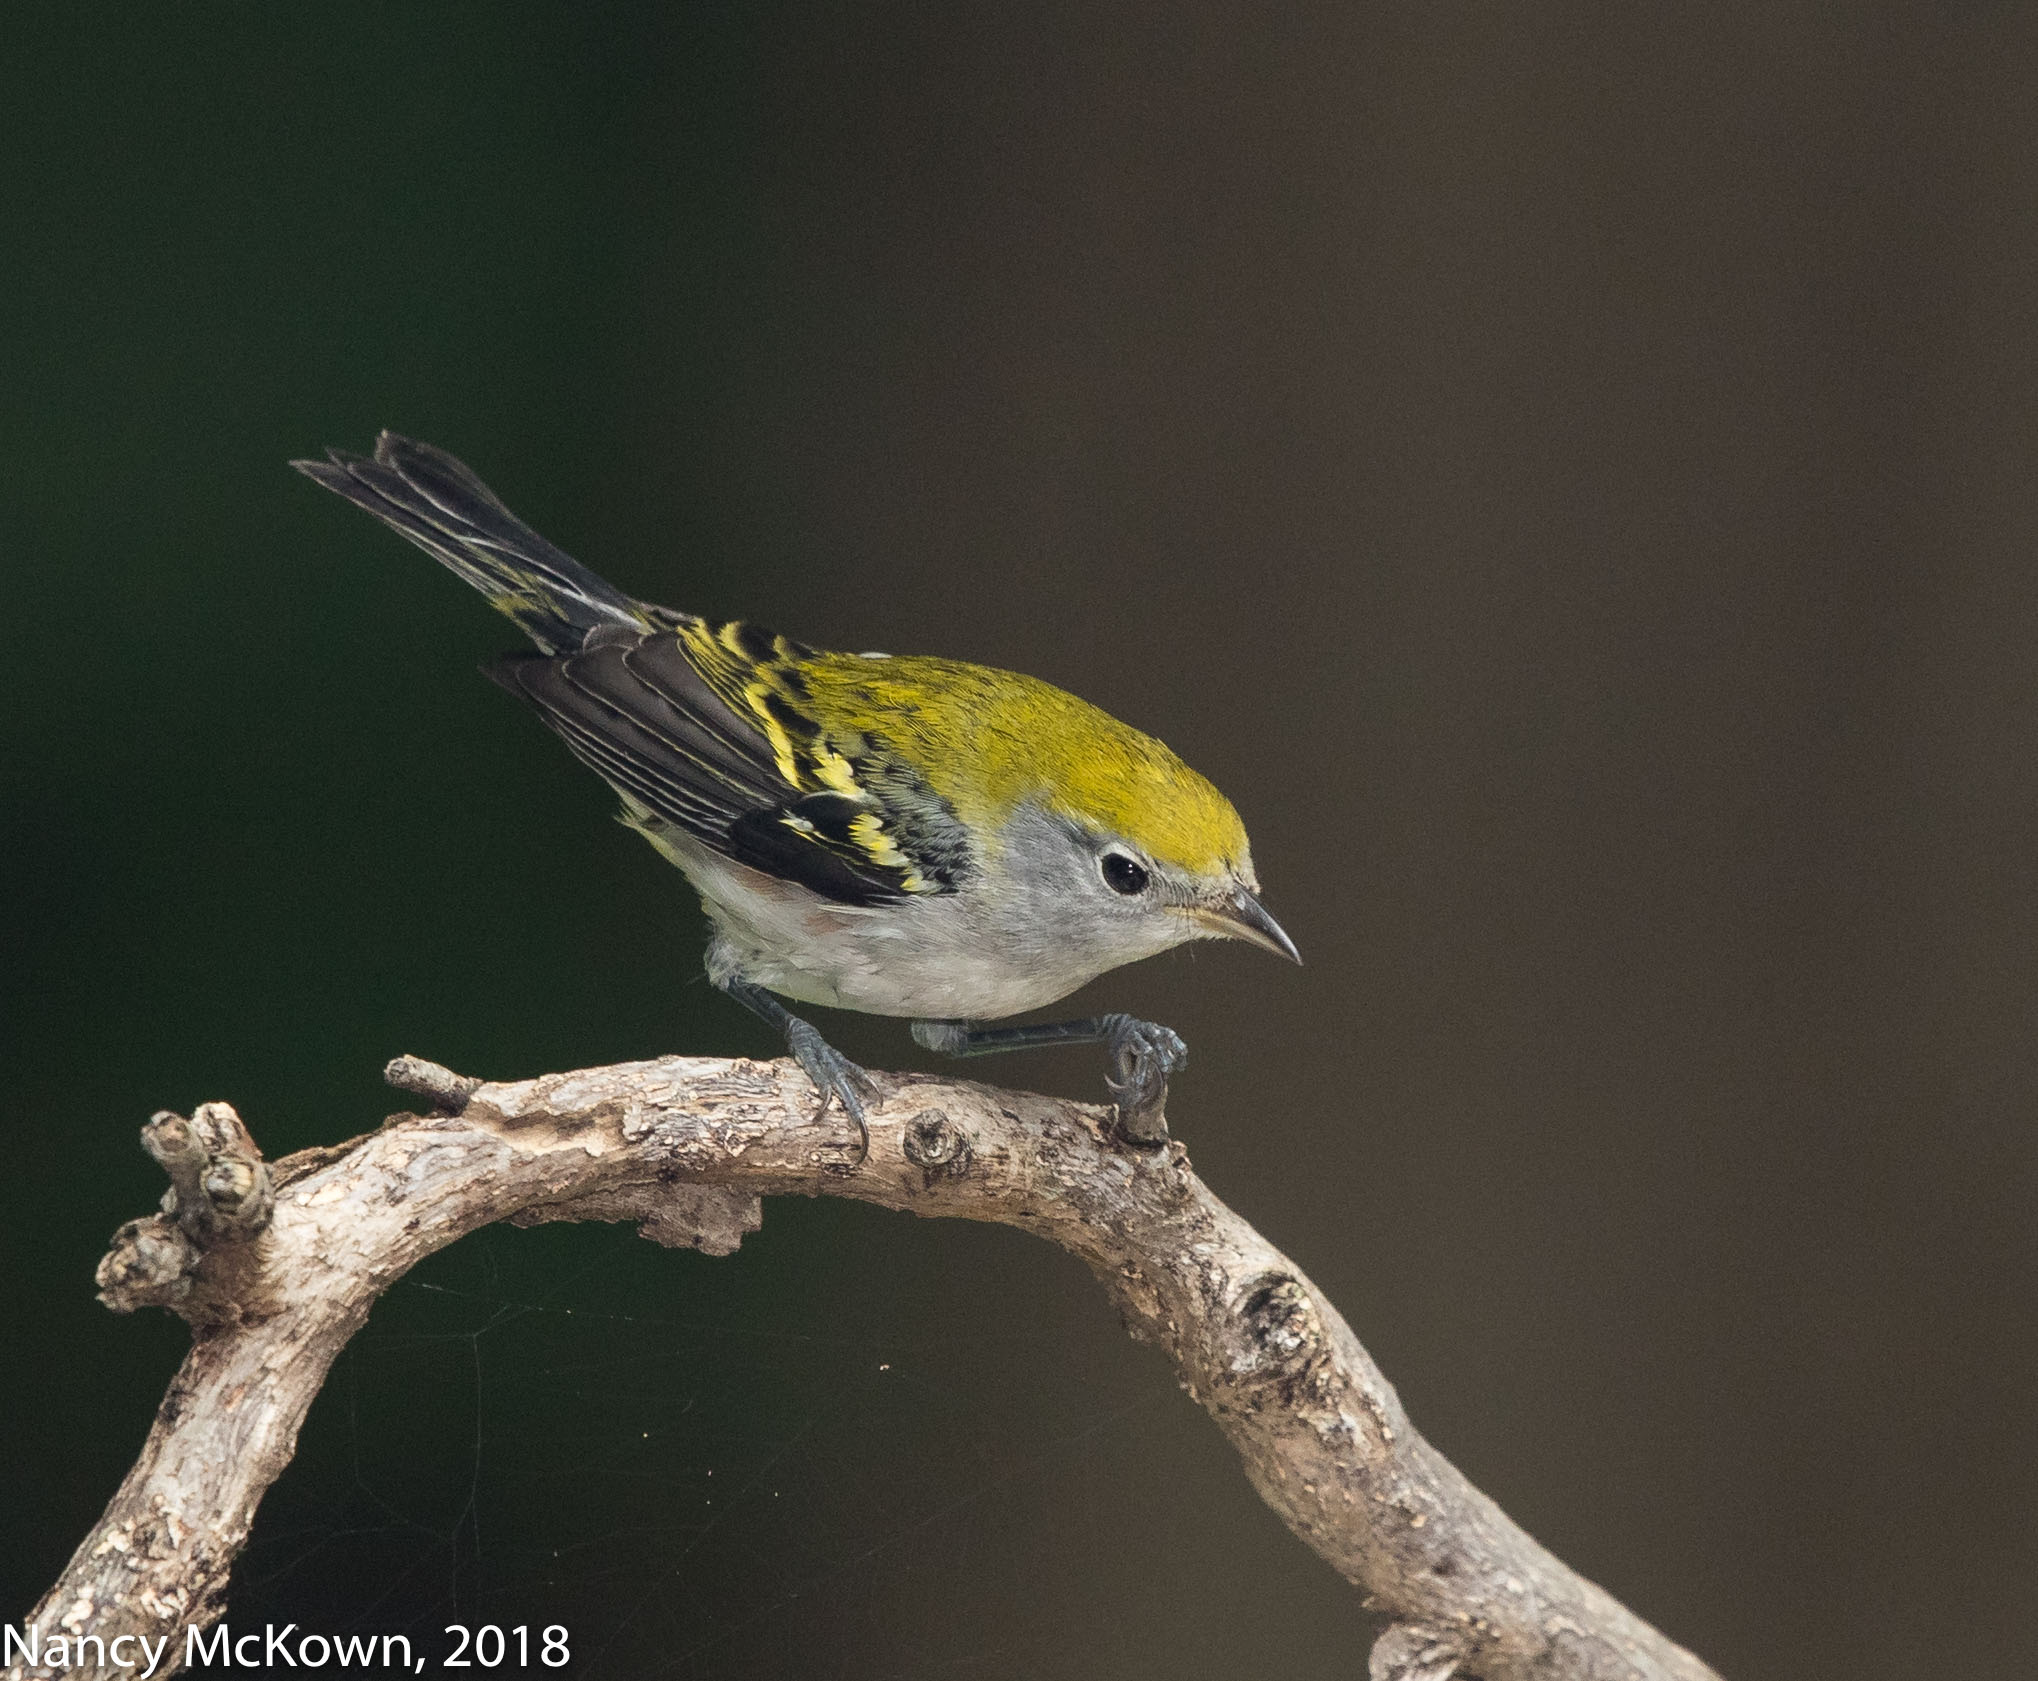
Why Aperture Size Impacts Autofocus
Whenever I read about tele extenders, dire warnings about potential focusing problems surface. I find the literature on this subject to be somewhat baffling, or perhaps just incomplete, so I did some more research.
The basic question: Why might autofocus be compromised when I attach a 1.4 or 2.0 extender to a telephoto lens?
It really depends on the lens – or more specifically, the maximum aperture of the lens. (See this post to learn more about the basics of aperture.)
Attaching an extender to a lens effectively narrows the the size of the len’s max aperture. A 1.4 extender shifts the len’s max aperture one stop smaller; a 2.0 extender shifts the len’s max aperture two stops smaller.
Chestnut Sided Warbler ISO1250; f/6.3; 1/500 Second
The Downside – Less Light
If the len’s maximum aperture becomes smaller when you attach an extender, light transmission through the lens is reduced. Example: My 300mm lens 2.8 L II lens with a 2x extender would lose 2 stops. As I look through the viewfinder I would see the equivalent of a f/5.6 aperture. That’s significantly less light. So What?
In order for you to see optimally through the viewfinder, you need light. In order for the camera and lens to accurately auto focus, they need light. When preparing to take a photo, the len is always set to its widest aperture for auto focus purposes. It immediately stops down to the aperture needed for correct exposure when the shutter is released.
Modern AutoFocus Point Technology
Modern multiple focus point technology (selectable and non-selectable assist points) is engineered to deal with a wide variety of action, accurately and fast. But autofocus points need light to work. With an active bird, you increase your chances of accurate focus if the maximum aperture of your lens lets in a lot of light. As the max aperture is reduced (as is the case when you attach an extender) the lens slows down and does a lot more hunting, especially on a low light cloudy day, and most especially when multiple focus points are activated.
If you have a lens letting in a lot of light (2.0 or 2.8 maximum aperture), the camera’s access points have sufficient light with which to autofocus. Attaching a tele extender to this lens would be no problem. However, a lens with an extender narrowing the max aperture to f/5.6 or f/8 may have insufficient light and/or contrast, causing some autofocus points to be slow or not operational. NOTE: The center auto focus point will most likely work because it will get the most light.
If you have a modern DSLR camera and are wondering how many auto focus points are actually working with a lens and extender attached, you can check. Activate all auto focus points, look through the viewfinder, press the shutter half way, and see how many light up.
Manual Focus to the Rescue
If autofocus does not work, you are left with manual focus. Looking through a relatively dark viewfinder may hinder your ability to get an accurate fix in manual focus. NOTE: I find it hard to manually focus without lots of light so I generally switch the camera to Live View and focus from the LCD screen instead of thru the viewfinder. (More info on Live View is available at this post.)
Variable Aperture Zoom Lenses
Just to complicate this issue, some zoom lenses have variable apertures; meaning the max aperture available changes depending on the focal length. Example: Canon EF 100-400mm f/4.5-5.6L IS II USM Lens. The widest aperture of this lens is f/4.5 at 100mm and f/5.6 at 400mm.
Here’s a photo of the female Chestnut Sided Warbler:
Female Chestnut Sided Warbler ISO800; f/8; 1/250 Second
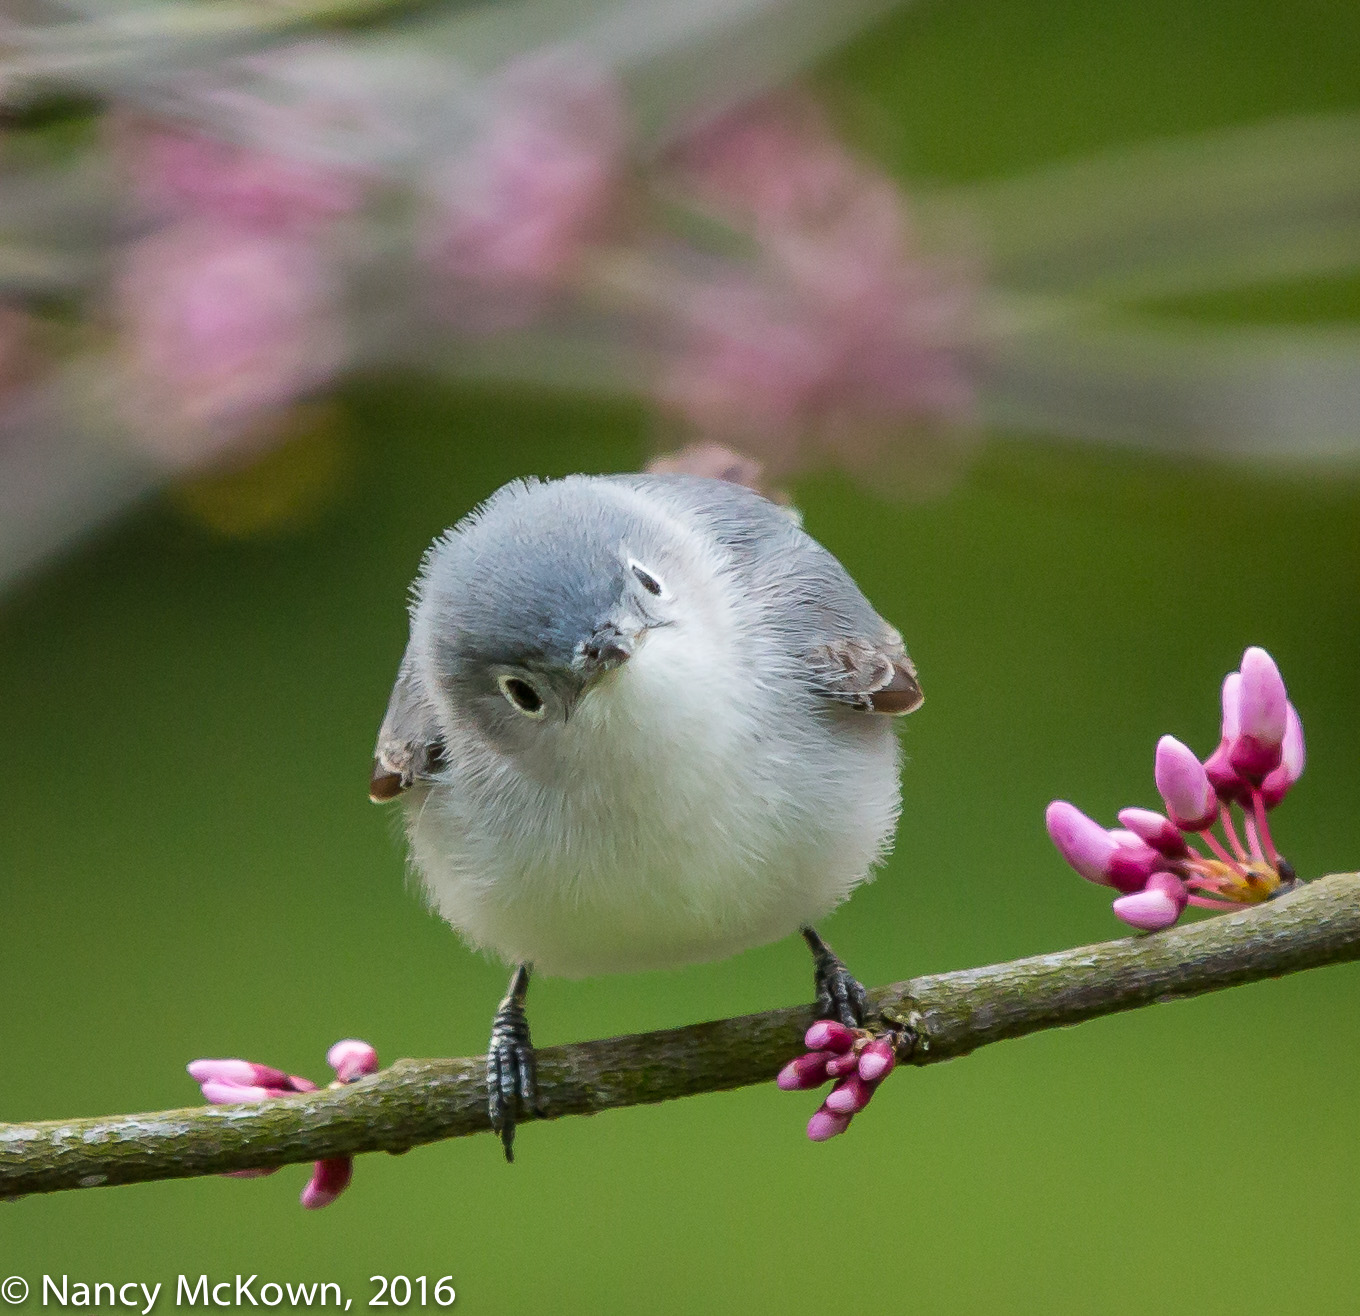
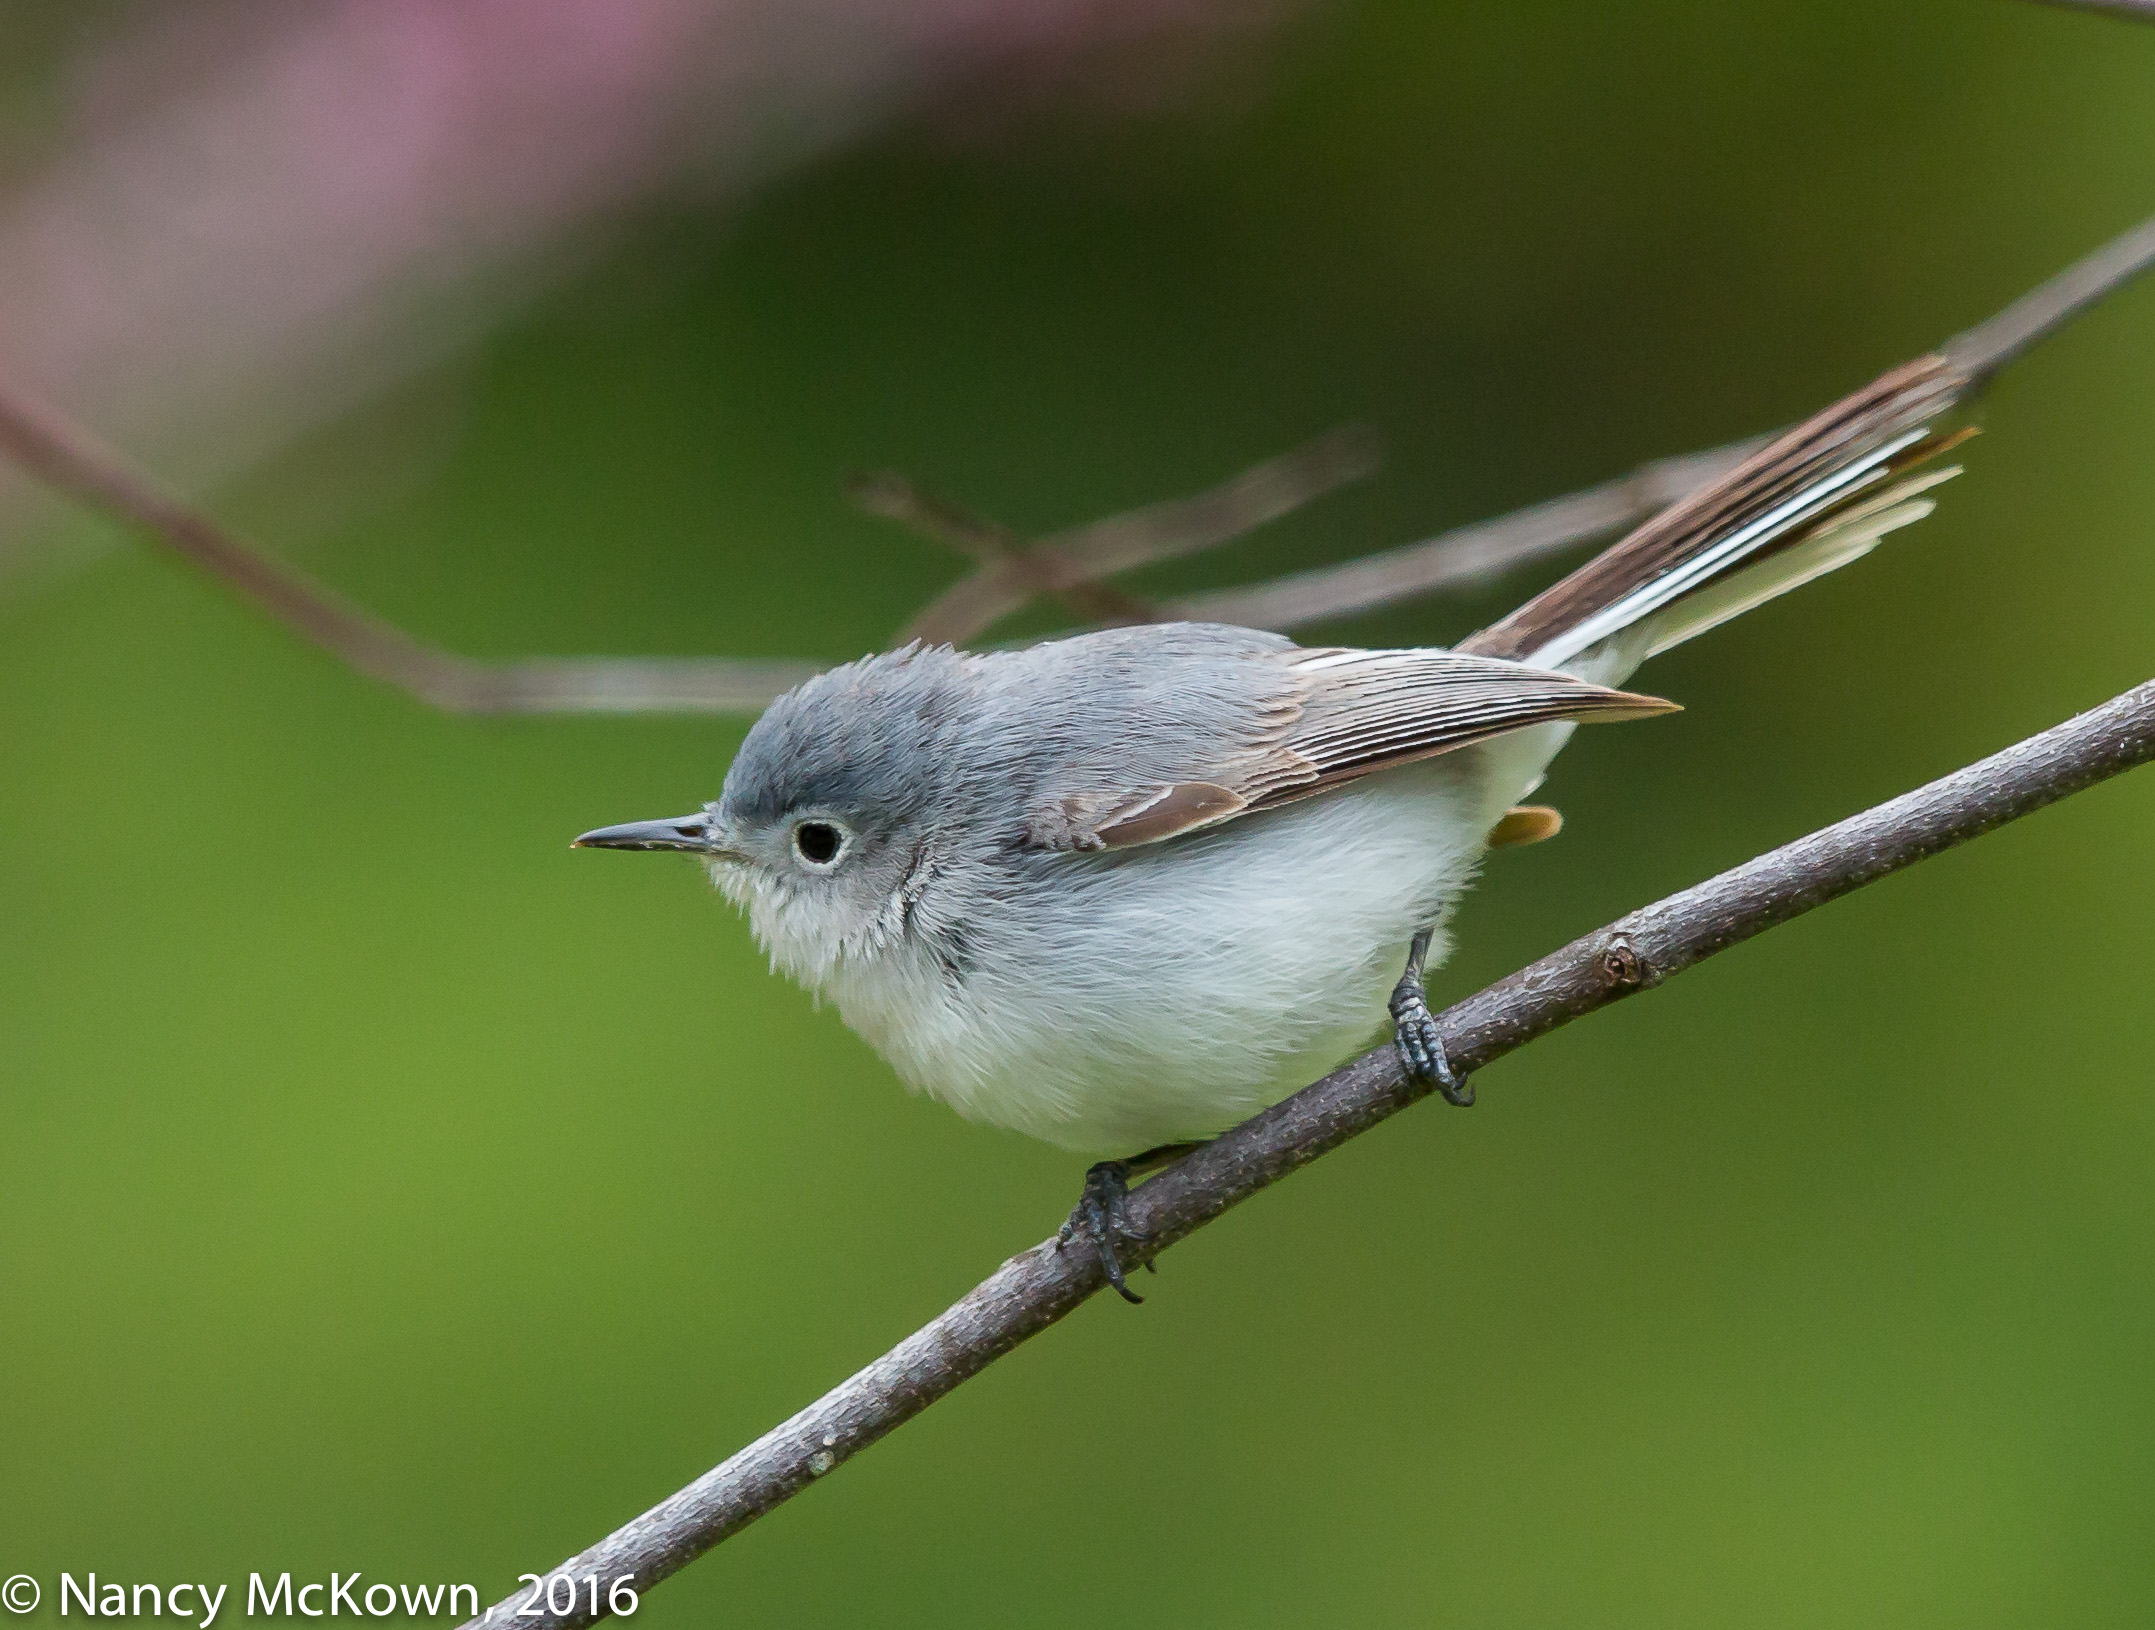
When I first saw this tiny songbird through the lens, he was looking back at me with an inquisitive look on his face. (Birds usually take flight at the sight of the camera, especially when it’s so close.) I kept my wits, aimed the camera and set off a burst of continuous shots. Seconds later he lost interest in me and hopped to a different branch. Initially, I confused this diminutive wonder for a warbler because of his thin straight bill and flitting behavior while foraging for food. But once I was able to see a profile of his body, especially those swishing long tail feathers, I knew he was a gnatcatcher.
My camera was set to continuous shooting drive mode paired with Al Servo focusing. Without that pairing, I simply would not have been able to capture multiple shots in sharp focus of this fast moving little bird.
Blue Gray Gnatcatcher Looking Back at the Camera. ISO1600; f/6.3; 1/640 Second
Don’t Confuse Shooting Mode with Focus Mode
Lots of photographers confuse shooting modes with focusing modes. They are very separate functions, even though they work hand-in-hand.
Shooting Modes simply control how the shutter release operates- including self timers. There are seven shooting modes available on modern Canon DSLR cameras:
Single shooting mode
High Speed Continuous shooting mode
Low Speed Continuous shooting mode
Silent Single shooting mode
Silent Continuous shooting mode
Self Timer 10 sec remote
Self Timer 2 sec remote
Focus Modes kick in immediately after the shutter is depressed (autofocus only) and determine how the camera will achieve focus. Modern DSLR Canon cameras have 4 focusing modes:
Manual Focus (no autofocus)
One Shot Autofocus (will initiate focus once)
Al Servo Priority Autofocus (continually tracks and updates focus)
AI Focus (automatically alternates between One Shot and Al Servo modes, depending on the situation)
Blue Gray Gnatcatcher ISO1600; f/6.3; 1/640 Second.
Shooting Mode Paired with Focusing Mode
Once you choose a shooting mode, it’s critical to understand and decide how the camera will focus in this shooting mode.
If Single Shot Shooting (1 or 4 above) mode is paired with One Shot Focusing mode, the camera will lock down focus once (and ding if it is set to ding) every time you press the shutter. (NOTE: If the camera can not lock down focus, the shutter will not fire, no matter how much you push it.)
If Single Shot Shooting (1 or 4 above) mode is paired with Al Servo Continuous Focusingmode, the shutter will burst in quick succession (cache and memory card size allowing) as long as you hold down the shutter button, but auto focus will not continually adjust focus after that first shot. All shots taken after the first shot will be based on how the camera focused the first shot. (No good in fast moving and chaotic bird photography.)
If Continuous Shooting(2, 3, or 5 above) mode is paired with Manual Autofocus mode, you can burst away all you want, but the lens will not focus unless you do it manually. (Read more about Manual focus here.)
If Continuous Shooting (2,3, or 5 above) mode is paired with Al Servo Continuous Focusing mode, the camera will initiate and manage focusing operations after that first shot, as long as you continually hold down the shutter. (The photographer must accurately track the subject for this pairing to be worthwhile.)
Al Servo Paired with Continuous Shooting
I almost always pair a continuous shooting drive mode with Al Servo Priority Autofocus mode for bird photography. With this pairing, Al Servo Autofocus can “predict” and keep focusing the lens during the continuous shooting burst —as long as I make sure that the focus points (whether all of them or just one) can find the target.
How Fast is Al Servo Paired with Continuous Shooting?
When you pair a continuous shooting drive mode with Al Servo Priority Autofocus mode, how fast your camera is able to “burst” during continuous shooting depends on the following:
The size of your camera’s buffer (especially if you are shooting RAW)
Inherent limitations of the camera and lens
The size and speed of memory card
The Al Servo priority autofocus settings. (Huh?)
More Settings for Al Servo Priority
NOTE: This is an example of when menu complexity in a DSLR camera can be daunting. It’s no wonder that a lot of photographers prefer to use their camera’s default settings; or perhaps just fiddle with one or two plain vanilla automatic functions and use those forever, no matter the shooting environment.
One more thing must be customized in the menu after you have paired Continuous Shooting Drive Mode with Al Servo Priority focusing mode. You must also choose how you want the camera to prioritize focusing.
The following settings are available:
Prioritize burst speed,
Prioritize focus accuracy; or
Prioritize a balance between the two.
My Choice: Maximize Sharp Focus
Prioritize focus accuracy is an easy choice for me. In bird photography, I always, always want tack sharp photos, so I am willing to sacrifice frame-per-second (FPS) burst rate speed. When I choose focus accuracy over burst speed, my keeper rate is higher. The continuous burst may be slower, more interrupted -especially in low light-causing me to miss some of the action. That’s OK with me.
I will do whatever it takes not to compromise sharpness.
More information on the Al Servo Mode Autofocus Tracking is available at this link.
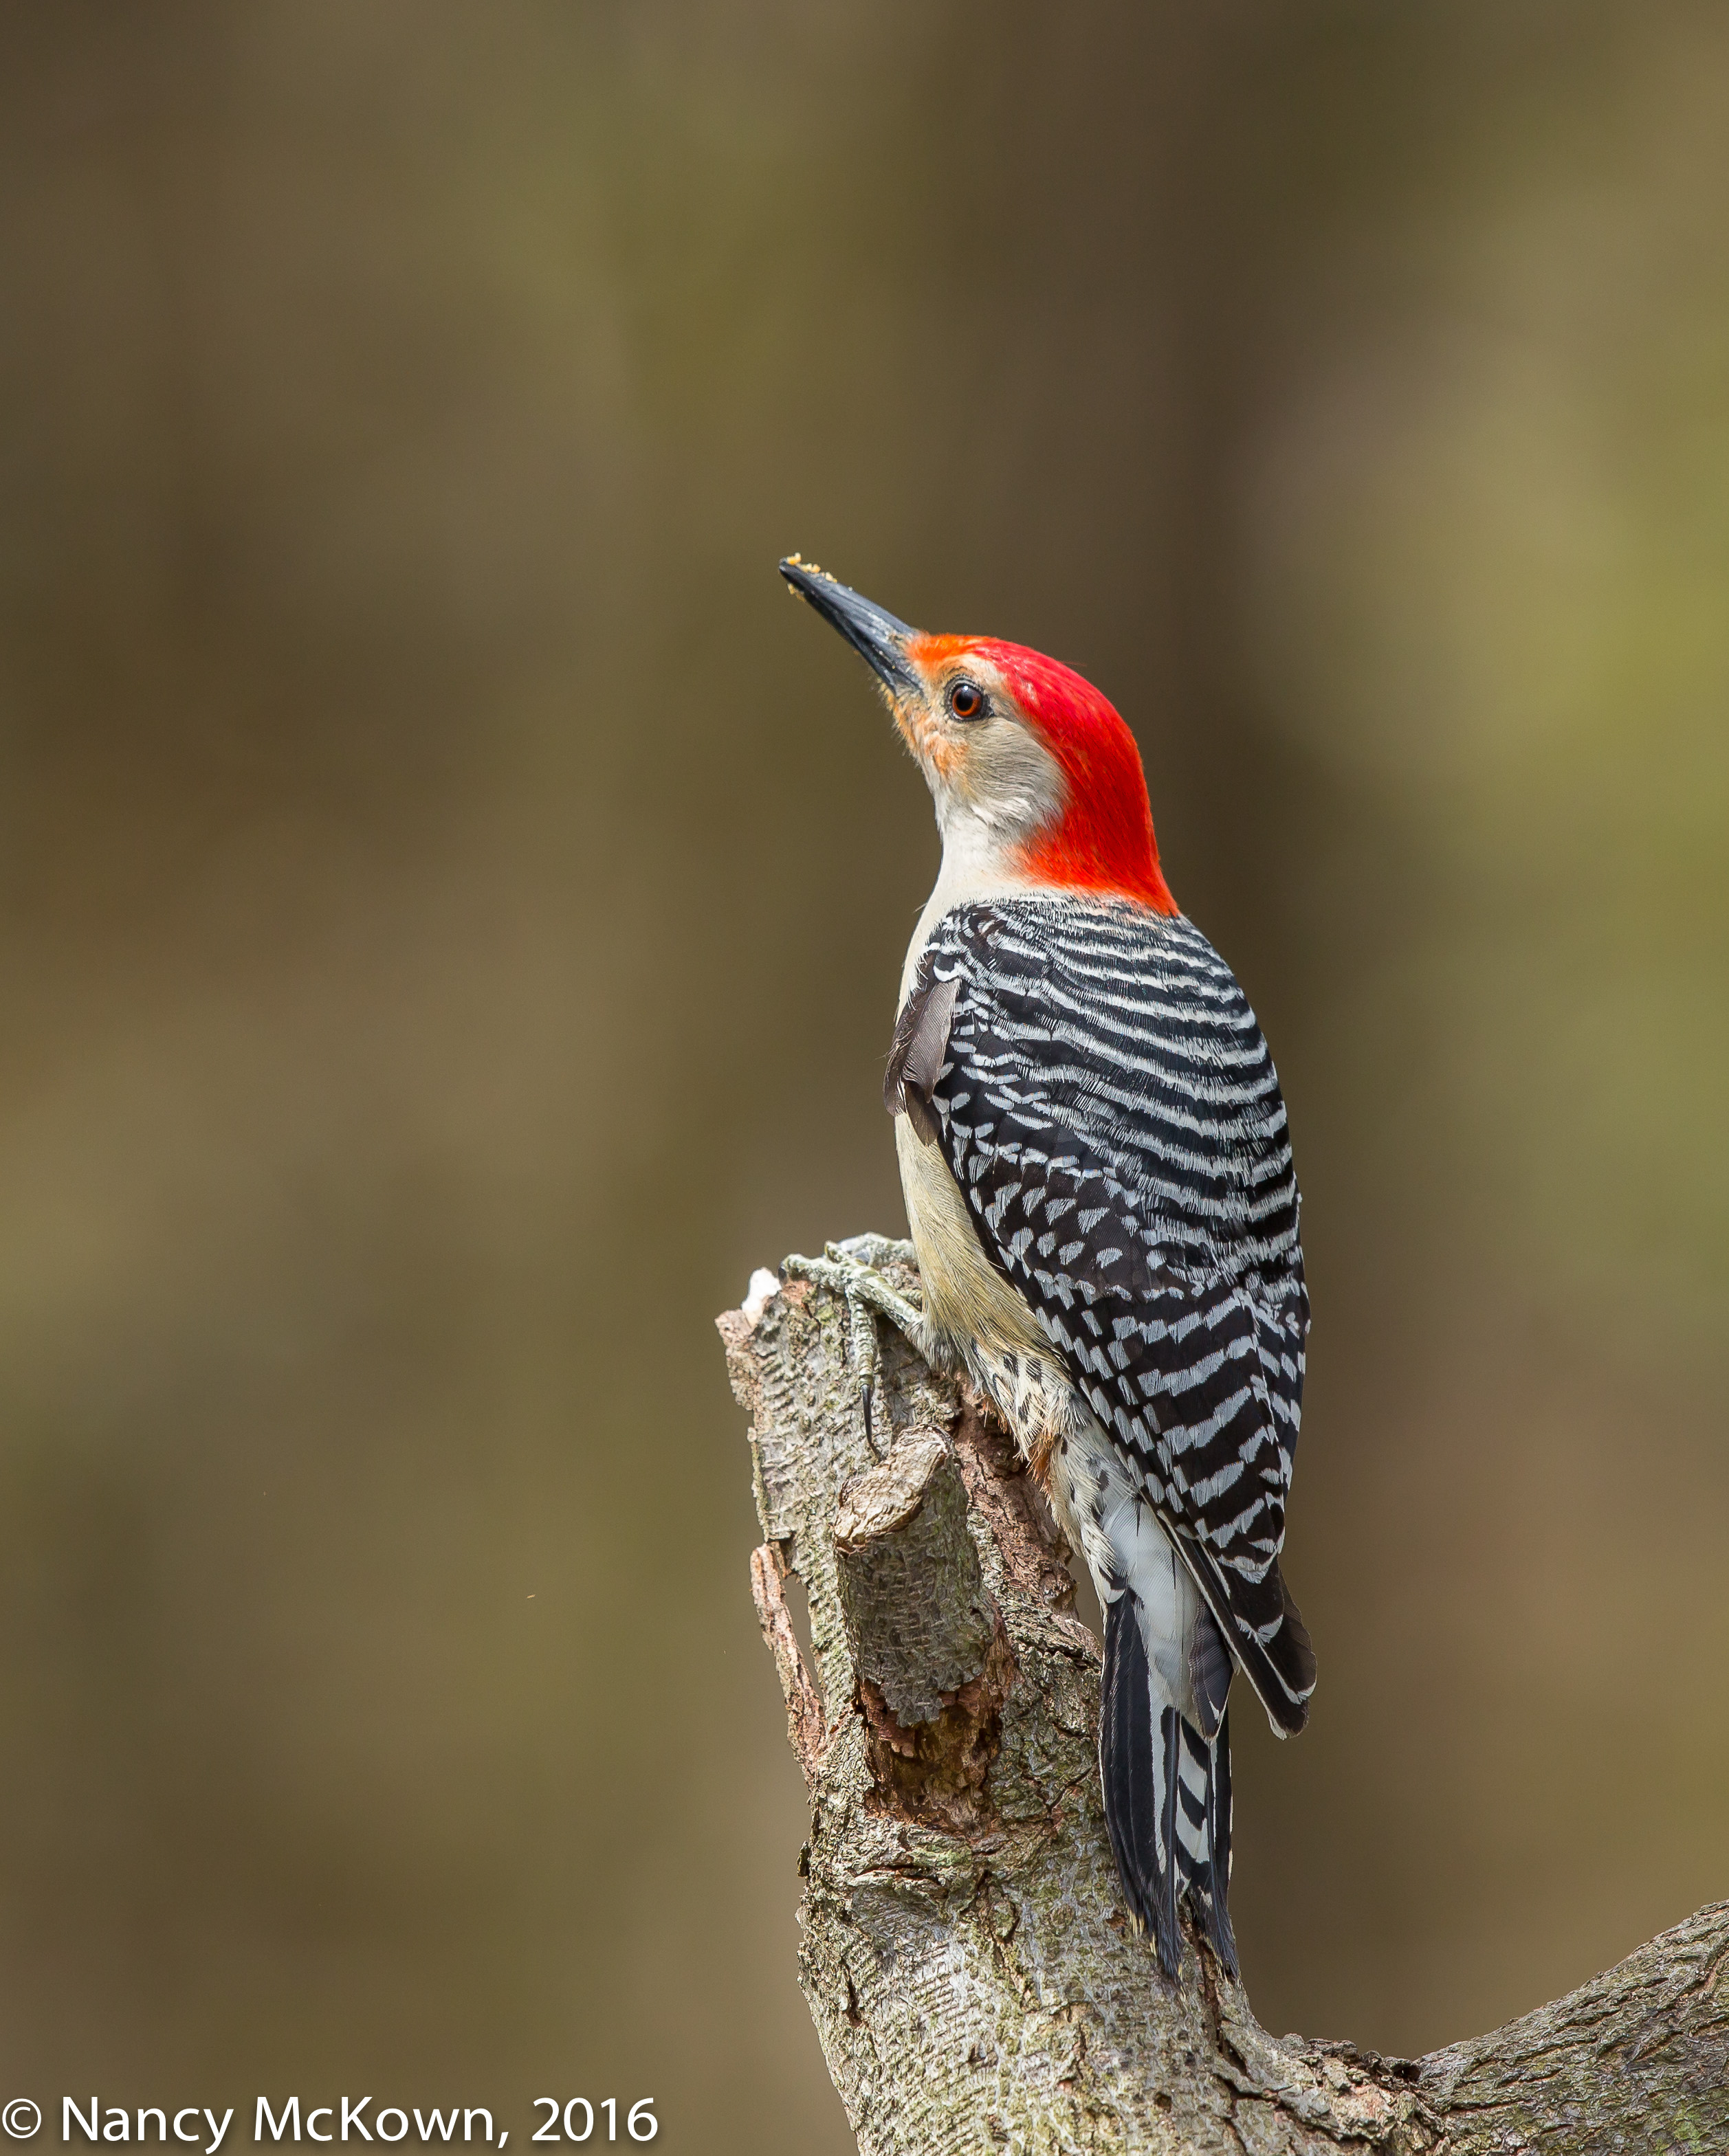
An assortment of Woodpeckers live in or visit our heavily wooded yard, but the Red Bellied is the most prominent year round resident. (Odd name, since only a slight tint of red can be found on their bellies.) The males sport a prominent red crown, right above that chiseling beak common to woodpeckers. While probing and excavating for food, these birds strategically prop their tail feathers down on their perch for balance. Most prominent on all woodpeckers are their oversized clinging 4 toed feet (zygodactyl – two toes forward, two toes back). Drumbeat roll from these guys tap-tap-tapping on trees =19 taps per second.
Red Bellied Woodpeckers are easy to photograph because they often cling to bare tree trunks and inch up and down methodically with their back feathers dragging behind. This male Red Bellied posed for me on a limb with ample morning light and no background distractions. He stayed less than a minute, but it was long enough for me to capture a couple shots.
Red Bellied Woodpecker
ISO500; f/7.1; 1/640 Second
Read all About It
Can’t help but notice that Canon’s newest flagship camera (EOS-1D X Mark II) was due out in the Spring of 2016- right about now. Apparently, stores like Adorama, B&H, and others offered sample prototypes (for a day, a week?) to their favorite (and incredibly lucky!) photographers in exchange for writing a review. (Some restrictions did apply on the type of photos they could publish.) These teaser reviews get photographers like me salivating about owning a camera that is packed with spectacular image quality and state of the art creative control.
Red Bellied Woodpecker ISO400; f/7.1; 1/640 Second
Crazy?
Am I CRAZY to want to own this camera? The updated EOS-1D X Mark II is very pricy–$5999- too pricy considering that it’s not a good long term investment. Top of the line DSLR professional cameras do not keep their value like Canon’s premium lenses.
Like computers, every camera upgrade brings enhanced speed, quality, and capacity- so much so that, after getting use to it, you wonder how you got along without it. For the last 15-20 years, I’ve always purchased Canon’s 2nd tier and 3rd tier more affordable DSLR cameras. These cameras are enticing because they typically contained two or three components that have trickled down from Canon’s best imaging technology.
Bottom line: 5 years ago I would have scoffed at the idea of buying this camera. I always presumed that the whole flagship DSLR camera package was not only out of my reach, but unnecessary. At this point in my photographic adventures, I’m considering it.
Expectations and Potential
This newest flagship camera is all about expectations and potential. A few reviewers out there grumble that it’s a toy for the rich and that the enhancements over the last flagship model are just superficial- not worthy the upgraded “Canon D X Mark II” label. But I don’t think so. This camera is an admittedly expensive investment for bird photographers (professionals and amateurs) who take their work seriously and find pure, unadulterated delight in the possibilities of a cutting edge tool.
Camera Aficionado
I’ve always been a camera aficionado, carefully attentive to equipment and always tuned in to pioneering developments as they relates my extravagant fondness for bird photography. New, more complex electronic and mechanical contrivances are an essential part of my challenge. A new camera brings with it an aura of wonder – surprise mingled with admiration–not only because it’s bigger- better-faster, but because I have to understand what makes it tick.
Make no mistake. This new equipment won’t solve problems of poor lighting, entice a Red Bellied Woodpecker to come closer or even show up in the first place. The challenge, the rewards, the adventure, the striving to get better, the thrill of success—all these things are possible with a lesser camera.
But that’s not what I’m looking for at this time in my life. I want to devote time and initiative to new gear (trappings?) that force me to be quick and nimble, go past old boundaries and struggle to better understand the potential and rewards of the new imaging technology.
A Girl Can Dream
When everything’s said and done, this camera sounds fabulous and I want one. It has an advanced Digic 6+ processor and faster bursting, (with enhanced buffer and memory card storage to accomodate), a more precise 360,000 pixel RGB+IR metering sensor, and a more advanced 3D auto focus and tracking system. I can expect to see more comprehensive dynamic range in my images, better detail (in the shadows) at higher ISOs, and better camera stability due to a new springless mirror assembly that minimizes bounce.
I write a lot about sensor quality…. so this is my favorite part. The full size sensor is 20.2 megapixels with increased sensitivity engineered to keep the ISO low when light is scarce, especially in the dark portions of the image. When the light is so inadequate that ISO must rise and compensate (especially in my yard) the quality of high ISO images from this new sensor promises to be much better than its predecessors.
My biggest disappointment so far: No cropped-sensor options; no 4:5, 1:1, APS-C or other crop options as have been included on the 5DS megapixel cameras.
The list goes on and on. Build-wise, it most certainly is rugged enough to outlive me –though probably won’t outlive my interest for the new and exciting.
I will sell the old to make way for the new and bite the bullet. I might hold off on this purchase just to see if other photographers who use this camera day-in and day-out are impressed.
Buyer’s remorse may come, but, on the other hand; “You can get what you want or you can just get old.” (Billy Joel)
NOTE: Press this link for more information on my thoughts about the Canon’s 50 DS R 50 Megapixal cameras.
For a long time, I did not dare to venture into the confusing maze of menus that controls auto focusing on modern DSLR cameras. I was too comfortable with the Single Point AutoFocus, thus limiting the multi-point focusing functions of the camera and using only one, center based AF point. Keeping a moving bird’s head or body contained in just one focus point is not easy, especially if the bird is bouncing in and out of the frame and you are in the limited panning environment of a vehicle. I used single point autofocus so much because I felt I could trust my bird tracking and panning abilities more than the camera’s technology to react fast and lock focus on target. That’s a mistake in bird photography.
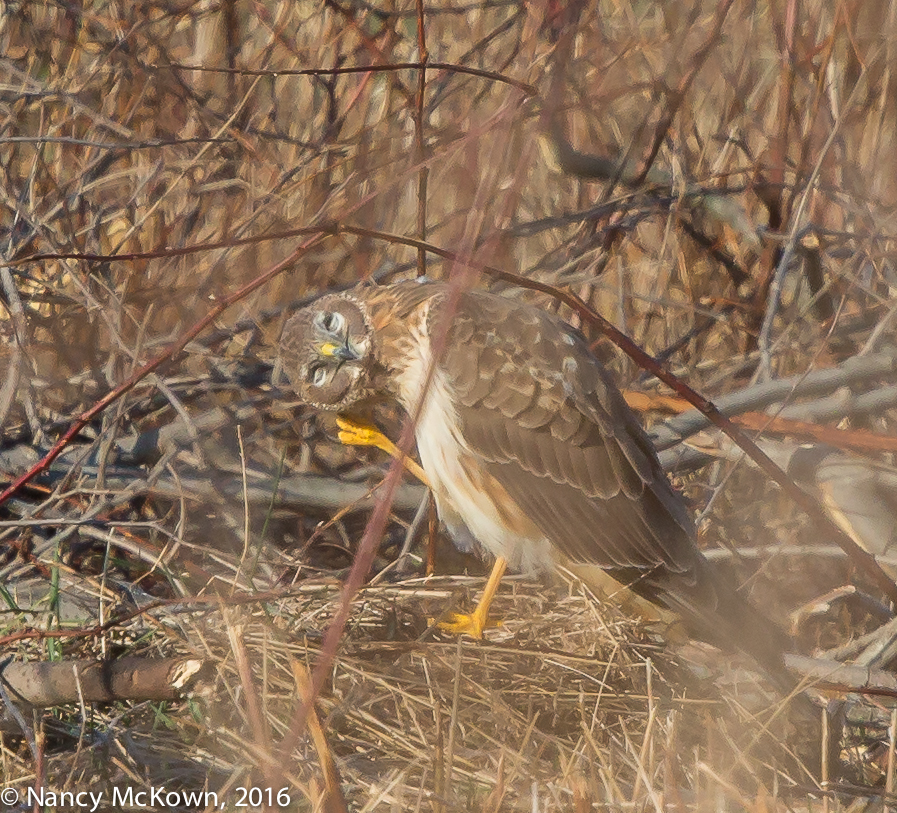
Extreme Enlargement of a Northern Harrier, on the Ground and Tightly Surrounded by Foliage. ISO 800; f/9; 1/1600 Second
Auto Focus Compromised From the Start
For this shoot, autofocus was compromised from the start. The Northern Harrier was embraced within tightly packed brambles and grasses. His plumage blended well with the foreground and background – so much so that there was not a lot of contrasting color to separate the surroundings from the target and help the auto focusing mechanism lock focus. Worst of all, the bird was NOT anywhere near to filling the frame.
NOTE: The distance between the bird and the lens alone was enough for me to pass up the shot. However, this bird just happened to be a Northern Harrier, a handsome and unfamiliar raptor, so I had to go for it.
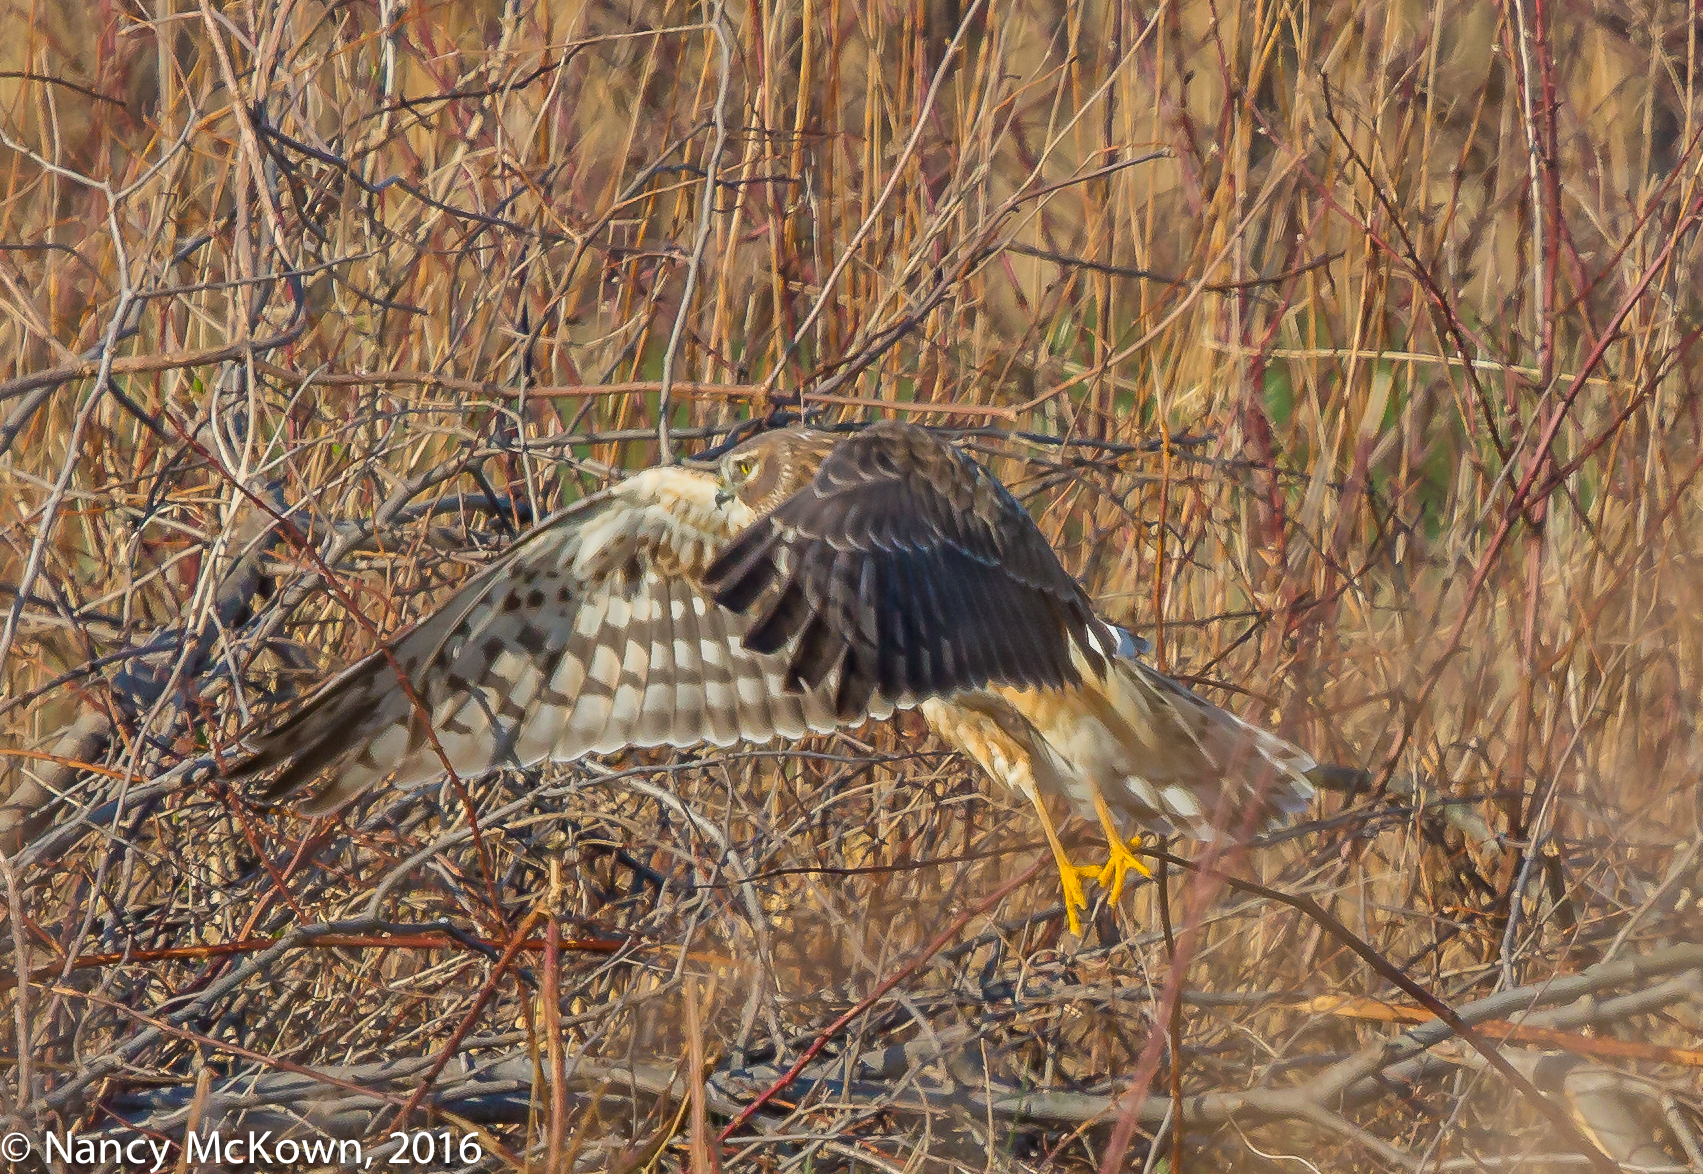
Northern Harrier at Liftoff, Extreme Enlargement ISO800; f/9; 1/1600 Second
Check AutoFocus Settings
For a long time, I assumed that if the images I took looked decidedly out of focus, it was because I somehow mishandled the camera. I also wondered if perhaps my expensive 500mm lens needed to be re-calibrated or sent to Canon Service to bring it back to factory specifications. Auto focus can go wrong for a lot of reasons, both camera/lens related and user error, but one of the first things photographers should check is the autofocus settings within the camera menu system.
Different Focusing Scenarios
Canon DSLR cameras offer 6 different auto focusing choices. You must choose one option from the six (6) “case scenarios” that you think best fits the focusing challenges you will be faced with in the field. You then customize that one chosen scenario by deciding how intensely you want the following three (3) focusing functions to respond: a) Tracking Sensitivity, b) Accelerating and De-accelerating tracking; and c) Auto-Focus Point Auto Switching.
My Auto Focus Settings
I have set and re-set these functions many times on both my cameras. I have erred on the side of restricting the cameras too much for most of the bird photography challenges I encounter.
I have had the most success when my cameras are set to the Case #2 scenario. The Canon manual defines Case #2 Auto Focusing as: “The camera will try to continue focusing the subject even if an obstacle enters the AF points or if the subject strays from the AF points. Effective when there may be an obstacle blocking the subject or when you do not want to focus the background.”
Once you match a case scenario to the conditions in the field, the camera’s auto focus system will be able to evaluate the scene and automatically adjust focus so much faster than the photographer can do manually.
Within the Case #2 Focusing Scenario, I have adjusted the “behaviors” of Case #2 as follows:
Tracking Sensitivity
As I track the bird in this mode, the tracking sensitivity is programmed to stay with the original subject (set at -1). Intruding obstacles (like blowing grasses, other birds, tree trunks, irate DNR officers) do not distract focusing from the primary target. (NOTE: If you do want the camera to track focus on anything that intervenes with your target, set it to +1 or +2 .)
Accelerating and De-Accelerating Tracking
It’s almost impossible to predict where, when and how fast the bird will fly off. I set the accelerating and de-accelerating tracking to immediately respond to the movement of the bird. Mine is set to -1.
Auto Focus Point Auto Switching
Having multiple points to help keep track of your subject is very advantageous. What is even better in fast and unpredictable situations is when the camera is programmed to follow the action and immediately switch as needed to activate the best auto focus points within the range of the viewfinder. Mine is set to +1
Activate Auto Focus Points
Once you engage the lightning fast, predictive auto focusing system that best fits your birding environment, don’t constrain it by setting the camera to use only one focusing point within the auto focus area selection options. You can be cautious and use the more limited zone focusing or let loose and activate the entirefocus point system. (On Canon’s more modern cameras, 61 autofocus points are available.)
Then, once your autofocus settings match your bird photography scenario, it’s just a matter of watching and waiting; and hoping that the bird will take off sooner rather than later because of your aching back and neck.
NOTE: Canon 5 D Mark III cameras allow you to quickly switch between Zone AF and 61 point automatic selection AF. See this link and for more information.
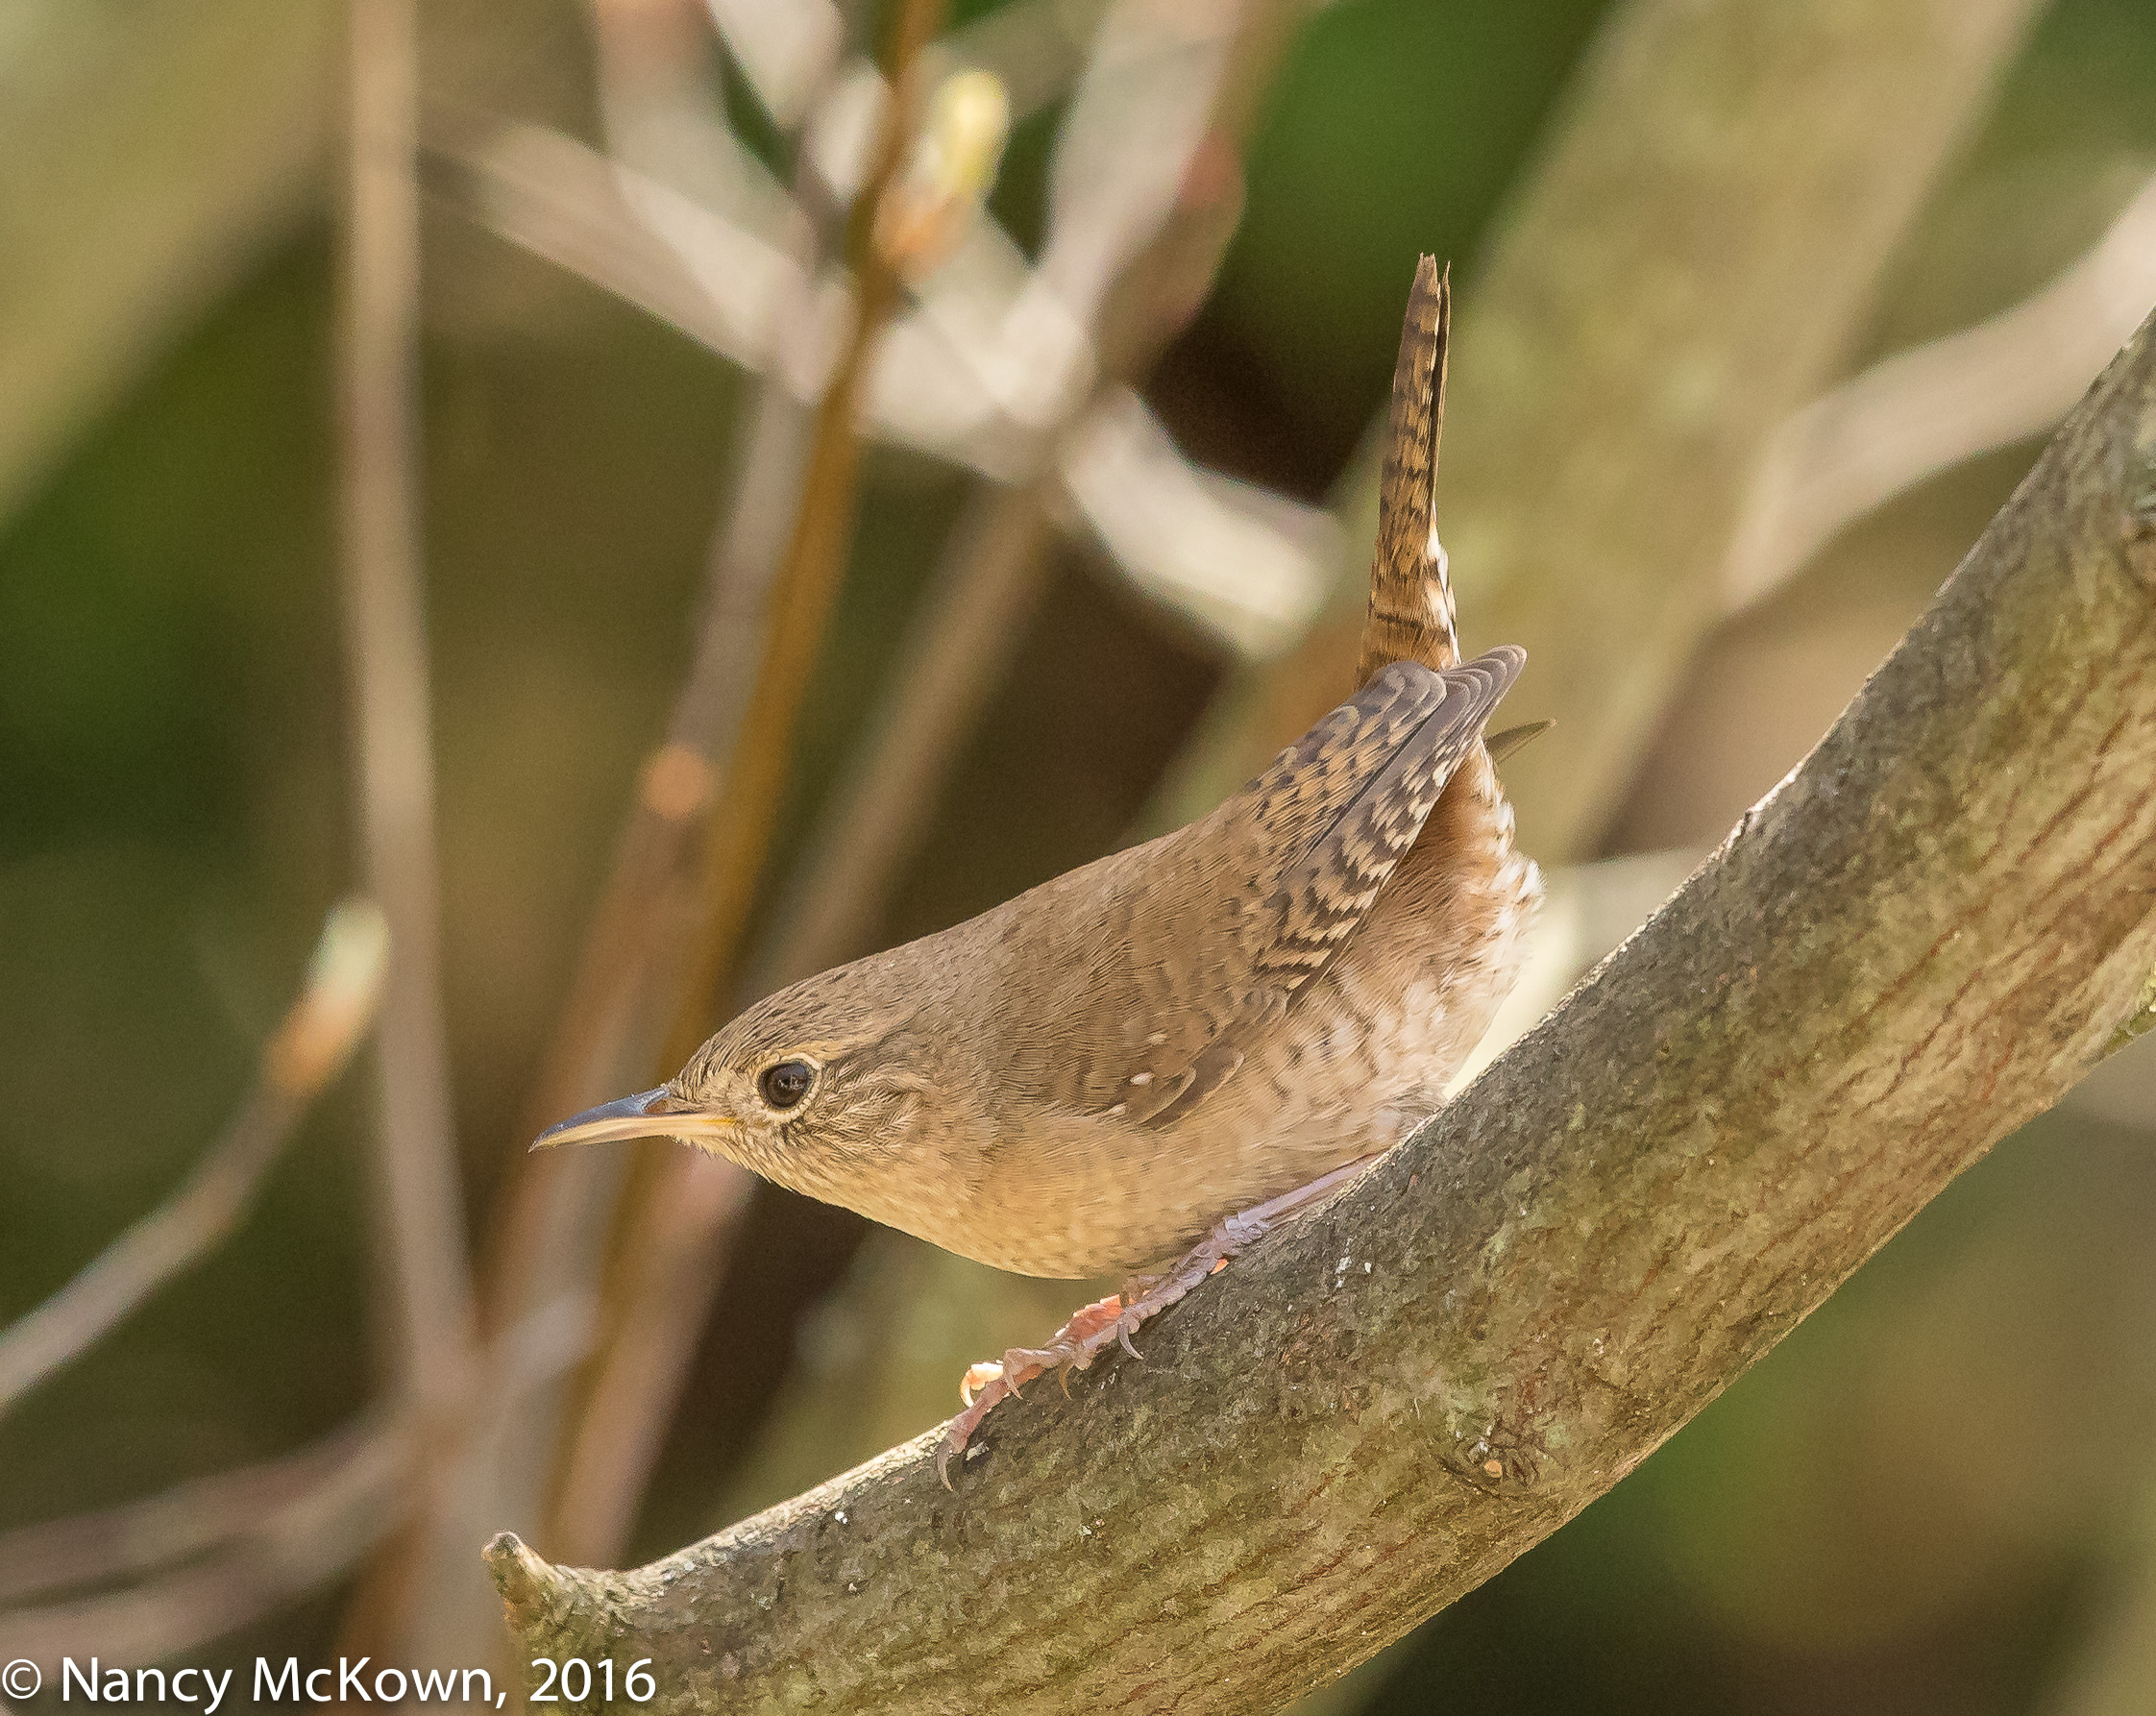
The skies were overcast when the first male House Wren arrived to our yard. He has been dashing from tree to bush, in full view, heartily singing his bubbly rhapsody. Apparently no female has arrived yet because he has not commenced his nesting ritual of building multiple starter homes from which the female will choose.
House Wren ISO2000; f/7.1; 1/640 Second
A Quick Primer on Viewing Light
Since it is often counterproductive to try to enhance and manage natural light with extra light equipment, bird photographers have to be more observant about how light plays on their subjects, and act accordingly. Knowing how to observe light involves understanding the following terminology:
“Highlights” are the brightest part of the photo. They indicate where the light source is the closest and most unobstructed.
“Shadows” are those blocked areas that receive little or no direct light. If shadows are lit, it is from scattered, diffused light reflecting off the highlights.
“Mid tones” often make up the majority of the light and are those tonal areas between the highlights and shadows.
Bright sun creates much more contrast between the lighter and darker parts of your image, and thus makes it much easier to identify the highlights, shadows and mid tones. Diffused light softens the contrasts across the whole image, making for a more even and balanced look.
NOTE: This tonal information is mapped on the camera’s histogram. The shadow areas are on the left side; highlights are on the right, and mid tones are represented in the middle. The histograms for both of these photos show a rich range of mid tones heavily weighted in the center of the graph, with very little activity on the right or left side.
House Wren with the signature Perky Tail. ISO1600; f/71; 1/640 Second
Pay Attention to the Light
Shadows help bring out dimensionality, texture and perspective. Highlights (from the dominant light source) throw excess, diffused light into recessed shadow areas, uncovering detail. If the light is overly bright on the subject, the edges of the highlights and shadows become sharply defined, creating harsh, unattractive contrast.
Light creates mood, purpose, drama – and thus draws visual interest. Bird photographers pay attention to the intensity and directionality of light, and evaluate how the sun scatters light and cast the highlights, shadows and mid tones. They watch how the light interacts with the shape and size of the subject to determine where to position the camera.
NOTE: On a cloudless day, the sun’s position (orientation and distance) in the sky determines the location, size, shape and length of the shadows.
Softening the Effects of Harsh Light
It’s almost impossible to adequately soften harsh shadows after the image is shot. That said, there are tools you can use to mitigate the effects of glaring, contrasty light.
The Shadow/Highlight Sliders in Post Processing
You can balance the light on your images by using the highlights and shadows sliders in Lightroom. NOTE: It is common to use a heavy hand and overuse the shadow slider; over brightening the shadows and reducing tonal richness. In addition, the more you push that shadow slider, the more likelihood of noise in the shadow areas.
Canon’s Camera-Auto Lighting Optimization – ALO
Auto Lighting Optimization (ALO) is in-camera processing that automatically softens contrasts and restores highlight and shadow detail immediately after the shot is taken. You can choose from 4 settings…”Standard”, “Low”, “Strong” and “Off”.
Ultimately, I prefer to handle the shadow recovery myself in post processing. I leave ALO “Off” for the following reasons:
Camera processing time slows as the camera writes the ALO optimization data to the memory card.
ALO will have an impact on other camera exposure adjustment functions that are engaged, like exposure compensation, flash compensation, automatic exposure bracketing, and others.
ALO will be automatically disabled if Highlight Tone Priority or High Dynamic Range functions are turned On.
ALO settings are reflected in the shape and position of the histogram as well as the highlight alert warnings (Blinkies) in the camera’s preview LCD screen. I like to review this data unencumbered with ALO effects.
The Photographer’s Greatest Challenge
In bird photography, rarely are there assistants available to manage heavy spotlights intended to project light onto your subjects, or scrims to block harsh sunlight, or reflectors to throw back light and fill the shadows. These light enhancing strategies (and the assistants) would most likely backfire and scare away the birds.
Placement of the different types of light affects every feature of your image and is the photographer’s greatest challenge. It pays to be watchful of the light.
To read more about House Wrens and Bird Personalities, press this link.
To read more about histograms and dynamic range, press this link.
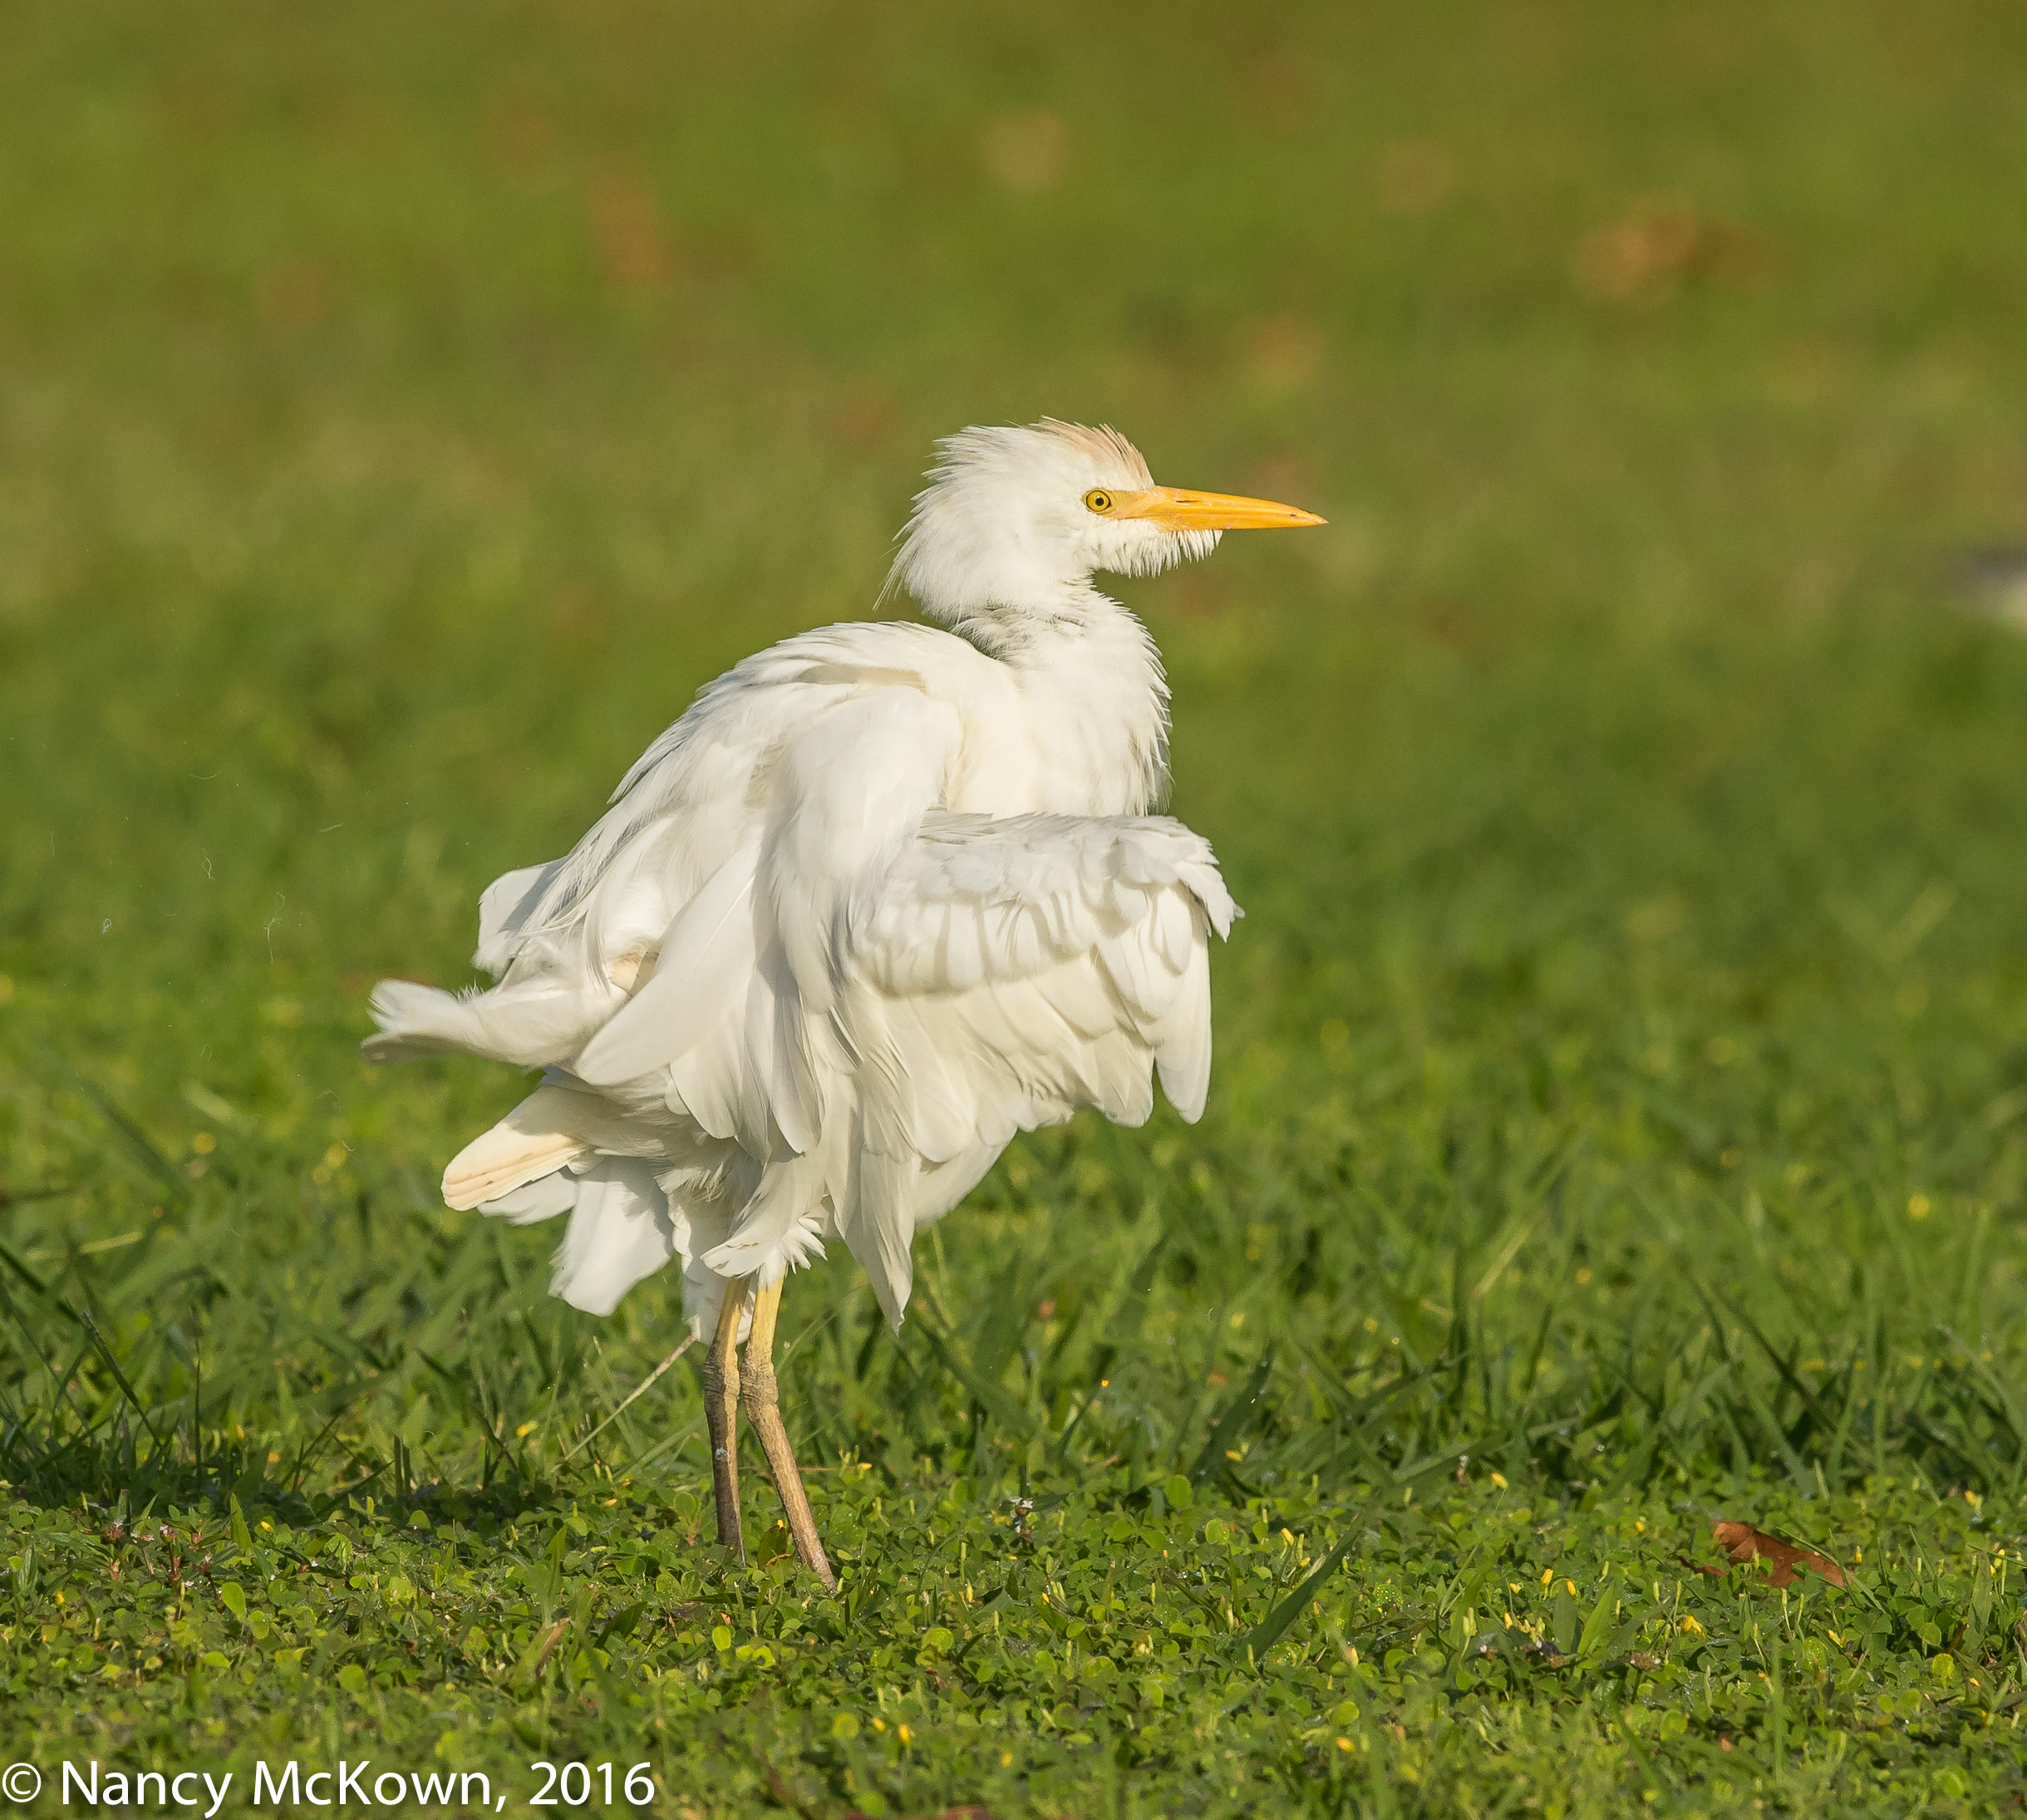
Cattle Egrets are tropical herons. These images were taken in March, 2016 in Hawaii on the garden island of Kauai where they are found on every golf course, roadside and back yard.
The Cattle Egret is one of the few herons that typically hunts for insects and invertebrates in open grassy areas, fields and marshes, especially where humans keep domesticated grazing livestock. They are often seen following anything big enough to stir up insects, like cattle and farm equipment. Somehow, they still manage to look elegant, even when following a tractor or riding atop a cud chewing cow.
Cattle Egret in Summer Plumage. ISO320; f/9; 1/1000 second
Proper Exposure of White Subjects
It was early morning and the foraging Cattle Egrets were cautiously keeping their distance from the camera. Just as well. The light meter was reporting a fairly balanced exposure from where I was standing.
When photographing white birds, I try to set exposure to bring out texture and detail in the plumage. During this shoot, the histogram showed lots of dark and light variation because of the wispy golden spring plumage (on the bird’s head, breast, and back), yellow legs, black feet and lots of vibrant green grass. There were no light pixels creeping up the right side of the histogram, indicating that details data in the birds’ feathers would be preserved. (NOTE: Keep those blinkies turned on.)
Canon’s Evaluative Mode
For this shoot, light meter was set to Evaluative Mode and due to the advantageous mix of light and color, exposure was spot on. It is true that modern day in-camera light meters are designed to work best when there’s “normal” and “average” light, but Canon’s Evaluative Mode has been engineered to be smarter than that. It does a fabulous job compensating for extremes in brightness (light and dark) because algorithms built into this metering mode selectively compare and evaluate the scene and give more weight to the active auto focus points. Spot metering would have allow me to take a meter reading right off the bird, but given so much diversity in the scene, it was not necessary.
With photo shoots like this, I rarely have to use exposure compensation (EV) options available to me unless backlighting is an issue, the white bird fills the frame, or a blanket of snow covers the scene.
Cattle Egret Fluffing his Feathers. ISO250; f/7.1; 1/1250 Second
Nailing Exposure of White Birds
I usually complain about being too far away from the wild birds I photograph. This is one of those times when benefited from NOT getting close to the subject.
The photos shown here are of white birds, but photographing them was not much of a challenge because there was plenty of color and light variety from which to measure accurate exposure. The REAL exposure challenge will come when I am lucky enough to be able to fill my viewfinder frame with a beautiful white feathered bird.
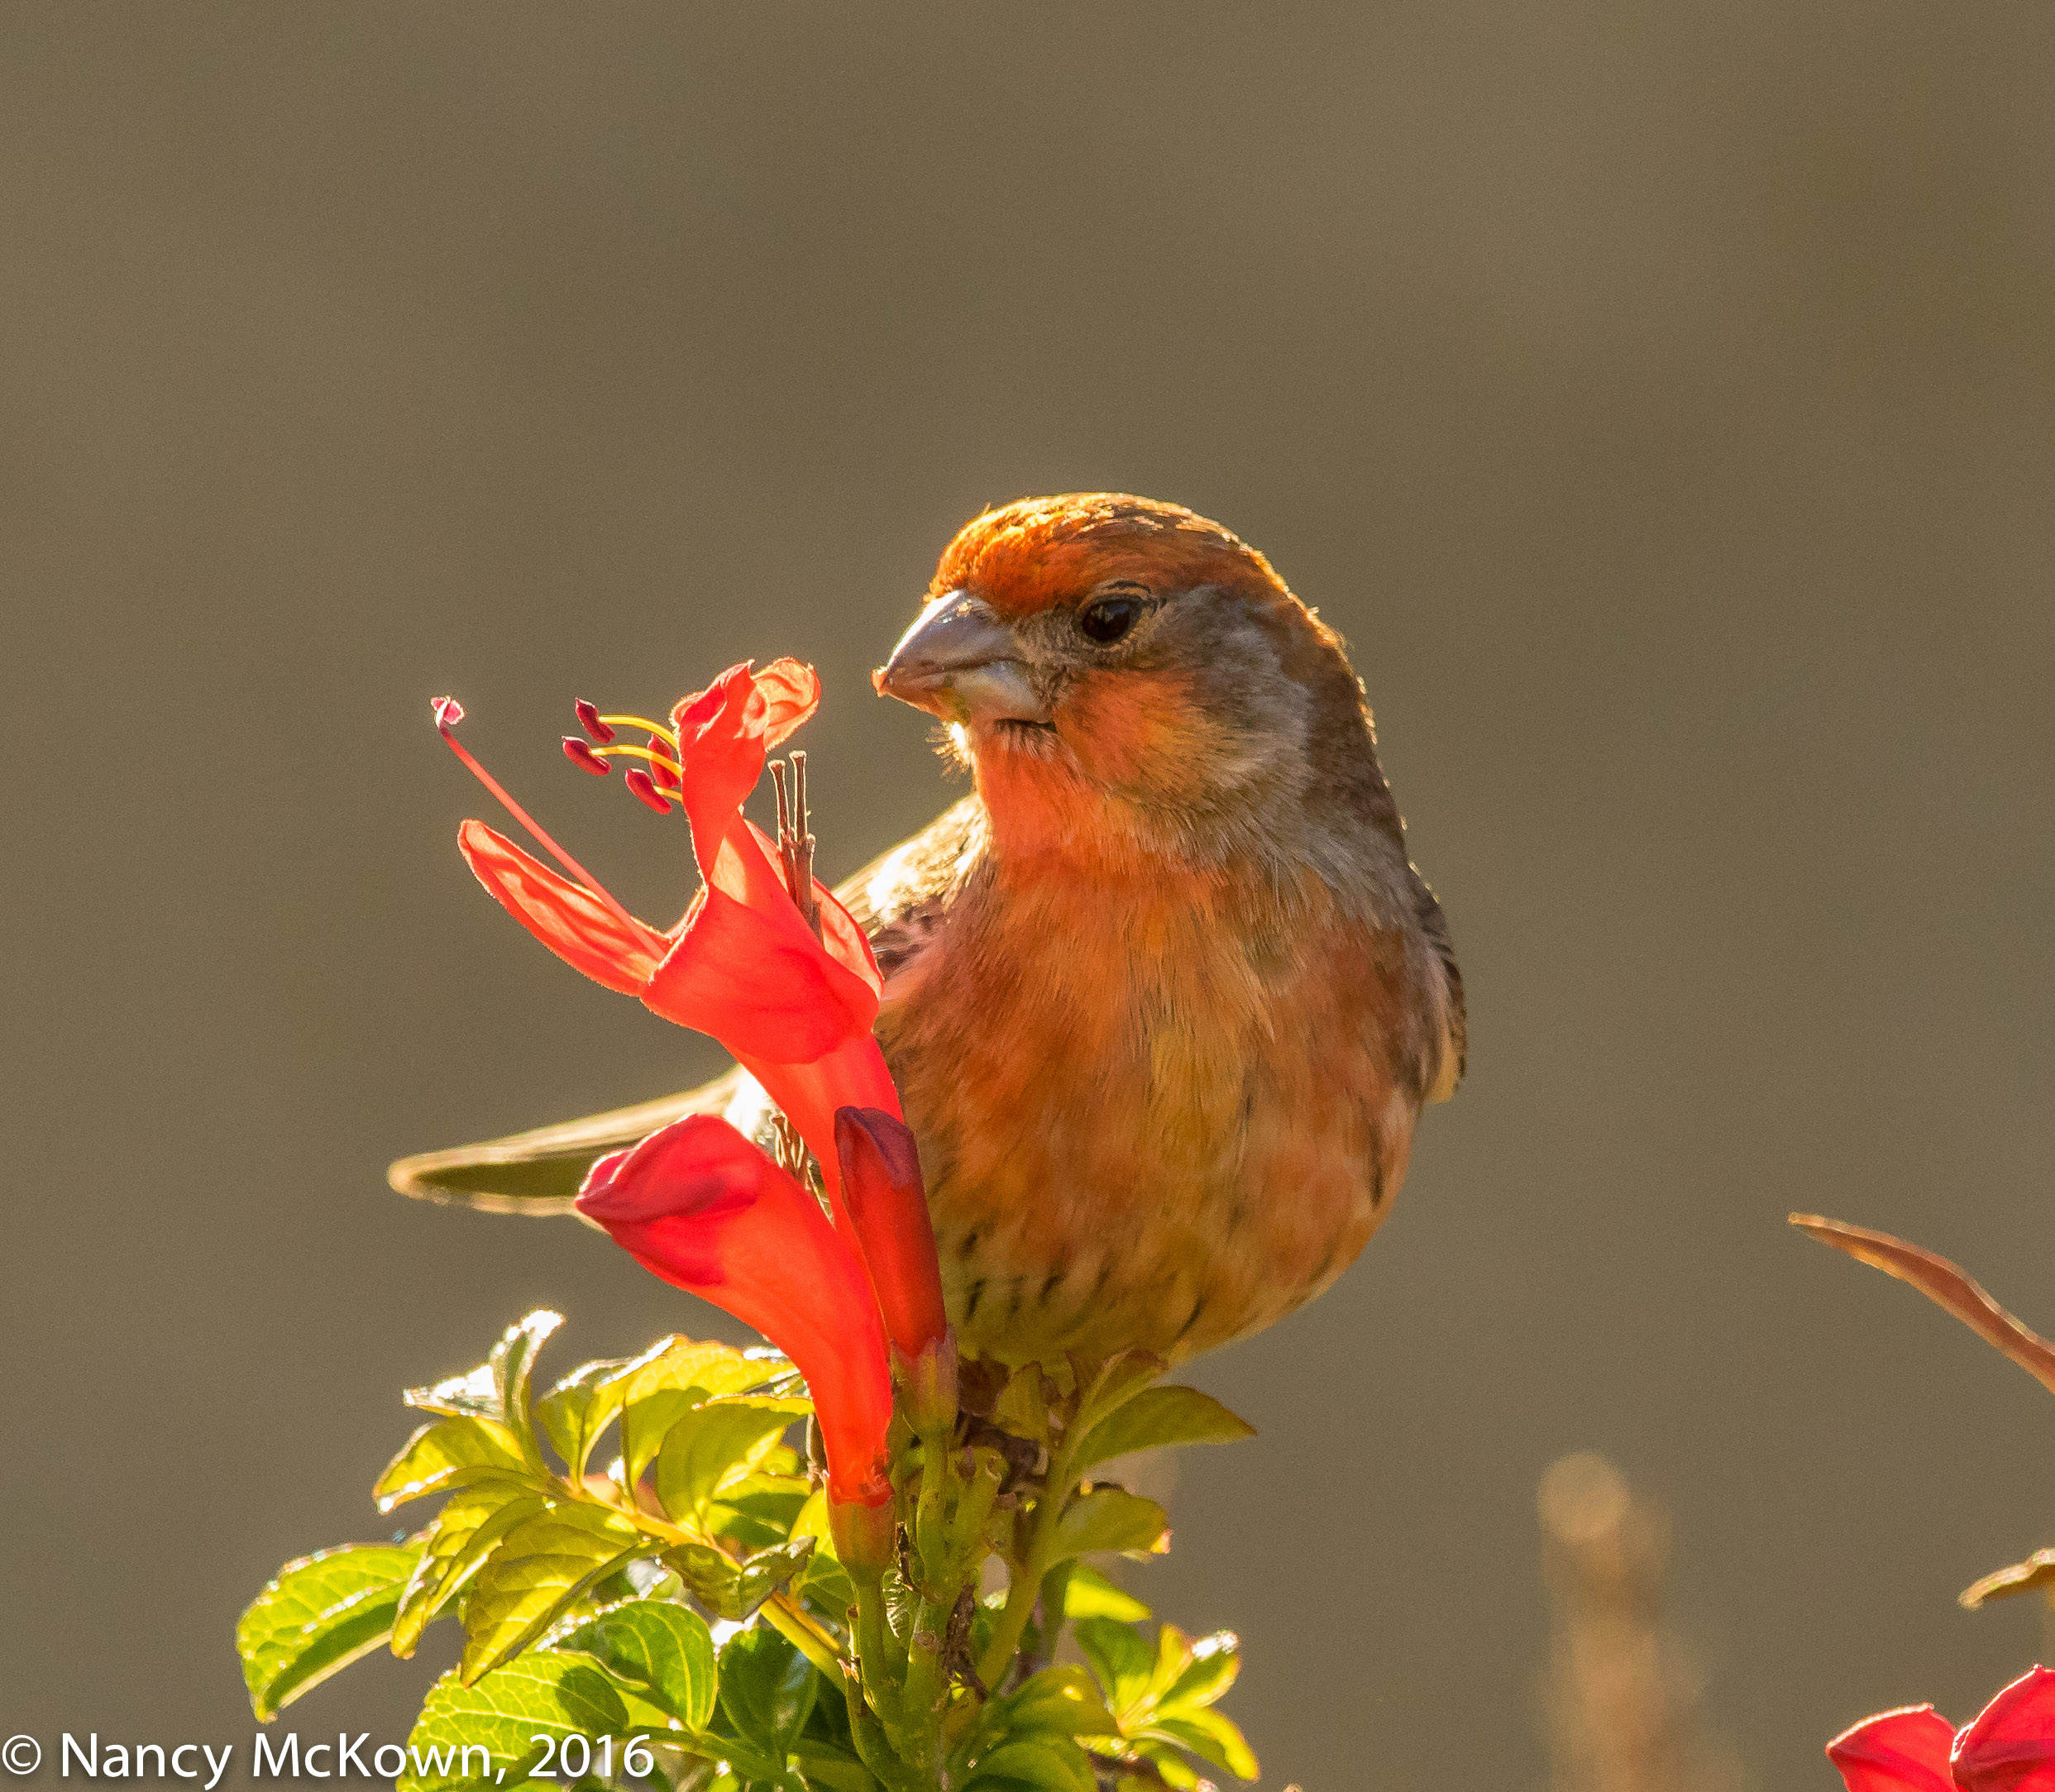
House Finches are primarily herbivores consuming nutritious foods wherever and whenever they can. It was rather easy to find and photograph House Finches in San Diego engaged in some serious pruning; tearing the base off of flowers and consuming the soft buds, blossoms and nectar from blooming bushes.
House Finch – Female – Eating A Flower. Lens flare and Some Reflective Glare potmark the background. ISO1000; f/6.3; 1/800 Second
Lens Flare Everywhere
Take a good look at the photos of the House Finches above and below. In the first image, the background foliage is potmarked with small polygon shaped, bright white ghost images and some glare. At first I thought that those white spots were a consequence of how the light played in the shadows on the leafy background. Looking closer, it is easy to see that these bright white points of light are indeed lens flare combined with leaf glare.
The second photo below is a less cluttered image because an olive colored wall takes up the majority of the background, but you can still see tiny lens flare orbs in the leafy foliage of the plant.
House Finch, Male, Eating Flower Buds. Lens Flare in barely evident in the in the Leafy Foliage below the Finch. ISO1000; f/6.3; 1/800 Second
Sun Flare Sneaking Into the Lens
Lens flare is no more than stray light (usually unintentional and undesirable) sneaking in and bouncing around the inside of a camera lens and leaving on your images an assortment of light specters shaped like the diaphragm of the lens. Lens Flare is almost always a consequence of backlighting coming from within or outside the frame.
These photos were taken with my 300mm L 2.8 IS II lens pointed at the birds, but also toward the sunlight. Despite the multi-coated technology on the lens, the use of an attached lens hood, and my hand blocking extraneous light from coming into the viewfinder cup, the sun’s position and the light’s angle must have been just right to enter the lens (and ultimately reach the sensor) and blast the images with little orbs.
You can see in the second photo that as I repositioned myself and altered the angle of the lens, the intensity of the lens flare became much more subdued. The backlighting at this angle also helped create a soft glow around the bird’s head.
AutoFocus Challenge
Chaotic backlighting can trick the auto focus system, causing the lens to act erratically and incorrectly lock focus. For both of these photos, the backlighting causing the lens flare did not impact auto focus- in part because spot autofocus was set and the camera was able to securely and correctly lock down focus on the bird’s body.
Not Necessarily Operator Error
Flare and glare happen all the time and often goes unnoticed. In this particular shoot, lens flare was widespread within all of my images.
In bird photography, I find lens flare and glare to be unattractive and distracting- an operator error which can be remedied. But it’s a personal preference. Some photographers find it desirable and creatively insert lens flare into their images….either in the field or afterwards in post-processing.
See this post for photos of Eastern Bluebirds subsisting on plant materials during the Michigan winter.
It’s no secret to people who read this blog that my favorite birds to photograph are warblers. These birds present an exhilarating challenge to find and photograph, especially in the spring when their breeding plumage is resplendent and they have reason to display and sing.
The 38+ species of wood warblers who breed in Eastern North America display a wide variety of color and melodic embellishments; and peculiar names. Though a certain warbler species may be difficult to precisely ID without being fairly close (and for me, accompanied by a confirmation photo) the behaviors marking them as warblers are quite consistent. Tiny, (avg 5″ and less than 10 grams) jittery, purposeful, arboreal birds with broad ranging migratory habits, warblers skitter about on the ground or in dense brush and rarely pose on the perfect photo perch.
Blackpoll Warbler ISO1600; f/4; 1/500 Second
Monocular Vision
When I placed my dominant right eye up to the viewfinder eye cup to photograph this Blackpoll Warbler, my left eye automatically shut, effectively blocking out any other birds that may have been outside the center of my one-eyed gaze.
The most obvious reason my left eye closes is that binocular vision only works when both eyes are working together. It is too disorienting when one eye is looking through a long lens showing a limited field of vision and the other is looking without magnification at a much wider field of view.
So, I keep my left eye closed when photographing birds and have honed my skills at transitioning quickly between binocular vision (with overlapping fields of view) to the one-eyed magnified view I see through the viewfinder.
Blackpoll Warbler ISO1000; f/4; 1/500 Second
Through-the-Lens Bird Relocation
It is not uncommon for me to spend many frustrating moments trying to re-find a fast moving warbler that I saw with two eyes, but lost once I peered through the lens. I must direct the lens and quickly re-locate that spot while looking through the much narrower field of view of the lens, all in a highly charged instant. If the warbler is bouncing in and out of the viewfinder, and then gets lost in densely packed undergrowth, there is no choice but to lift my head again until I catch sight of it and am able to redirect the lens.
NOTE: With time and lots of practice, my through-the-lens warbler re-location skills have improved.
Blackpoll Warblers
This female (or immature male) Blackpoll Warbler is a new one for me. She is not as distinctive as the male Blackpoll, with his black cap and white cheeks, but lovely none-the-less. As is often the case, I saw only the less colorful bird in my yard. The females or immatures look very similar to the BayBreasted Warblers. I was lucky enough to see them last Fall as well.
This Blackpoll Warbler stayed less than 5 minutes, looked around at all the commotion the other birds were making, and then decided not to play.
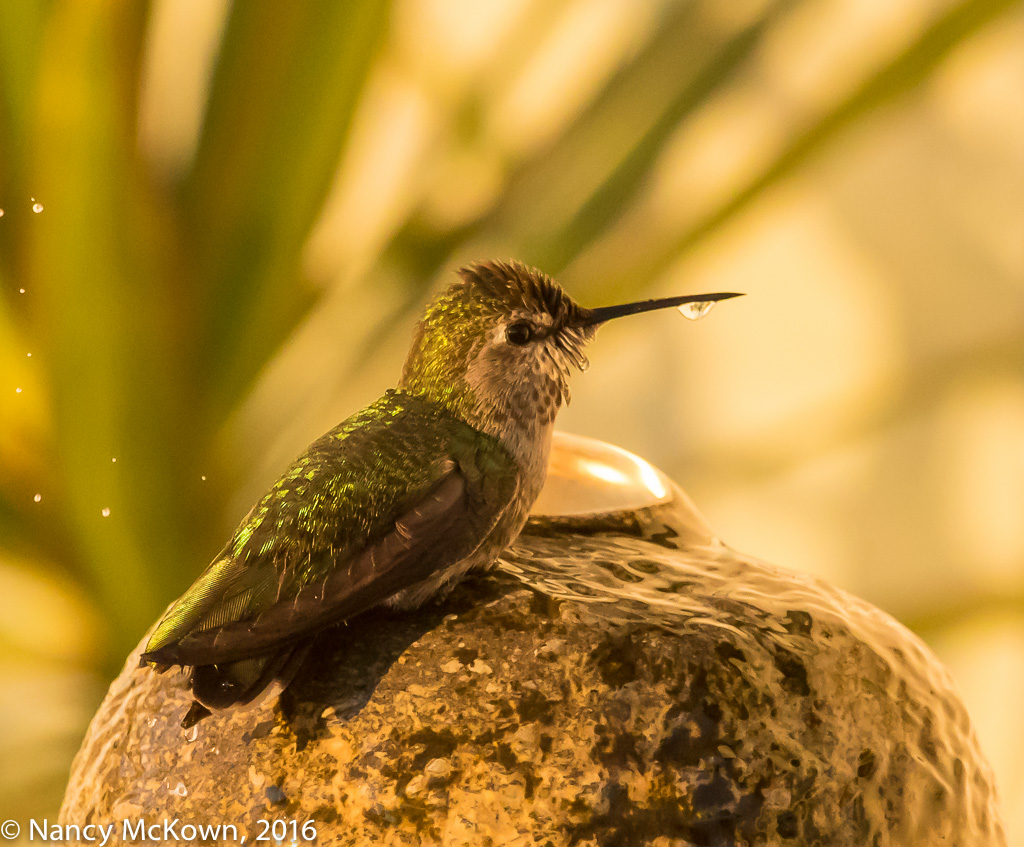
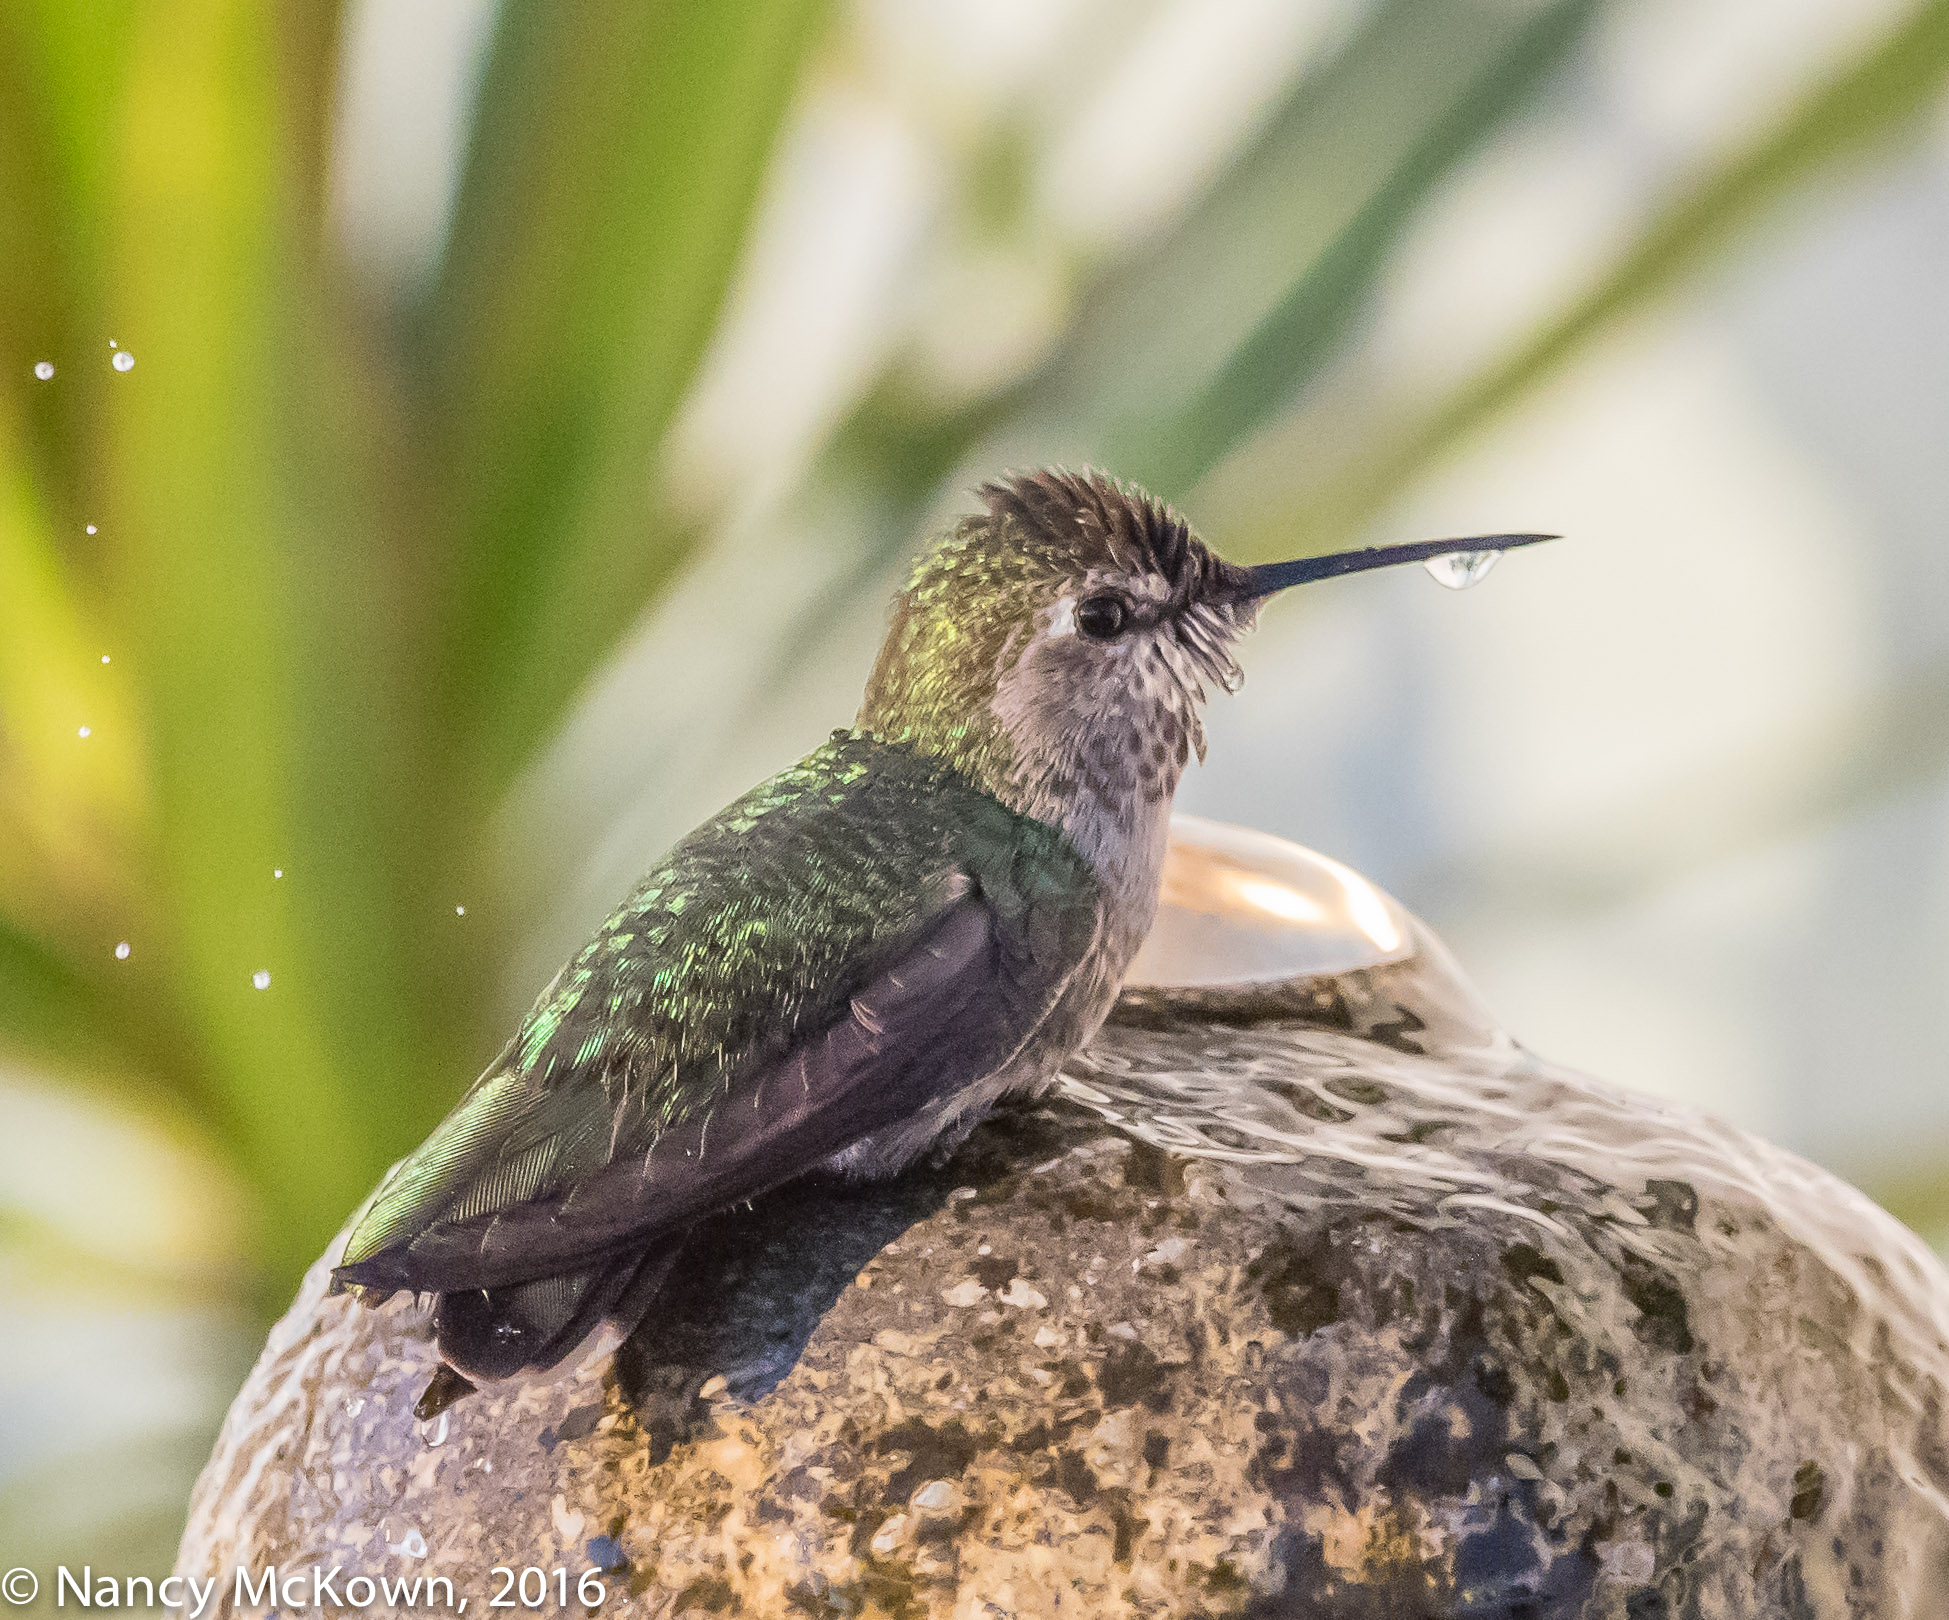
It was early in the morning in San Diego with the sun (my only illuminate) rising fast in the sky. We came upon a small house decorated with a bubbling stone bird bath pushed up close to a creamy stucco wall. A dozen or so palm fronds leaned against the wall, their green and brown shoots mingling with the creamy wall and creating distracting shadows on my background. Two bathing Anna’s Hummingbirds darted in and out of the gushing water. My presence did not disrupt their activities, so I positioned myself so the sun was slightly to my left. White balance on my camera was set to “Cloudy” (as usual), to bring out the warm tones that I prefer.
Anna’s Hummingbird in Early Morning Light. ISO2000; f/7.1; 1/1600 Second
“As Shot” White Balance Setting In Lightroom
In post processing, I try not so much to accurately reproduce the color temperature, but to create a pleasing balance between warm and cool tones. The first image (above) illustrates how the camera interpreted the “Cloudy” white balance setting. (NOTE: To bring out the detail, I had to heavily adjust the highlights and shadows sliders in Lightroom.)
I generally like the golden tones I get from the “Cloudy” setting, but the color cast in these photos looked very unnatural to me-a gaudy and unpleasant yellow.
In Lightroom, I corrected these brassy colors by changing the “As Shot” white balance setting to “Auto”. As you can see in the second image below, “Auto” rather drastically neutralized the color temperature to a cooler and, to my eye, a more natural and pleasing tone.
NOTE: Sadly, no matter what white balance color hue I chose, the bird’s chin and breast area closely matched its stone perch, making the subject rather indistinct from its surroundings.
Anna’s Hummingbird. Same Photo as Above, Using Lightroom’s “Auto” White Balance. ISO2000; f/7.1; 1/1600 Second.
Color Tint and Temperature
White Balance allows you to choose how the camera sees the color temperature. (Almost all cameras have an “auto” white balance setting, allowing the camera to guess at the color of light appropriate for the scene.) The “goal” of setting the white balance is to customize color tint and temperature to get an image with a specific color tone. It can be warm, neutral or cool; as true-to-life or as unorthodoxas you want it. White balance settings allow you to paint with the hue of light you prefer and cast the mood appropriate to the image.
Trust Your Creative Judgment
Assuming you shoot in RAW and are photographing birds using only sun light (not a mix of natural and artificial light) Lightroom’s AUTO white balance setting generates reliably good results. If you want to experiment further, Lightroom and most other post processing software offer the resources to fine tune from a wide variance of color temperature and tints, no matter how white balance was set on the camera.
When reviewing your bird photographs, take the time to become more discerning about how temperature and tint of light affect your images. Most of all, trust your creative judgment.