Yearly Archives: 2016

Photographing Black Phoebes Close to Sunset

Photographing Black Phoebes

Most mornings, I’m up early enough to greet the dawn. It’s not always sunny, but I still get excited thinking about photographic prospects that may come with the glorious morning light.

One recent morning in sunny San Diego, I woke to a cloudy gray morning with no promise of favorable light for bird photography. I decided to scout around for possible locations that might offer the likelihood of engaging sun-set lit images.

Photo of Black Phoebe
Sunset Lit Black Phoebe
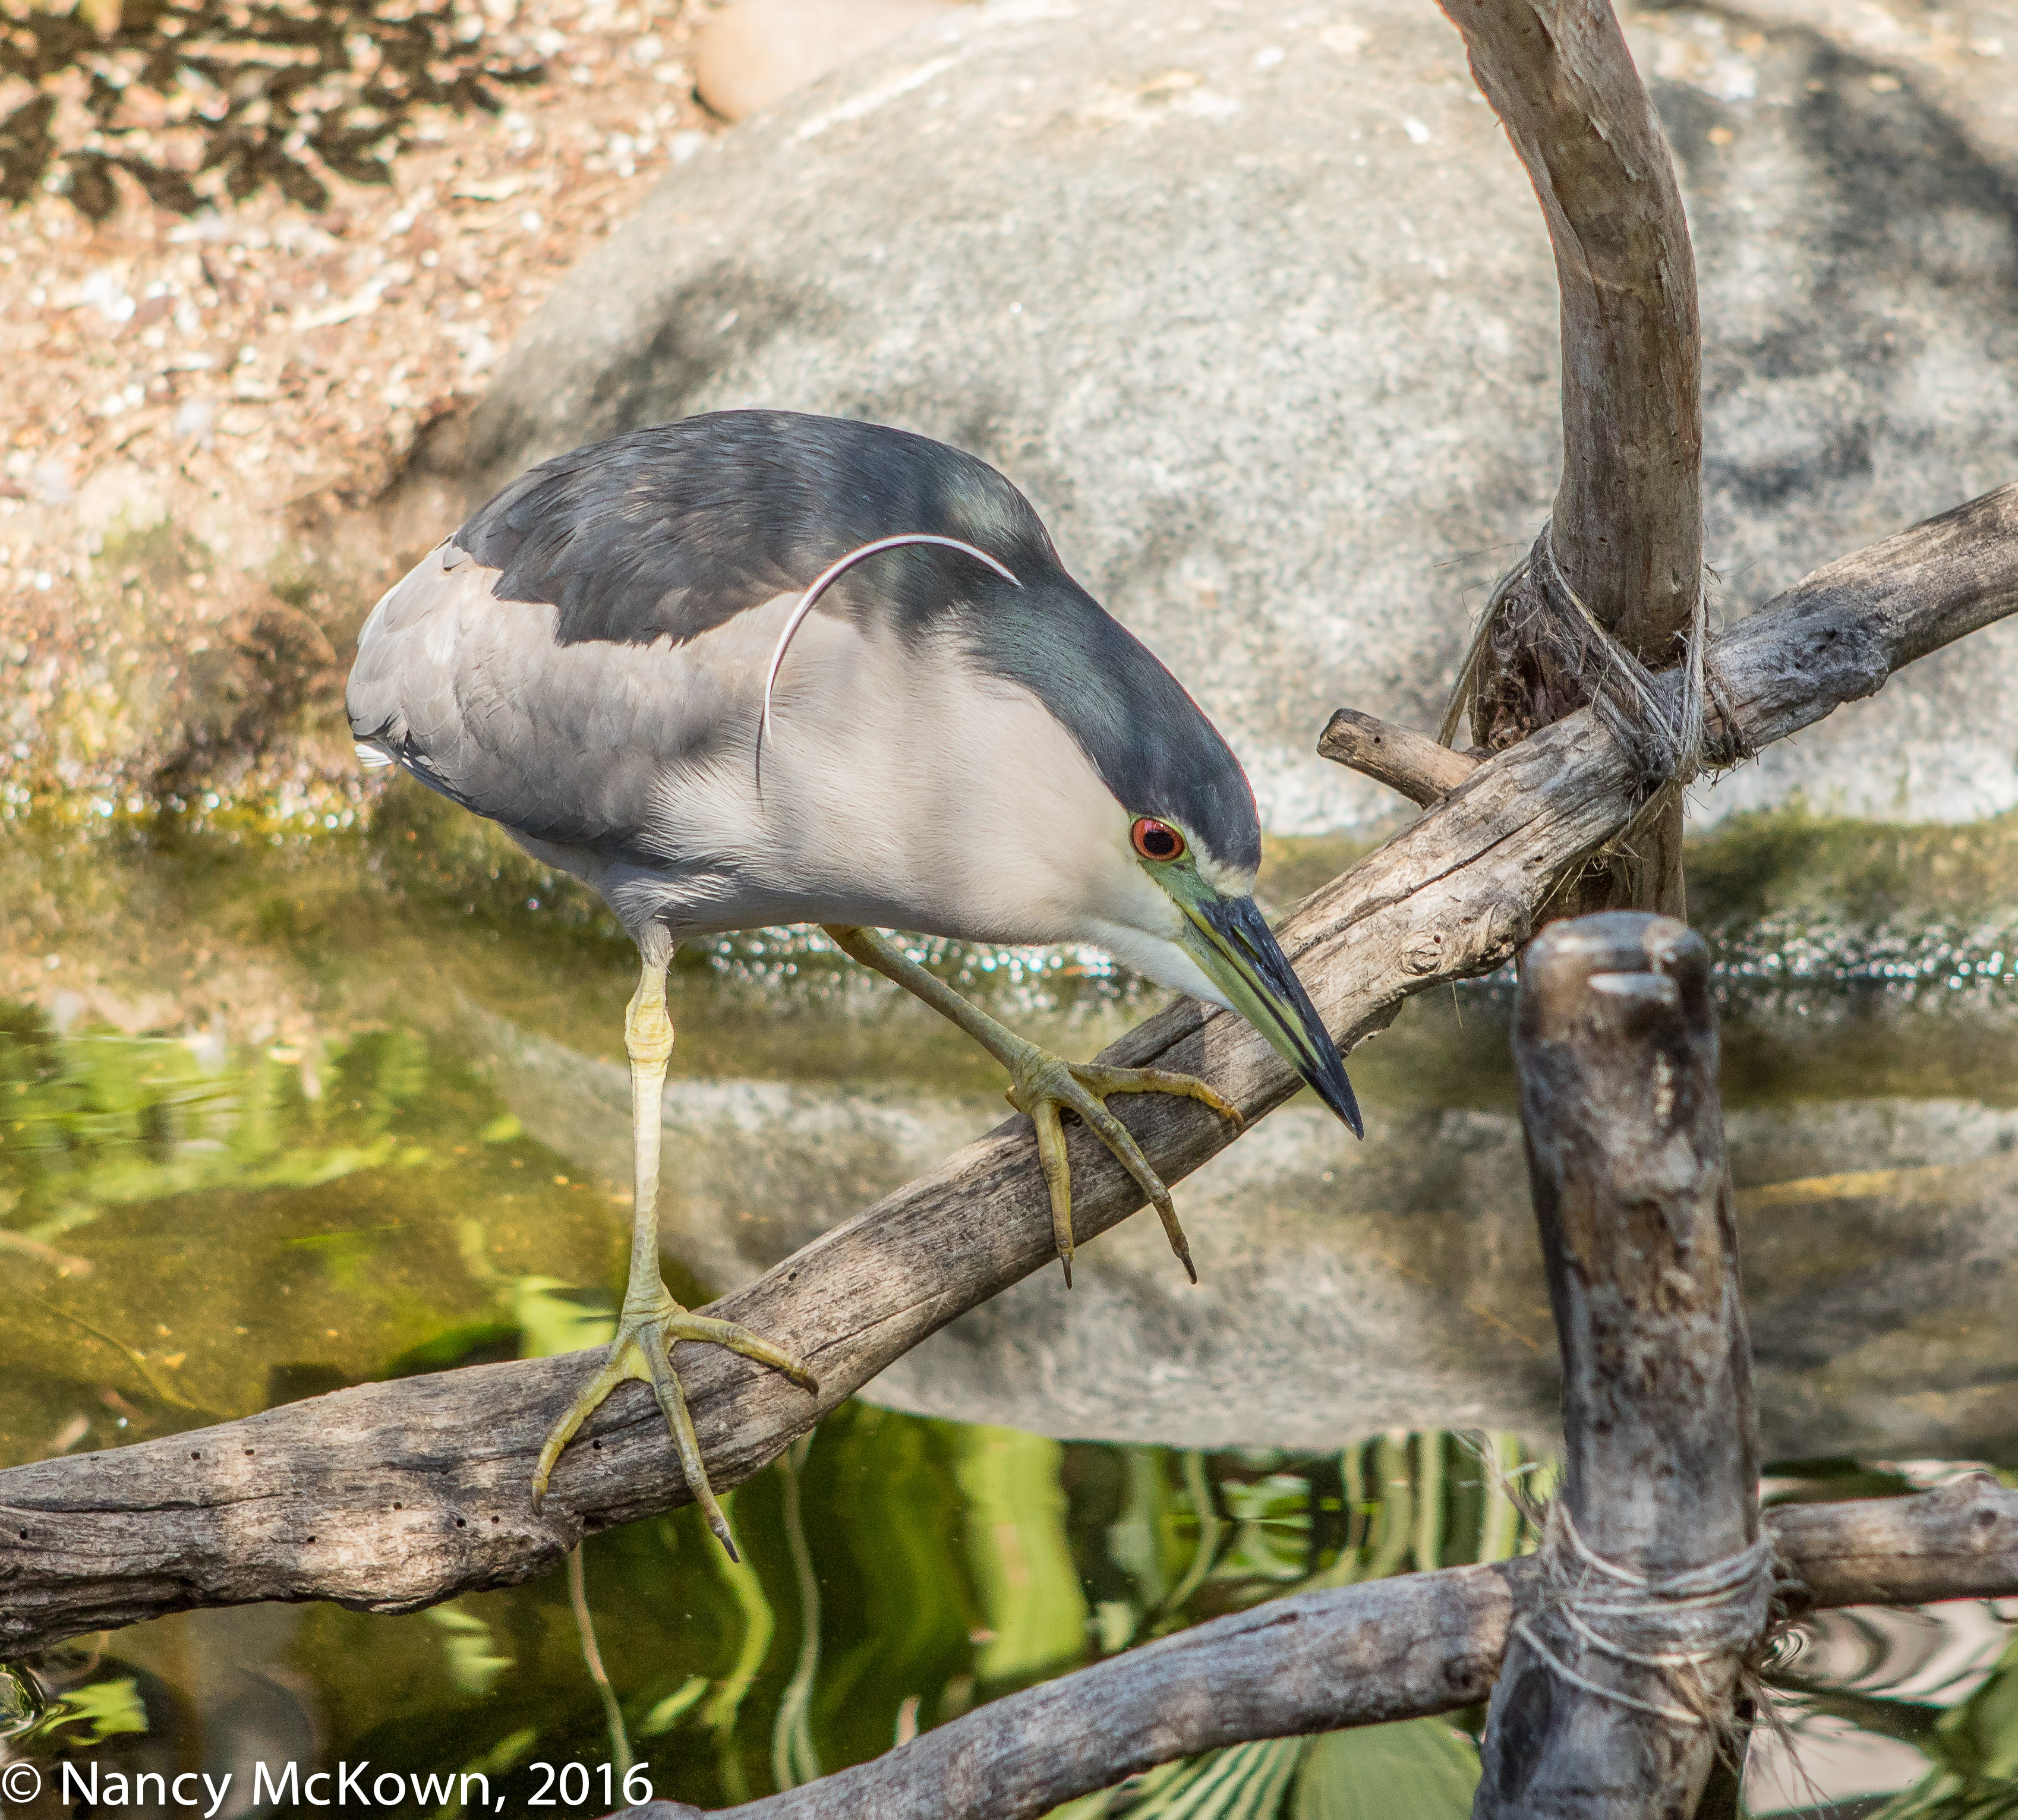
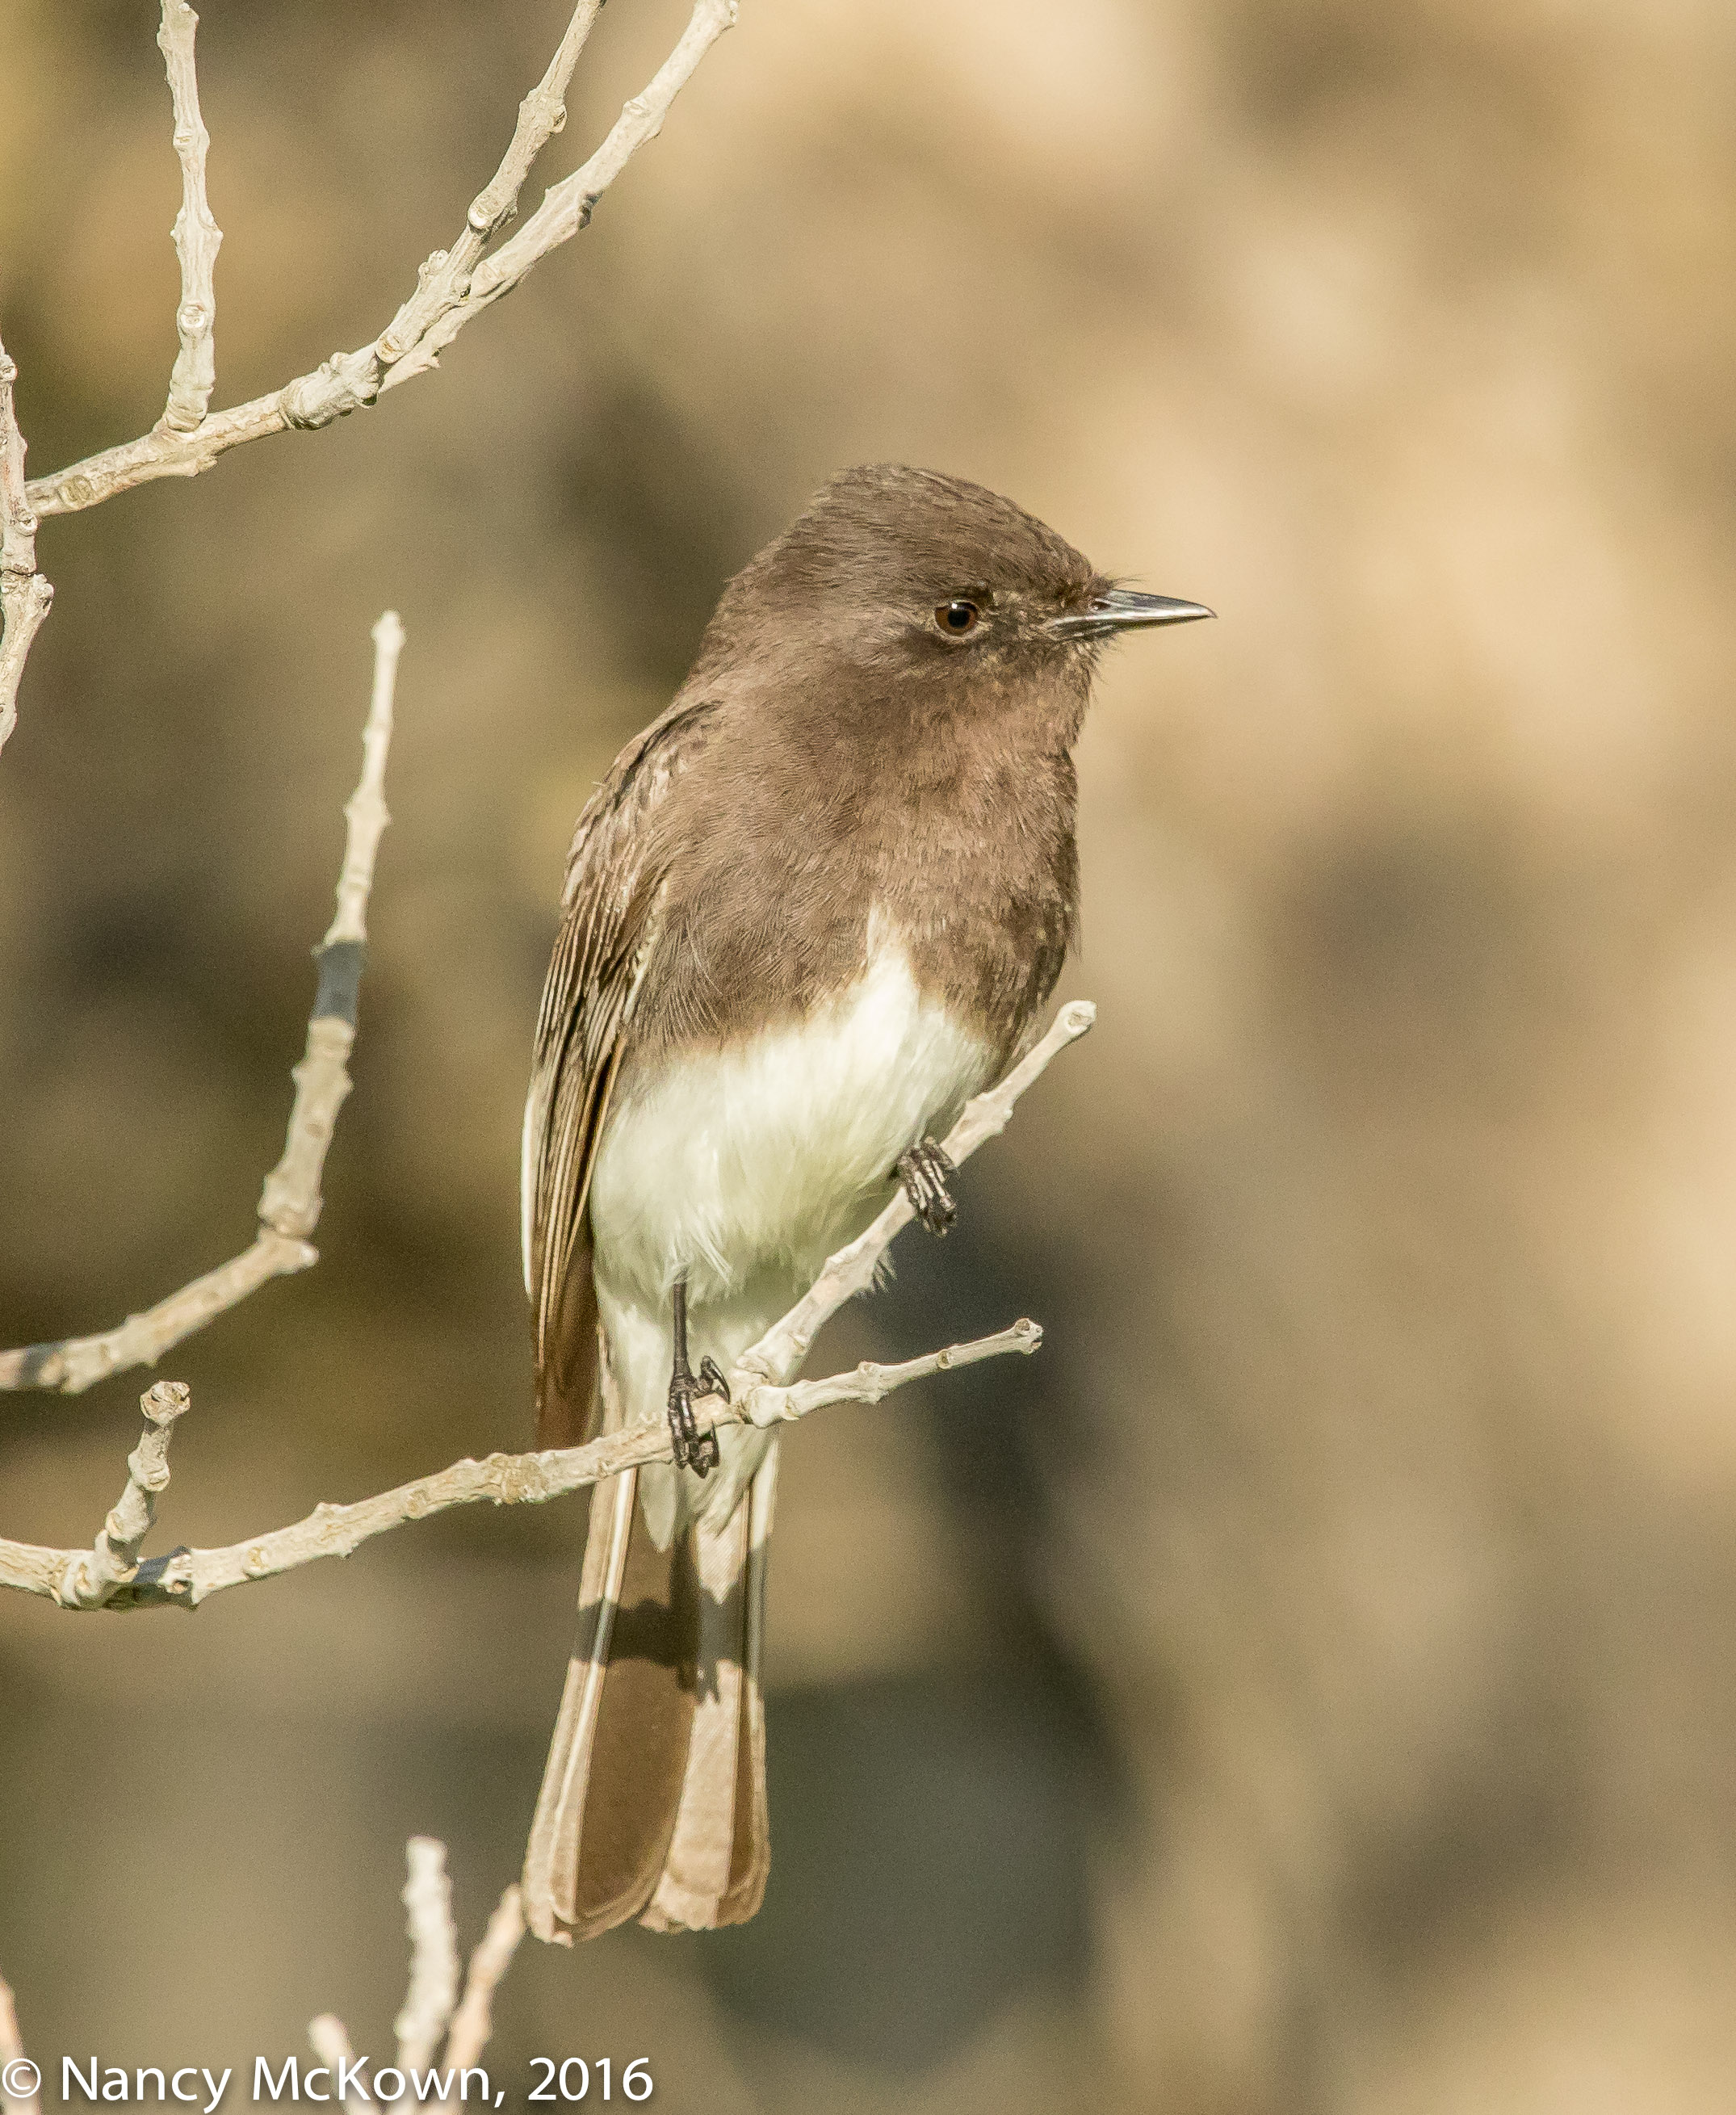
Plumage is More Brown than Black.
ISO1600; f/8; 1/1250 Second

Dawn v Dusk

At dawn, soft luminosity rapidly intensifies into a day long burst. The light seems cleaner, clearer with warm colors embellished by the mist in the air. Moving from darkness into light, my eyes do not struggle to adapt. But sunset feels entirely different. Vision rapidly declines as light fades quickly to murky gray. My impaired vision struggles to discern birdish contours in the diminishing light. Once the sun dips below the horizon, there is only enough light for silhouettes.

Sunset Lit Black Phoebes

Bird photography is always a waiting game, but it has been my experience that birds are more actively foraging during the early morning hours. On this particular evening, a few aerobatic Black Phoebes swooped up, down and around, catching flying insects while airborne. They momentarily rested on lower tree limbs, quickly pounced on unsuspecting ground quarry, then reclaimed their perches to swallow and prepare for the next strike.

I stood with my tripod fairly close to the activity, approximately 8 feet away. (Minimum focusing distance for the Canon 300mm f/2.8L II IS Lens = 78.7″) Long shadows extended in front of the camera…. so much so that I had to move the equipment further back so my shadow did not obstruct light on the subject in front of me.

Wildlife Activity Down

When I searched out possible sunset shooting locations that morning, I saw a lot of potential in way of light and bird activity. I did not however, factor in the influence people have on the behavior of wildlife. Ordinarily, very few people are around to disturb the early morning calmness. Thirty minutes before sunset when I set up my camera and tripod, people were everywhere.

I should have known. Birds were scarce because people generated road and foot traffic was up. Most of the human transients ignored me and continued with their activities and conversations, but some stopped to stare, walked over to investigate the area where the camera was pointing, or just walked by in front of the camera.

Photo of Black Phoebe
Black Phoebe
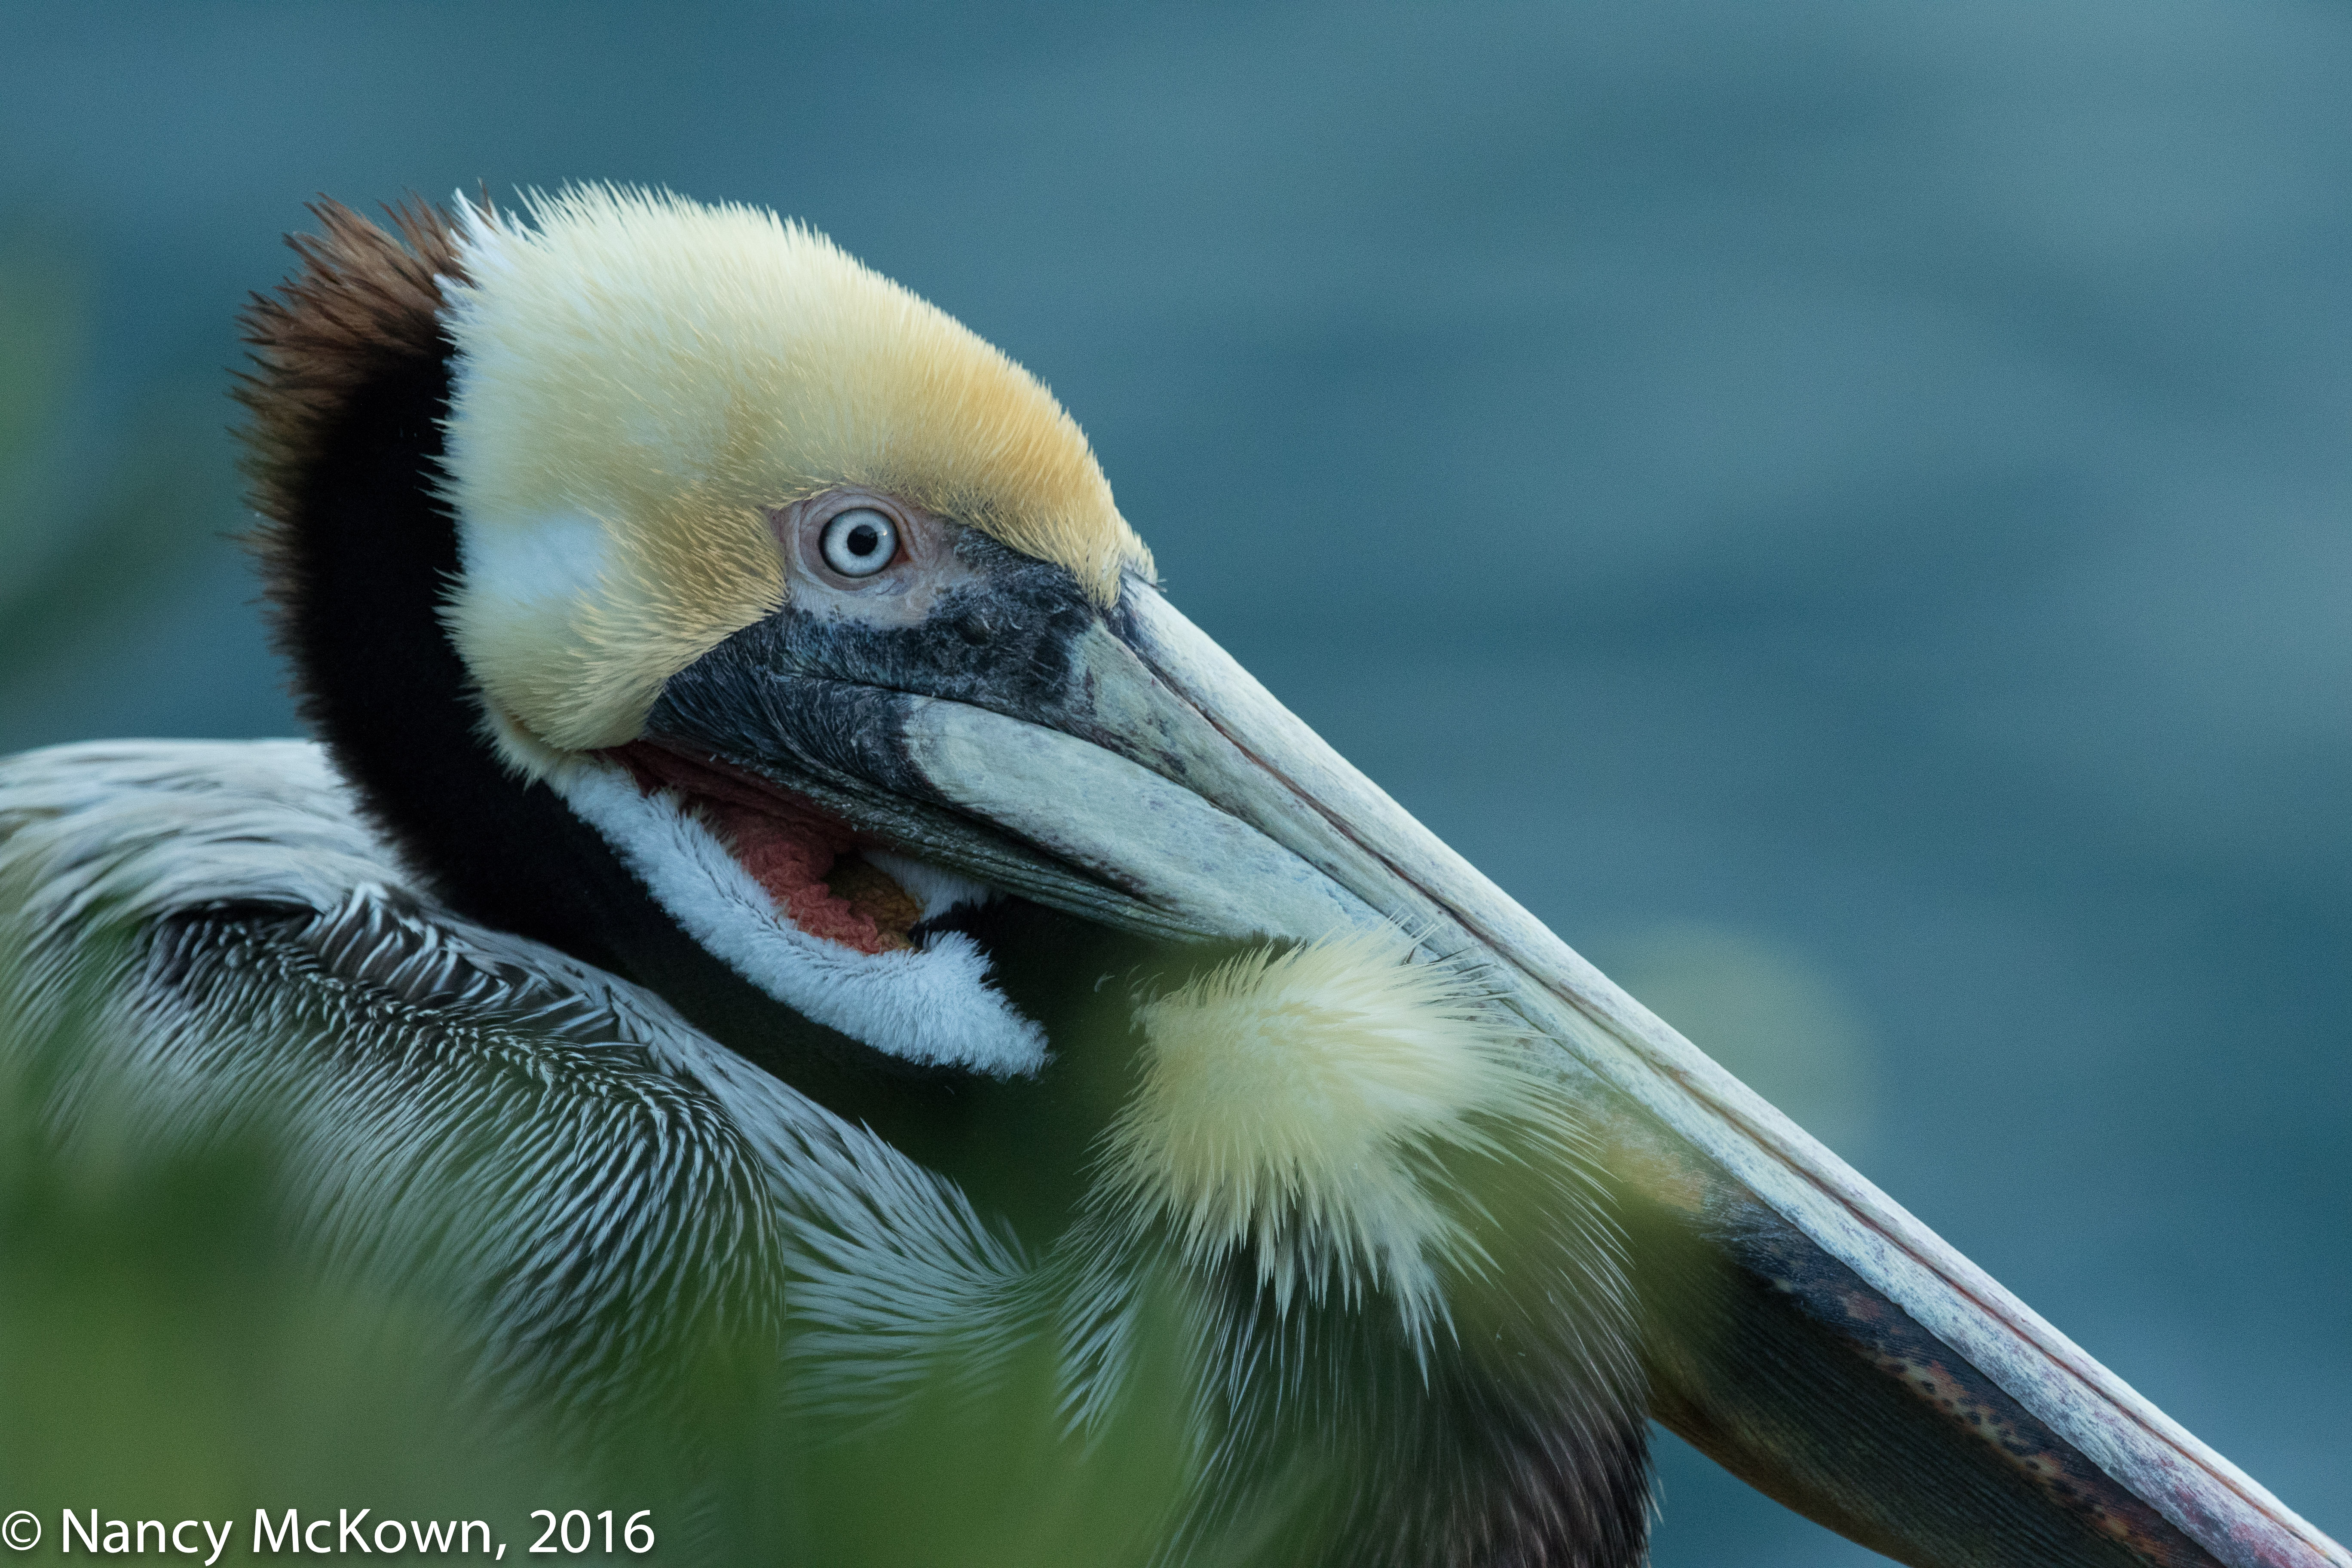
ISO1250; f/8; 1/1250 Second

Sunset Success

It didn’t take long before the sun’s angle was low enough to flood the Black Phoebe straight on with soft and flattering light (except for a few branch shadows on the tail feathers). The creamy brown bokeh is the result of light intermingling with densely packed wooded tree trunks. Thankfully, there was a good 12 feet between my subject and his background. This distance helped achieve a seamless blur despite using a fairly tight aperture – f/8 – on my Canon 300mm 2.8 L IS lens with 1.4 telephoto attached.  I think this rich background contrasts nicely with the subject and helps bring out the detail in the bird’s plumage.

NOTE: “BOKEH = noun, a Japanese term for the subjective aesthetic quality of out-of-focus areas of a photographic image.” No matter how visually appealing, Bokeh is wasted on an image that doesn’t have an interesting subject and composition.


Photographing Japanese White Eyes and Taking Off the Telephoto Extender

Bonus Reach Needed?

I often pair my 300mm and 500mm lenses with either a Canon EF 1.4X III or 2.0X III telephoto extender…both of which were designed specifically for Canon’s newest telephoto lenses. Birds are small and seemingly always out of reach..and even though I consider myself to be a stealthy stalker of birds, I regularly assume that I will need that bonus reach; that extra level of magnification when I’m out in the field.

Photo of Japanese White-eye
Japanese White-eye
The Clarity (note the relatively low ISO)
and the Background Make this Photograph
Look like an Audubon Print.
ISO 400; f/6.3; 1/640 Second

Remove the Tele-Extender

So, despite the fact that I can state unequivocally that I have achieved pro quality results on images I simply would never have captured without the extra reach of an extender, I decided (just this once) to remove the 1.4x extender on my relatively fast Canon 2.8L 300mm IS II prime telephoto lens.

I have to admit that I thought about this long and hard…felt a little trepidation thinking that some wondrous bird would come out of nowhere and perch just a little too far away from the 300mm’s reach. But I did it anyway… purposely took off the telephoto extender just to remind myself why I bought a 300mm L II lens. I distinctly remember that I did NOT buy this highly rated, fast, tack sharp, expensive and reliable prime lens to put an extender on it.

Found a Bird Close Enough

It took me awhile, but I finally came upon a couple pairs of small, quick Japanese White-eyes willing to pose close to the camera. (We visited the island of Kauai in early March, 2016. Japanese White-eyes are one of the most common birds in Hawaii.) The lens’s ultra-sonic auto-focus motor felt adept and nimble as I tracked the birds. It locked focus almost immediately on the fast moving Japanese White-eyes.

Overall, I am very happy with the quality of these images, especially the image above where I was able to maintain a relatively low ISO. Giving up the bonus reach during this photo shoot was definitely worth it.

Photograph of Japanese White-Eye
Japanese White-Eye
ISO1600; f/6.3; 1/500 Second

Disadvantages of Telephoto Extenders

To work well, a telephoto extender must be compatible; designed to physically and electronically interface with specific lenses. The main reason photographers buy telephoto extenders is so they don’t have to purchase and haul around a larger prime telephoto lenses. Attaching a telephoto extender is very convenient, but there are disadvantages:

  • Probably the most significant drawback: Image quality is impacted. Whenever you disrupt the path between a lens and the DSLR by inserting additional “glass”, you sacrifice quality in contrast and sharpness. Images look softer. Questions a bird photographer must ask:  How much clarity is sacrificed? and…Does it matter?
  • Attaching an extender will reduce the maximum aperture on the lens, and consequently decrease the lens’s potential to bring in light. NOTE: This is not usually a problem because with long lenses and bird photography, sufficient depth of field requires that you tighten up the aperture, not open it.
  • You make the lens longer when you attach a telephoto extender, and consequently, you magnify camera shake. Increasing the shutter speed may help stabilize the lens, but in low light bird photography, that is not often an option.
  • Autofocus is slower and less accurate with a telephoto extender attached, especially when your bird is positioned in low light or with insufficient contrasting background.
Photo of Japanese White Eye.
Japanese White Eye;
ISO1600; f/7.1; 1/400 Second

No Matter How Long the Lens

I complain a lot about not having enough reach to get the shots I want. The truth is that in most circumstances, no lens is long enough in bird photography. The perfect bird shot would be, more often than not, out of reach, even if I bought a Canon EF 1200mm f/5.6 L USM lens.

That’s OK.  I still plan to get out there with the bird lenses and telephoto extenders that I have and do my best.

Photographing A Black-Crowned Night Heron and Experimenting with “Live View”

Photographing a Black-Crowned Night Heron

I observed this Black-Crowned Night Heron, squat and thick, stalking huge Koi fish swimming in an outdoor pond. I had been photographing people at a San Diego bayside resort and consequently had my wide angle zoom (Canon 17-40mm f/4.0L) lens attached to the 7D Mark II DSLR camera.

The heron seemed comfortable using the resort’s tropical water features as his own exclusive aquatic habitat. I did not see any fish in the pond that were smaller than the heron–(most were at least 18″ long – approximately 3-4 lbs). Still, he held himself motionless, his red eyes intent on tracking his prey.

Lacking Visual Harmony

The heron seemed oblivious to my presence. I had only my Canon wide angle zoom lens, so I quietly crept toward him as close as I could. The late morning sunlight was overhead and haphazardly filtered by palm trees.

All of the 30+ photos that I took of the heron were disappointing. Insufficient contrasting colors and unattractive shadows made the heron appear to blend with his background rather than be the primary focus of the photo. Overall, the images were visually confusing and unappealing. (See below.)

Photo of Night Heron
Night Heron Intent on Action Beneath the water
ISO250; f/5; 1/400 Second

The Night Heron was clearly accustomed to humans milling about and was not about to be distracted by me. Despite the poor light, I decided to take advantage of the bird’s close proximity and experiment with a feature I don’t often use: Live View Mode.

Looking Through the Viewfinder

Most photographers know the basics of how a DSLR camera works: 1) Light travels through the lens; 2) The reflection hits a tilted mirror; 3) The light bounces upward through a prism and;  4) The reflected image appears when you look through your viewfinder. When you press the shutter, the mirror flips up, shutting off light to the viewfinder. The sensor records the image and saves it to a disk. 

Live View Mode

In Live View mode, instead of using that larger LCD screen to review images after you snap the shutter, you use it to preview streaming images before you take them. Consequently, there is no need to compose your shot by lifting the camera to your eye and peering through the small view finder atop the camera. NOTE:  Every modern point-and-shoot mirrorless LCD digital phone camera operates this way.

When operating in Live View Mode, the camera and lens are not lightning fast. Light captured by the lens reaches the sensor and then is continuously streamed back to the LCD screen. You are operating “mirror less” because the mirror automatically locks in the up position and blocks the optical viewfinder. When you are ready, you can capture a copy of the real-time streaming image to your memory card by pressing the shutter. (The quality and resolution of the camera’s LCD screen definitely impact what you see.)

Advantages and Disadvantages of Live View Mode

Advantages and disadvantages of Live View Mode include:

  • Live View is very convenient when you can not easily place your eye to look through the viewfinder eye cup. (For instance, when you must point the camera upward to capture a bird perched in a tree top canopy.)
  • Live View is not convenient if you rely on the adjustable diopter in the viewfinder to sharpen your poor eyesight.
  • In Live View, you can readily observe (in real time) how your exposure settings, white balance, ISO, depth of field, etc will impact your image before you take the photo.
  • Since the optical viewfinder is blocked by the raised mirror, stray light can not influence the light meter by entering through that tiny portal. No chance of polygonal shape lens flare on your images.
  • Live View makes it easy to keep both eyes open while you shoot….(as opposed to closing one eye when looking through the optical viewfinder).  You miss less action this way.
  • The Live View function offers multiple focusing options in its menu, one of which detects human faces.
  • Most DSLR’s allow you to superimpose a histogram onto the live view image.
  • Focusing is slower (the image sensor does the focusing instead of a separate, speedier auto focus sensor) but you can autofocus on any part of the frame, even the edges.
  • If you want the camera to focus quicker, you can select the “AF Quick” option, which allows you to use the camera’s faster and more precise auto focus sensor. (AF Quick momentarily shifts the camera out of mirror less mode by lowering the mirror and blanking out the LCD screen.)
  • You are able magnify or zoom the video stream to check focus and depth of field.
  • Time and tripod are essential for Live View shooting.
  • Since the mirror is raised, there’s no mirror slapping. This minimizes the chance of camera movement.

Out of My Comfort Zone

I’m usually eager to experiment with DSLR functions that are new to me, but Live View Mode took me out of my comfort zone. Lifting the camera’s eye cup to my eye is second nature to me and I’m use to an instantaneous responses (focus and shutter) after I frame my shots through the view finder. Live View was sluggish as it hunted for focus. It felt like I was missing too many shots and those that I did record were not tack sharp.

One shocking eye opener: Live View gave me a real time streaming lesson on how very wobbly a camera on a tripod can be when you are tracking and focusing on an moving bird.

I’m done with Live View mode for bird photography. Next time I am asked to photograph larger, more cooperative subjects (like humans), I will give LIVE VIEW mode another shot.


Photographing Brown Pelicans in the Early Morning Light

Pre-Dawn Setup

Not yet pre-dawn…. setting up in the dark. I don’t really know where to stand for best light, so I follow the birds. Ready (I think) and waiting. It’s very quiet. Friends are with me, along with a scattering of other bird photographers scurrying about to place themselves and their equipment in position…. rising sun to their backs. This transitional time when the intense blue darkness gives way to golden light makes me feel warm and relaxed. The motion and rhythm of the water and the wind on my face have a calming effect. Dark transitioning into light happens quickly – so best not to get lost in the moment.

Pelican photo
Pelican Resting in Pre Dawn Glow
Minutes Before Sunrise.
ISO2000; f/6; 1/640 Second

That Space Between Pre Dawn and Light

The space between when the sun’s first glimmer of light emerges and when the luminous glow of full sun rests on the horizon line seems very brief. I quickly and nervously keep changing my position. In my mind’s eye I see a composition of wild grasses in the foreground-and a lone Pelican just beyond. I keep looking back over my shoulder to check the fast changing horizon-worrying that the best light has already passed.

Histogram Corroboration

It’s a good morning! A quick check at the back of the camera shows a wide range of dark and light variation on my images spread evenly within the bounds of the histogram. No blinkies!

Photo of Pelican
Pelican basking in the early morning luminous light of sunrise.
ISO1600; f/6.3; 1/640 Second.

Light Transitioning

Once the images are transferred into my computer, I can track the light transitioning from predawn softness to golden sunrise. The camera recorded lots of glimmering warm tones, lush color and soft shadows. Texture and three-dimensionality make the birds sparkle. I leave the images a little underexposed because I think that helps bring out the drama of the moment.

Balancing Light

The white balance setting on the camera tells the sensor how to see various types of light and interpret exposure. I usually set my white balance to “Cloudy” because: 1) I prefer to accentuate the warmer tones of the colors and intensities rather than let the camera’s sensor neutralized the color and;  2) I always shoot in RAW, so I can easily change the white balance in post processing if I don’t like how it looks.

Color Can Be a Distraction in Post Processing

When making shadow and highlight adjustments in post processing, lots of image color can be distracting. If I temporarily switch from color to black and white, I can concentrate on the overall look and better gauge how much highlight and shadow adjustment is needed.

In order to accentuate the warm colors for both of these photos, I moved the Highlights slider to -100% and the Shadows slider to between +26%-+57%.  (NOTE:  See bottom of this post to view the raw images as they were before I made adjustments in Lightroom.)

Photo of Brown Pelican
Pelican looking Back at the Camera.
ISO640; f/8; 1/640 Second.

Final Positioning of Camera

I moved my camera and tripod around quite a lot before the break of dawn. For these photos, I positioned myself so I was shooting downward at dozens of Pelicans promenading on the nearby rocks. My goals were to use the rich color of the fast moving ocean currents as my background and also to mostly avoid the unsightly look of white stain on the barren rocks. Overall, I am pleased with the images; definitely worth the time and effort I put into getting them.

Images Before Post Processing Adjustments:

For Beverly, Image #1 Before Post Processing
For Beverly, Image #1 – Pre- Dawn Glow…. Before Post Processing
For Beverly; Image #1 BEFORE post processing.
For Beverly; Image #2; Sunrise on the Pelican….BEFORE post processing.


Photographing Meadowlarks and Thoughts About Too Bright Light

The Quality of Light

I get so excited when a new bird ventures near my camera….to the point where the intensity and directionality of light is forgotten. Afterwards when I look at the images, I wonder why I bothered.

These sub par, late morning photographs of Eastern and Western Meadowlarks serve as a good reminder lesson about the indispensability of complementary light in bird photography.

Photo of Eastern Meadowlark

Eastern Meadowlark in Bright, Overhead Sunlight.
Post Processing Did Little to Minimize the Harsh Shadows.

Light Falling Full Blast

I’ve learned over and over again that when the light is unfiltered and high in the sky, it’s a terrible time to photograph birds. Light falling full blast from overhead results in images with too much contrast, deep and harsh shadows, and blown out color. Post processing magic will do very little to fix these problems.

What Can Be Done?

Here are a few strategies I have used to help minimize the effects of the harsh overhead sun. 

1)  Light is Transitory

Unlike photographers of people, bird photographers can not simply move birds inside or into the shade where the light is softer and more even. The best solution may be to simply wait until the sun is no longer directly overhead. Bad light is as transitory as good light. While you wait (assuming the bird stays within range of your camera and lens) try to get yourself into a position where the angle of the sun falling on the subject is less harsh.

2)  Bring Your Own White Reflector

I use to pack a big round 43″ collapsable white reflector with my equipment to either diffuse the sun and thus soften the impact of the light or try to bounce more light back on the subject to fill in some of those deep shadows. I rarely used it because it was practically impossible to set it up in a quick and stealthy manner, even when I had help. It does work well when there’s time to position it toward what you know to be a popular bird perching platform. 

3)  Drop-in Filters for Canon Telephoto Lenses

You can’t purchase filters large enough to put on the end of Canon’s big telephoto lenses. Most of Canon’s longer telephoto lenses come equipped (close to the base of the lens) with a drop-in gel filter holder with a clear glass filter installed. You can buy different kinds of Canon drop-in filter holders–for instance, a circular polarizer drop-in with an external control rotation wheel or a drop-in that accepts 52mm screw in filters (like varying degrees of neutral density filters).

These filters tame the light reaching the sensor and thus change the way your lens sees and measures light. It is then easier to manage your exposure parameters. Be sure to read about how different types of photographic filters impact color, glare and reflections before you buy them. Different manufacturers sell varying degrees (densities) of diffusion filters so you can control your filtering based on lighting conditions. The stronger diffusers can make the image look hazy or dreamy. NOTE: Some photographers will not use filters because they believe that inserting them between your subject and camera’s sensor will degrade image quality.

Photo of Western Meadowlark

Western Meadowlark, Perched on an Unattractive Chain-link Fence in Heavy Wind and Bright, Overhead Light. I’m Photographing from Below to Help Minimize the Flat Look.
ISO500; f/8; 1/2500 Second

Eastern and Western Meadowlarks

The Eastern Meadowlarks are common in SW Michigan but the Western Meadowlarks are rather hard to find. Both nest in Michigan. The two species look very similar and are most reliably identified by their distinct songs. I had the help of a local birding expert who, after listening to this bird, confirmed that the second photo is indeed a Western Meadowlark. Hopefully, this summer I will have another opportunity to photograph Meadowlarks – this time in more complementary light.

Photographing The Dark Eyed Junco and Thoughts About Resizing Images

Photographing Dark Eyed Juncos

Abundantly distributed in the U.S. in the winter, these dark topped and white bellied sparrows are easy to find everywhere I go. There’s a wide range of variability in the black, gray and brown color patterns of this species, but the black eyes and pinkish bills are consistent.

If I was going for boring, I would photograph the flocks of Dark Eyed Juncos competing for seeds on the ground nearest to the feeders. Sadly, most of my images from that particular morning shoot are departing shots of their bright white outer tail feathers as they fly away.

I did manage this one-sided profile pose. Notice the exposure readings shown beneath the photo below. There was enough light that morning to play for a change.

Dark Eyed Junco

Dark Eyed Junco
ISO640; f/9; 1800 Second

Preserve those Megapixals

In post processing, whether I upsize or downsize my photos, my goals are to preserve the quality while also preparing the file to download faster on the web. NOTE: Minimal cropping and zooming were needed in post processing for the above photo because this little sparrow came in very close to the camera.

I am aware that pixel density is just not that important for web viewing. Judicious cropping also helps change the proportions of the image for the better. However, there are loss-in-quality consequences to resizing and zooming (technically and ascetically) because these processes eliminate data. The more you do, the worse it gets.

Over Zoomed

This is pretty basic stuff for a photographer, but for some reason, it took me a while to figure it out. Going back over my portfolio, I find way too many over-zoomed photos that, way back when, I considered excellent. Now they are nothing short of embarrassing.

A Practiced Eye

This bird photography blog has helped me to be more self critical — to be practiced at discerning what’s bluster and what’s skill.  When I first purchased a high-end DSLR camera and professional quality lenses, I was overly dazzled with the clarity I saw in the photos. I magnified and cropped the photos way too much in post processing. Overemphasized detail masqueraded as quality. For the most part, whatever artistic merit these photos had was squandered.

Perspective and Humility

I’ve grown over the years as a photographer. Knowledge, experience, skill, perspective (in the field and in post processing) and not a little humility (the mother of all virtue) all contributed to this growth.  

For better or for worse, I’m quick to recognize the post processing “flaws” in others’ photos displayed in art shows, on Facebook, Etsy, etc. (NOTE:  You never really know if the original image was as badly flawed as what eventually shows up on social media. Many of these digital showcases automatically downsize a photo using a process that does not retain the image quality.) I also enjoy examining the bird photos of several outstanding bird photographers and learn from them about what constitutes quality…..and what does not.

BTW- There are many other artistic and technical problems in my photography screaming out at me now. A lot of them have to do with too little planning and too much reliance on random shots….- but that’s for another blog.

Photographing an Osprey in Flight and Thoughts About AF Point Coverage

Photographing An Osprey in Flight

My camera was set up on a second story balcony overlooking a relatively calm bay side view of the ocean in Southern California. Yes indeed! We left cold and cloudy SW Michigan for a short vacation in San Diego.

Photo of Osprey
Osprey Lifting off a Sailboat Mast Head.
ISO400; f/10; 1/2000 Second

In front of the camera, Ospreys, Pelicans, Herons and Seagulls spent their time combing the shores for sustenance. These are opportunistic sea birds and it’s comical to watch them brazenly pilfer the catch of more successful avian predators.

On this day, things were relatively quiet. Two Ospreys were chasing each other, playfully somersaulting every which way until the larger one perched on the topmast of a nearby moored catamaran. No room for the smaller Osprey, so he flew on.

No Time to Swap Out Telephoto Extenders

On the tripod, I had my 300mm f/2.8L IS II lens with Canon 1.4 III telephoto extender attached to my Canon 7D Mark II 1.6 cropped sensor DSLR camera. The perching piscivore was just a little too far away…. even if he spread his wings taking flight. (NOTE: An adult Osprey’s wingspan is 5′-6′). I had a moment to think about swapping out the 1.4 for the 2.0 telephoto extender. No time. The Osprey spotted a meal, leaped into the air (See photo above.) and circled around to a spot closer to the shore. He momentarily hovered directly above his quarry–and then plunged, maneuvering into a feet first position just before hitting the water.

Photo of Osprey
Osprey Heavily Lifting Out of the Water
After His Dive;
Sadly, Without A fish.
ISO800; f/9.0; 1/1600 Second

This fish hawk plummeted so fast that by the time I dropped my lens into position, he was completely submerged. I did however capture him as he heavily lifted himself out of the water, without a fish.

Tracking A Bird in Flight

Modern cameras make tracking and locking focus on a bird in flight relatively easy, assuming the following:

  1. You are able to hold steady the lens while tracking.
  2. The light and contrast are good enough to achieve focus
  3. You are tracking a bird that is within range of your lens’s magnification
  4. The bird’s flight path is in a relatively open area.

My Canon 7D Mark II has 65 all cross type AF points. After setting the camera to Al Servo continuous autofocus and selecting your auto focus points, the camera will (within a fraction of a second) track movement and predict where that fast moving and erratic bird will go, all the while adjusting focus accordingly. Assuming your lens is up to the task, the technology is blazing fast.

Photo of Osprey
Osprey, Lifting Himself Into the Air.
ISO800; f/9; 1/1600 Second

Auto Focus Point Coverage

Efficiently tracking a flying bird takes all of your concentration. When you look through the viewfinder at a fast moving bird, those densely packed auto focus points are not spread out across the entire frame. Instead, they are mostly clustered in the center area. You must continuously and skillfully manuever the lens so that your subject is at least partially within the center area covered by AF tracking points. If you let your subject wing its way outside the focusing area, the camera lens will try to re-focus on anything it can within the auto focus point coverage area.

Quality auto focus performance is about so much more than the number and spread of the AF points. Still, the newest and most advanced Canon and Nikon DSLR cameras (Nikon D500 and Canon 1D X Mark II to be release in the Spring, 2016) are both proudly touting expanded auto focus point coverage, despite the very real inherent limits of widening the autofocus coverage area.  

Makes me excited just thinking about getting my little hands on a prototype. 

Press this link to read more about opportunistic shorebirds fighting over a fish.


Photographing a Tennessee Warbler and Thoughts About IS on a Tripod

Photographing a Tennessee Warbler

Out of all the warblers that visit our yard during migration, the Tennessee Warbler is our most frequent visitor. Somewhat drab, this species is best identified by the markings on its face; a thin yellowish line over the eyes and a dark line running through the eyes. Like most warblers, it  breeds in the northern states and Canada and winters in South American countries like Columbia, Venezuela, and Ecuador.

Tripod Steady

The Tennessee Warblers pictured here were both methodical and swift as  they probed the branches and limp leaves for insects. For this shoot, I was lucky to have a relatively bright day in our yard. I took advantage of the light by using a faster shutter speed, one where the advantages of image stabilization on a tripod would probably not be needed. As always, the weight of the lens alone is enough for me to keep my equipment mounted steadfastly on the tripod.

Photo of Tennessee Warbler
Tennessee Warbler
ISO1250; f/5; 1/500 Second

Tripod Based Movement

Most of the time, the light is low in our heavily wooded yard, forcing me to resort to shutter speeds below 1/100 second. Stabilization is essential. (Frustrating NOTE: In Michigan, there’s a 29% sunshine rate…the percent of non-cloudy sunshine hours during the winter months.- See this link.)

Tripod steady is not always enough to capture sharp images at low shutter speeds. Even the most stable of tripods can not keep the camera and lens completely still. There will always be some tripod based vibration due to shutter mirror slap, or just because I am moving about on the floor, twirling the camera and lens this way and that, and pressing the shutter button in a continuous effort to capture a pose. Also, the longer the lens I have mounted on the tripod, the more this minute vibration is magnified.

NOTE: Remote shutter releases do help stabilize cameras on tripods, but I don’t often use mine when photographing birds because I feel less in control; bird action just happens too fast.

Tennessee Warbler
Tennessee Warbler
ISO1250; f/5; 1/500 Second

Enter MODE III – IS and Tripod Use

With previous IS Canon lenses I have owned, I had to remember to manually turn off the image stabilization function when I used a tripod, otherwise it would pick up the tripod’s inherent vibrations and erratically try to correct. It was not uncommon to end up with more blurriness on the images instead of less.

Since low shutter speeds are pretty essential to increase the amount of light available for exposure, tripod movement was a problem. Clever engineers at Canon’s R&D helped to minimize those obstacles by creating a secondary image stabilizing mode…. one made specifically for tripod use.

Canon IS lenses with Mode III functionality are engineered to sense when the lens is on a tripod. The purpose is not to disable the IS feature, but to identify and compensate for those slight tripod movements when the shutter is set between 1/30 second and 1 minute  – the settings at which the camera is very vulnerable to producing blurry photos. NOTE: Image Stabilization on the tripod is automatically disabled if the shutter speed is set for 1 second or longer.

Remember, birds are constantly moving – and IS will not compensate on that end. 

To read more about Image Stabilization, press this link.

It is easy to mistake the Tennessee Warbler for another drabbish warbler…. the Orange Crowned Warbler. To see this bird in action, press this link.

It has been my observation that accuracy, consistency, logic and convention do not appear to matter when naming birds. Read more about this here.

Photographing the Yellow Rumped Warbler and Experimenting With Focus Preset

Photographing the Yellow Rumped Warbler

In my yard and in most of the Eastern US, it’s the hardy white throated Yellow Rumped Warbler of the Myrtle subspecies who lingers in the cold long after other species of warblers have gone south. Feasting on bay berries to survive, it’s not uncommon to see them here in November and December.

In the western U.S., the yellow throated Yellow Rumped Warbler of the Audubon subspecies thrives. Both have the trademark “butter butt” – a bright yellow patch of feathers above the tail.  NOTE: I hope to photograph this western variety on my next trip to California. Update:  My first day in San Diego and the Yellow Rumped Audubon subspecies showed up in front of my camera. See last photo below.

Yellow Rumped Warbler

Yellow Rumped Warbler from
the Myrtle Subspecies.
ISO1600; f/5; 1/500 Second

Finding the Right Perch

In my yard we have a few optimal bird perching spots with lush and colorful backgrounds that receive a good amount of the morning light. They are ideal little niches with no unsightly and chaotic debris to interfere with the len’s ability to lock focus. Most importantly, I know warblers perch there.

Photo of Yellow Rumped Warbler
Yellow Rumped Warbler.
ISO1600; f/5; 1/500 Second
Photo of Yellow Rumped Warber
Yellow Rumped Warbler of the Audubon subspecies.
Common in the West.
ISO640; f/8; 1/2000 Second

The Focus Preset Function of the Lens

These perching spots offer an opportune time to practice a function on my telephoto lens that is never urgently needed but fun to play with. It’s called FOCUS PRESET. I don’t use this function much because it’s unnecessary for the most part… modern auto focus lenses are so fast to focus.  But, since I paid a whole lot of money for my 300mm and 500mm L II lenses, I think I might as well better understand the precision electronic data-transfer controls that make them so expensive.

Focus Preset allows the photographer to save a predetermined distance to the len’s memory and then automatically recall it.

To Set Focus Preset:

1) Turn the focus preset switch to On or On with Sound. (NOTE: The On w Sound setting simply means that you will hear a beep to confirm that focus preset is initiated. On w/o sound  = no beep.)

2) Using auto or manual focus, focus the lens on the spot that you want the lens to memorize.

3) Press the SET button

Your desired distance is now saved, and will be saved in the lens until you turn the focus preset switch to the “off” position.

To Engage Focus Preset

The auto focus function on your lens works as it normally does until you recall the Focus Preset.

Just give a little twist (either to the right or left) on the thin serrated metal focus preset ring (located right in front of the manual focus ring on the lens) to instantaneously recall the lens to focus on the spot previously saved to memory.

Kind of fun once you get the hang of it.

Subspecies or Hybrid

NOTE: In my many bird photography adventures, I have photographed several subspecies, but I have never photographed a bird that would be considered a hybrid. A subspecies is a variety of the same species….a population (usually geographically isolated) that has a slightly different appearance than others of its own species. A hybrid is born when two different and closely related species successfully breed..

An excellent article about hybridized warblers can be found at this link.

To see photos of Palm Warbler Subspecies, press this link.

Photographing the Male Scarlet Tanager -My Nemesis Bird

Formidable to Photograph

It’s official. The male Scarlet Tanager is my “nemesis” bird. That’s bird photography jargon for the inability (over and over again) to connect with a readily identifiable but highly illusive bird.

Once you claim a nemesis bird, it becomes personal. More than just chance, luck or opportunity is at work. Nature is simply not cooperating- and if you give up, you have failed. It’s all the more irritating when the bird is not a rarity, but a nesting resident right in your home town.

“My Destiny Calls and I Go”

Despite years of searching, this secretive though not uncommon bird intentionally thwarts and eludes me. I have spent countless hours in the woods with my camera, following up on leads, plotting, hoping, yearning. During my many travails, I have had a thrilling sense that a male Scarlet Tanager finds me….watches me.  I see quick red flashes high in the trees that vanish into nowhere. I’m at a point now where I will settle for any shot, but hope for the time and light to do it right.

NOTE: To add insult to injury, my husband once boasted that a tropical looking male Scarlet Tanager was shamelessly showing off his Spring plumage right in our back yard, no doubt with a ginormous colorful insect in his beak.

Photo of Female Scarlet Tanager
Female Scarlet Tanager Eating Fruit.
ISO 1250; f/9.0; 1/500 Second

Photographing the Female Scarlet Tanager

One lucky day in late summer, 2014, I saw two of the less intangible female Scarlet Tanagers high in the forest tree top canopy. The female’s plumage is muted; olive above, yellow below, far less exotic looking than the male. She sports thin yellowish eye rings and (like the male) a thick round beak, accented with a little notch. These photos were taken as they feasted on the fruit high in a Mulberry tree.

Tripod Shooting Angle

Photographing the underside of a bird produces mostly unflattering images. The shooting angles for the images below were still within the range of the tripod head – even for the highest bird. NOTE: Shooting angle on most tripod heads is restricted. However, I find it almost impossible to handhold and then prop upward a camera with a 500mm telephoto lens. Even with image stabilization engaged, there’s too much shaking! I was happy that the shooting angle was such that I was able to keep the heavy camera on the tripod head.

Photo of Female Scarlet Tanager
Female Scarlet Tanager
Notice that Little Notch around Center Point
In Her Long Beak.
ISO 640; f/9; 1/500 Second
Photo of Female Scarlet Tanager
Female Scarlet Tanager.
The Big Beak Comes in Handy.
ISO1250; f/9.0; 1/500 Second

It’s Personal, Not Business

The pursuit of bird photography is personal for me. Absorbed in the challenges of this pursuit, enjoyment mounts and hours fly by. Searching for and then capturing an image of these avian wonders in their natural habitats cultivate within me a deep interconnection with nature. It’s a passion into which I can pour my heart and soul.

I’m resigned to waiting until next spring when the Scarlet Tanagers return from Northern South America and the Caribbean. After all, what other choice is there?  

Patience! Perserverence!

“And the wild winds of fortune will carry me onward
Oh, whither soever they blow.”

Man of La Mancha