Photographing a Nashville Warbler and the Photo Equipment Conundrum

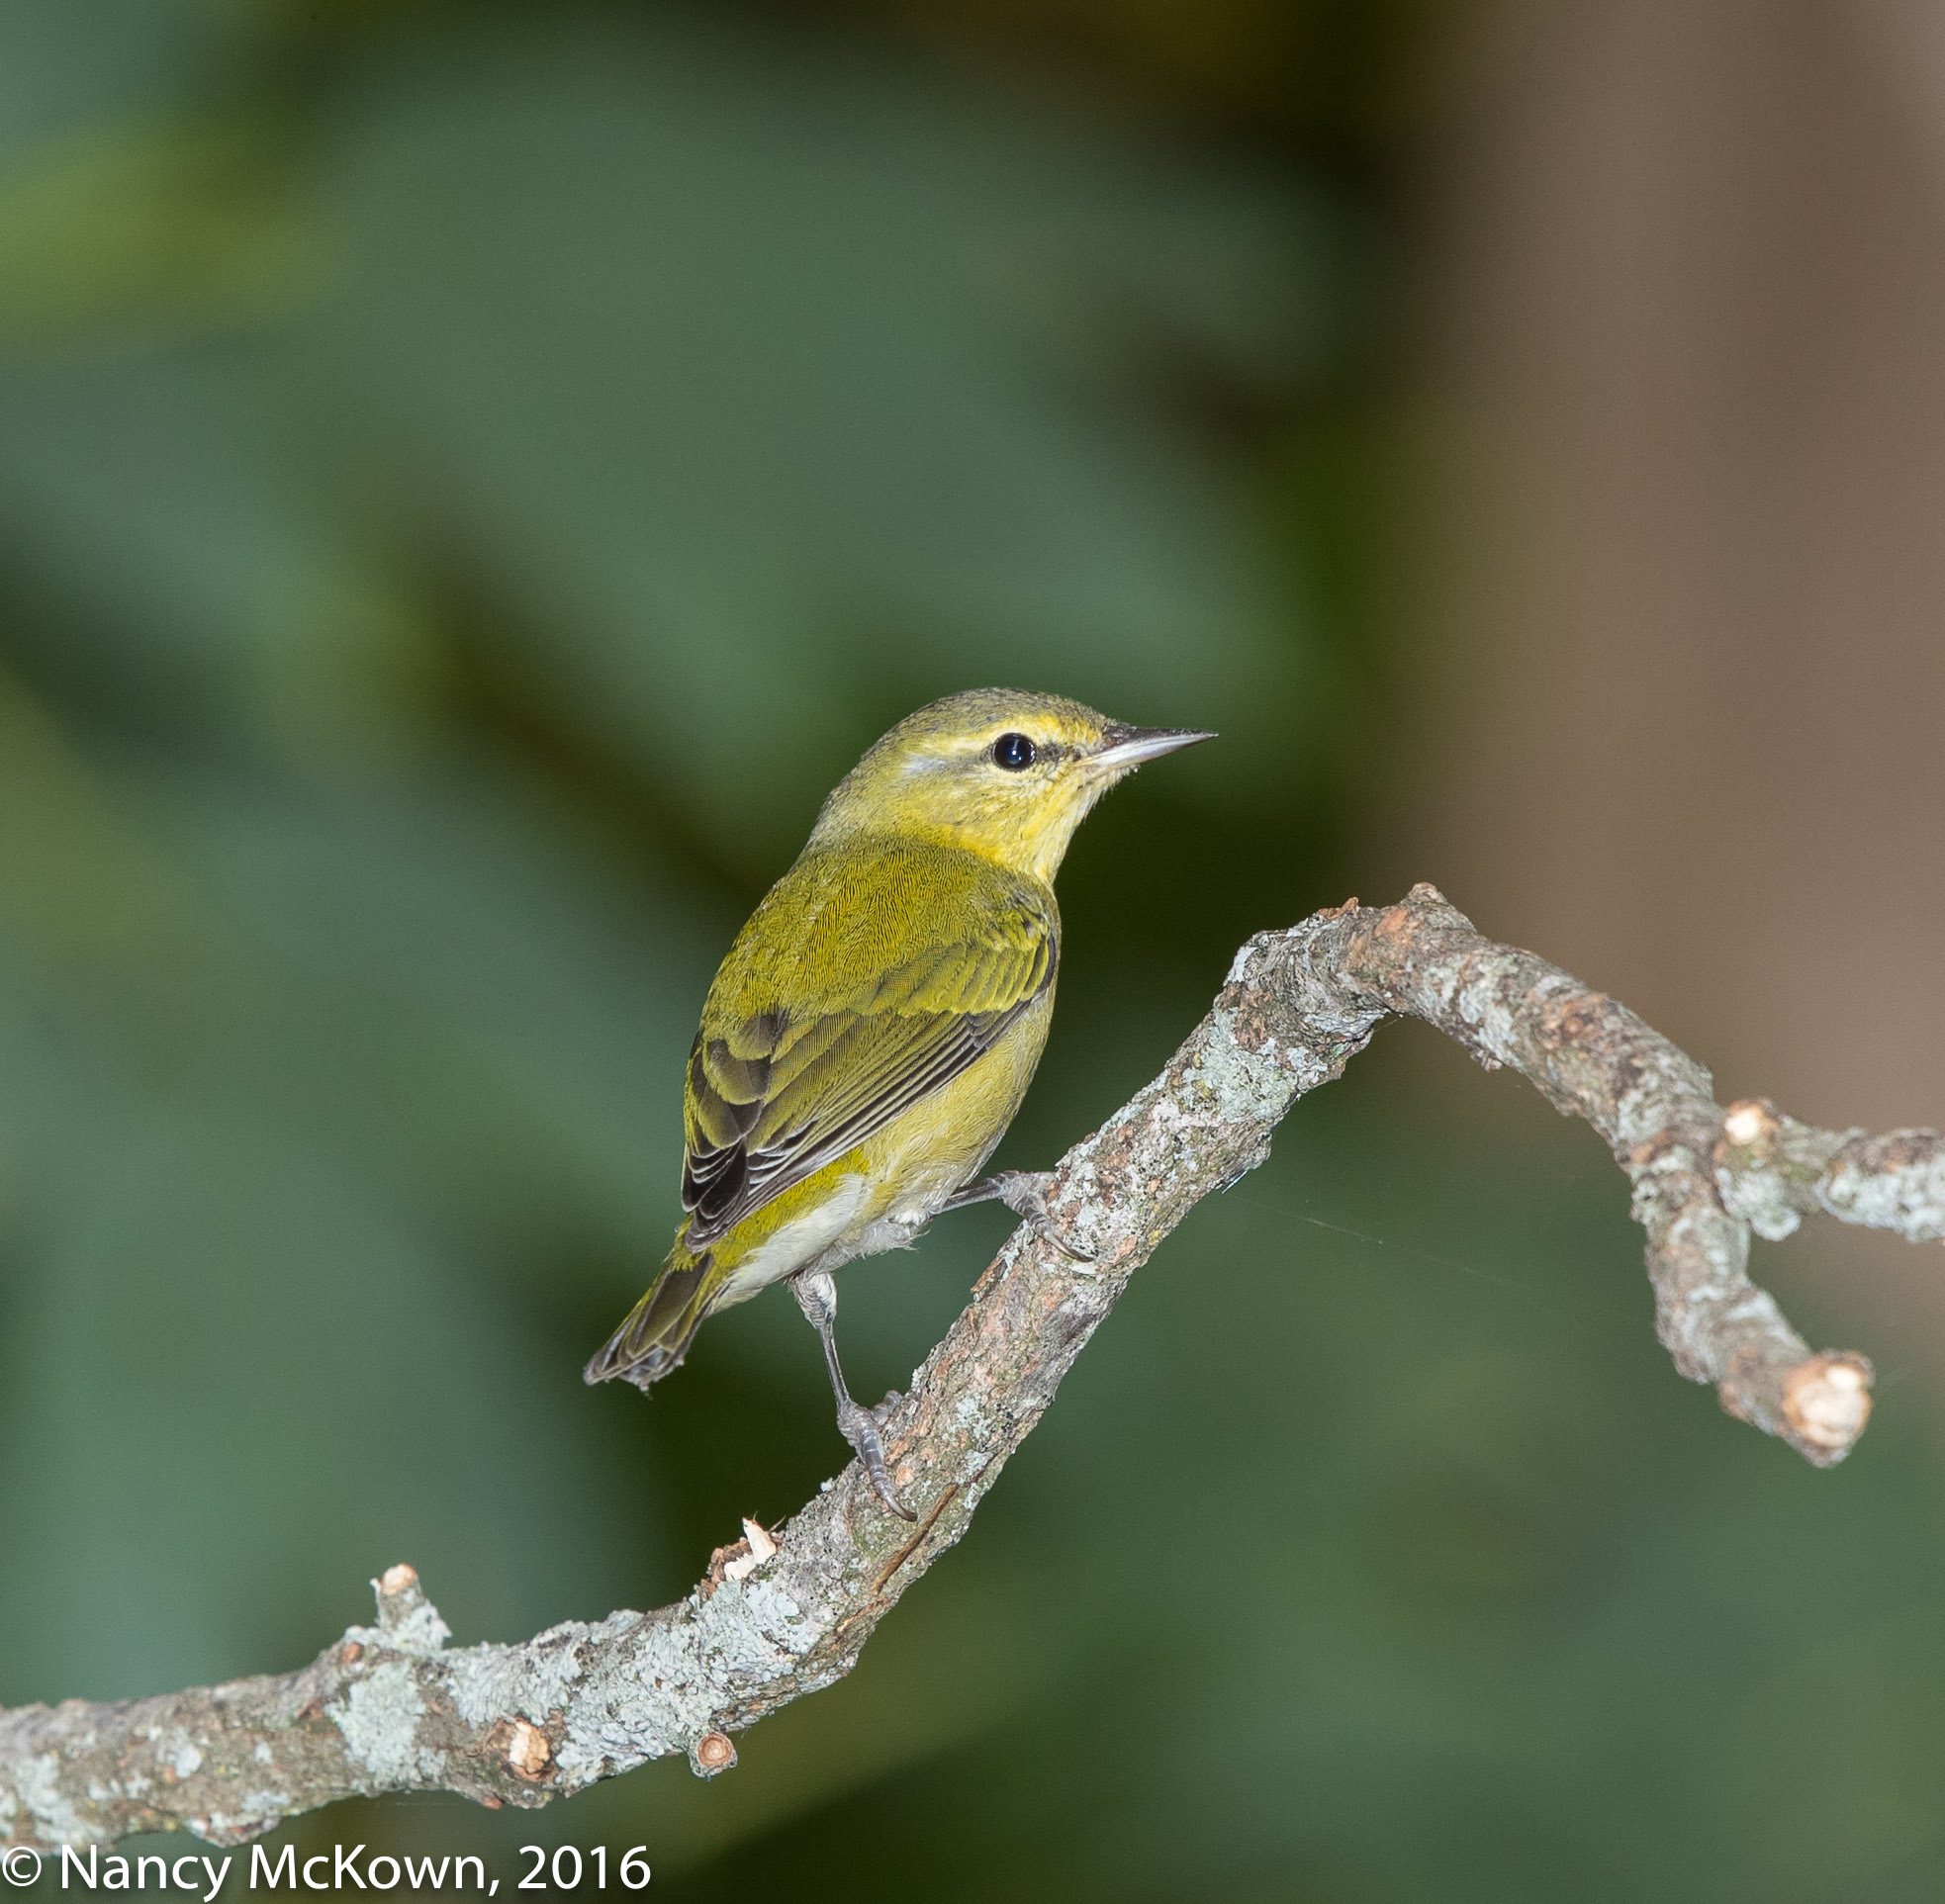
Photographing Nashville Warblers

I have come to expect to see avian newcomers when the bird activity is busiest… perhaps crowds are a marker of safety in numbers. Despite the constantly moving assembly of birds, it’s pretty easy to spot warblers (profile, behavior, color, markings) as they congregate with the non-migrating bird species in our yard.

Every summer, we strategically placed just a few shiny metal yard ornaments to spruce up the gardens. They are slipped in amongst the ferns and bleeding hearts where they can glisten in the sun. I always hope that the birds will use them as perches.

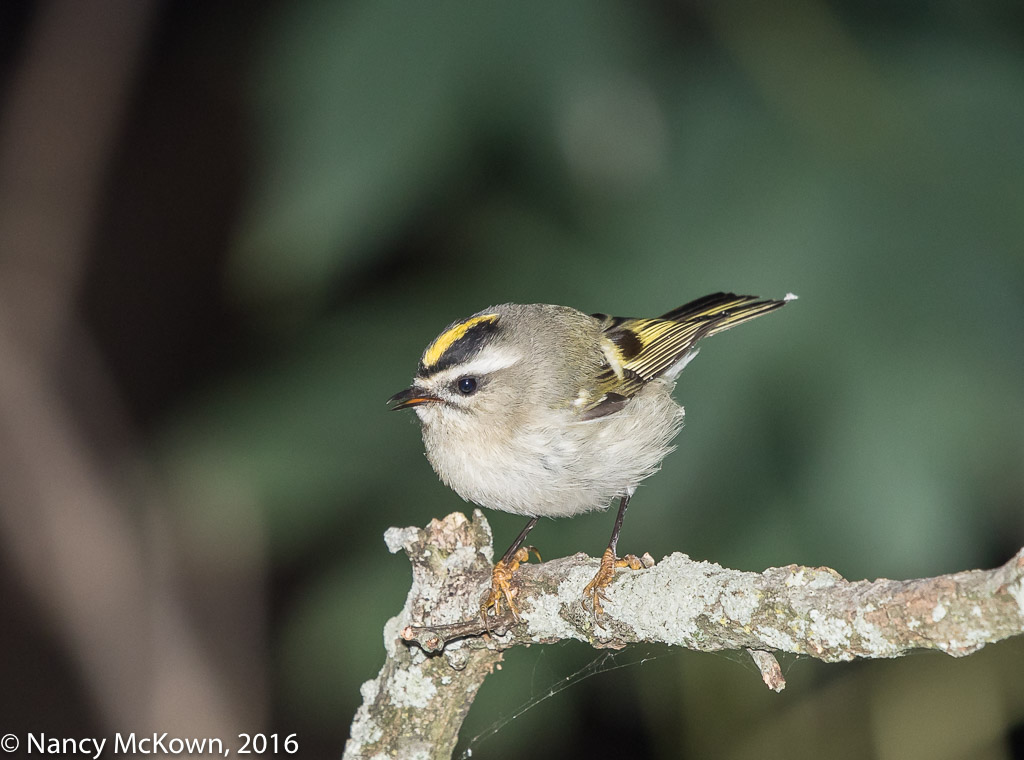
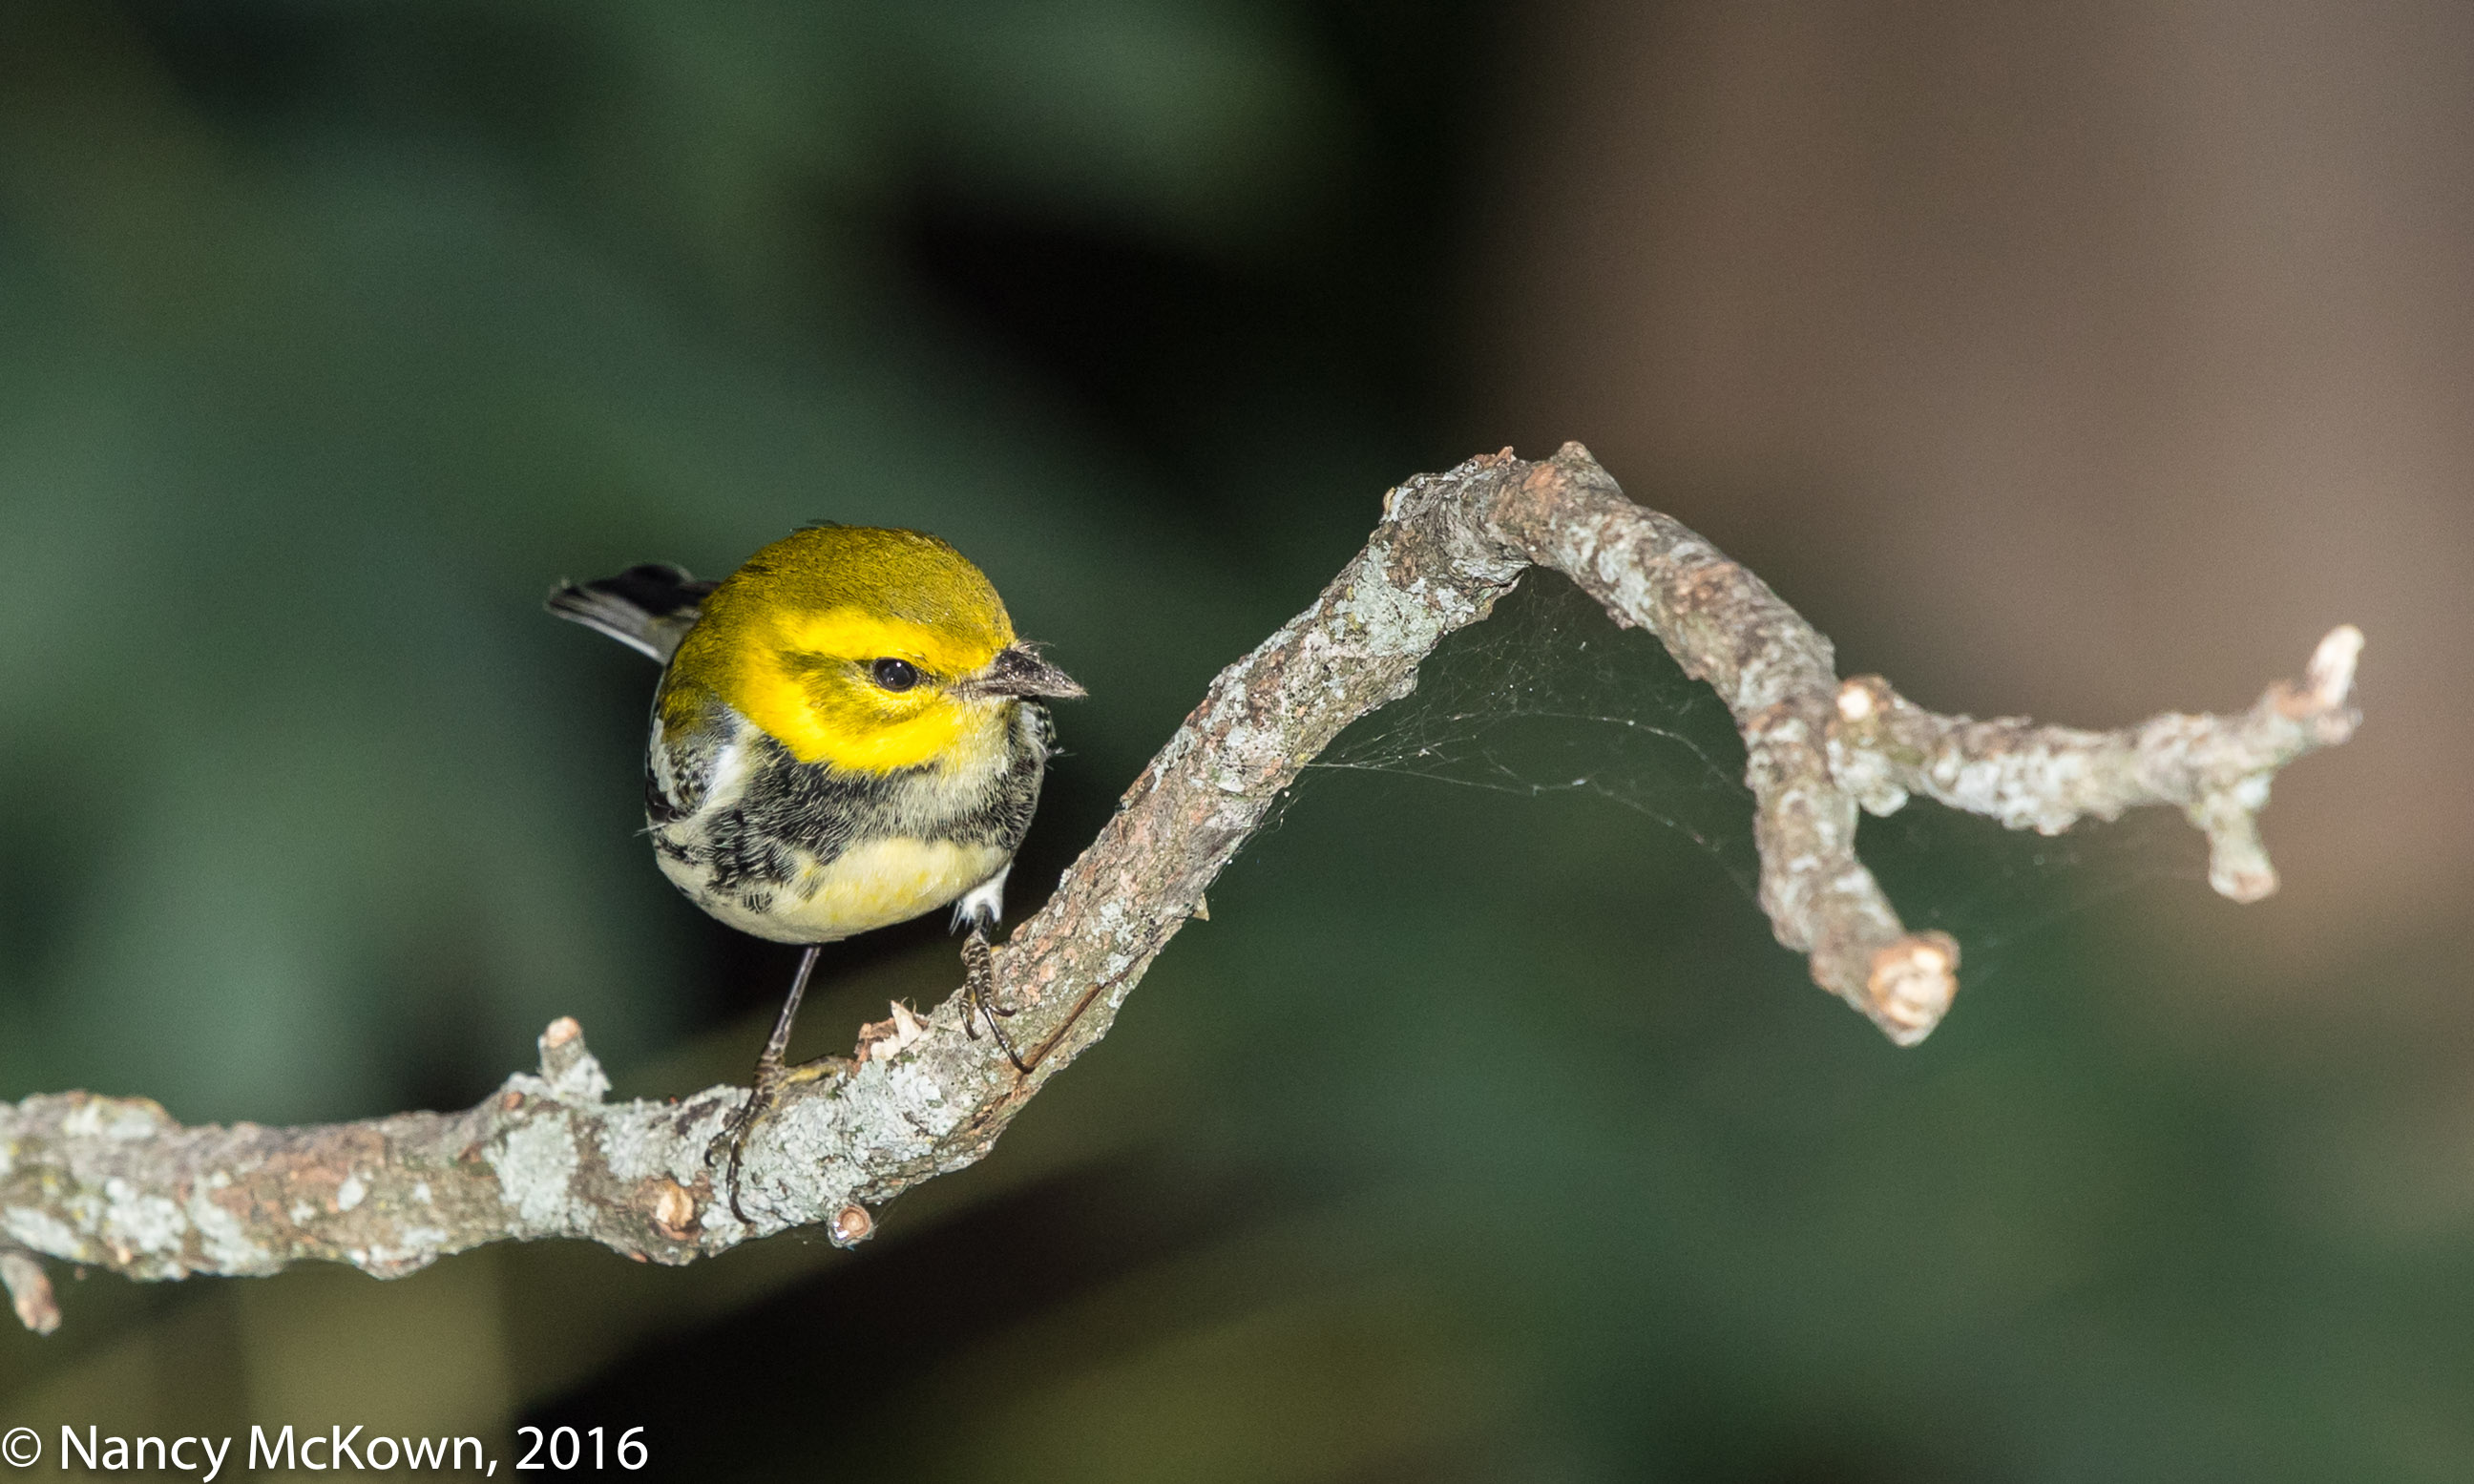
This little Nashville Warbler with his bright daffodil breast came to momentarily rest on one of the bird-like ornaments. He looked it over with ease…(certainly not the wary stink-eye he used to scrutinize me). I got in 2 shots before he departed. The camera lens was aimed downward and set with a fairly tight (f/9) aperture. The telephoto flash balanced nicely with ambient light–making for a pleasant bokeh.
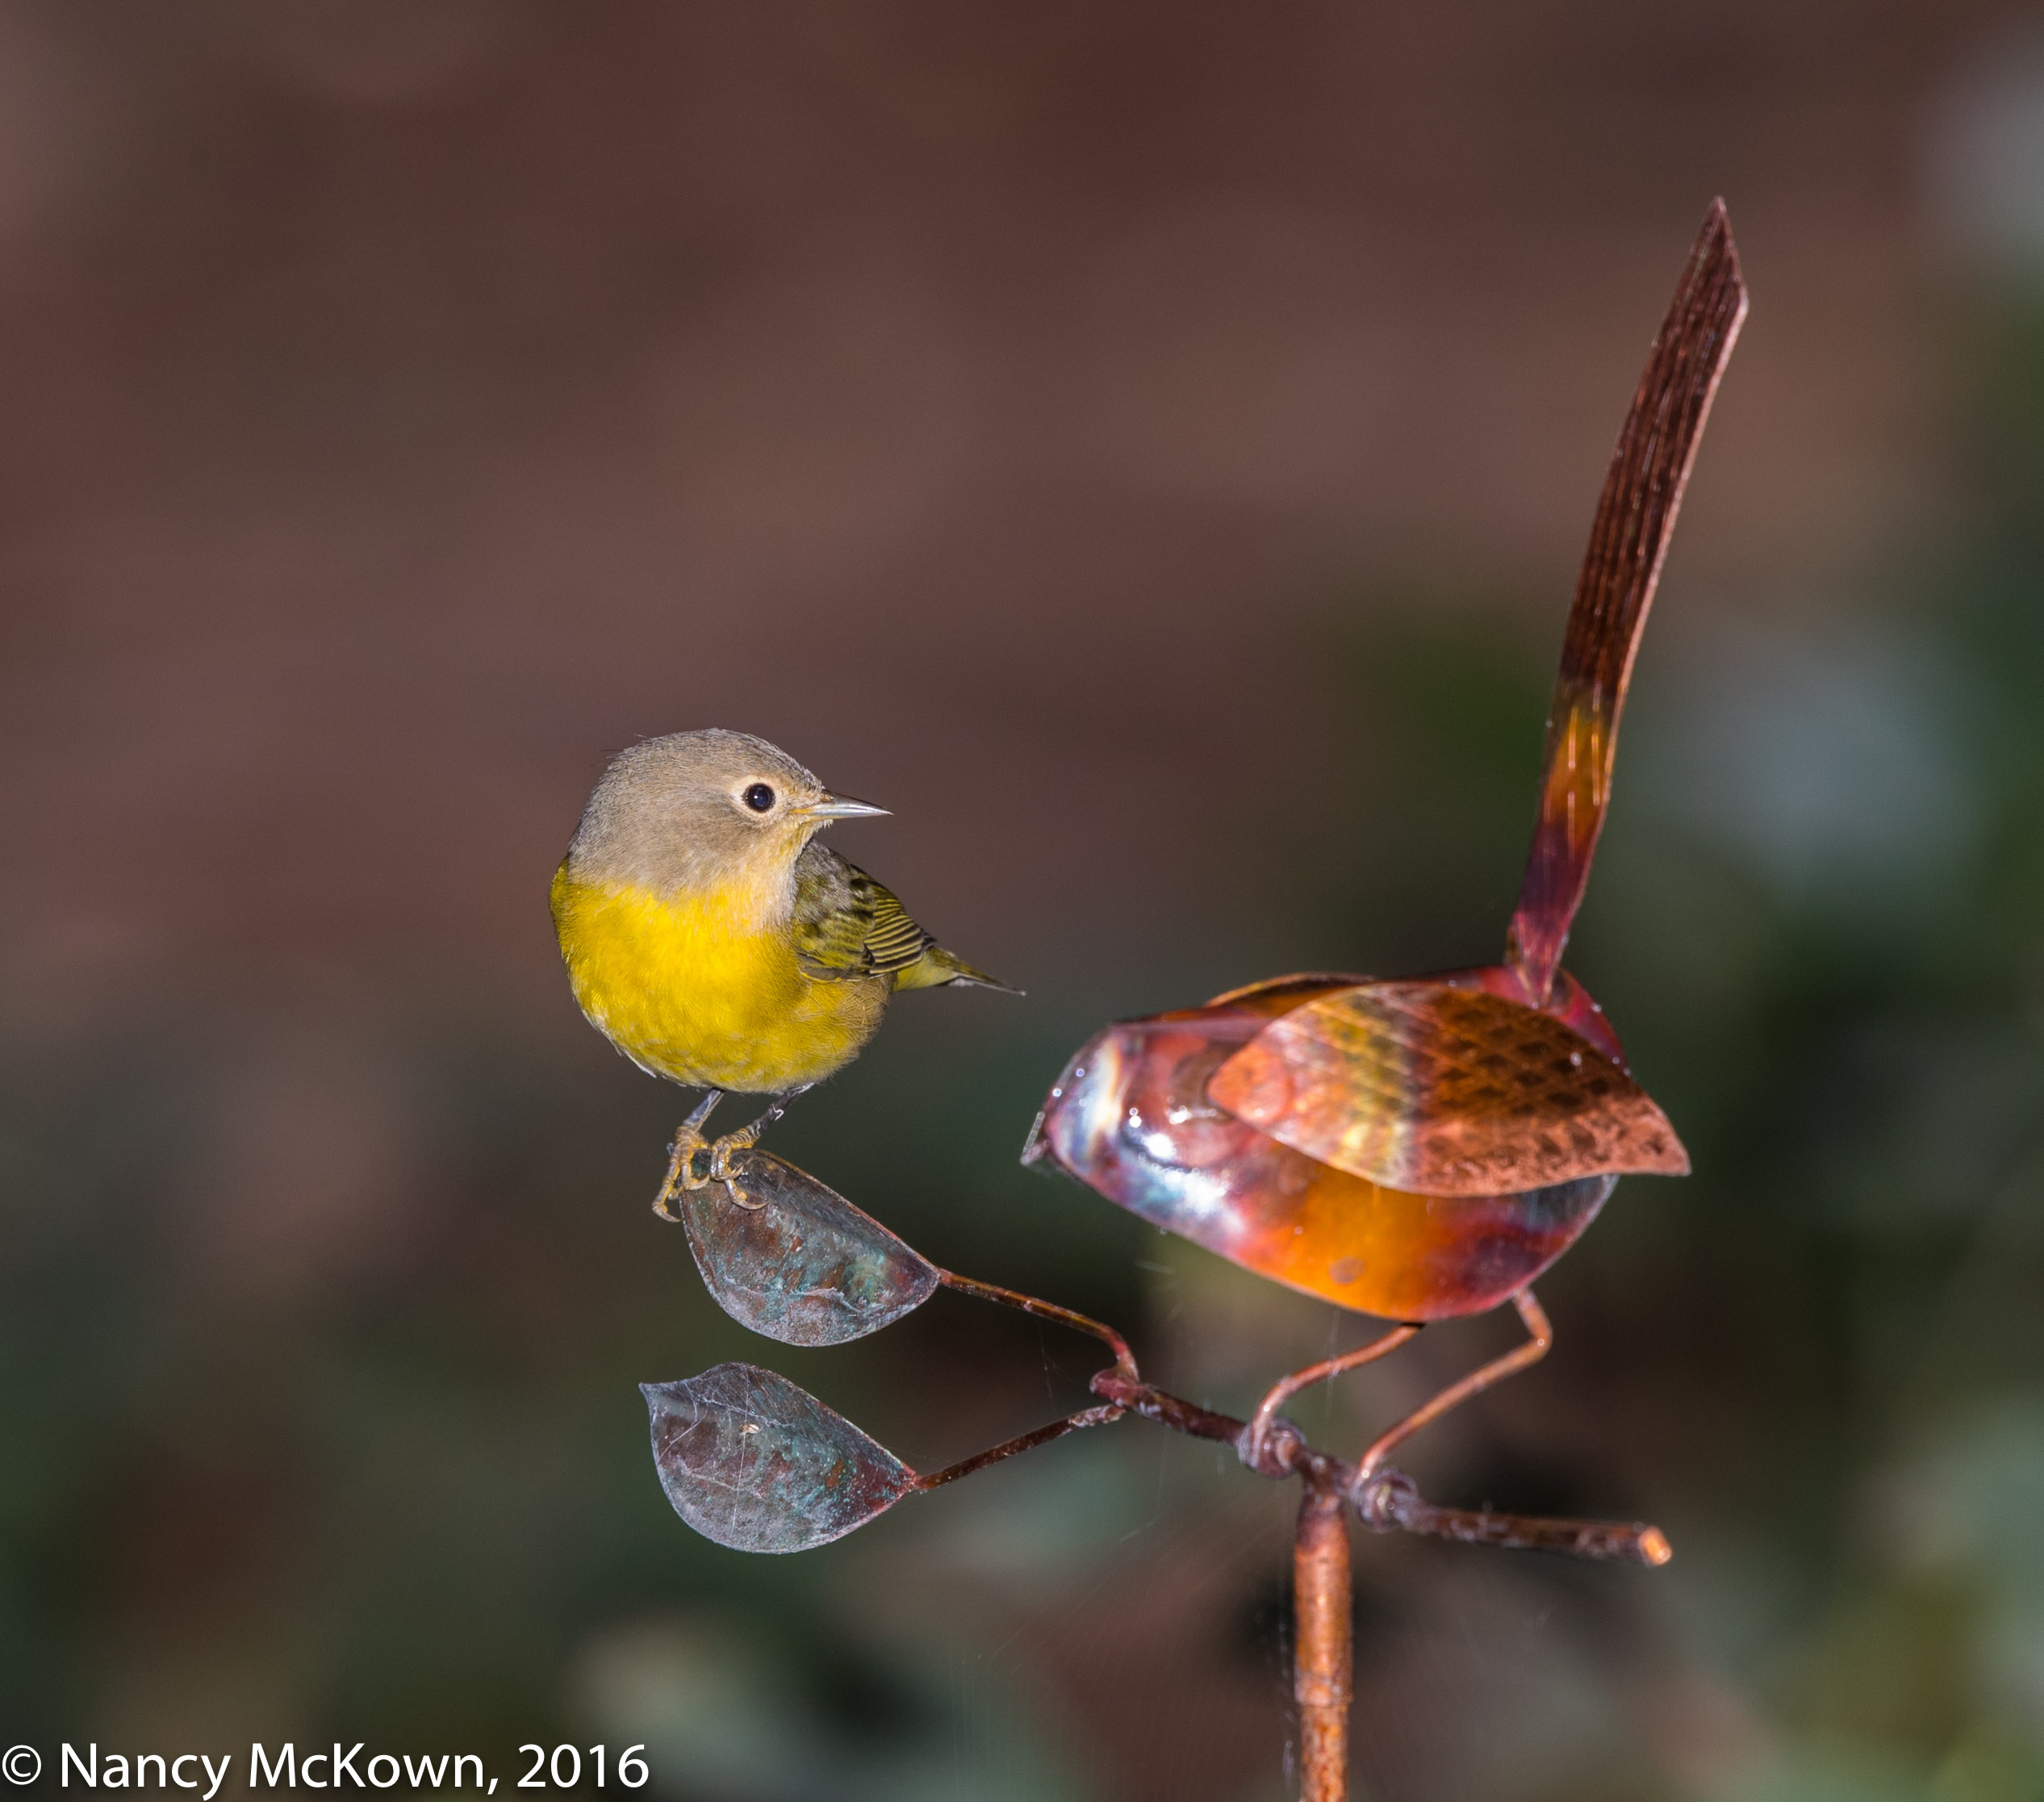
Photo of Nashville Warbler
Nashville Warbler with
Garden Ornament.
ISO400; f/9; 1/250 Second

Photography and a Minimalist Lifestyle

As I assembled and set up the equipment for this shoot, I couldn’t help but reflect on the mountain of things that has become a part of what I do. Labor of love or not, this compulsion to buy one more tool in the hopes of acquiring that creative edge seems to never end.

Yea it’s me, taking the time to re-evaluate my buying habits and the attitudes, beliefs, and assumptions buried underneath acquiring all this camera gear. Seems like a good time now that the excesses of the holidays are upon us.

The Equipment Conundrum

Camera companies aggressively market consumer and pro grade equipment to photographers hoping to steer them onto a long and expensive road. I have listened to that seductive song, felt that fleeting rush of buying something new and convinced myself that each and every item I buy will improve my bird photography. I can even talk myself into buying something on an “I might need this later” basis. My only guarantee so far is that I am on track to own a mountain of out-of-date stuff.

(NOTE: It’s important to state up front that great bird photography is not necessarily a consequence of using expensive equipment.)

Less is Better Philosophy

Here are a few questions to consider in light of the less-is-better philosophy:

  • What amount of photo equipment does it take for you to be successful as a bird photographer?
  • What offers the most chance for growth, joy, a sense of calm and balance, interaction with friends, personal satisfaction, and accomplishment? (NOTE: Try to keep self aggrandizement out of the mix.)
  • Is what you buy practical and worth the cost and effort you’ll be putting into hauling, storing and maintaining?
  • Can any tool be a permanent solution with camera technology changing so fast?
Photo of Nashville Warbler
Nashville Warbler
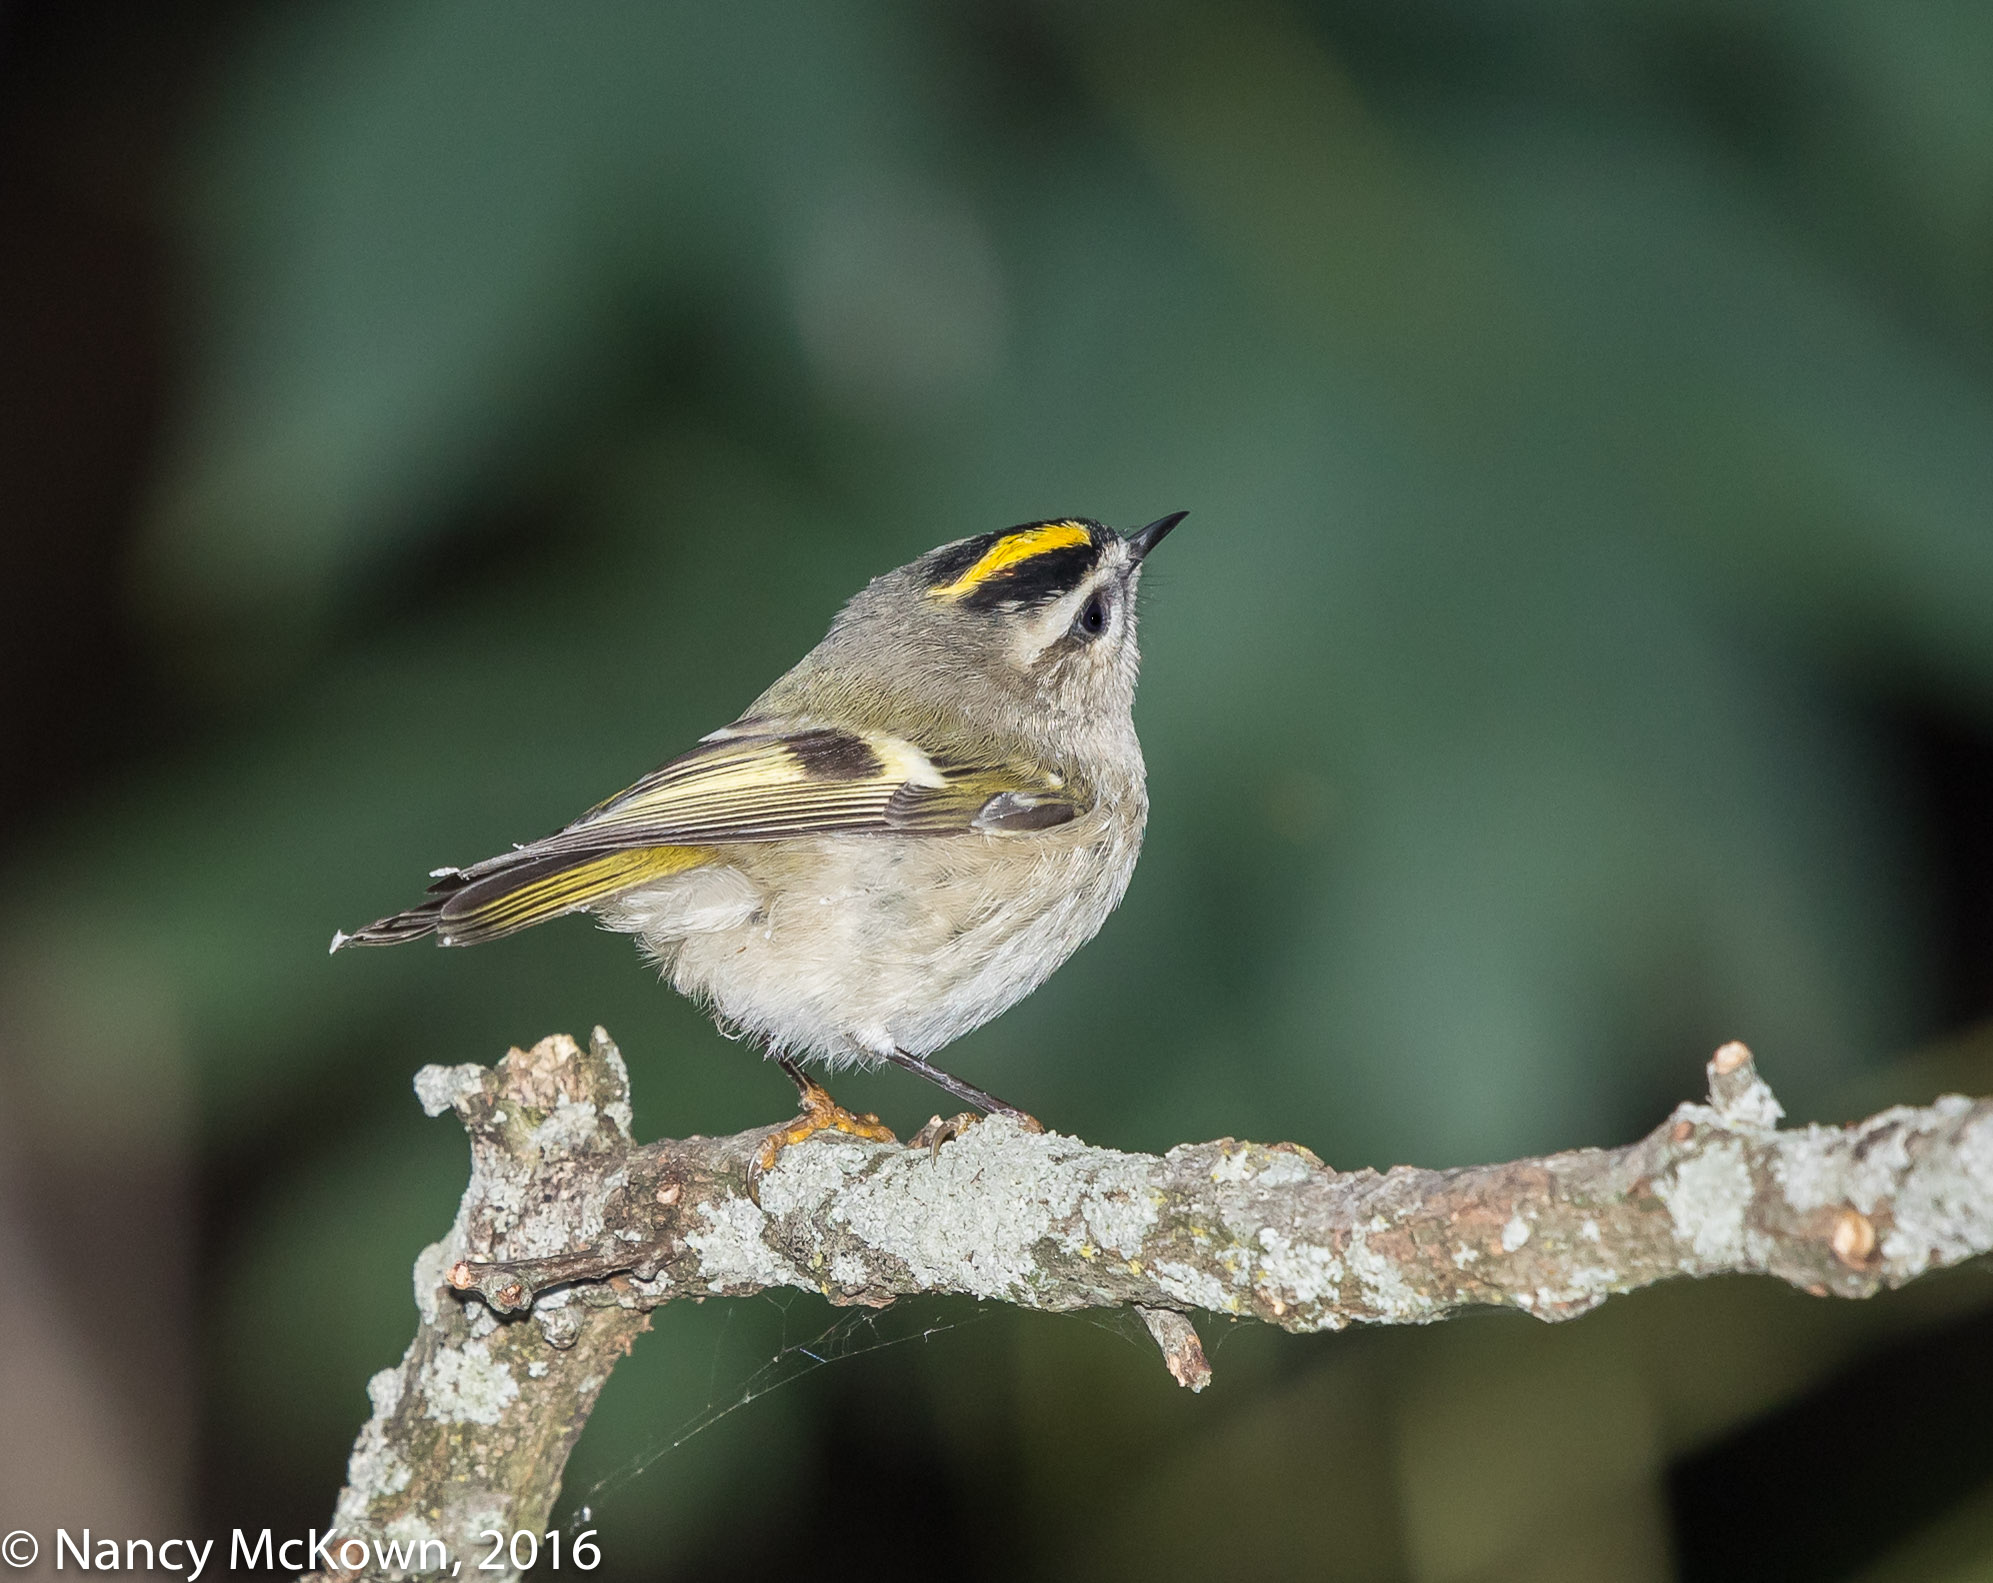
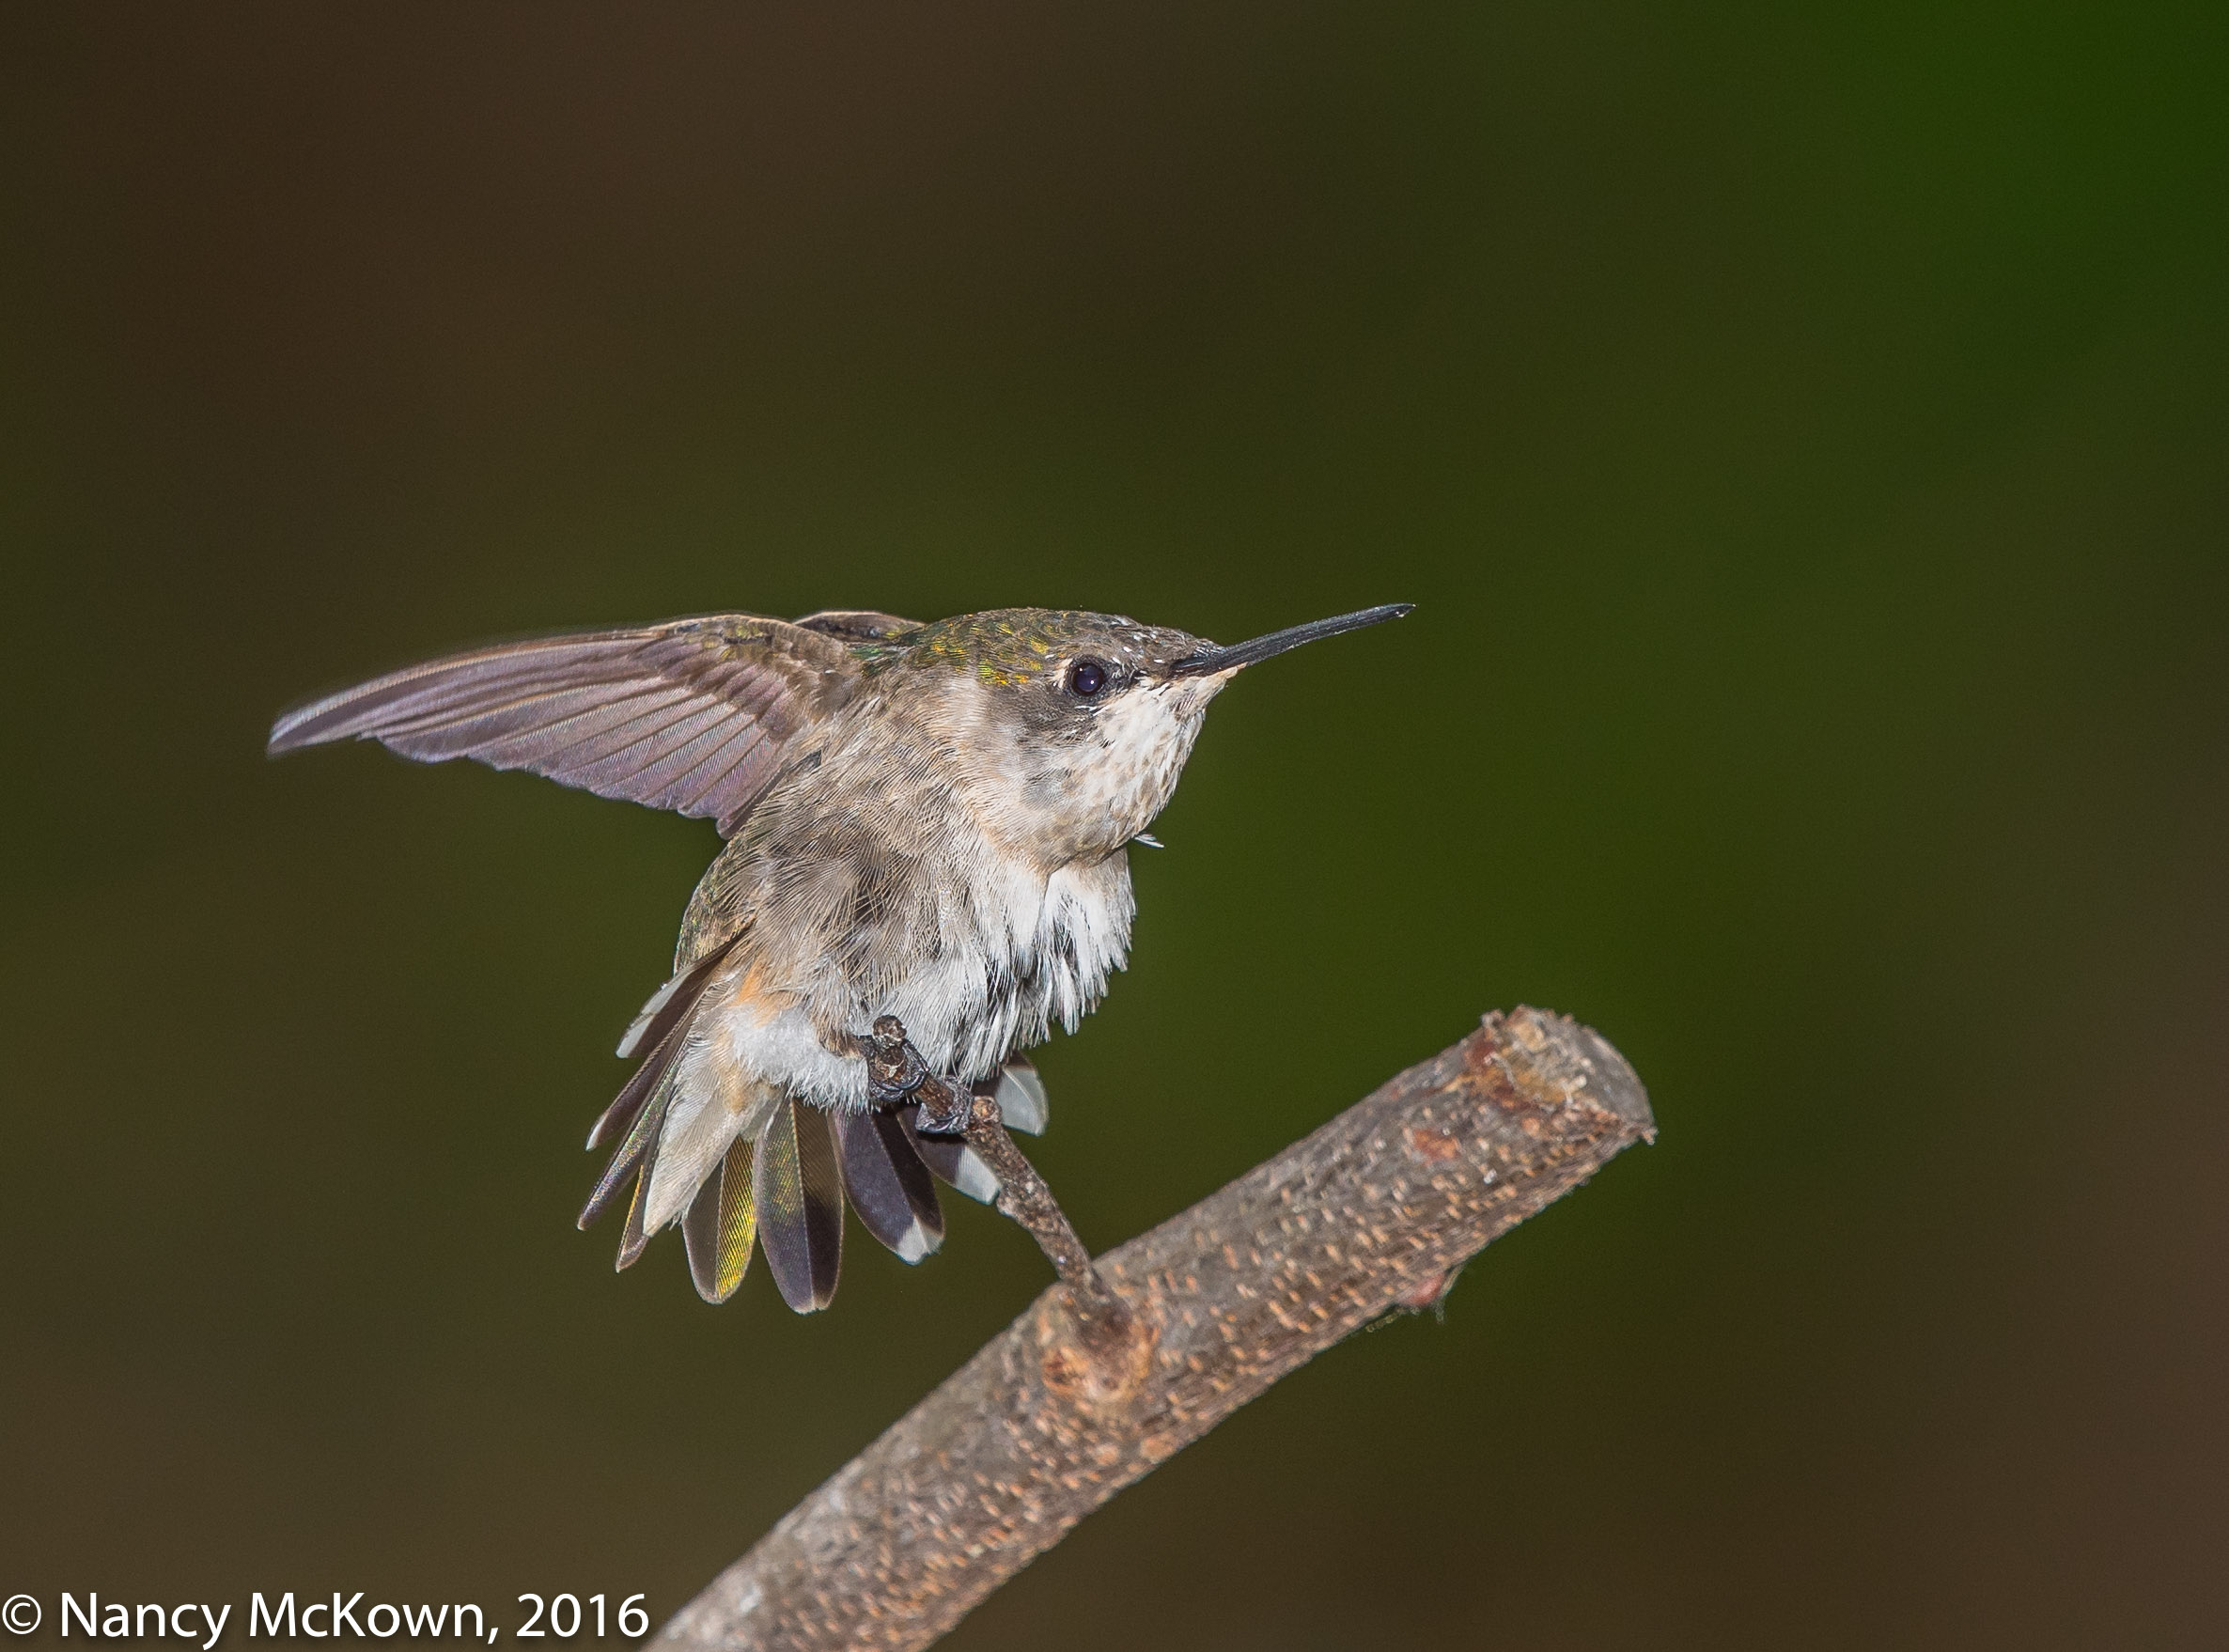
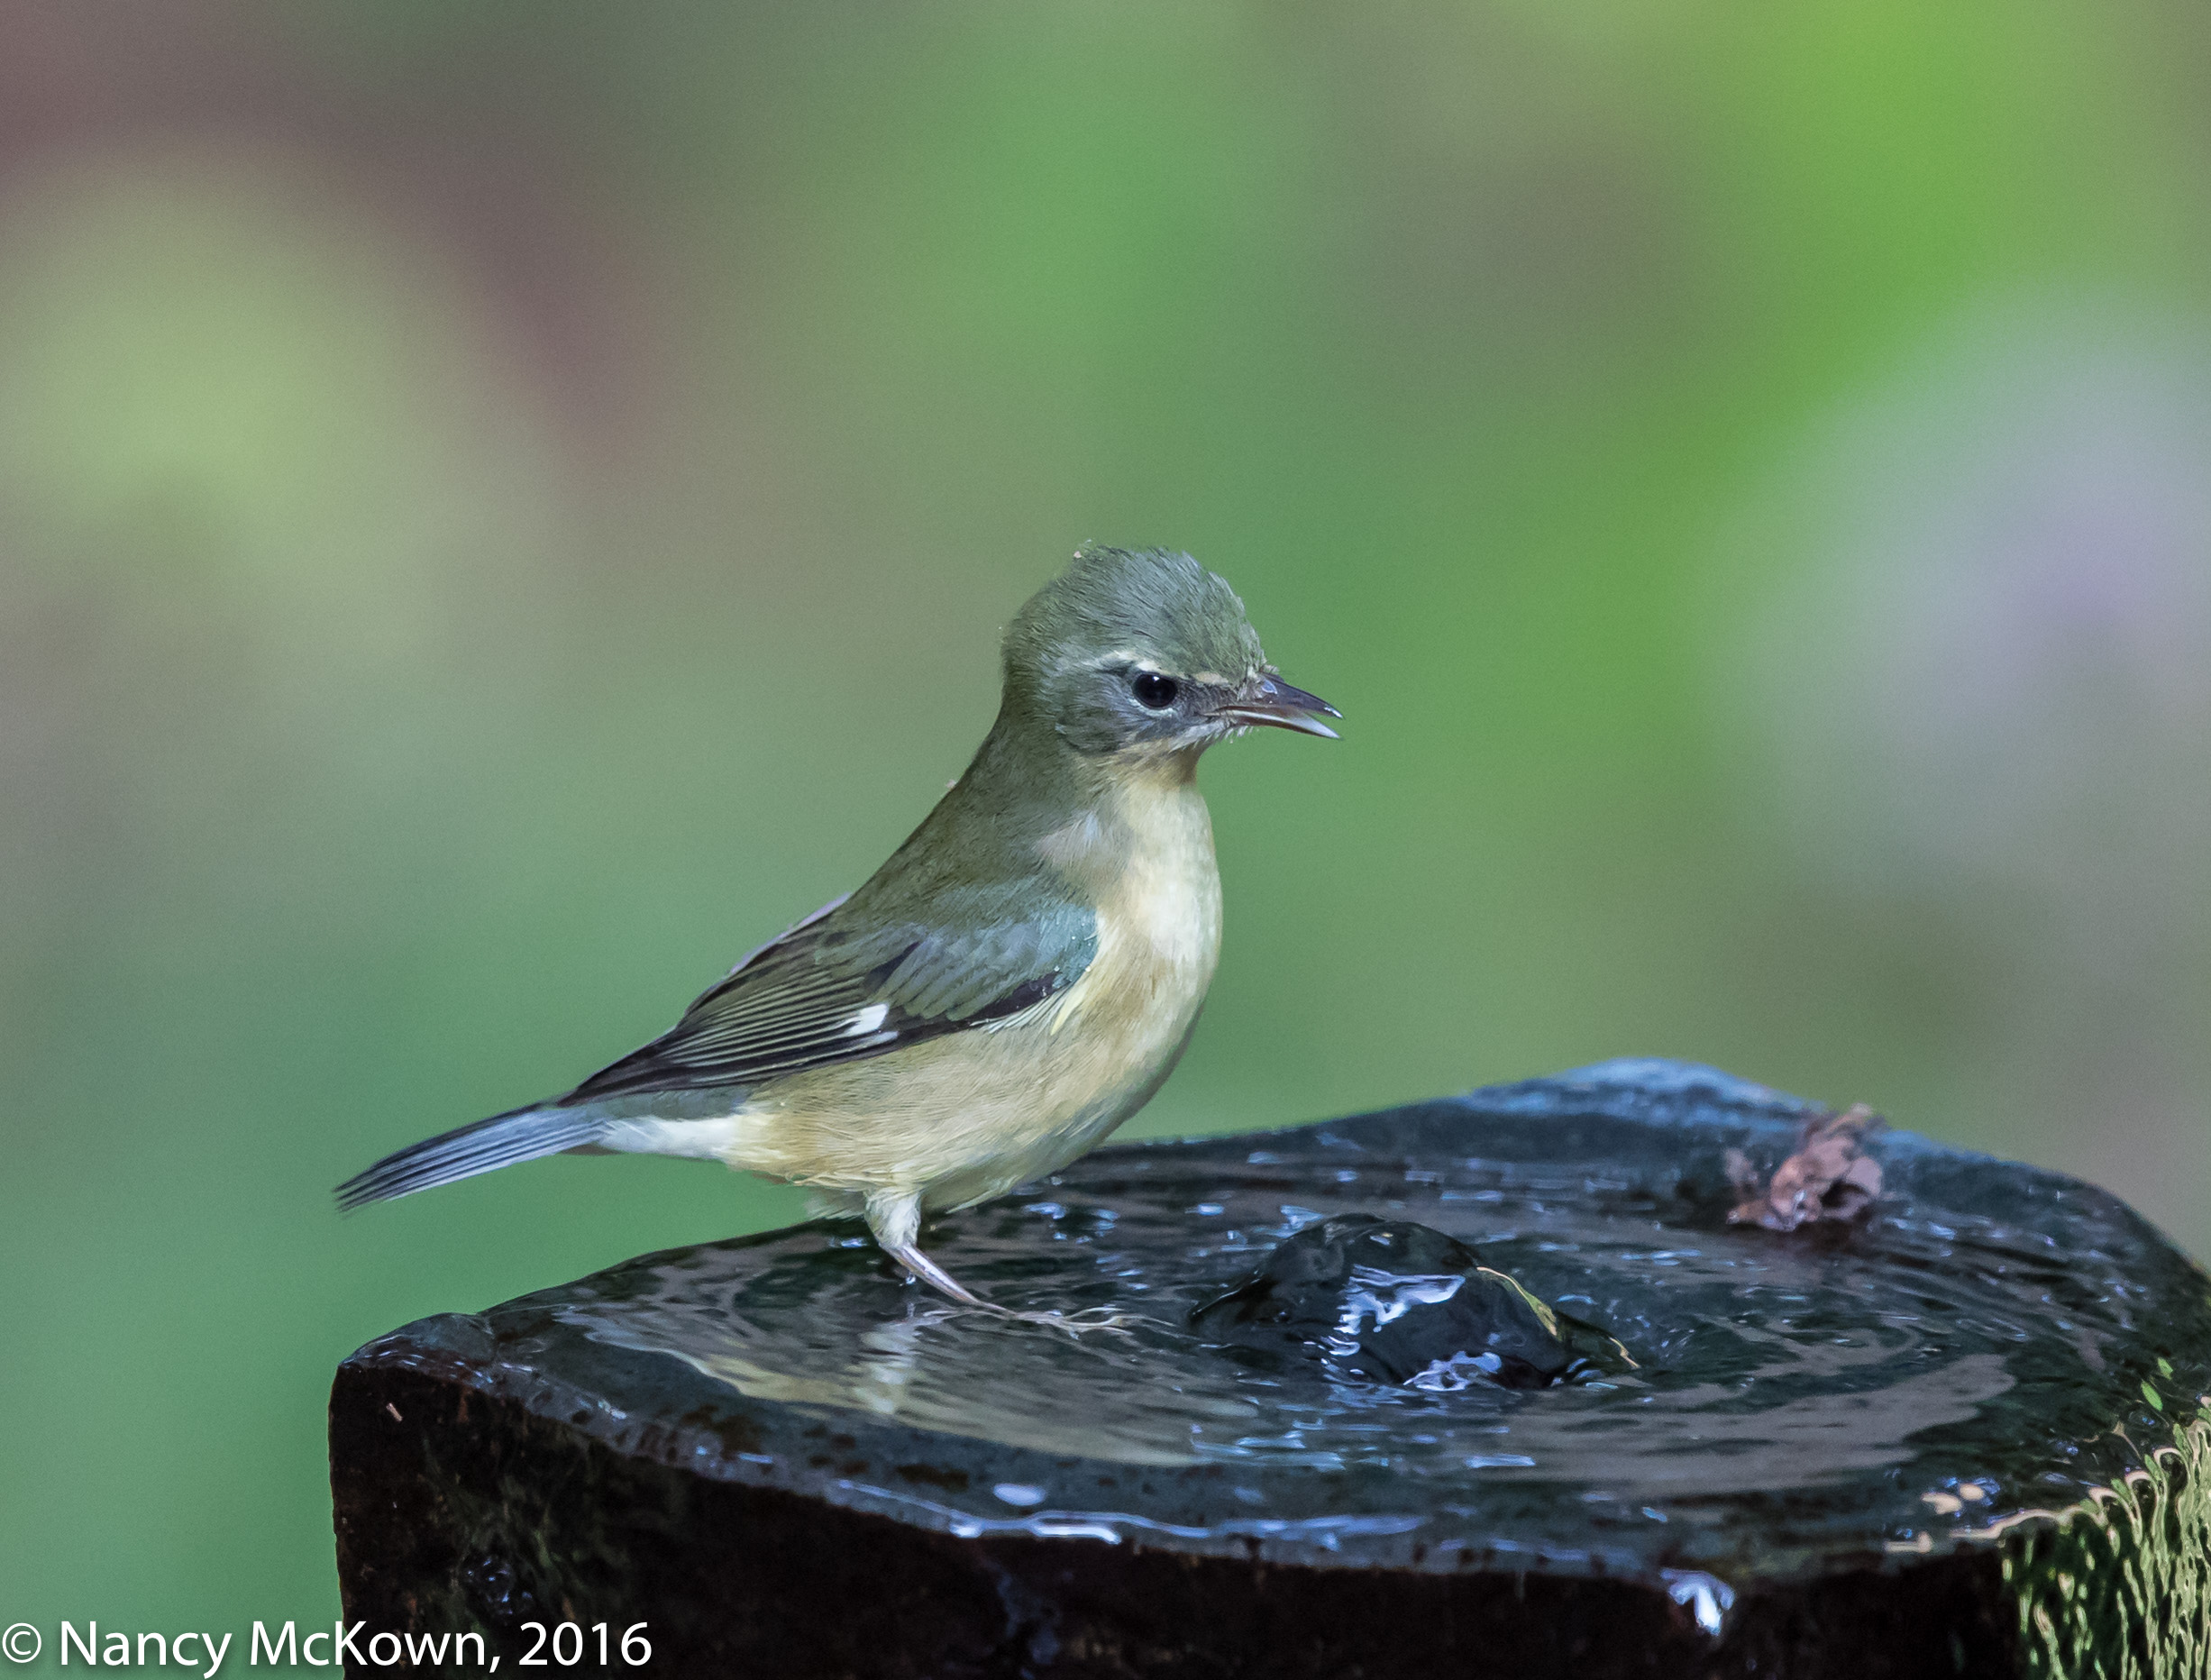
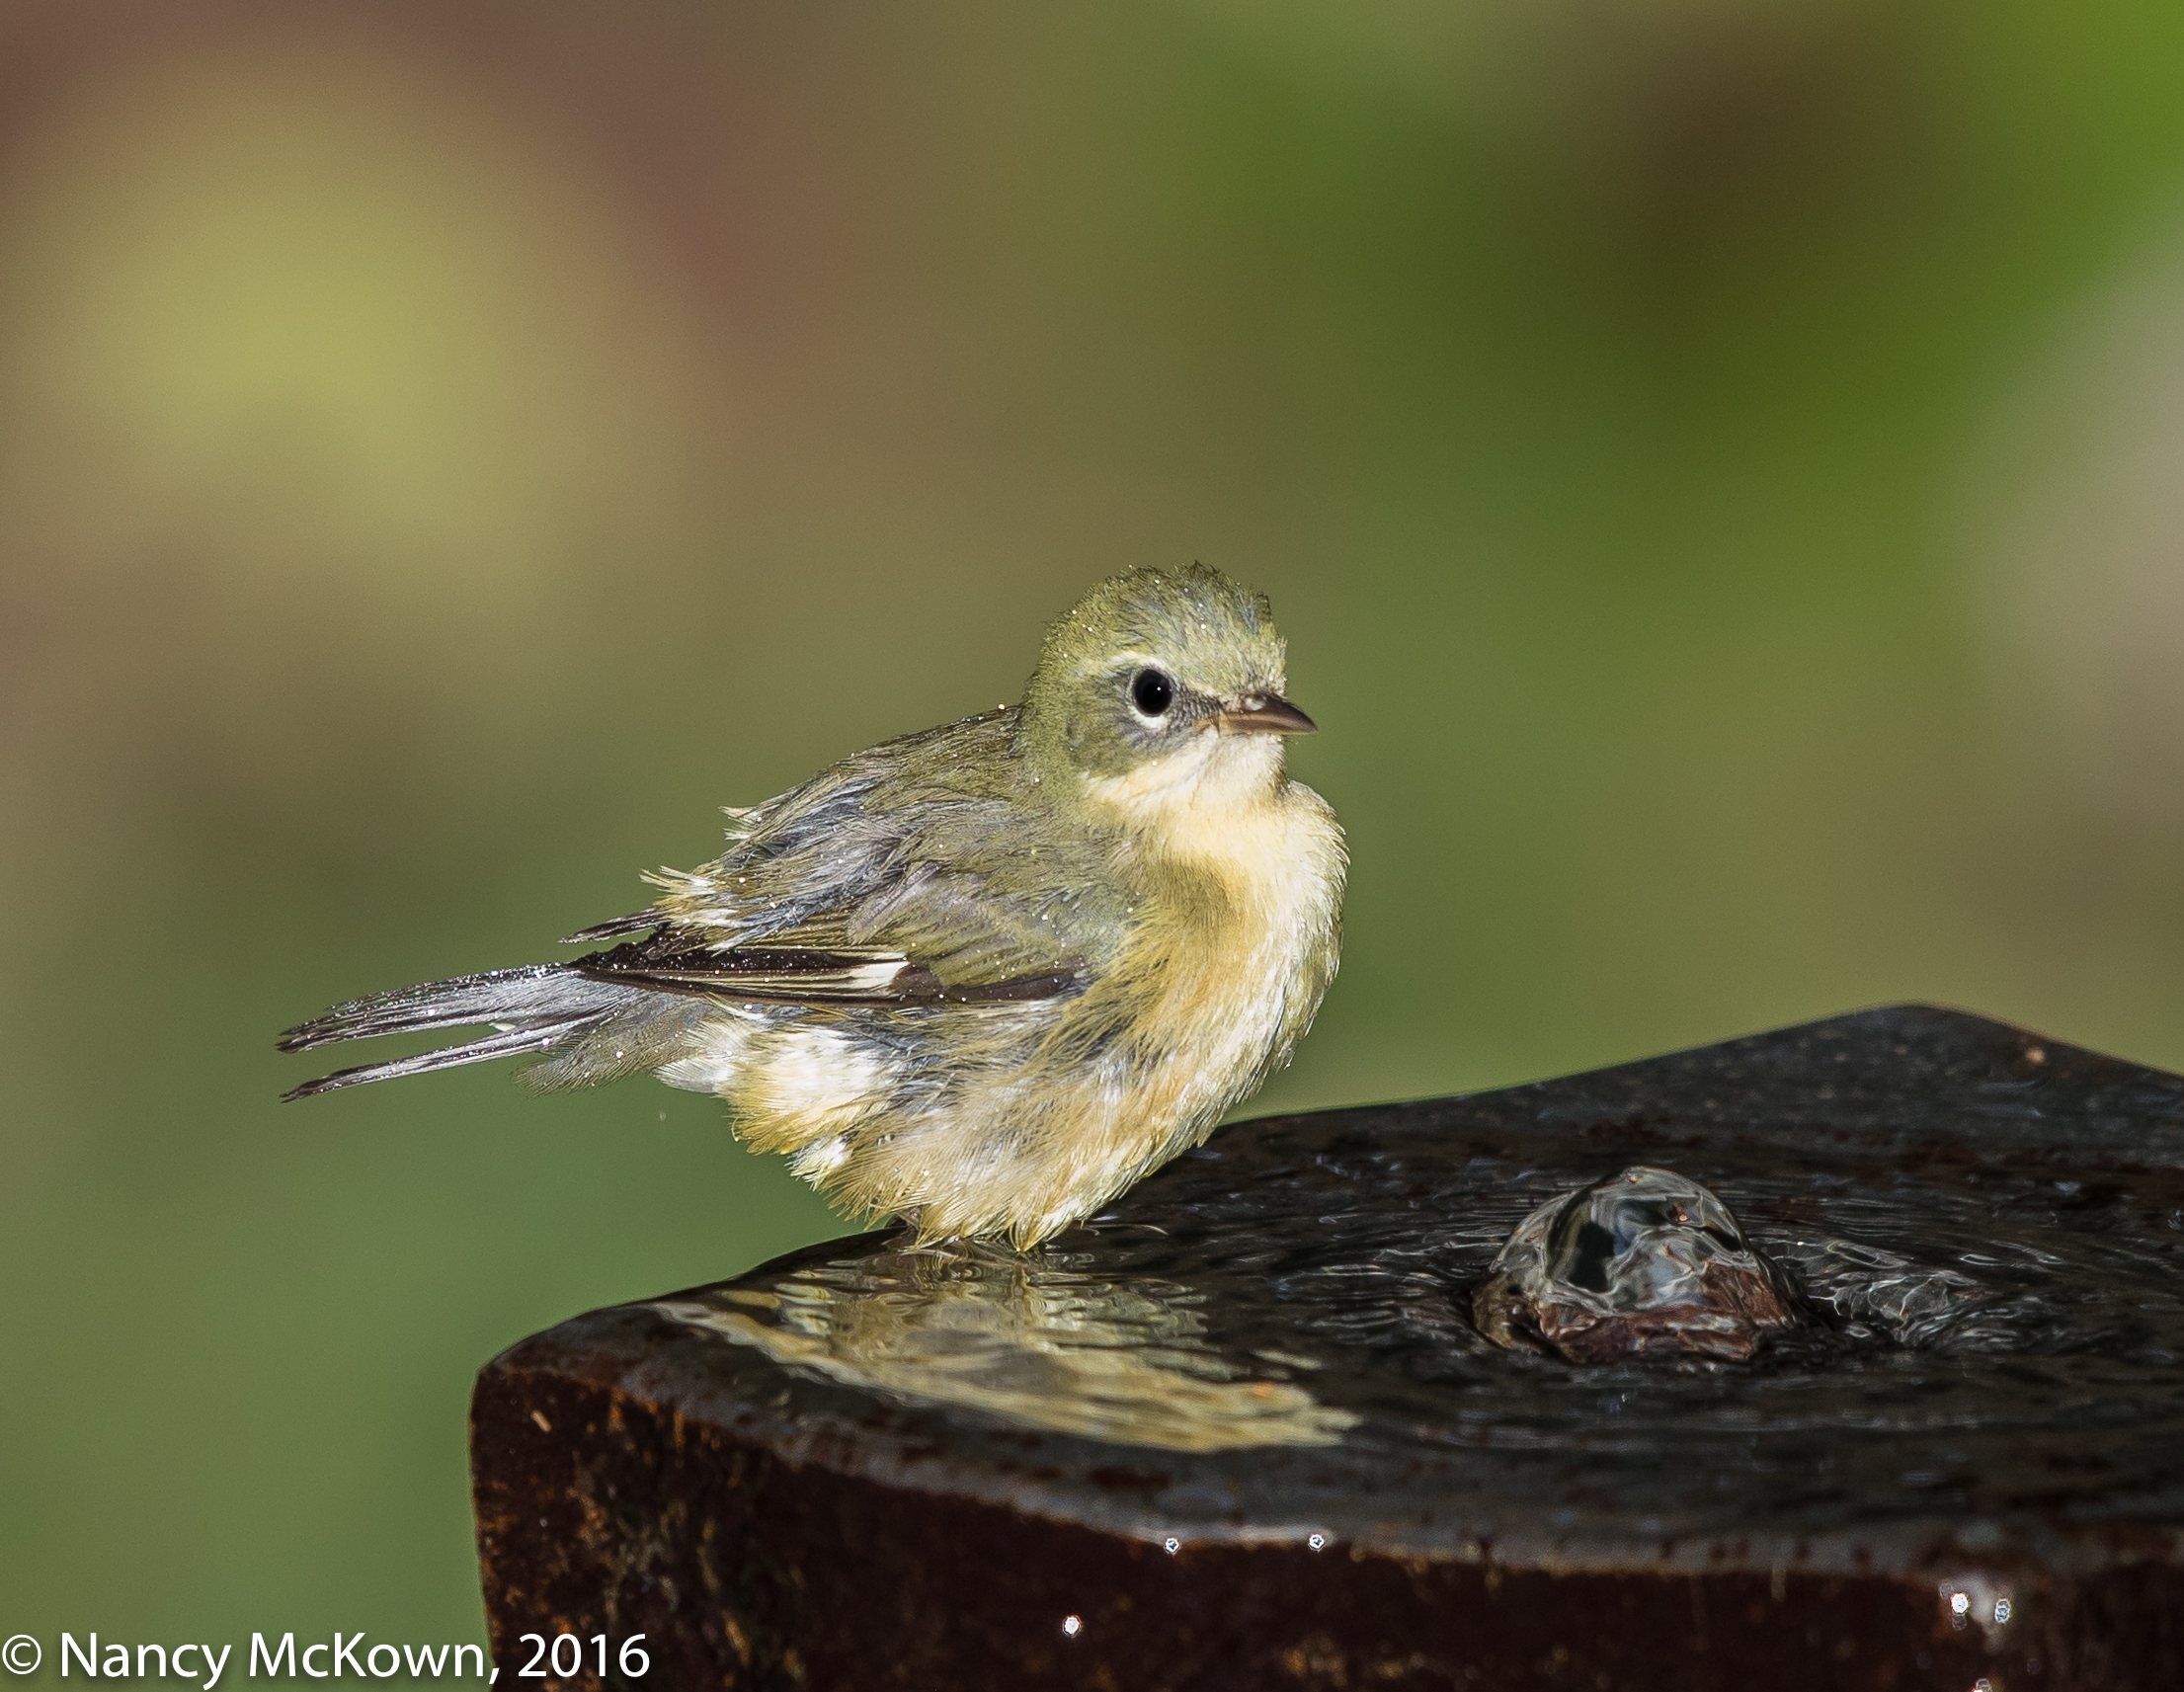
Posing on a lone branch near the fountain.
ISO400; f/9; 1/250 Second

Renewal Takes Time

Some photographers interpret minimalism not as an exercise to get rid of stuff, but as an intellectual challenge intent on reducing an image to its “essence” to capture its intrinsic nature and thereby create a simple and beautiful two dimensional scene.

I’m more interested in the renewal that comes with ranking and sorting and paring down what you have and what you want. Backing away from what may be obsessive behavior is a good idea, especially if it helps you to be more discriminating about image quality. It won’t happen over night, but it’s worth the investment, if only to avoid a depleted wallet.

Wishing you all a very Happy Thanksgiving.

Photographing the Gold Crowned Kinglet- A Late Fall Migrator

Attracting Fall Avian Migrators

It’s getting cold out there. We’ve unplugged and removed the pump from the fountain, put away the outdoor ornaments and patio furniture, and even gone so far as to pest proof some of the creature hidey-holes in the garage and on the deck.

Most of the migrators have passed through, although I’m still expecting a few. Purple Finches, Pine Siskins, and the Yellow Bellied Sap Suckers have not made an appearance yet. (Or, perhaps they’ve flown past our area without so much as a backward glance.) As always, I secretly hope to see a species or two that I’ve never seen… the Redpoll Finch perhaps, or a Northern Goshawk coming to SW MI to settle in for the winter. Until then, I won’t be lonely. There are plenty of winter hardy year-round residents to keep me company.

Photographing The Gold Crowned Kinglet
Gold Crowned Kinglet
ISO1000; f/8; 1/250 Second
159K

Photography Routines are Changing With the Light

My bird photography routines are changing with the season…..so much less light. No need to rush in the morning because sunrise is later but I find myself hurrying in the afternoon before the light slips away.

Most of the migrating birds we have seen this late in the season seem to find comfort where other birds are foraging. If I see a lot of our resident chickadees, nuthatches and titmice in the trees near the feeders, I look harder to find one or two stray warblers, kinglets or vireos rapidly weaving through the branches and picking off tiny insects and spiders.

Photographing the Gold Crowned Kinglet

This Gold Crowned Kinglet is one such late visitor — quick, fluttery and constantly on the move. Kinglets rarely sit still long enough (even when eating insects) to give the lens time to lock focus. I got lucky with this one. Chittering away, he pivoted back and forth in full view of the camera, looking like he just could not decide where to go. I set the ISO to 1000 to calm the flash blast and let the ambient light dominate with just a little well rounded fill flash. (NOTE: The light meter registered ambient light alone at ISO 12,000.)

This diminutive bird is winter hardy despite its size (avg length: 3.1 to 4.3 in-avg weight: 0.21 oz). The e-Bird maps indicate that kinglets (not that much bigger than a hummingbird – avg length: 2.8 to 3.5; avg weight 0.12 oz)  winter in lower Michigan, usually within the protective surroundings of dense conifers. We have never seen them in the winter.

Photo of Gold Crowned Kinglet
Gold Crowned Kinglet
I like the Exiting Pose, Despite the
absence of a catchlight in his eye.
ISO1000; f/8; 1/250 Second

Maintaining a Bird Friendly Yard

Our back yard is mostly quiet and secure except for the occasional avian predator striking fear in the hearts of birds and small mammals. Ample cover (continuous spaces of native plants, colorful nectar filled flowers, ferns, wildly overgrown thickets, various brush piles) all free of chemical pesticides thrive in our yard. Squirrel, raccoon and deer proof feeders are kept clean, full and safe from land bound predators.

A key attractor this Fall was the availability of a clean, multi-level running water source for drinking, preening, and washing. A wide variety of birds converged there and within view of my camera, even in the rain. NOTE: Lots of birds (Thrushes, Towhees, Juncos, Sparrows, etc) prefer to stay low when they come in for a drink, so our multilevel water feature includes stones at the base.

We try to provide a buffet of healthy food for the birds, but the most restorative and economical bird food sources are found in nature, even in Michigan’s persistently cold weather. Native trees and plants provide nutritional seeds, nuts, sap, nectar, berries and insects, even grit. Birds live in and around grasses, vegetation, fungi, mosses, lichens, rotting leaves and decaying wood so they can be first to feast on mosquitoes, worms, grubs, spiders, gnats and many other varieties of arthropods within those natural spaces. They may even feast on an occasional amphibian.

One of the best things we’ve ever done was to build an inviting, eco friendly space to attract birds. It brings enjoyment on so many levels, especially when it comes to watching and photographing birds.

Photographing the Blue Winged Warbler and Beam Concentrating Fresnels

Photographing the Blue Winged Warbler

The last time I photographed a Blue Winged Warbler was in the summer of 2015. I found him preening within his nesting area….a cluster of dense, brambly foliage at the forest edge in the Allegan State Game area. He was a good distance away from the camera, but sedate and cooperative.

This Fall, a Blue Winged Warbler came to our back yard fountain. It was a rather gloomy day, so I had the flash attached. He perched just for a moment on a lichen covered branch in front of a nut brown tree trunk- making for an image with a rather dark cheerless background. Quite a few other year-round birds were clustered on the water feature at the time, so this warbler flew away without a drink.

I stayed next to the camera hoping he would return, but he didn’t – at least not while I was watching. I had my computer next to me because I wanted to investigate a new type of telephoto flash beam-concentrating fresnel attachment recommended by a friend.

Photo of Blue Winged Warbler
Blue Winged Warbler
ISO400; f/9; 1/250 Second

Beam Concentrating Fresnels

Ambient light is often not enough – so fill flash is fast becoming an essential tool to photograph birds in my yard.

Beam concentrating fresnels fasten a compact fresnel lens to a traditional flash gun. It is positioned 6″ or so from the light bulb on the flash. The whole shebang is then hoisted on a bracket and secured half way down the lens barrel. The goal: To better illuminate distant subjects by refocusing the broad beam of a flash (that would normally be spread wide and wasted) so the light extends farther with a tighter more spotlighted beam.

The Better Beamer works fine with my 500mm and 300mm telephoto lenses, and provides better long distance light compared with the max zoom setting on my flash. It is mostly trouble free once I take the time to velcro it tightly to the flash head. It even stays put when I rotate the camera from a horizontal to a vertical position.

Better Light Projection For Telephoto Flash

There are, however, frustrating issues that have sent me to the web to look for other solutions. First of all, some of the flash beam is lost because there’s no cover or snoot to wrap around the light to keep it contained while it is being re directed.(How can ETTL measure exposure accurately with all this waste?). The biggest problem is mounting and tear down. Essentially, for $30+ you get a flimsy, awkward piece of equipment that is troublesome to securely fasten to the flash head with velcro. It’s particularly exasperating when a bird is nearby and I’m trying to hurry and get this thing attached to the flash before she flies away.

Photo of Blue Winged Warbler
Blue Winged Warbler
With Light from Telephoto Flash.
ISO400; f/9; 1/250 Second

I started looking for a fresnel device that would change my telephoto flash attaching workflow, one that not only fit tighter to increase the efficiency of the flash blast, but also fasten to the flash gun in a less trembly way.

There are lots of flash altering devices out there… but not many telephoto beam concentrating flash extenders. I found instructions on how to make your own fresnel extender for very little money, but the final product looks much like the Better Beamer with all its wobbly features.

MagBeam

The MagBeam Wildlife Kit was the only fresnel extender that I found that was sturdy and easy to apply. Magnets embedded in the base (wrapped around the flash head) and on the fresnel extender make it effortless to attach. The expandable rubber allows less light leakage. One disadvantage, because it is not flimsy and weighs more than the Better Beamer, the flash head on which it is attached tends to bend a touch downward.

Overall I am pleased because my bird photography setup and teardown routines are much simplified. I wish I had been more investigative and discerning before I bought the Better Beamer.

Photographing the Black and White Warbler and Relying on the Gimbal Head

Photographing a Black and White Warbler

I see the boldly striped Black and White Warblers only during migration. They behave more like nuthatch than a warbler, moving up and down tree bark probing for food. Not a lot of warbler color, but distinctive and fun to track with the lens. This little one gave me plenty of time to photograph him because he ignored the camera and proceeded to drink, bathe and preen at the fountain.

Photo of Black and White Warbler
Black and White Warbler
ISO400; f/9; 1/250 Second

Watching and Waiting

On slow birding days, I don’t spend all my time watching and waiting for migrating birds. This Fall, I have 2 cameras set up in different rooms. With windows and doors open wide (despite the cold), I can monitor the bird activity while I attend to other chores around the house.

The two camera setups have proven to be a convenient way to either sit there quietly to wait for birds or to get up to do other things without worrying about the cameras. This is true because the heavy and unwieldy gear can be locked down and secured on the tripod supported Gimbal heads.

Photo of Black and White Warbler
Black and White Warbler
ISO400; f/9; 1/250 Second

Gimbal Tripod Head Balancing Act

Gimbal Tripod heads are smooth and steady swing mounts designed to fit atop tripods and maneuver long lenses easily and quickly. A Gimbal head will support heavy equipment and enable the photographer to easily move it around horizontally and vertically. This includes the weight of not only the camera and lens, but also the lens hood, the flash and its fresnel extender, battery pack, flash bracket, telephoto extender and various straps.

I use to think the art of balancing the camera rig on the Gimbal tripod head worked like this:

1)  Level and secure the tripod.

2)  Slide the (Arca-Swiss type) mounting plate (which is attached to the camera’s lens foot) onto the Gimbal head platform until you sense that the center of gravity of the equipment load is balanced.

3) Tighten the horizontal and vertical adjustment knobs.

4) Keep the vertical knob tightened so the lens doesn’t tip too far up or down until you are ready to loosen it to control camera/lens movement and track effectively.

WRONG- at least partly.   8-(

I should not have to do #4….tighten the vertical knob to insure that my rig stays level.

Once the weight of the camera setup is properly balanced, the Gimbal head should stabilize the gear so it flows effortlessly (sideways and up and down-concurrently) with a touch of your hand. Left unattended, the camera and lens should return freely to a level position on its vertical axis. It should not tip up or down when the vertical adjustment knob is loosened.

Achieving the Correct Balance

No matter how much time and effort I put into sliding and shifting the mounting lens plate trying to correctly balance the weight of my rig on the Gimbal head, the equipment setup still tilted (lens forward) with the vertical knob loosened. I simply could NOT equally distribute the weight of my camera equipment on the Gimbal head. Something was wrong.

I called the very helpful sales and service reps at JOBU Design, the manufacturer of the tripod Gimbal heads that I use. They said that the removable lens foot designed for the Canon 500mm 4.0 L II lens was incorrectly placed on the lens. It’s situated too far forward to balance properly. The solution: I would have to purchase and install a lens replacement foot for the Canon 500 f/4 L II lens. Since the JOBU replacement foot does not require a mounting plate, JOBU offered a $30 credit off of the lens replacement foot if I sent back the mounting plate.

I ordered and received the JOBU replacement foot, carefully removed the original lens foot that came with the Canon lens, screwed on the new JOBU foot, and the Gimbal head balancing act was corrected.

NOTE:  Not every long lens requires that you replace the lens foot to balance your rig properly on a Gimbal head, but the Canon 300L f/2.8 II lens and the Canon 500L f/4.0 II lenses both do.

BTW…..Just a little irritating to own the top of the line expensive Canon telephoto lenses that come with lens feet that won’t properly balance on a Gimbal head.

Photographing A Black Throated Green Warbler with Flash and Higher ISO

Photographing the Black Throated Green Warbler

As I look back on the Fall Warbler images taken in previous years (2014, 2015), I see a lot of photos full of high ISO pixel noise. Back then, I had convinced myself that despite the poor image quality ( IQ), I didn’t want to use anything but available light.

NOTE: Eugene Smith’s reaction to the philosophy of using only natural light:
 “Available light is any damn light that is available!”

Photo of Black Throated Green Warbler
Black Throated Green Warbler
Too bright uni-directional light.
ISO1000; f/9; 1/250 Second

Balancing the Light

In general, I am pleased with the light provided by the fresnel directed telephoto flash. (NOTE: It is set to automatically manage exposure settings (ETTL) while camera is in manual mode (M). I do fiddle with the FEC to help control the intensity of the light.) The resulting image clarity and color and saturation improvements look much better then the crazy high ISO photos I took in previous years.

At times however, the subject looks too intensely spotlighted and the background is mostly black. This usually happens when the subject is close to the lens, the ambient light is low, and/or the background is just too far away to be affected by the flash.

Ambient and Flash Light Scenarios

Without flash, ambient light is often evenly spread; it may be dim, but the exposure readings for the front and back of your subject should be similar. (NOTE: When your subject is silhouetted because the background is too bright, it’s easy enough to take the exposure readings from the background, lock the exposure settings, recompose on the subject and shoot. The flash should nicely fill in the subject with a more natural looking soft light.)

When you add flash without a fresnel directional enhancement attached, your distant subject will most likely not be sufficiently illuminated. A lot of the light blast will spread wide, bounce and scatter depending on what’s in its path and the proximity of your subject.

When you add uni-directional fresnel telephoto flash lighting intended to spotlight a distant subject, it is more difficult to balance flash and ambient light in the foreground and background. The best you can do is try to control the artificial light’s intensity by modifying the exposure parameters and tweaking the flash exposure compensation (FEC). (NOTE: Other less manageable elements impact exposure parameters; like distance between the lens and your subject and tonality of the subject.)

Exposure Tradeoffs

We all know the low light exposure conundrum. Low ISO settings, tight apertures and fast shutter speeds make the flash work harder to achieve proper exposure and at the same time reduce the impact of ambient light on the scene.

Widening the aperture lets in more light, but sacrifices depth of field (NOTE: On long lenses, depth of field is very tight). As for shutter speed, I am hesitant to try to capture moving birds with anything lower the the flash sync speed  (1/250 second on my DSLR camera).  So that leaves adjusting the ISO.

Photo of Black Throated Green Warbler
Black Throated Green Warbler.
ISO 1000 helped… but not enough. 
It is still obvious that this image was taken with
Flash attached.
ISO1000; f/8; 1/250 Second

Raising the ISO to Bring in More Ambient Light

Ultra sharp image quality is directly related to low ISOs, so when I started using the telephoto flash in our heavily shaded yard, I was thrilled to be able to set the ISO at 400 or below.

Lately I’ve been experimenting with raising that ISO when using flash in order to let the ambient light on the scene dominate exposure settings more. This strategy not only helps reduce the impact of the flash blast on the subject, but also creates a better balance of light.

Pushing up the ISO to reduce the intensity of the flash is a very enticing alternative, given the high quality of modern sensors in DSLR cameras. For this photo shoot of the Black Throated Green Warbler,  I experimented with ISO1000, but the flash was still too intense for my liking. The question becomes: How high can I go with the ISO (with fresnel telephoto flash attached) in order to get a more natural looking image and still maintain image quality?

This Black Throated Green Warbler took off before I had a chance to push the ISO above 1000. However, I plan to keep experimenting… raising the ISO up to 5000. We will see what happens.

Photographing the Ruby Throated Hummingbird – Guarding Food Sources

Photographing the Ruby Throated Hummingbird

Ruby Throated Hummingbirds are plentiful in our yard and feed on a wide variety of small insects, spiders, sap and nectar. They linger into early October before commencing on their migration journeys. During Spring and Summer, these tiny birds are commonly seen on and around feeders making them relatively easy to photograph.

Guarding Food Sources

Every time I photograph birds in our yard, I always notice one or two aggressive Ruby Throated Hummingbirds acting like bullies around a hummingbird feeder. This behavior can be described as territorial and takes the form of menacing, purposeful, greedy dive bombing of other hummers who attempt to drink from the same hummingbird feeder.

Photo of Ruby Throated Hummer
Ruby Throated Hummingbird.
An Aggressive Pose.
ISO400; f/9; 1/250 Second

On this particular shoot, an aggressive female unconcerned with me established herself on a camera level perch very close to the feeder. She spent the whole morning standing guard, watching, waiting, only occasionally coming to the feeder for a quick drink. I also managed to photograph another female hummer (see photo below). She crouched down in the wet foliage to hide and watched for an opportunity to sidle past the sentry and sneak in for a drink at the feeder.

Ruby Throated Hummer
Ruby Throated Hummingbird.
This non aggressive Individual
is Watching and Waiting for her
chance at the Feeder.
ISO400; f/9; 1/250 Second

Some (Anthropomorphic) Observations of Aggressive Hummer Behavior

  • The aggressive Hummer (either male or female) will defend food resources relentlessly, so much so that I wonder when they find the time to get enough nourishment for themselves.
  • They are not afraid to insistently confront humans when their feeders run dry.
  • They choose a “watchtower” perch near the feeder that provides the best vantage point from which to watch for trespassers.
  • They create a “no fly zone” into which all other hummers are considered trespassers. If another hummer gets too close, they initiate an attack.
  • This aggressive behavior includes: loud chittering, tail and wing displays, dive bombing, pursuing the interloper until he is out of the designated territory,  aggressive ramming using their chests, sharp beaks, and claws.
  • These individuals guard their food source all summer, right up to the time they leave on migration.
  • Solutions to this behavior include clustering multiple nectar feeders in one area or widely separating them….. making them impossible for one individual to police.
Photo of Ruby Throated Hummer
Ruby Throated Hummingbird
ISO400; f/9; 1/250 Second

There were plenty of opportunities to photograph the hummers on the feeder, but where’s the challenge in that?  I wanted to capture some hummer flight action– but for the most part, the dizzying speed and agility of these little birds left my tracking abilities in the dust. I did manage to capture the aggressor hovering over the feeder in between dashes to and from her watchtower perch.

Hoping for a Vagrant Hummer to Visit

As I sit and watch the birds, I keep hoping I will see and photograph an uncommonly seen species of hummer as she passes through our yard in the Fall or Spring. The most likely species for Southwest Michigan would probably be the Rufous Hummer. More rare and accidental spottings have been documented in Michigan of the more elusive Broad-billed Hummingbirds, the Green Violet-ear Hummingbirds, and the White-Eared hummingbirds.

It could happen.

Photographing a Perky Wilson’s Warbler – Dealing with Inadequate Flash Power

Photographing A Wilson Warbler

A soothing fall day. Just a few bright withered leaves drift down. Soon there will be plenty of light.

It’s early October and the number of migrating birds who have interrupted their journeys to take refuge in my yard has dwindled. A few jewels may still appear. The camera and long lens are set up in the house pointing toward the dense foliage near the fountain. The scene is not reflecting much light on this breezy morning. The background is thick and indistinct.

The camera is set on low speed continuous shooting and al servo focusing mode – perfect for fast moving birds. But in low light, it doesn’t matter how fast the camera can burst if the flash is weary after the first one or two shots.

Photo of Wilson's Warbler
Wet Wilson’s Warbler
Bathing at Fountain
Flash Engaged
ISO 400; f/9; 1/250 Second

Slow to Recycle

The more I use my flash, the more evident it becomes that AA batteries recharge it too slowly for bird photography. One shot – wait.  One shot – wait. This seems true even if I need only a touch of fill light and use a fraction of what the flash can deliver. I have to pause… hold myself back –slow down my shutter action to give the flash gun time to recover.

Photo of Wilson's Warbler
Wilson’s Warbler
Taken with Flash extender
ISO400; f/9; 1/250 Second

Wait Time Analysis

Here’s a quick analysis of the situation:

  • Recycle Rate on Canon 580 EX II Flash is 6 seconds (with fresh AA batteries).
  • With 8 additional batteries attached, (Canon CP-E4 Compact AA alkalide battery pack) recycle rate time decreases to 2 seconds (with fresh batteries).
  • The speed of low speed continuous shooting mode can be as high as 13 frames per second on modern Canon DSLR cameras. (Note: Lots of issues can impact the speed of continuous shooting– most especially if you set your camera to shoot RAW rather than JPG).
  • In ETTL mode, longer distances between flash and subject as well as tight apertures, low ISOs and higher shutter speed settings (Max 1/250 per second in flash mode on my camera) will cause the flash gun to work harder.
  • Fast draining batteries impact speed and responsiveness of flash unit. In addition, going off task to swap out dying batteries takes time.
  • No wall power adapter is available for the Canon 580EX II flash gun.
  • The tube on the Canon 580 EX II flash gun will start to overheat after 15-20 flash bursts paced at 2-5 seconds apart. This bumps up flash recycling time to 8 to 20 seconds. Soon after, the over burdened flash will require a “rest time” of 10-15 minutes. (NOTE: An overly heated Canon flash gun will give thermal warning and shut down flash operation to avoid permanent damage to the flash. There is no override switch to cancel shutdown on the 580 EX II.)

NOTE:  The flash may shut down, but not the camera. If I continue fast shutter action without a flash, I will end up with a lot of very noisy (5000+) ISO images – assuming the ISO on the camera is set to AUTO.

Prodigious Power Users

Modern flash guns are prodigious power users. Lots of photographers choose to replace the AA batteries with powerful, light, versatile and portable lithium ion power packs and chargers designed to recharge faster and last longer.

More Power, Faster Recycle

On a friend’s recommendation, I researched Flashpoint‘s Blast Power Pack PB-960. It was the least expensive lithium ion power pack I could find. The customer reviews were very good.

  • You can regenerate your flash unit to full power in less than 1 second. When the power pack runs dry, it’s a simple matter to swap it out for a fresh unit. A $20.00 cable to join two batteries to one power pack will cut the recycling time in half.
  • Power pack battery life is rated to deliver 1800 full power shots.
  • A bright LED power level indicator on the unit keeps the photographer aware of power drainage.
  • With very little fuss, heavy duty locking cables securely attach to the flash unit.
  • Lithium Ion battery recharge time takes approximately 3 hours…which is why you need an extra battery to swap out with the drained one.

NOTE:  Wedding photographers must love carrying the Flashpoint PB-960 on their gear belts. It is engineered to power two different flashes simultaneously off the same power pack.

A Better Option than AA

The Flashpoint lithium ion power pack definitely performs faster than AA batteries, providing more consistently reliable, portable power. It’s not a cheap date. I bought the power pack, 2 batteries, recharger, and carrying strap for $350.00.

Controlling My Trigger Finger

What seems like an interminable wait for my flash to respond is really not. I was able to get 3 or 4 different, well lit shots of the Wilson’s Warbler when he came to refresh himself at the fountain. If I feel the need to hold down the shutter in order to get the perfect shot, more of the images will be adequately illuminated with the Flashpoint attached.

However, no lithium ion power pack will be able to keep up with camera bursts, nor for that matter, will the flash gun. I’ll just have to learn to control my trigger finger when using flash.

Photographing Female Cardinals– Birds and Disease Transmission

Birds and Disease Transmission

When I’m out photographing birds, I have plenty of down time to watch and think about the complex relationships and interactions between birds and other species. Recently, I was very interested to read about how Northern Cardinals indirectly help reduce the spread of West Nile disease.

Northern Cardinals (along with most other birds) play an essential role in the transmission of disease to humans. When a female mosquito successfully pierces a bird’s skin to probe for blood vessels, suck blood and then leave behind saliva, that bird will become a host to any viral infections carried by the biting mosquito. The infected bird will then spread the infections to the next mosquito who pierces her. Eventually down the line, an infection carrying mosquito will transfer the virus to a human.

How Northern Cardinals Fit In

Some species of birds don’t offer the same quality disease spreading services for blood sucking insects.

Epidemiologists at the CDC claim that when virus carrying mosquitos feast on the blood of Northern Cardinals and infect them with West Nile Virus, the virus does not circulate in that species bloodstream at the level required to transmit the disease to the next mosquito host. Scientists surmise that this disease can be slowed or even halted by an unaccommodating bird host like the Northern Cardinal. Fewer infected mosquitoes means fewer transmissions to humans. (NOTE: Other species of birds that may also suppress this disease are Northern Mockingbirds, Gray Catbirds, and Brown Thrashers.)

So the proliferation of West Nile disease (in the U.S. since 1999) depends on which birds are infected. To make this phenomenon even more fascinating, epidemiologists are finding that the appetites of mosquitoes change mid summer so they are more likely to choose to take their blood meals from poor hosting species like Cardinals, thereby slowing down exposure to humans.

Female Northern Cardinal
Crest held high.
ISO640; f/8; 1/800 Second

Photographing Northern Cardinals

Northern Cardinals are one of the most common year-round residents in our yard. They are cautiously bold and curious, perching on or around the bird feeders near the windows to forage. No other bird in our yard is as easy to approach with a camera. When I make plans to photograph Cardinals, there is little need for me to venture outside with my camera and become a blood meal for mosquitos and ticks.

It’s the coloration of the female cardinal that I find most eloquent. Subtle olive brown feathers are tinged with red on the crest, eyebrows, wings and tail. Her bold red/orange cone shaped beak matches the male cardinal’s beak, but appears less protuberent against the more understated colors of her face.

When I took the photo above, the sky was almost completely covered with sun obscuring clouds, making for a bright but diffused light. Diffused light softens the contrasts across the whole image, making for a more even and balanced look. This type of light creates less of a distinction between the shadows, highlights and mid-tones.

Showy Bird Crests

When focusing in on a female Northern Cardinal, I normally try to include a capture with her crest held high. If she notices the camera, her crest generally goes down, perhaps an effort not to be detected. When a bird sports a crest, she can raise and lower it to indicate mating readiness, nervousness, excitement, caution, and fear. These upright barbs high on the bird’s crown are made of soft, bendable fluffy feathers which can be raised high in a perky salute or tucked back smoothly on the head. Nestlings and newly fledged Cardinals often display still growing crests that look more threadbare.

Female Cardinal
Fledgling Female Cardinal.
No Red Beak Yet.
The light was less even, consequently,
More shadows and highlights are
visible in this image.
ISO2000; f/4; 1/400 Second.

To view photographs of Northern Cardinals engaged in courtship feeding, press this link.

Photographing Tennessee Warblers -Going On the Road

On The Road In Search of Warblers

The birding hotspot that peaked my interest is called Good Harbor Bay Trail off M-22 in the Sleeping Bear Dune National Preserve. It’s a 2.8 mile trek just a short distance from the Lake Michigan shoreline, 20 miles north of Empire, MI. The trail was described as being fairly flat, very wooded, with planks placed strategically along the route to help hikers traverse through swamp areas.

When we got to the trail, it was warm and fairly windy with a storm brewing over the lake. Warblers on migration often come down to rest before and/or during a storm. Dark clouds produced a dull pall over the scene, making details in the woods indistinct. I was prepared for low light photography.

Photo of Tennessee Warbler
Tennessee Warbler
More Success in My Own
Back Yard.
ISO 400; f/9; 1/250 Second

Traveling With Camera Equipment

Prepping for the uneven terrain, we packed the camera equipment onto the cart and headed out to search for migrating Prairie Warblers and Pine Warblers. Car travel allows me to pack (overpack?) any and all equipment we might need. I was sure this was going to be an active bird photography day, so I made sure I was ready. Here’s an itemized listing of the load:

  • ECKLA Beach Rolly Cart to haul gear on the trails, beaches, docks, boardwalks, or any rugged terrain we might encounter. (NOTE: To negotiate the wetland part of the trail that consisted of single board planks, the two of us lifted the front and back ends and then carried the Eckla cart over.)
  • A padded Tamrac super telephoto lens backpack* to transport and protect the Canon 500mm lens.
  • Manfrotto Tripod.
  • Plastic 15 Qt rectangular container to store 1.4 and 2.0 telephoto extenders, Canon 580 EX Flash, Better Beamer Flash extender, bracket to lift flash above camera, cabling, bungee cords, CF Memory cards, extra battery pack for camera, compact battery pack for flash, extra AA batteries, and rain gear.

*The Tamrac backpack is big enough to accommodate the assembled DSLR camera, 1.4 Canon extender and 500 mm lens. Before heading on the trail, we secured all equipment to the cart with bungee cord. (NOTE: The last time we used the Eckla cart, one of the wheels fell off because its cotter pin was not secure and dropped off. Can’t move a full load with only one wheel. We spent several frustrating hours retracing our steps looking for the pin.)

Learning Through Experience

For short treks, it is convenient to have as much of the gear assembled before placing it (zipper forward) in the backpack and then in the cart. For long distance car/plane/train travel (moving around in airports, in and out of taxis and hotel rooms, etc), I pack the various components separately.

I learned the hard way. On one of our long distance birding adventures, my assembled camera, lens and extender were carefully padded and stowed in the Tamrac backpack. In one of the airport terminals, the pack rolled a little too fast off of my husband’s back and landed with a sickening thud. Apparently upon impact, the camera body swung one way and the 1.4 extender and long lens went in different directions. This torquing was too much for the mounts to endure and they all twisted apart. Separate unconnected components would have endured the impact within that heavily padded backpack.

The Canon authorized service center inspected the damage and concluded that all mounts had to be replaced. In addition, the autofocus mechanism on the lens was damaged, so it had to be taken apart, repaired and reassembled. Our insurance paid the $700.00 repair bill, but we were left without a camera for more than a week.

On the Trail…..

We heard a few distant warblings coming from high in the trees, but we only actually saw a chickadee and a mourning dove. It was certainly not the first time (nor will it be the last) when extensive prep and high hopes came to nothing.

Serious bird photographers are often let down. You learn that disappointment is a waste of energy – especially considering that you have no control over nature’s forces. It’s best to include in your birding adventures other avenues of peace and pleasure. We had a very pleasant walk in beautiful country, sans mosquitoes, and the packed Eckla cart made our trail travels effortless.

Photo of Tennessee Warbler
Tennessee Warbler
Color Detail Comes through with
the help of flash extender.
ISO400; f/7.1; 1/250 Second

Photographing the Tennessee Warbler at Home

Lovely trip, but no birds. When I’m on the road, I spend much of my time moving, looking, hoping to stumble upon birds that other birders have seen in the same location. I’ve come to learn that setting up the equipment in one or two places and having the patience to wait until the birds come to you is often a better plan than walking with gear on a long trail.

These photos of the Tennessee Warbler were taken in our yard after we got home. It took a little under 10 minutes to unpack and assemble the gear.

Photographing a Female Black Throated Blue Warbler and Auto Focus Modes

Photographing a Female Black Throated Blue Warbler

First cool day we’ve had in a long time. The mosquitoes seem to be taking a break as well. The camera, 500mm lens, 1.4 extender, flash with better beamer extender, and extra battery power pack are all setup on a tripod at the patio door opening to the deck. One leg of the tripod is on the wood deck platform, but most of this ensemble (including me) are in the house.

It’s one of those “happy to be alive” sunny days. The cicada and bird song intermix agreeably with the ringing chimes in the front yard. I have high hopes today because so far this Fall, I’ve seen and photographed 13 species of warblers who have interrupted their journeys south to rest and replenish in our yard.  (See Flickr 2016 Fall Migration Album.)

Female Black Throated Blue Warbler
No Telephoto Flash
Pleasing ambient light color tones, but the High ISO value
makes details less distinct. 
ISO3200; f/6.3; 1/400 Second

My Canon DSLR camera was set to Al Servo mode for these photos of the female Black Throated Blue Warbler. I activated a splattering of center based auto focus points. Same day, same time, but distinctly different color tones coming through. Different colors are a consequence of the type and intensity of the light. Hard to predict what colors tones will come through with flash… but it is easy enough to correct what you don’t like in post processing by experimenting with the white balance options. NOTE: The color balance for all of these photos was not changed in post processing….and appear “as shot”.

Black Throated Blue Warbler
Female Black Throated Blue Warbler
Taken with Telephoto Flash Extender.
More gold tones in this shot.
Enlarge the above photo
to View how the Low ISO Setting
Brings out the Details.
ISO400; f/6.3; 1/250 Second

Matching Auto Focus Mode with Shooting Conditions

So many issues and conditions impact the ability of the camera and lens to precisely focus.  As long as the light is good and one or more autofocus points are able to lock focus on the target, you can expect accurate focus, no matter what autofocus mode is set on the camera.

If all of the DSLR autofocus modes work great, why not pick one and stick with it- or better yet, let the camera decide?

Because when you are dealing with high level of subject unpredictability, anything can happen. A fast and responsive lens is designed to achieve the sharpest auto focus when you match shooting conditions with camera’s auto focus modes.

Canon’s Auto Focus Modes

Here is a quick description of the auto focus mode choices available in modern DSLR Canon cameras.

1) One Shot…. for use when your subject is mostly stationary. Once the camera achieves focus, the shutter will release- and NOT before. Perfect for portraits and landscapes where conditions tend to be more predictable. (NOTE: The focusing assist beam on the flash gun that bounces light to the subject and then back to the camera to gauge distance and aid focusing will only work in One Shot mode.)

2) Al Servo…. continually tracks, readjusts and re-focuses until the shutter is pressed down completely. This is the most reliable auto focus mode to capture images of birds on the move. Al Servo places the camera in charge of responding to movement, as long as photographer adeptly tracks the action with activated autofocus points.

3) AI Focus….. the photographer relies on the camera to determine if there’s movement at the time the shutter is released. I don’t find much use for Al Focus mode. I trust Canon cameras to make critical focusing decisions with regard to autofocus points – but not to decide what autofocus mode fits the activity level in a scenario that is likely to be constantly changing.

NOTE:  You can turn off auto focus on the lens and focus manually. The auto focusing technology built into modern cameras and lenses is so accurate that even in diminished light, I rarely set the lens to Manual focus.

Photo of Female Black Throated Blue Warbler
Female Black Throated Blue Warbler
No Flash.
ISO3200; f/6.3; 1/400 Second

Back Button Focus

When you set your DSLR camera to Al Servo continuous focusing mode you have to keep that shutter button half-engaged to achieve focus. This is highly inefficient, especially when you are tracking lots of action. The Back Button focus function allows you to disengage the shutter button from the focusing function, thus making focusing faster and more precise. To do this, simply focus on your subject by holding down the back focus button with your thumb and get ready to press the shutter release with your fore finger when the peak action starts. The camera will continually focus on the subject, and the shutter will not try to engage focus before taking the photo. Once the subject stops moving, let go of the back button focus and use the shutter button to focus as you did before.

My Preferences

I use Al Servo focus (combined with back button focus) most of the time because this mode puts the lens on the alert for movement. Designed to work hand-in-hand with whatever focus points are activated, it efficiently adjusts and readjusts focus the second it senses motion. Al servo is also essential for panning (following a moving subject) and for bursting.

Read about the difference between shooting modes and autofocus modes here.