Monthly Archives: January 2017

Photographing Hermit Thrushes – Correcting Mistakes in White Balance

Photographing Hermit Thrushes

Around evening’s twilight, four or five Hermit Thrushes would quietly congregate at the fountain after all the other bird species had left. At first, just a bold and curious few came. They did not scatter or even flinch when the flash went off. I could see a few more of their wary companions hiding in the dimness beyond the fountain.

Out of all the thrushes, Hermit Thrushes are short term migrators….the only thrushes to winter in the United States. They migrate through early in the Spring and depart late in the fall.
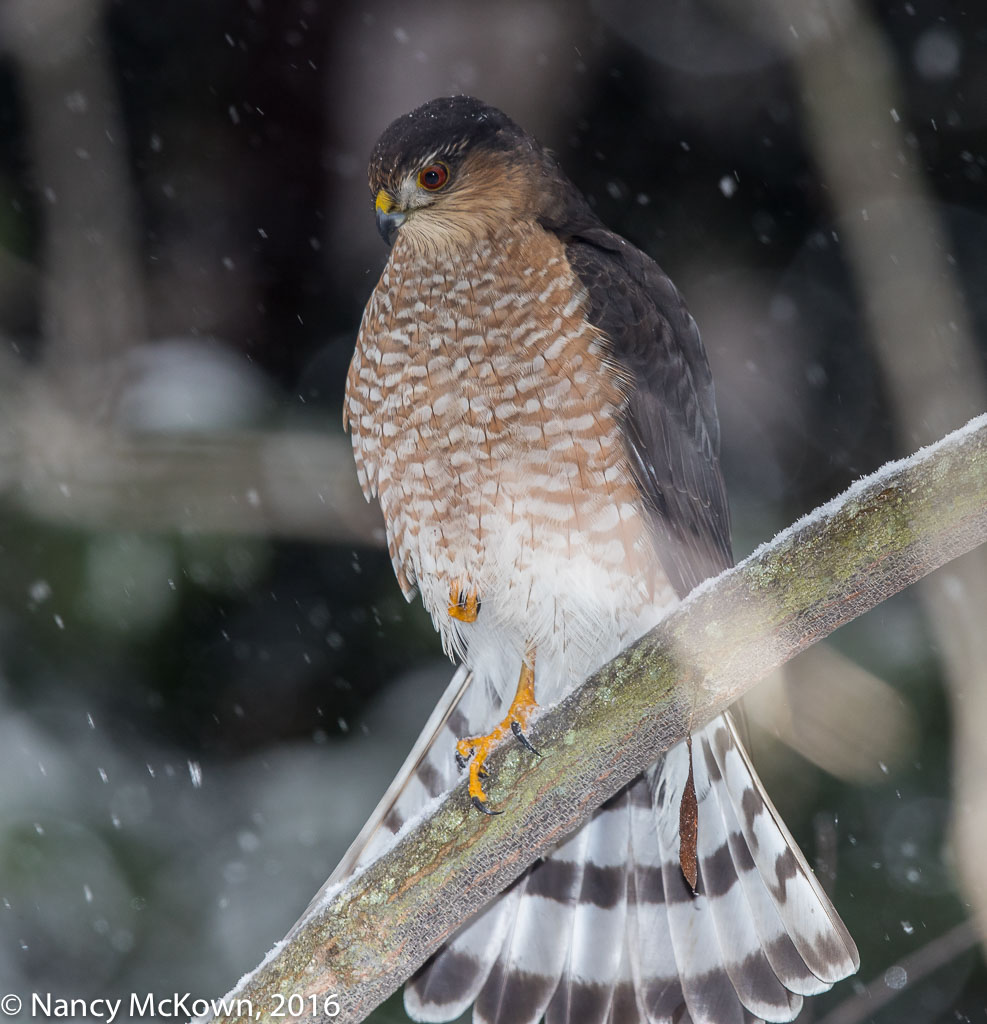
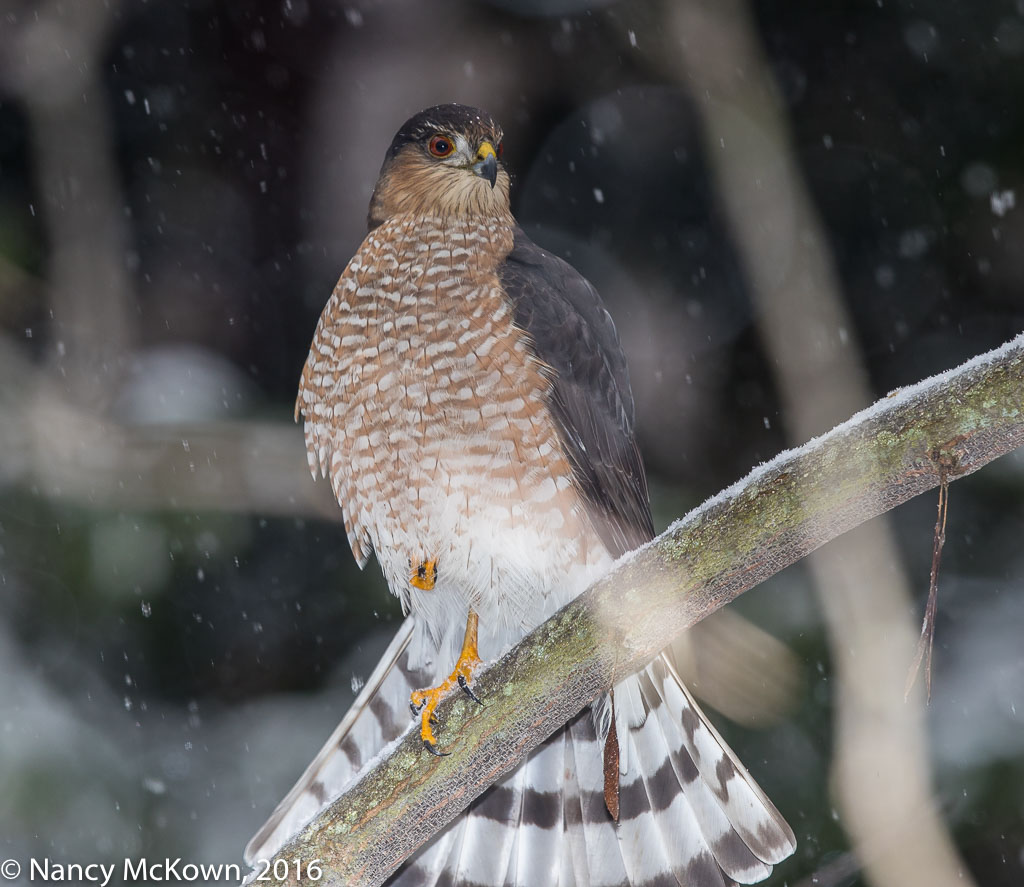
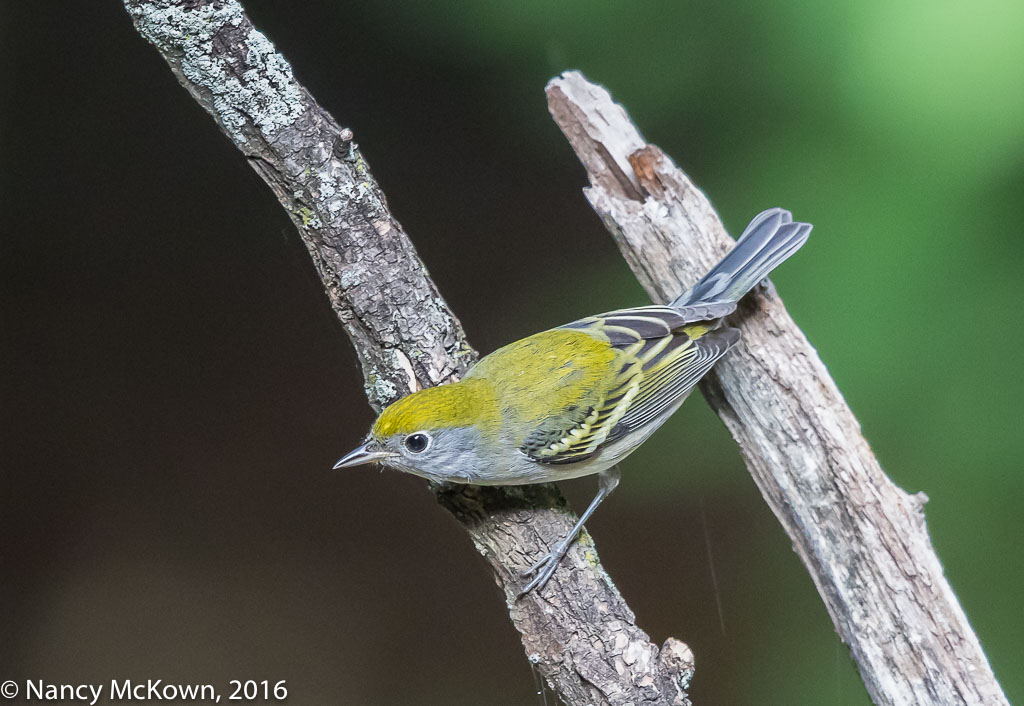
Hermit Thrush

Hermit Thrush
ISO 800; f/8; 1/250 Second

Combining Ambient Light with Flash

When I took these photos, the camera’s ISO registered at ISO 12000, so I used the telephoto flash. It was simply too late in the day to rely only on the diminishing ambient light.

Combining ambient light and telephoto flash can cause color temperature imbalances and throw off white balance. It’s an easy enough fix if you shoot in RAW and train yourself to be attentive to it in post processing.

Realistic Color Rendition

Once in a while, I go through my images in Lightroom to review, organize, delete and otherwise cleanup my stash of digital photos. One of the most common post processing mistakes I find are those related to white balance. Time after time, I unconsciously skip over or ignore an unnatural color portrayal in my images, even if it is clearly not a realistic rendition of the color at the scene. I think this is not an uncommon oversight for photographers, despite how fast and easy it is to test for and fix white balance problems in camera and in post processing.

Consider:

  • Programmed “presets” (auto, incandescent, fluorescent, flash, cloudy, open shade, sunny) are white balance correction processes that are built into the camera and do a precise job of rectifying white balance for most lighting situations.
  • White balance fixing algorithms built into post processing software are, for the most part, amazingly accurate. If tonality of an image seems “off”, correction is wide open in post because all color data has been retained (assuming you shoot in RAW).
  • Information about balancing light is probably one of the most published photographic fixes on the web.
  • The Live View function on your DSLR camera can give you a real time comparison of the impact that white balance will have on your images. With the camera set to Live View, you can flip through the various light balance settings (auto, incandescent, fluorescent, flash, cloudy, open shade, sunny) and observe in real time how the different color casts will look before you take the shot.

Quick Tutorial in Correcting White Balance

To achieve proper white balance is to remove unrealistic color. Your goal is to “fix” the color temperature of the light source and thereby correct warming and cooling color tones that don’t belong.

Most post processing programs have a white balance correction tool. Lightroom provides an icon that looks likes an tiny eye-dropper.

  1. Make sure the white balance is set to AS SHOT– so all previous attempts to correct WB are erased.
  2. Find a neutral color that you know to be true… a light gray or white component in your photo. This is your sample of realistic color upon which all color correction will be based.
  3. Activate the eye dropper (white balance selector tool) by clicking it on. Use this tool to hover over that neutral gray/white space in your photo, and watch the live preview of the white balance adjustments in the Navigator Panel. Once you touch down the eye dropper onto the image, temperature and tint functions automatically adjust the rest of the color in the photo.

A Problem of Perception

Color Realism should be the “first things first” job in post. It’s essentially a problem of perception – one that (at times) needs more than the naked eye to see.

Photographing a Sharp Shinned Hawk on a Snowy Morning

Photographing a Sharp Shinned Hawk

Baby it’s cold outside.

I’ve been inside the house with my camera, watching the year-round birds at the feeders and looking for behaviors that might indicate that a hawk was lurking nearby. These include eerie silence, no activity, and perhaps one or two Downy Woodpeckers clinging to a branch, still as death.

I spotted a Sharp Shinned Hawk obscured in the foliage of one of the tall arborvitaes (Northern White Cedar) on the property line. This perch was distant and too heavily obstructed for the lens to focus accurately. I only saw the concealed bird because another Sharpie rousted him from his hiding place. After a fast paced and aggressive chase, the dominant raptor finally managed to force the interloper out of her hunting territory .

Photo of Sharp Shinned Hawk
Sharp Shinned Hawk.
Look at that fierce face and towering demeanor!
Makes you glad you’re not a small mammal or songbird.
Notice the Seed Pod from a Red Bud
Tree Entangled in Her Splayed Tail Feathers.
ISO400; f/8; 1/250 Second

Prepping for a Possible Encounter

Once I spotted the hawks, I opened a couple windows in the library (despite the wind, snow and intense cold), and maneuvered my rig into place. The scene was heavily clouded, so I attached the flash, hoping the fill light would enhance the color and sharpness of the images. After 30 bone chilling minutes, the Sharpie did fly in and perch on a nearby branch.

A Little Too Close

The perch upon which the Sharpie alighted was slightly above camera level, but too close for the 500mm lens to include all of the bird and leave a pleasant frame. Notice that in both images, the bottom parts of the splayed tail feathers are cut off.

During camera setup (when I am not rushed), I always try to position the lens so as to optimally frame whatever bird I hope to photograph that day. The goal is to visually balance the setting to include some context for the viewer.

I missed the mark. This was a large Sharpie (female raptors tend to be approximately 25% larger than males) and she was just too close to the lens to include a pleasant border.

Possible Remedies

There are strategies that I could have used to remedy the situation.

  • Reorient the tripod collar to a vertical position. I did not do that because the tele flash on bracket and battery pack were attached (and necessary – ISO reading at 8000), so turning the tripod collar to a vertical position would have thrown off the trajectory of the light beam and possibly upset the weight balance of the gear.
  • Move the whole tripod setup farther back into the library. Re-situating a large, heavily laden tripod only takes a minute to do, but it does cause a distraction. Birds don’t wait around for you, so I attempt that move only after I get in the first few shots. I was glad I did not take the time to move the gear because the Sharpie perched less than a minute.

(NOTE: I love the quality and precision of prime lenses, but for situations like this I wish I had a quality zoom lens. Canon makes a 200-400 F/4L zoom lens with a built-in 1.4x extender, giving the lens a range of 280-560mm (f/5.6) on my full frame DSLR. This means optimal versatility when out in the field photographing birds, especially in situations where it is difficult or unwise to move the camera or attach or detach an extender. (NOTE: One day I plan to rent this lens. It is ridiculously expensive to purchase…$10,999!)

Photographing Birds in Falling Snow

Snow flakes can float down gently or fall fast and furious. To capture them, you need to decide what look you want and adjust the exposure settings appropriately. The slower the shutter and the faster the snowfall, the more fog-like blurring and streaking you will see.

Photo of Sharp Shinned Hawk
Sharp Shinned Hawk
Taken with tele flash
ISO400; f/8; 1/250 Second

During this shoot, the snow looked picturesque (big, soft, feathery ice crystals) and fell  fast. I kept the telephoto flash on bracket turned on because heavy cloud cover darkened the scene and I needed some fill light to reach my preferred aperture and ISO. The shutter speed was set to the camera’s flash maximum sync speed of 1/250 second. The flash did a good job of illuminating the scene but flash will not freeze motion if there significant ambient light on the scene. In addition, the notoriously shallow depth of field on the 500mm lens was blurring the snowflakes in front of and behind the Sharpie.

End result: The camera captured a few snow flakes that look like round unattractive blotches. The flash illuminated the large snow flakes in the foreground, causing those splotches to stand out the most.

On-The-Job Training and Hindsight

Take-away from this shoot: Lots to things prepare for when photographing birds in the snow. I’m hoping that all this on-the-job training and hindsight will eventually translate into better bird photography.

(NOTE: Flash has been an essential tool to photograph birds this winter. Per our local weatherman’s blog (Bill Steffen), “….between Dec 1-18, 2016, SW Michigan had only 2 hours and 41 minutes of sunshine, or 8.9 minutes per day…. Jan 15  was only the 4th day since Nov. 29th with more than 45% of possible sunshine. Twenty-six of the last forty-five days have had zero sunshine…not even a minute.”)

Photographing a Female American Redstart- Experimenting With Shutter Release

Photographing a Female American Redstart

A pair of American Redstart Warblers nested in our yard this past summer and they reliably visited the fountain every day. I watched this conspicuously lovely and hyperactive female American Redstart from a distant back window. Unlike her male counterpart, she was wary of humans and would not come near the fountain with me sitting behind the camera. She regularly perched in the same spots, constantly on the move as she surveyed the surroundings. If it was clear, she would dive down for a drink. If she saw me, she was gone. (NOTE: This individual was very unlike the female Redstart who slipped into my house last summer.)

Photo of Female American Redstart
Female American Redstart
Flash Engaged.
ISO400; f/9; 1/250 Second

I set up my blind for a while in the hopes of fooling her, but she was highly sensitive to any movement made by the camera and blind. It became obvious that capturing an image of this little warbler would require that I hide somewhere out of sight with a remote shutter release.

Remote Shutter Release

A remote shutter release is an electronic trigger that allows the camera’s shutter to fire from a distance without the need to directly press the shutter button. Using a shutter release definitely has advantages in bird photography as long as the bird lands upon the one spot on which the lens is pointed. I have watched birds long enough to know that it is possible to predict their behavioral patterns, especially near feeders and fountains.

My Failed Bluetooth Experiment

Recently, I bought a fairly inexpensive new shutter release (wired and wireless radio remote combo). WHY?  Something just snapped and I was sick and tired of messing with the troublesome 5 year old  bluetooth shutter release that I had in my camera bag.

Bluetooth is a wireless technology standard that allows you to connect and exchange data (wirelessly over short distances) between different electronic devices. Theoretically, all you have to do to get this device operational is download the appropriate app to a smart phone and “pair” the phone to the camera connected detector, thereby turning the screen of the smart phone into a remote shutter release.

I have in the past used this bluetooth shutter release successfully. Problem is, the pairing doesn’t seem to “hold” making it unreliable and causing me to miss many shots. By far the worst irritation is when I connected this device to a camera set to continuous shooting mode. In this shooting mode, one lighthanded touch of the blue tooth connected smart phone and the camera’s shutter would start tripping– fast, erratically and non-stop — until it reached the upper limit of the the compact flash memory card’s capacity. The only way I could get the camera to stop was to power it down. Afterwards I had to delete dozens of unintended shots from the memory card.

Photo of Female American Redstart
Female American Redstart
With Flash
ISO400; f/9; 1/250 Second

Useful Gadgets

When using a remote shutter release, a photographer is bound to miss shots simply because she is not in control at the helm and unable to swivel the Gimbal tripod head to capture the action. Still, there are advantages to getting the photographer out of the picture.

Why Bother With A Shutter Release:

  • I tend not to have a gentle touch when I press the shutter button, thereby causing slight movement to the camera rig while the shot is being taken. A long telephoto lens will magnify that vibration.
  • The slower you set the shutter speed, the more you need a shutter release:  (NOTE: Shutter speed is probably the most likely cause of blurry photos.) There’s a simple reciprocal rule to remember for setting the lowest shutter speed possible for hand holding your camera. If you have a 600 mm lens, set the shutter for at least 1/600 of a second. With long telephoto lenses, the shutter speed/focal length reciprocal rule does not just apply to hand holding, but tripod mounted rigs as well.
  • Vibrations cause by mirror slap should not impact focus at shutter speeds above 1/60 second. (NOTE: In the newest DSLR cameras, mechanical parts of the shutter have been re-designed to reduce vibration, especially at slower speeds.)
  • Dangling the cabling from the new shutter release could cause very slight camera shake….which is why it’s a good idea to fasten it somewhere.
  • I usually use back button focus…but not with a remote shutter release attached. If back button is activated on your camera, the shutter will fire, but auto focus will not engage. Since I have pointed and pre-focused the lens to one spot in the hopes of a bird perching there, it’s not really necessary to activate autofocus again…. but, just in case the camera catches some action off perch…. I keep the focusing function activated when I’m away from the camera.

There’s always the hope that completely removing myself from view may bring new varieties of timid newcomers. That alone is reason to attach a shutter release to the camera.

Photographing an Immature Chestnut Sided Warbler – AEC in Manual Mode with Auto ISO

Photographing an Immature Chestnut Sided Warbler

This little immature Chestnut Sided Warbler visited the fountain late in October, 2016. He is very unlike his swanky male counterpart photographed last Spring. Plumage on his crown and back is a chartreuse yellow resting atop a solidly gray base. Prominent white eye rings stand out. No chestnut color markings are apparent.

Photo of Female Chestnut Sided Warbler
Female Chestnut sided Warbler.
ISO5000; f/6.3; 1/400 Second

It was early in the morning of what promised to be a sunny day. The flash was not attached. As usual, the camera was set to Manual Mode with Auto ISO.

The heavily filtered light was spotty and uneven, enough to throw off the camera’s light meter (set at evaluative metering mode). In Manual mode, I can ignore the camera’s meter readings and underexpose or overexpose as needed, adjusting one or more of the exposure variables to compensate for uneven light. This shoot was a good opportunity to play with the Automatic Exposure Compensation dial with the camera set to Manual mode and Auto ISO.

Automatic Exposure Compensation in Manual Mode with Auto ISO

Automatic Exposure Compensation combined with Auto ISO and Manual functionality in some Canon DSLR cameras seem to me very peculiar.

I had mistakenly assumed the AEC function on my Canon 5D Mark III DSLR worked in Manual “M” Mode as long as I set the camera to Auto ISO. After all, the camera could adjust exposure compensation by changing the ISO. However, on many Canon Cameras, setting the AEC function does nothing at all when the camera is set to “M” Manual mode. The AEC function on the camera will not work because it will not override the M manual settings (aperture, shutter, ISO) the photographer has set, even if the photographer set the camera to determine the ISO (Auto ISO).

As Canon keeps adding cameras to its fleet, this functionality of allowing automatic exposure compensation to integrate with Manual mode and Auto ISO was included in the following (and most recent) Canon DSLR cameras: EOS-1D X, EOS-1DX Mark II, EOS 5DS / EOS 5DS R, EOS 7D Mark II, and EOS 80D. Manual Mode with Auto ISO is essentially an “auto exposure mode” without a label.

Basic Auto Exposure Compensation -AEC

The light metering systems on modern cameras have all sorts of algorithms to figure out what exposure is proper for the scene. Many times lighting conditions are not average and the camera’s light meter can calculate the wrong exposure for the existing light.

Most digital cameras allow photographers to over ride the camera’s exposure settings with an “auto-exposure compensation” dial. When you play with the AEC dial on your camera, you are essentially changing the camera’s “optimal” autoexposure reading.  NOTE: A simple formula to adjust exposure using the camera’s histogram can be found at this post.

Photo of Chestnut Sided Warbler
Chestnut Sided Warbler –
Immature male (or female?).
Motion Blur on the right wing and tail feathers.
ISO5000; f/6.3; 1/400 Second

Overriding Auto Exposure Settings

AEC is all about overriding some component of the automatic exposure functionality of your camera. If you use Manual mode to specifically set fixed values for shutter, aperture, and ISO, no AEC is possible. In Manual mode with Auto ISO engaged, ISO is the only exposure variable accessible to change exposure. The AEC dial can be turned to the right (+) to add light, thus raising the ISO; or turned to the left (-) to subtract light, thus lowering the ISO. The shutter speed and aperture settings that the photographer manually set will not change.

Pre-Set Thresholds for Auto ISO

Whenever using Auto ISO in any auto mode (P, Tv, Av) or Manual mode (M), take the time to go into the camera’s menu system to constrain auto ISO with pre-set thresholds. This will prevent the floating ISO from going sky high and producing speckled unusably noisy images. The minimum and maximum ISO ranges that you set should be based on your personal preferences and the noise reduction technology built into your camera’s sensor.

NOTE:  When the light is low, take a second to check the exposure readings on the meter bar in the viewfinder to determine if your pre-set ISO value limitations are preventing the camera from achieving proper exposure. This meter bar is informational only and will not change the exposure parameters set in Manual mode by the photographer.


Female Chestnut Sided Warbler
Female Chestnut sided Warbler
ISO800; f/8; 1/250 Second