Photo of Horned Lark

Photographing the Horned Lark

Photographing Returning Migratory Birds

Whatever triggers the start of spring migratory behavior in birds in the Northern Hemisphere appears to be working (length of day, celestial cues, magnetic sensing, warmer temperatures, food availability, learned routes and genetic wiring, etc.). Many species of songbirds are returning, even though Michigan is still deep within the icy fingered grasp of old man winter.

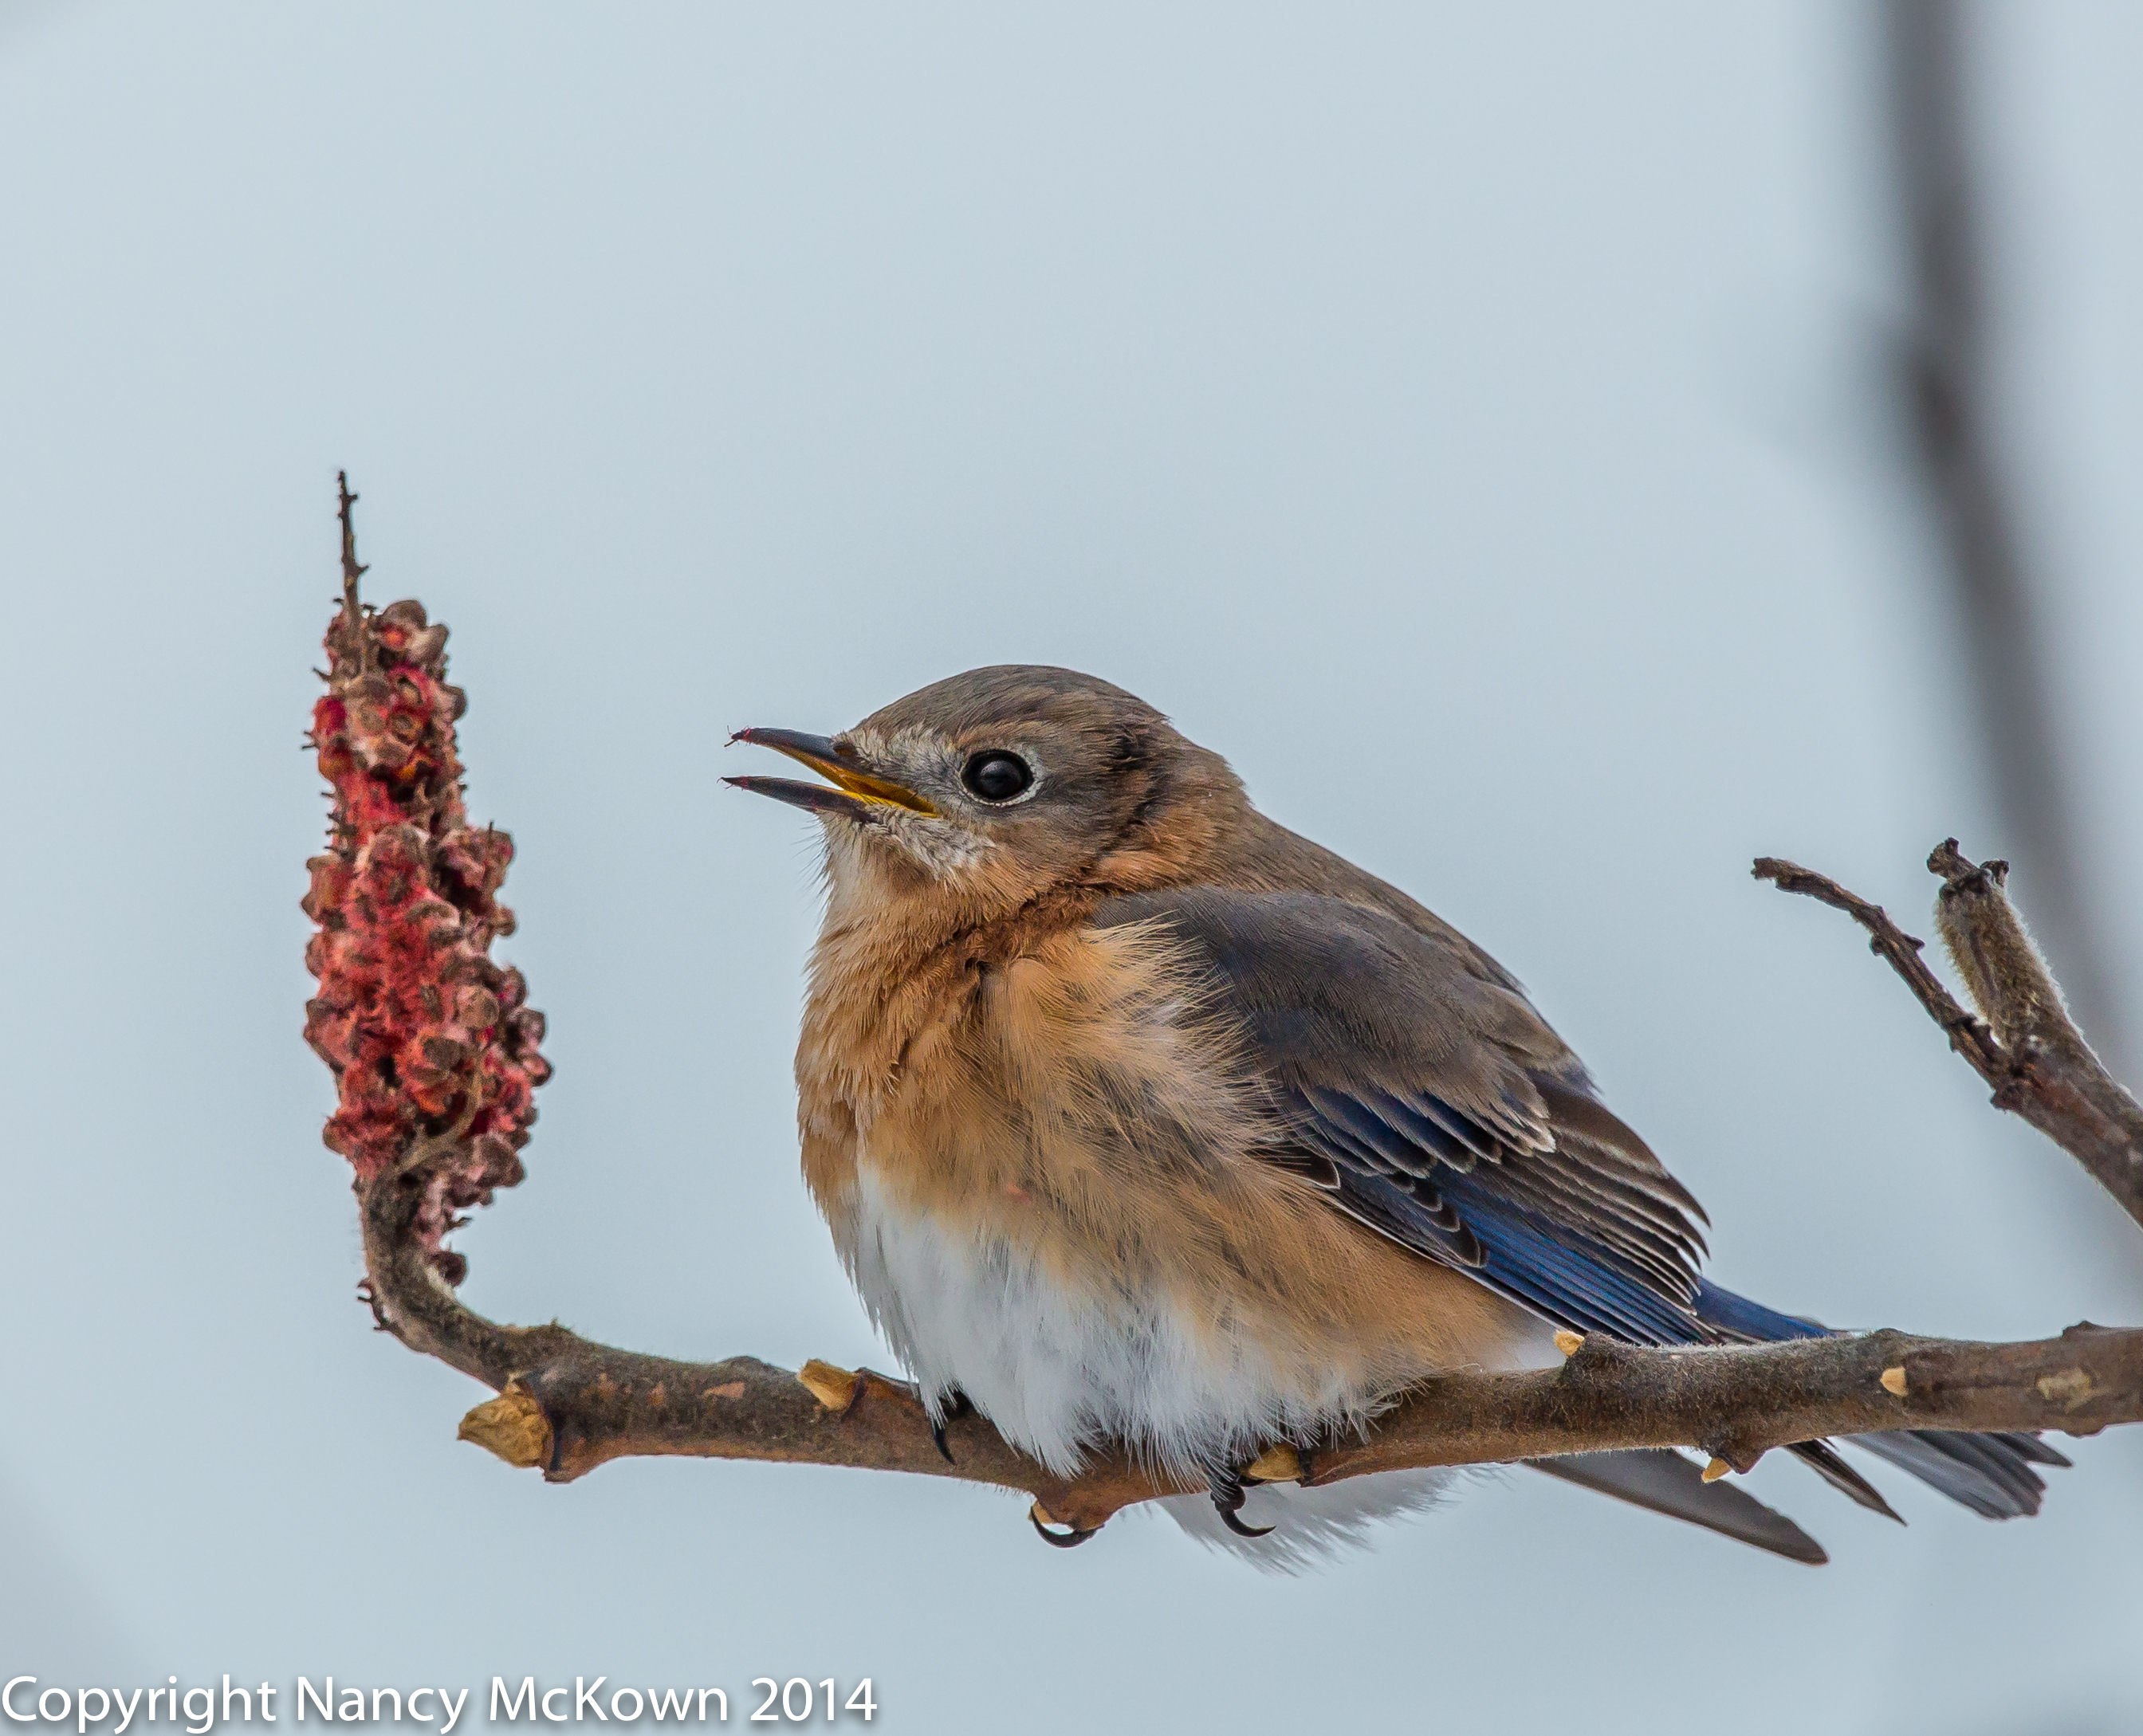
But these triggers are not totally foolproof for all birds. More than ever before, I’ve seen individuals of several species of migratory birds (Eastern Blue Birds, Robins, Cedar Waxwings)  ignore the call to regular seasonal movement and spend the winter in Michigan.

The Evolution of Migration Patterns

It’s all about long term survival. Migration patterns evolve with the changing environmental conditions. When some individuals stay behind, their survival through the winter can determine, over time, whether migration will change.

The birds that do migrate are those who feed primarily on nectar and insects-not readily available in winter. Some birds will ignore the call to migrate, despite the dangers inherent in winter survival, if there is subsistence to be found where they are. (See Wintering Bluebirds Post at this link). After all, staying put might be safer than facing the hazards they may encounter on their migratory journeys. These dangers include exhaustion, starvation, inexperience, predators, loss of stopover habitats, destruction of wintering grounds, collisions, night time lighting and getting lost.

A very good explanation of WHY a small percentage of every migratory species do not migrate is available at this link and this link.

Extreme Closed up- Horned Lark
Extreme Close up of Horned Lark with its Feather Horns.
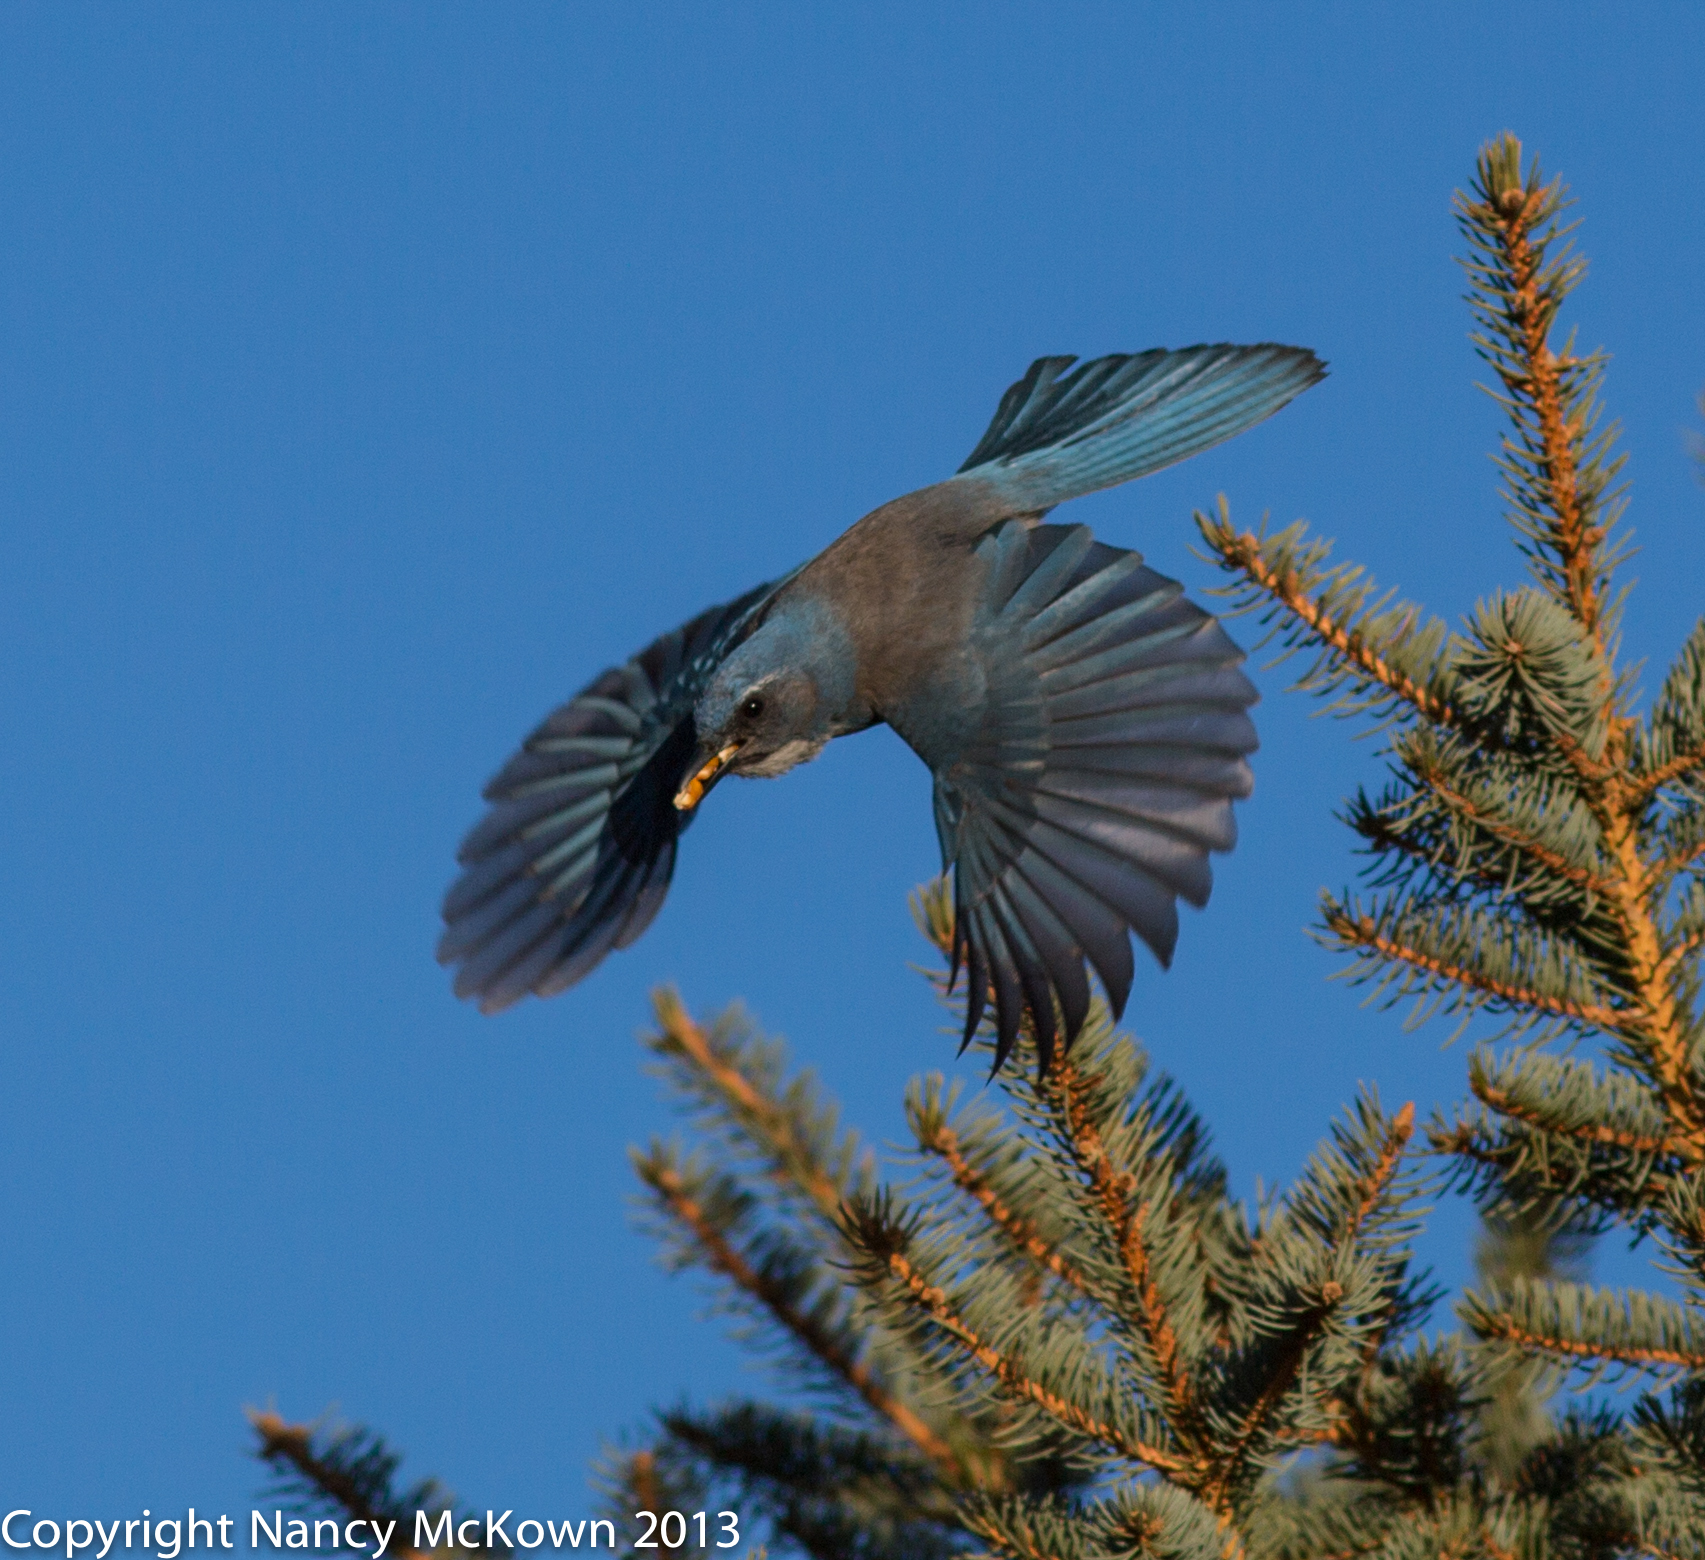
ISO 160; f/9.0; 1/2000 Second

Spring – A New Beginning

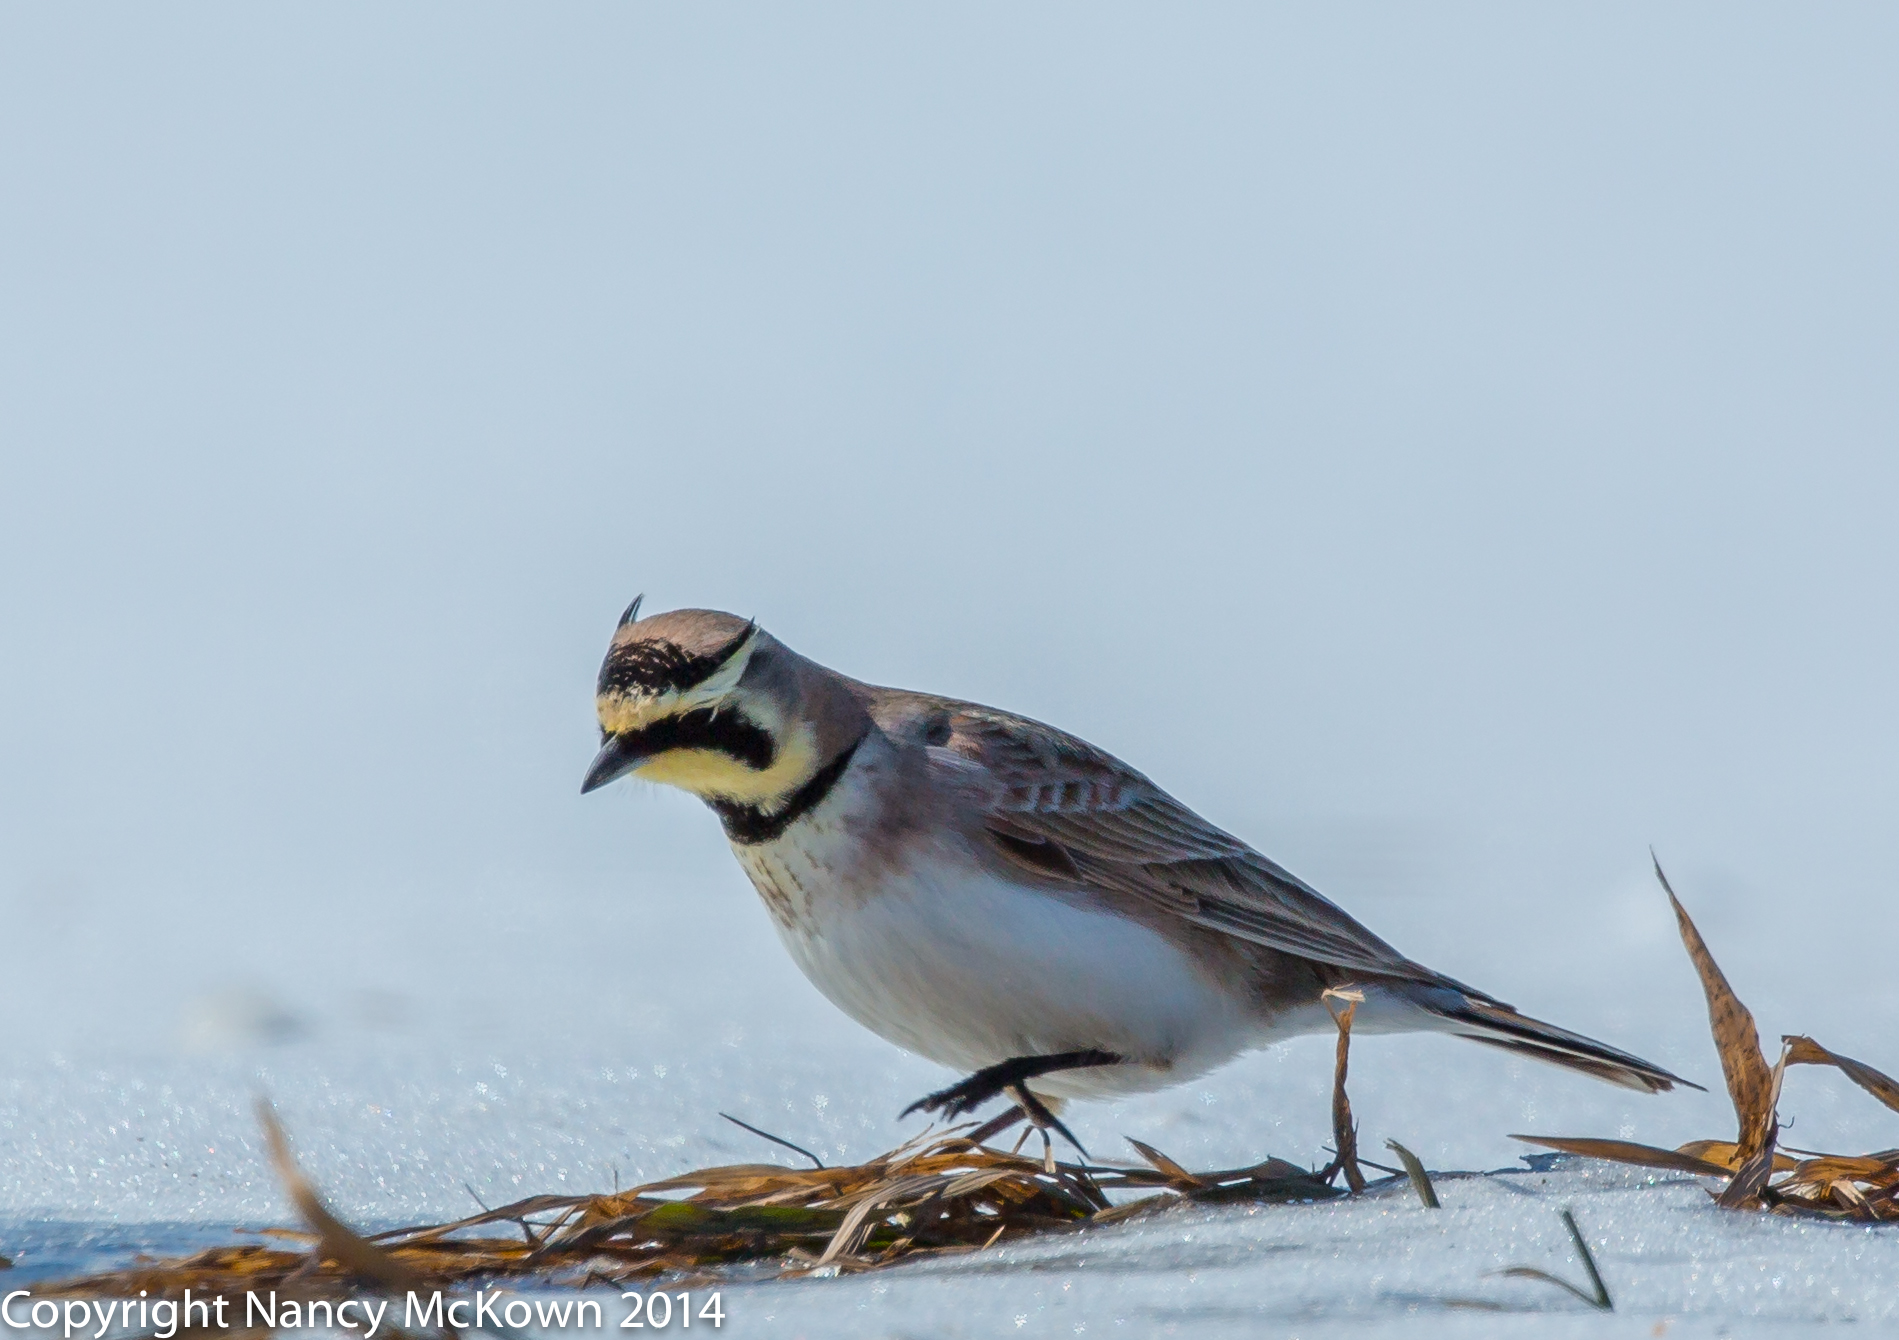
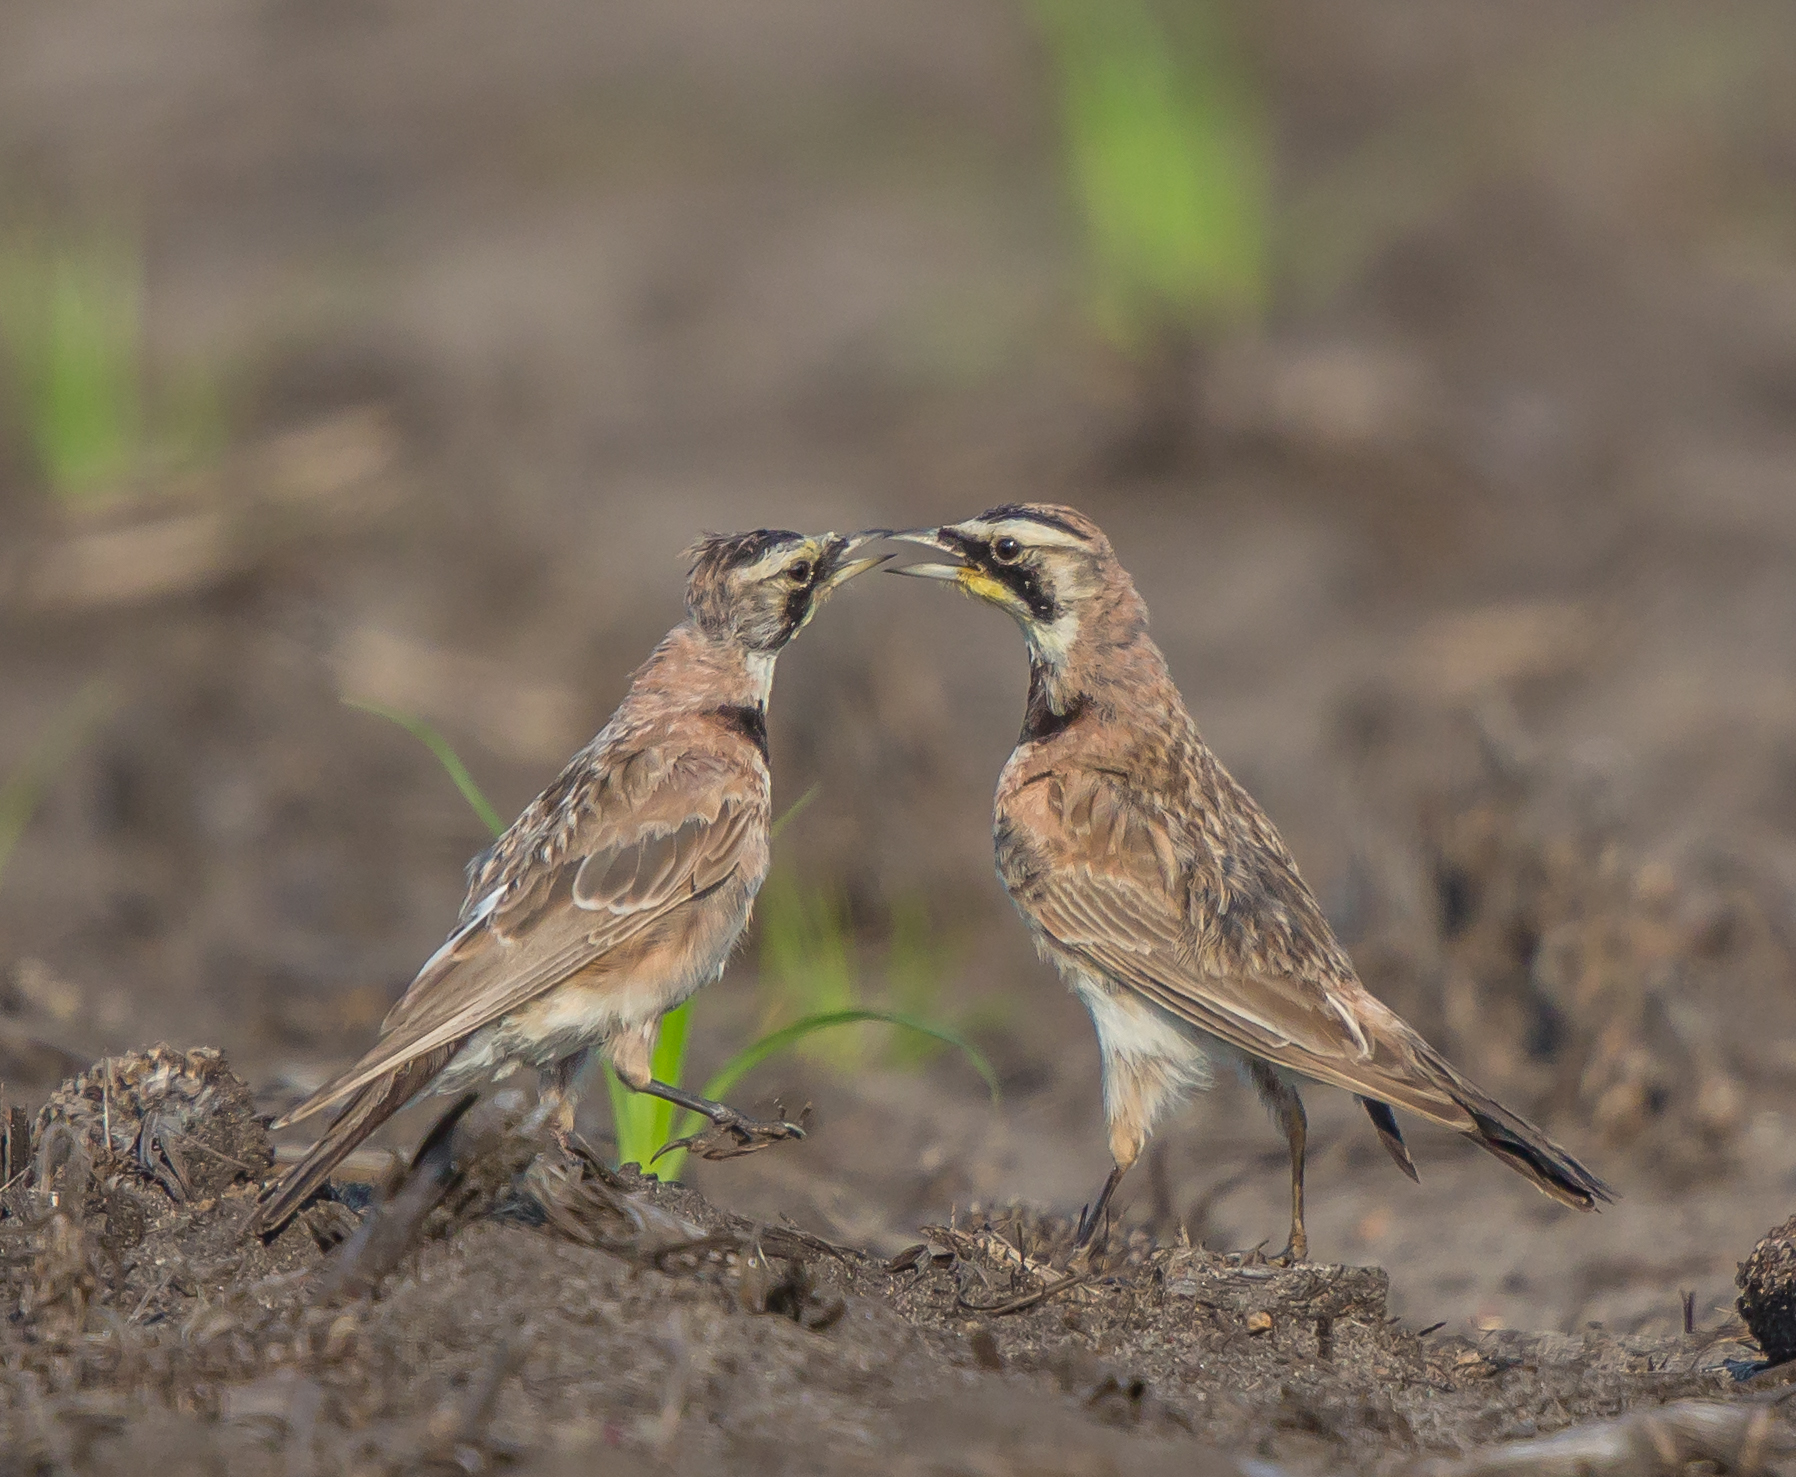
For the past couple days I’ve noticed flocks of hundreds of returning horned larks flying in the cornfields, shivering in the snow and searching for grit by the roadsides. Male horned larks have devil-like horn feathers on top of their heads. The birds’ colors blend well into the background of the gravel roads. Once spotted, they are hard to approach. When one bird becomes alarmed, the whole flock lifts off and circles back to another location on the ground.

Photo of Horned Lark
Male Horned Lark Strutting Around with Both Horns Prominently
Displayed- Part of an Elaborate Courting Behavior.
ISO100; f/7.1; 1/2000 Second

eBird.org Migratory Tracking

I have been incorrectly assuming that all migratory birds move from northern to southern locales in the winter. (That’s what I would do to get away from the cold.) But the migratory behavior of birds is varied and complex. eBird, an organization that tracks bird movement information gathered from bird watchers, has been tracking millions of data points (showing locations and dates) of 300 individual migratory bird species. The goal is to better understand how much the migratory behavior of birds is changing over time, and why.

According to the eBird data, horned larks do not go south for the winter. Please visit this eBird link for more information about the horned larks’ east to west migratory patterns.

UPDATE – Horned Lark Still in Michigan in April, 2015

According to my birding books, the horned lark does not nest in Michigan. The snow is almost gone and we are still seeing quite a few horned larks in April and into the summer months in the fields in S.W. Michigan.  I think they do nest here as  See photos below.

Adult and Immature Horned Lark
Adult and Immature
Horned Lark, July, 2014


Photo of Horned Lark
Horned Lark, April, 2015.
(Finally photographed one on an Attractive Perch!)
ISO500; f/8; 1/2500 Second

Photographing Exotic Birds – Part II

Missing SanDiego Weather

We’ve been back from our trip to San Diego for a week now. The extremely cold temperatures in Michigan make us wish we had stayed in Southern California longer.

Below please view Exotic Birds – Part II – The best of my photographs from the San Diego Zoo and Safari Park.

Photo of African Spoonbill
African Spoonbill; widespread across Africa and Madagascar.
ISO160; f/2.8; 1/640 Second
Photo of American (Caribbean)  Flamingo
Caribbean Flamingo, breeds in the Galápagos, coastal Colombia, Venezuela and nearby islands, Occasional seen in Florida, (considered to be escapees)
ISO100; f/6.3; 1/640 Second
Photo of White Face Whistling Duck
The White Face Whistling Duck, breeds in sub-Saharan Africa and much of South America.
ISO 100; f/5.0; 1/640 Second
Photo of Black-napped Oriole
Blacknaped Oriole – Part of the Oriole family widely distributed in Asia.
ISO 800; f/3.2; 1/500 Second.
Photo of Asian Fairy Bluebird
Female Asian Fairy Bluebird
from Malaysia and the Philippines
ISO 2500; f/3.2; 1/640 Second

A New Beginning

Spring will be here soon. Already I’ve had a glimpse of a returning bird that I have not photographed before. The Horned Lark. This lark usually returns to Michigan early…. late February… to start its nesting behavior. If the horned larks can stand these viciously cold temperatures and blowing winds, then I guess I can too.


Photo of Fire Tufted Barbet

Photographing Exotic Birds in San Diego – Part 1

Photo of Fire Tufted Barbet
The Fire Tufted Barbet, looking rather content
in the San Diego Zoo Aviary. This bird is found in Indonesia, Malaysia, and Thailand.
ISO 2500; f/2.8; 1/500 Second

California Dreamin’

It’s been a long, cold, and dreary winter in Michigan. On most days, I bravely put on my winter wear like most Michiganders and venture outside with my camera. However, my winter weariness skyrocketed when another Polar Vortex returned to the Midwest, bringing arctic high temperatures and brutal winds.

Something snapped.  I just had to get out of Michigan. My husband and I decided to fly to paradise for a week. San Diego.

What a difference!  Mild, warm and sunny weather… refreshing and nurturing coastal breezes. Just what we needed.

Since we only had a week, we decided to explore the locations that guaranteed a wide variety of wild (but captured) birds: The San Diego Zoo, Safari Park and Botanical Gardens.

Generally, I am not fond of taking my camera to zoos, but the facilities at the San Diego parks are known nation-wide to be outstanding, expansive resources that simulate the animals’ natural environment and focus on wildlife conservation. The parks harbor a wide variety of wild birds from all over the world.

Because so much walking is necessary at both parks, I decided not to haul around my heavy 300mm lens. Instead, I took my 135 mm 2.0 lens, along with a 1.4 extender. I did not see every bird in the aviaries and other enclosures in the parks (impossible given the multitude of hiding places inherent in the natural habitat provided) and I did not photograph every bird I saw.

Below please find Part I of what I consider to be my best photos from the San Diego Zoo & Safari Park. Since most of the birds were from far away lands and unknown to us, we took photos of the ID display boards to help us with identification when we got home.

Photo of Collared Lory
Collard Lory – A species of Parrot – found in tropical and subtropical forests found in the Figian rainforest.
ISO 2500; f2.8; 1/640 Second


Photo of Great White Pelican
Great White Pelican – Found in SE Europe, Asia, and Africa. ISO 100; f/4.0; 1/640 Second


Photo of African Wattled Lapwing
African Wattled Lapwing, Found in sub Saharan Africa
ISO 100; f/4.0; 1/640 Second


Photo of Asian Glossy Starling
Asian Glossy Starling. Lives in tropical and sub tropical -in Bangladesh, Brunei, India, Indonesia, Malaysia, Myanmar, the Philippines, Singapore, and Thailand. ISO 4000; f/2.8; 1/1000 Second


Photo of Yellow Billed Stork
The aquatic Yellow Billed Stork is from Africa south of the Sahara and in Madagascar
ISO 250; f/3.2; 1/800 Second

Exotic Bird Photography

Like most people, I would probably never have the opportunity to observe, photograph, and enjoy exotic bird species if not for these stunning San Diego resources. I am grateful that I had the opportunity to take my camera to the San Diego Zoo, Safari Park and Botanical Gardens, and leave behind (for a short time) one of the worst Midwestern winters ever.


Photo of Tree Swallow

Turn On That Image Stabilizer. Photographing Tree Swallows

Acrobatic Tree Swallows

Tree swallows are a study in fast and precise acrobatics. These aerial foragers, with their tiny bills, forked tails, white breasts and iridescent, green-blue back feathers, feed on flying insects all day long. They are impressive acrobats, twisting and turning in unison, not unlike the tight flight performance so ably displayed by the US Navy’s Blue Angels.

The tree swallows I found at a local park did occasionally come down from their fast and furious acrobatic flying and perch. I did not have my tripod, so it was a good opportunity to play with the image stabilizer (IS) on my 300mm lens.

Shutter Speeds for Hand Held Photography

There are many, many reasons why the photographs I take are not all tack sharp (see the post here.) however, shutter speed is probably the most likely cause of blurry photos. There’s a simple rule to remember for setting the lowest shutter speed possible for hand holding your camera. If you have a 600 mm lens, set the shutter for at least 1/600 of a second. If you have a 300 mm lens, set the shutter for at least 1/300 second, and so on.

My experience has been that I have to set the shutter speed much higher than the simple rule prescribes to get sharp photos when hand holding my camera, especially when I’m using heavy lenses. (Even the tiniest movements are magnified with long lenses.) Consequently, when I buy a new lens, I always make sure it has a built-in image stabilizer to help compensate for my shaky hand holding.

Photo of Tree Swallow Getting Ready to Fly
Tree Swallow about to Lift Off. Hand Held Camera and 300mm lens
ISO 1000; f/5.6; 1/300 Second

Using Image Stabilizer When Hand Holding the Camera

It would be nice if the image stabilizer on my lenses maintained the stability of the birds I’m photographing. But no, image stabilization doesn’t stabilize the movement of the subject, only the shakiness of the photographer.

Image blur most often occurs when hand holding the camera. The longer the lens, the more likely the hand held camera will shake, even minutely. The more the lens shakes at low shutter speeds, the more blur. Image stabilizers help to reduce the blurriness caused by hand holding camera movement by up to 2-4 stops.

Think about it. The capacity to detect the subtleties of minute and constantly shifting movement in a hand held lens and then make corrections instantly most certainly requires complex equipment and computer analysis to built right into the lens. NOTE:  Some camera manufacturers build the IS mechanism into the camera itself, not the lenses.

How Do Image Stabilizers Work?

The Canon website describes the lens based image stabilizer technology as follows: “Canon Optical Image Stabilizer technology uses miniature sensors and a high-speed microcomputer built into the lens. The sensors analyze vibrations and apply correction via a special stabilizing lens group that shifts the image parallel to the focal plane. Motion blur is canceled, resulting in a sharper image. With Optical Image Stabilization, it’s like gaining up to four stops.”

No wonder IS lenses costs so much more.

Photo of Tree Swallow
Tree Swallow- 300mm lens, Hand Held

Keep the Image Stabilizer ON All the Time

Canon’s highly efficient IS system makes it easy to set it and forget it. The company has even invented a tripod detection system, so you don’t have to worry about turning off the IS when the camera is mounted on a tripod. Canon has also added extra stabilizer modes on their lenses that correct hand held movement when panning.

I leave the image stabilizer ON all of the time.  I personally can not think of an example when it did not work correctly.

Questions to Ponder About Image Stabilization

Is the image stabilizer useless at higher shutter speeds?  

Possibly. But it works in the background so smoothly that I’ve never had to shut it off as I increased the shutter speed. On my 300mm lens, I can definitely feel and hear when the image stabilizer mechanism is working. And I definitely hear and feel that mechanism less as the shutter speed is increased.

In fast moving situations, does the IS slow down the speed at which focus is locked down?

Absolutely! When I’m using a slower shutter speed, I feel and hear the IS mechanism going thru its corrections. I have to wait 2-3 seconds until these corrections are made before I am able to engage the shutter release. When your subject is moving fast, it is likely that you will set a fast shutter. The IS has to make fewer (if any) corrections at a high shutter speed, so focus lock down will not be delayed.

Photo of Red Shouldered Hawk

Red Shouldered Hawk Bracing Against the Cold

Photography On the Road

It was a dreary, cold morning and I was rather wishing that I would not have to open the car window to the -15 degree windchill outside. But then, I spotted an unfamiliar hawk perched on a utility cable, and that window went down in a flash.

I feel sensations of both anxiety and excitement when I have to transition from driver to photographer as quickly and safely as possible. The anxiety comes from worrying that the bird will fly away before I can be ready with the camera. The excitement comes from imagining the possibilities and enjoyment to be had from photographing an unknown bird.

I pulled off the busy highway and positioned the car as best I could for distance and safety. The heavy traffic kept barreling down the highway, creating buffeting winds that rocked the car and probably the hawk. The passing semi trucks regularly interrupted the scene in my view finder, throwing off the camera’s automatic focus.

Photo of RedShouldered Hawk
Red Shouldered Hawk, Feathers Puffed Out and Shuffling His Feet in the -15 degree Windchill.
ISO 800; f/9.0; 1/2000 second

100+ Photographs in Minutes

I managed to take a 100+ shots (moving the camera as best as I could, mixing up the exposure settings for a little variety)  before the hawk flew off in the opposite direction. (Sadly, only tail feathers in the departure shots.) Since I was confined to my car on a busy highway and had very little flexibility to be creative, I knew that most of the photos would look very similar.

Still, a red shouldered hawk in winter is a rare sighting for me, a story to tell, so I was excited.

Choosing the Best Photographs to Share

When I got home, I began post processing these photos. Barely moving from one shot to the next, the hawk was captured fluffing his feathers out against the wind, blinking, shuffling his feet, watching for possible prey, and watching me. Given that there was not much variety and a very short story to be told here, I decided to choose the two most revealing captures.

Photo of Red Shouldered Hawk
Red Shouldered Hawk Bracing Against the Cold.
It Does Not Appear to Be Any Happier About Being Out In The Cold Than This Photographer.
ISO 500; f/9.0; 1/2000 Second

A Picture is Worth A Thousand Words

I have friends and relatives who will occassionally send me a web link that leads to hundreds of snapshots (of siblings, newborns, children, grandchildren, dogs, relatives, birds, sunsets, weddings, etc). Once I click the link, it is evident that no effort has been made to go through and eliminate the photos that fall into the blurry, poorly composed, eyes shut, irrelevant, unflattering, over exposed, under exposed, embarrassing, and stupid categories.

I will be the first to admit that, when it comes to photography, I can, at times, be too critical and hard to impress. My plan when I receive these links is to keep my thoughts to myself. However, when the sender asks what I think about her hoard of snapshots, I have to tell her that it is just too overwhelming and discouraging to plow through so many unorganized photos.

Manage Your Photos as You Would A Rough Draft

Photos, whether taken from a point and shoot camera or DSLR camera, tell a story. Retelling that story well (whether you are a professional photographer or just sharing photos out of the kindness of your heart) requires that the photographer look through her cache for the essence of the story, (and perhaps for buried treasure) and determine how that story will unfold. An excessive number of unorganized photos is like excessive narrative: redundant, boring, and soon forgotten.

Get Rid of Photographic Clutter

Help your audience and get rid of the photographic clutter before you share. If necessary, include captions or a short introduction to entice your viewers. Be intentional and choose the very few photos that best convey the mood, the idea, the beauty, the wonder, the emotion, and the relationships of the story you are sharing.

The best part is that people may actually look at your story…and you just may become a better story teller and photographer.


Photo of Black Swan in Michigan

Photographing Black Swans -Spot Metering in High Contrast Scenes

Black Swans Wintering in Michigan

Black Swans are native to Australia, but shipped around the world because they are popular birds for zoological gardens and private bird collections. Exotic enthusiast often clip the primary flight feathers at the end of the wings. This is done, of course, to keep the bird from flying away. Since an exotic bird is not in its natural environment, keeping it safe and away from harmful predators and the elements often requires that the owners restrict its flight. This was no doubt the case for the Black Swans I came across in SW Michigan. These wild, but captive swans are beautiful and ornately situated in a well stocked pond with gazebo, on private property.

Keeping captured, ornamental birds is not something I would do, but I was glad to have the opportunity to photograph them.

Photographing High Contrast Scenes

When I looked at the black swans swimming in open water through my viewfinder, I was presented with a high contrast scene. In the forefront, there was brightly lit snow and ice. In the background, depending on the swans’ movements, there was either bright, white snow, or dark brown tree roots and dirt. I took a couple test shots and found that the camera’s light meter (set to Evaluative Metering) was having difficulty getting an accurate light reading.

Evaluative Metering v Spot Metering

Evaluative metering on DSLR cameras measures the light reflecting off the whole scene in the viewfinder to determine exposure settings. When using this metering mode to photograph the swans, the light meter was being over-influenced by the brightness in the foreground and background. It was a good opportunity to try out my camera’s spot metering function. NOTE: I usually keep my camera set on evaluative metering mode because EM is considered to be the most reliable of the automatic exposure settings. For more information on evaluative metering mode, see this post.

When to Use Spot Metering

When lighting conditions are such that you think the light meter should take a meter reading from a designated “spot” in the viewfinder rather than the whole scene, set the camera to spot metering. Spot metering gives you more control over exposure by allowing you to choose a small, center spot (approx 1%- 5% of the viewfinder) on which your camera will calculate the light for exposure and set the exposure values. This gives you the ability to meter only the bird- or a small part of the bird, depending on how close you are to your subject.

Photo of Black Swan in Icy Waters
Close up of Black Swan Against a Wooded Background – Icy Water in the Foreground
ISO 1600; f/7.1; 1/1250 Second
Photo of Two Black Swans
2 Black Swans Swimming in Icy Water.
ISO 2000; f/9.0; 1/1250 Second

Don’t Confuse Spot Metering With Spot Focusing

For way too long, I confused the spot metering function with spot focusing. These are two completely different functions often used together, but not necessarily. Spot focusing allows the photographer to set one very small spot in the scene on which the lens will focus.

Spot focusing gives the photographer much more maneuverability than spot metering because the focus spot does not have to be locked in the center of the viewfinder. On my camera, spot metering is restricted to the center, and spot focusing can be set in a wide variety of off center locations.

Give Spot Metering a Try

Spot metering is another one of those camera settings that is often ignored by bird photographers because there are so many other things to think about when the action is at its peak and time is short. Experimenting with the spot metering function is a very good way to better understand how your camera calculates exposure. Light, after all, is what photography is all about.


Photo of Scrub Jay in Flight

Motion Blur in Wild Bird Photography

Capturing Action with Fast Shutter Speeds

I generally crank the shutter speed way up when photographing birds in flight, just to freeze action all the way to the wingtips. My thinking is that time is short, and I won’t have another chance with this bird scene to get it right. I probably over-compensate with shutter speeds that are too fast because I’ve been burned so many times with blurred shots.

Motion Blur is Not A Weakness

But motion blur is not a weakness in wild bird photography. On the technical end, gauging what you want in focus and what you want blurred takes keen observation, lots of practice, and being more purposeful. If you can stop overcompensating with the fast shutter speeds, you will have more creative flexibility with aperture and ISO settings, and probably better bird photographs.

If you agree that ascetically, motion blur does add drama to a wild bird photo, that blurred wings make the shot feel more true to life, dynamic, and exciting, then it is a skill worth practicing.

Capturing Movement: Large Birds v Small Birds

I found that a shutter speed in the range of 1/2000 second – 1/3000 second is a good starting point to capture motion blur in the wings of small birds while at the same time keeping other body parts, especially the eyes and head, tack sharp. This shutter range is just a starting point, a guideline. Wingtip blur is a relative and creative term, subject to artistic judgment. The shutter speed you set will impact what is blurred, how much it is blurred, and the effect that blur has on the photo.

Larger birds tend to fly more slowly and flap their wings less. You can count the ups and downs of a heron’s wings in flight – 3 or 4 per second-at most. Plus, large birds use their expansive wings to glide more, thereby reducing the wing movement. The photographer doesn’t necessarily need a fast shutter speed to get the shot, just excellent panning skills to track the large birds as they fly by.

Consequently, larger birds in flight can be photographed at much slower shutter speeds, as low as 1/800 second or 1/1000 second, depending on the motion on which they are captured. Conversely, you visually can’t count the number of times a smaller bird flaps its wings…..way too fast and too numerous to count and capture with a slower shutter speed. Plus, little birds unpredictably flit and flutter every which way. Slow shutter speeds in the 1/800 second – 1/1000 second range are out of the question in most instances for photographing small, flying birds.

Three Different Degrees of Motion Blur

Below are photos of 3 small birds in flight (scrub jay, eastern bluebird, savannah sparrow) showing sharp facial features and blurred wingtips. The blurring is least noticeable in the wings of the gliding scrub jay and most pronounced in the wings of the erratically flying savannah sparrow.

Of course, other camera settings besides shutter speed can impact blur, most especially your aperture setting, focal length of the lens, and distance the photographer is to her subject.  To read more about these settings, see the post at this link.

Photo of Scrub Jay in Flight
A Scrub Jay with a Mouth Full of Corn – Slight Motion Blur on the Wings -Otherwise Sharp Focus.
ISO 200; f/4.5; 1/2500 second


Photograph of Eastern Blue Bird in Flight
Eastern Blue Bird in Flight, Slowing Down Upon Reaching his Nest.
Substantial Blur on the Wings, Despite the Fast Shutter Speed.
ISO 300; f/2.8; 1/3200 Second


Photo of Savannah Sparrow
Savannah Sparrow in Flight- Wings Heavily Blurred. There are a lot of visual problems with this photo, unsightly shadows, clipped highlights, background distractions. The heavily blurred wings are one of the few things I like about this photo.
ISO 500; f/7.1; 1/2000 Second


Pre-visualizing Before You Take The Photograph

Making judgments about how you want the photo to look before you take the shot is a skill worth developing. It means that you are pre visualizing….thinking, experimenting, calculating, and predicting how that photo will turn out. It takes you into the realm of new possibilities, and better bird photography.


Photo of Eastern Bluebird

Photographing Eastern Bluebirds in Winter

DSLR Camera Basics in the Winter

Most cameras operate perfectly fine in frigid conditions, even the dangerously cold polar vortex conditions that Michigan and the midwest have been suffering through this winter. I think the hardest part is not worrying about the electronics of the the camera (although I like to think that is what’s keeping me inside on some days), but motivating the bird photographer to get out there and photograph birds.

Birds are Highly Adapted to Surviving in the Cold

Once I am all bundled up and have taken the usual winter-guard precautions to take my equipment outside, I’m usually glad I ventured out. I stop thinking about me and focus on watching and photographing small birds in winter survival mode. Despite their small size and lack of fur, wild birds in Michigan are highly adapted (physically and behaviorally) to surviving and thriving in severely cold weather. Melissa Mayntz does an excellent job outlining these adaptations at this link.

An Unexpected Photographable Moment

Through my viewfinder, I panned the arctic tundra-like scene that is currently the Lake Michigan shoreline. It looked like a habitat suited to polar bears, so I was very surprised to find eastern bluebirds, fluffing their feathers and shivering to insulate themselves against the buffeting and brutally cold winds. No insects or fresh fruit to be had in the winter, so these bluebirds were picking the seeds and berries from the bright sumac bushes that grow on the dune.

Photo of Eastern Bluebird in Winter
Eastern BlueBird Subsisting on Sumac Seeds During a Cold, Brutal Winter.
ISO 1000; f/7.1; 1/1250 Second

Winter Photography in Michigan

There are a few advantages that winter can bring to the art of photography, if you can convince yourself to bundle up and get out in the cold. Here are my most motivating reasons:

  • Winter brings crisp, clear air. There’s very little pollen or other plant debris floating in the air in the winter – leading to outstanding image clarity.
  • Reflective snow adds a soft light – even on the dreariest days.
  • The sun is much lower on the horizon in the winter, helping to avoid the worst of the overhead harsh shadows so common in the summer season.
  • I can get up late in the morning and still have time to get outside and take advantage of complementary light.  😎
Photo of Eastern Bluebird on Sumac
Eastern Bluebird Atop A Sumac Flower – Emergency Sustenance During A Cold Winter
ISO 1250; f/7.1; 1/1600 Second

Photographing Migratory Birds That Do NOT Fly South

I wonder why I’ve never noticed eastern blue birds in the winter here in Michigan. Apparently, my assumption that these lovely, insect eating birds all migrated south in November and returned in the Spring trumped my observations skills, until now. Clearly there have always been a few fearless, non-migrating stragglers who linger, foraging fruit, nuts, berries and seeds. Makes me hopeful for more surprises. I just might be lucky enough to find other wild migratory birds this winter that did not fly south.

Photo of European Starling

Photographing European Starlings in Winter

It’s Winter. Finding Photographable Moments.

I’m always looking for scenes that spice up my winter bird photography. You have to if you are a photographer living through Michigan’s long, cold and gray winters. One solution is to include a short vacation to warm locales where the sun is always shining and the birds are varied and colorful, where I can walk down the street with my camera wearing only a tank top and shorts and everyone is helpful and interested in what you are doing, and….

But I digress. Back to Michigan. It is possible to find outdoor locations with some color, even when the sun is not shining. Last week, during a brutally cold and snowy week, I came upon an apple orchard, with shriveled, frozen, red apples still clinging to the branches. Long expired fruit and berries often provide the sustenance to draw the birds, even during extremely cold weather. Today, the orchard was being swarmed by European starlings.

I watched as hundreds of these starlings descended in tight flocks on the frozen apples. After 10 minutes or so of gorging themselves, they all left at once in a noisy mob.

Photo of European Starling
European Starling, Gorging on a Shrunken, Frozen Apple
ISO 2500; f/7.1; 1/1600 Second

Starlings are Dazzling Birds to Photograph

From a distance, starlings appear black and unimpressive, but they are actually quite dazzling birds, even in their winter plumage. Sporting lots of white spots in the winter, they are approximately 8″ long with short tails and green/purple shiny irridescent feathers. They can be found feeding on pretty much anything available, including fruit, insects, livestock feed, seeds and garbage.

As I watched these starlings through my viewfinder, I saw them successfully decimate the rock hard frozen apples with their sharp beaks. I read later that rather than clamping down with their jaw muscles, they puncture their food with their sharp, closed bills and then spring open their jaw muscles to break the food apart.

Photograph of European Starling
European Starlings, 2 Individuals of the 100 or so That Were Making
Short Work of the Shriveled Apples in the Orchard.
ISO 3200; f/7.1; 1/1600 Second
Photo of European Starling
European Starling with Frozen, Shriveled Apples on the Branch.
ISO 3200; f/7.1, 1/1600 Second

Dark and Dreary Days Mean No Catchlights

I do not carry a flash when I’m out in the field. Consequently, my wild bird photos taken on dark, dreary Michigan winter days, don’t often show catchlights in the birds’ eyes. This is a problem, especially when photographing birds that have black eyes (like European Starlings). When looking at portraits, our eyes are naturally and immediately drawn to the eyes in the photo. Without a tiny pinpoint of light sparkling in the corner of their eyes, starlings look blind, evil, even lifeless.

Adding catchlights in post processing solves this problem. It’s easy to do in Lightroom. This link leads to a very good YouTube video by Lightroom expert Laura Shoe for adding catch lights to eyes using Lightroom.

Photo Of Carolina Wren

Photographing the Carolina Wren

An Uncommon Bird At the Feeder – The Carolina Wren

I’ve spent a lot of time close to home lately, photographing birds at my beautiful, new feeder. After several days, I was rewarded with a glimpse of a rather uncommon feeder bird….. the Carolina Wren.

Carolina Wrens have the most intricate and lovely set of bird vocalizations that I’ve ever heard. (Sadly, there’s not much to sing about in the winter, so you will have to wait until Spring to hear them, or visit this link.)

These wrens are large and hardy, as wrens go, and not particularly shy. They are not easily shoved aside by the bigger birds at the feeder. On the coldest Michigan winter nights, we see them nestling under our front porch.

These photographs show a rather small bird photographed at a rather high ISO, with late fall foliage and then winter white in the background. Since noise takes a toll on clarity, and autumn colors fade with the approach of winter, I decided to punch these photos up a little using a couple tools in my upgraded post processing software, Lightroom 5.

Lightroom’s Non Destructive Post Processing

Shooting in RAW gives the photographer an impressive range of resources to make photo improvements during post processing. First of all, Lightroom 5 post processing software keeps your original raw photo data intact. So while you’re editing, you always have the option of going back to the last change or all the way back to square one. It’s also possible to make virtual copies to save all the different changes and enhancements you made while experimenting with Lightroom 5.

Shooting in RAW digital image format is best because it’s the only format where you have non destructive options during post processing. That means you can experiment without a care. My camera is set to RAW format all the time.

Improving the Clarity and Vibrancy of Your Photographs

I regularly use the “clarity” slider and the “vibrancy” slider in Lightroom 5. The “clarity” slider’s purpose is to enhance and brighten the details. so the image appears clearer. The “vibrancy” slider’s purpose is to bring out the dull colors….not all colors, just the dull colors. The results are subtle, but still impressive. Just remember that more is NOT better when using these two sliders, unless you are going for a surreal look.

Photo of Carolina Wren
Carolina Wren – Stretching to See if Other Birds Are Feeding
ISO 1250; f/7.1; 1/1250 Second


Photo of Carolina Wren
Close up of Carolina Wren, Sitting Pretty on a Decorative Feeder
ISO 1600; f/7.1; 1/1250 Second

Why I Like these Photos

In an effort to improve my skills, I’ve been trying to evaluate my photographs more for artistic merit. Here are my observations:

  • Catchlight in the birds’ eyes is appealing and draws the attention of the viewer. I’ve rejected many wild bird photos because of the subject’s lifeless eyes. It’s not a little thing, especially with regard to dark eyed birds. (If you are photographing a bird with shiny red or yellow eyes, catchlights in the eyes are not as critical.)
  • Curved lines make the image look more graceful and help organize and balance it.
  • The texture comes through in the foreground… all in focus. There’s very little texture visible in the background- just melt away color. I think this keeps the attention of the viewer on the areas in focus.
  • After using Lightroom 5 for a while, I’ve discovered that I like the unearthly and dreamlike qualities that I get by pushing the clarity and vibrancy sliders a little farther. I plan to spend more time playing with these tools.

Winter Bird Feeders

The other feeders in my yard may be devoid of charm, but they stand up better to the harsh Michigan winters. The carolina wrens don’t seem to care that I had to take down and store my newest feeder. Below are more photos of the carolina wren, taken during a brutally cold day in January, 2014.

Photograph of Carolina Wren
Carolina Wren Waiting a Turn at the Feeder. ISO 640, f/7.1, 1/1250 second
Photo of Carolina Wren
Carolina Wren Looking Quite Unsatisfied with the
Selection of Seeds and Dried Mealworms at the Platform Feeder.
ISO 320; f7.1; 1250 Second