Yearly Archives: 2015

Photographing the Ruby Crowned Kinglet – Up Close

More Light- Fewer Leaves

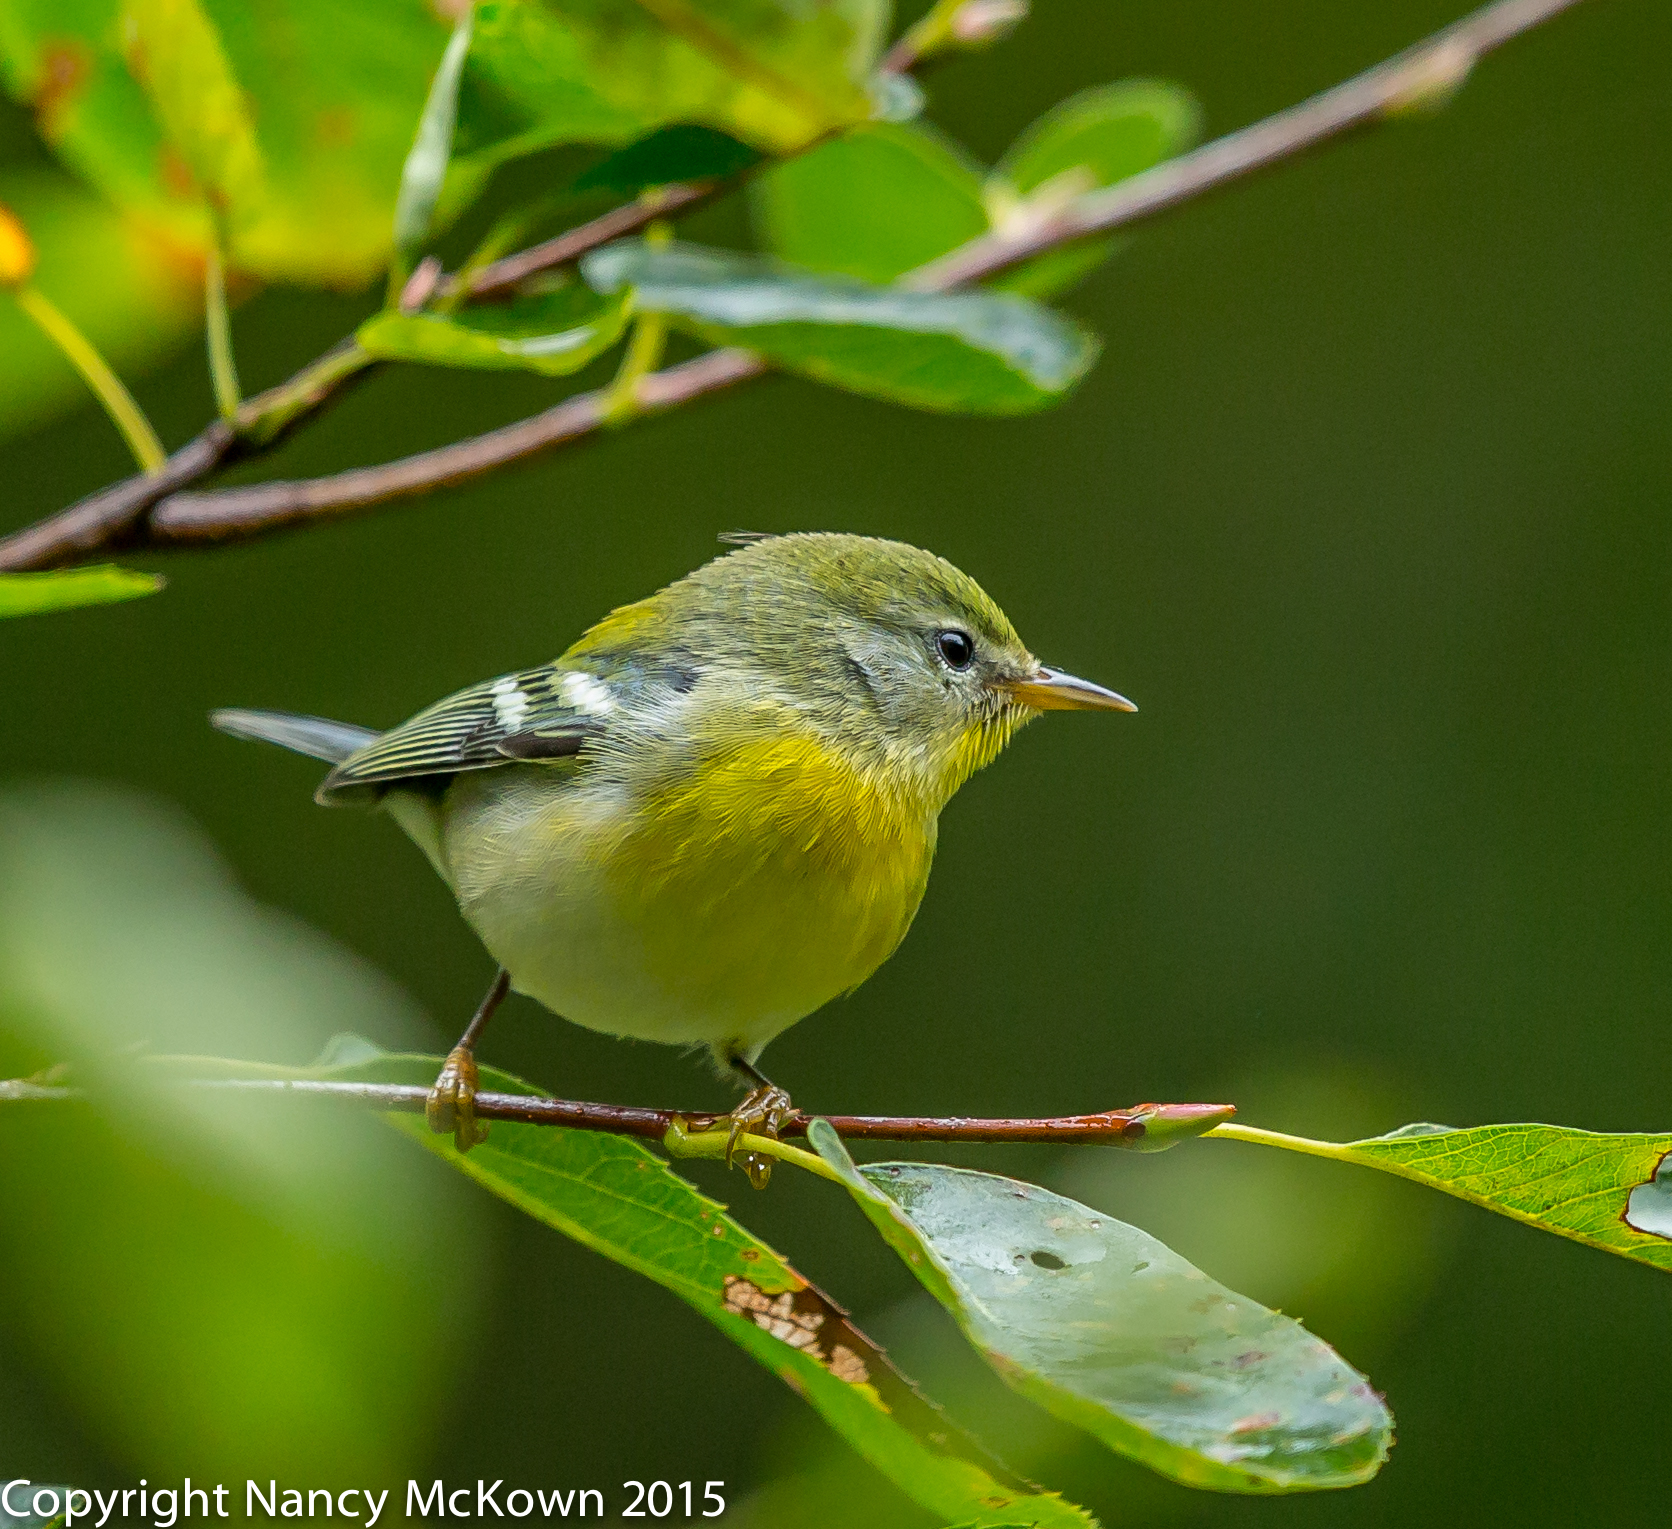
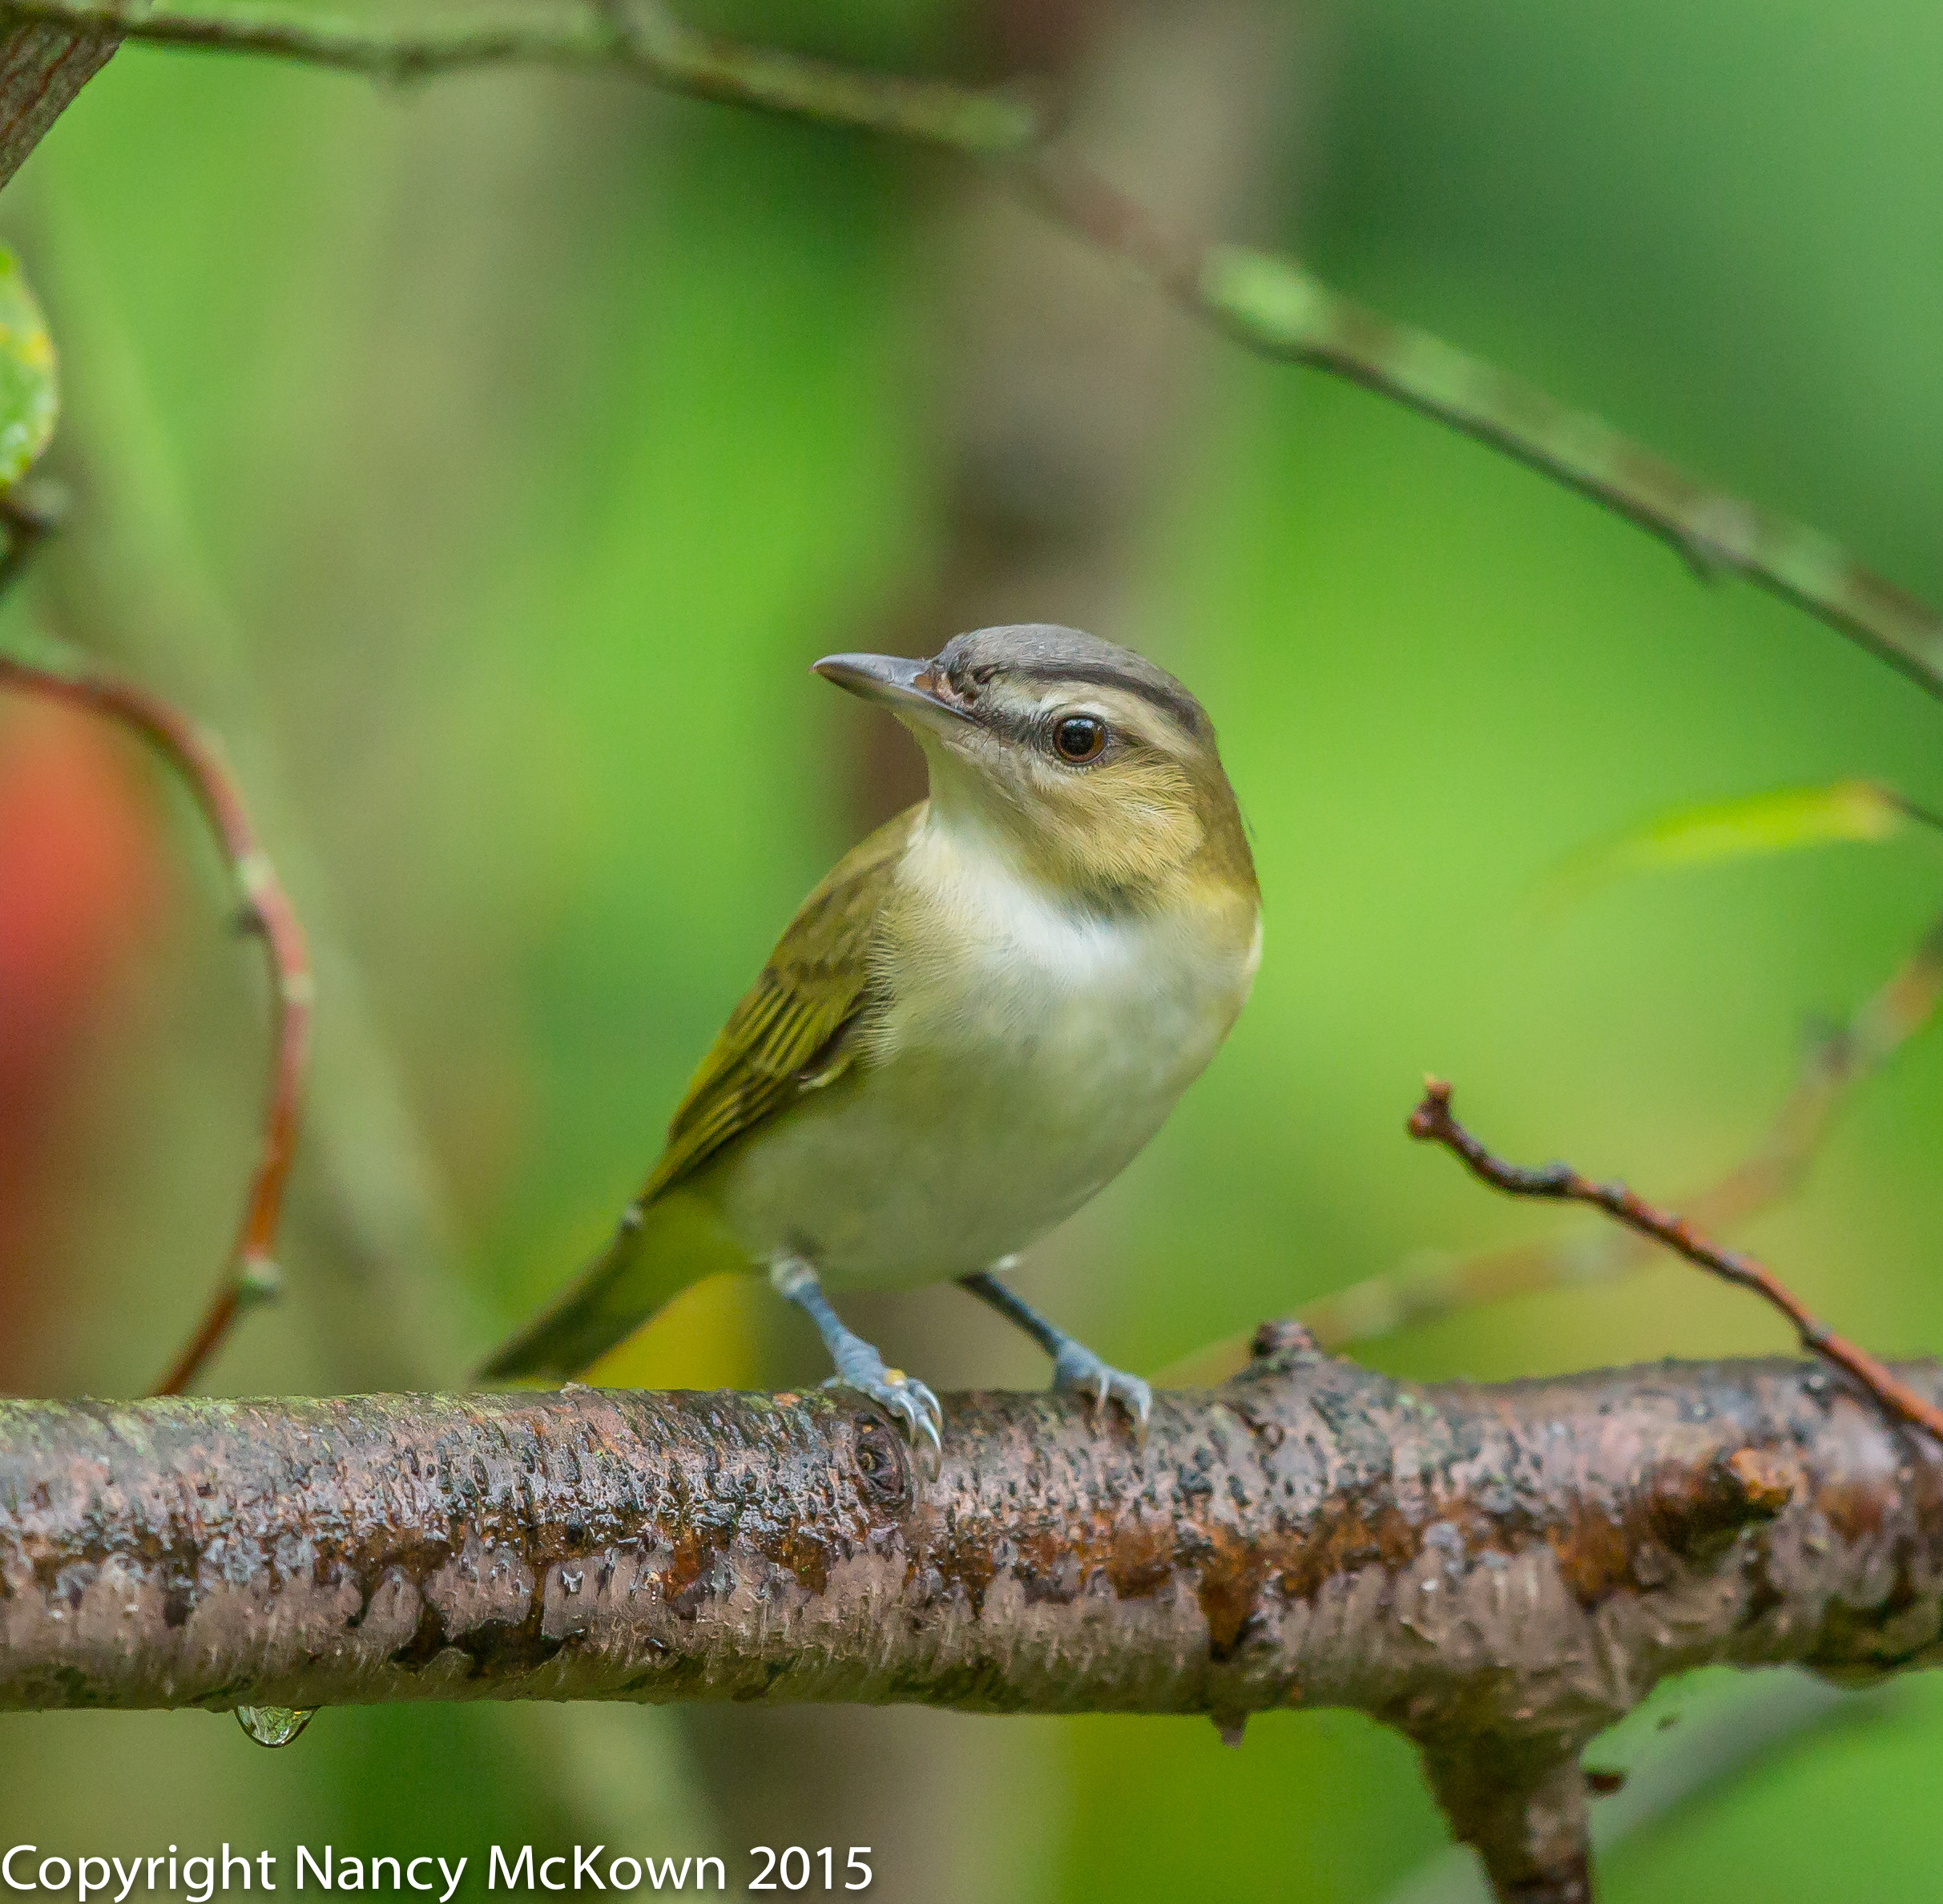
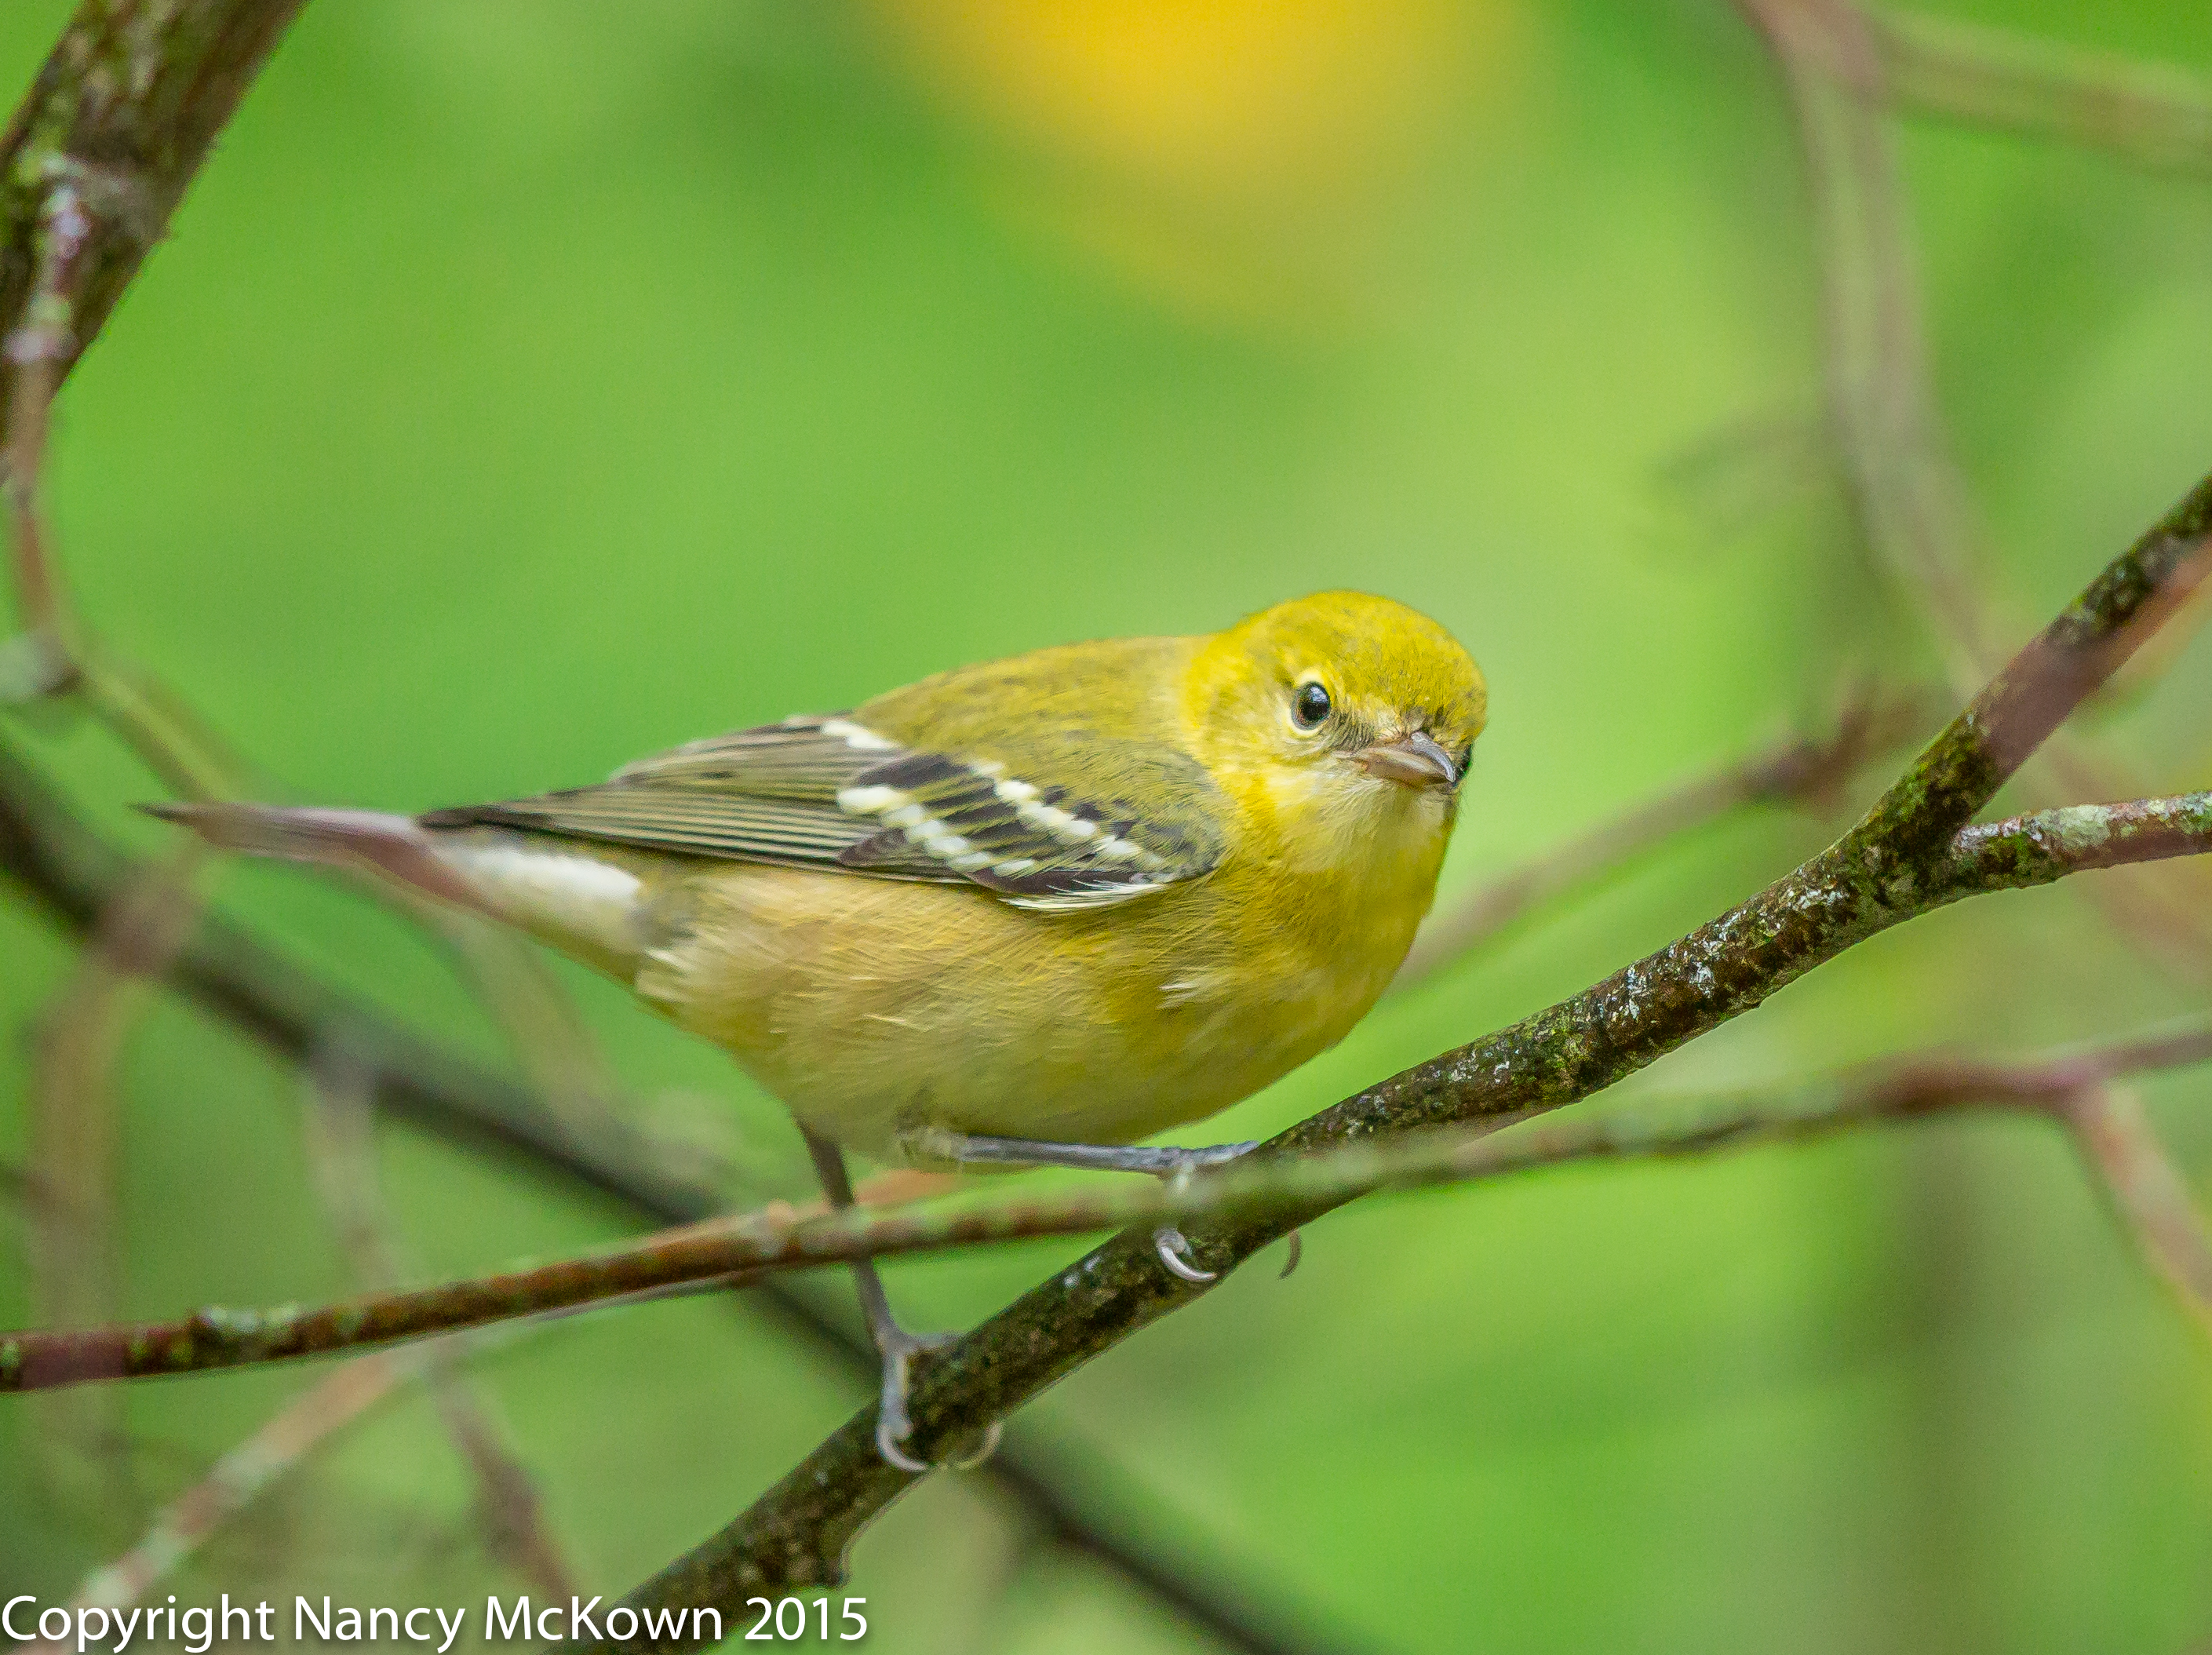
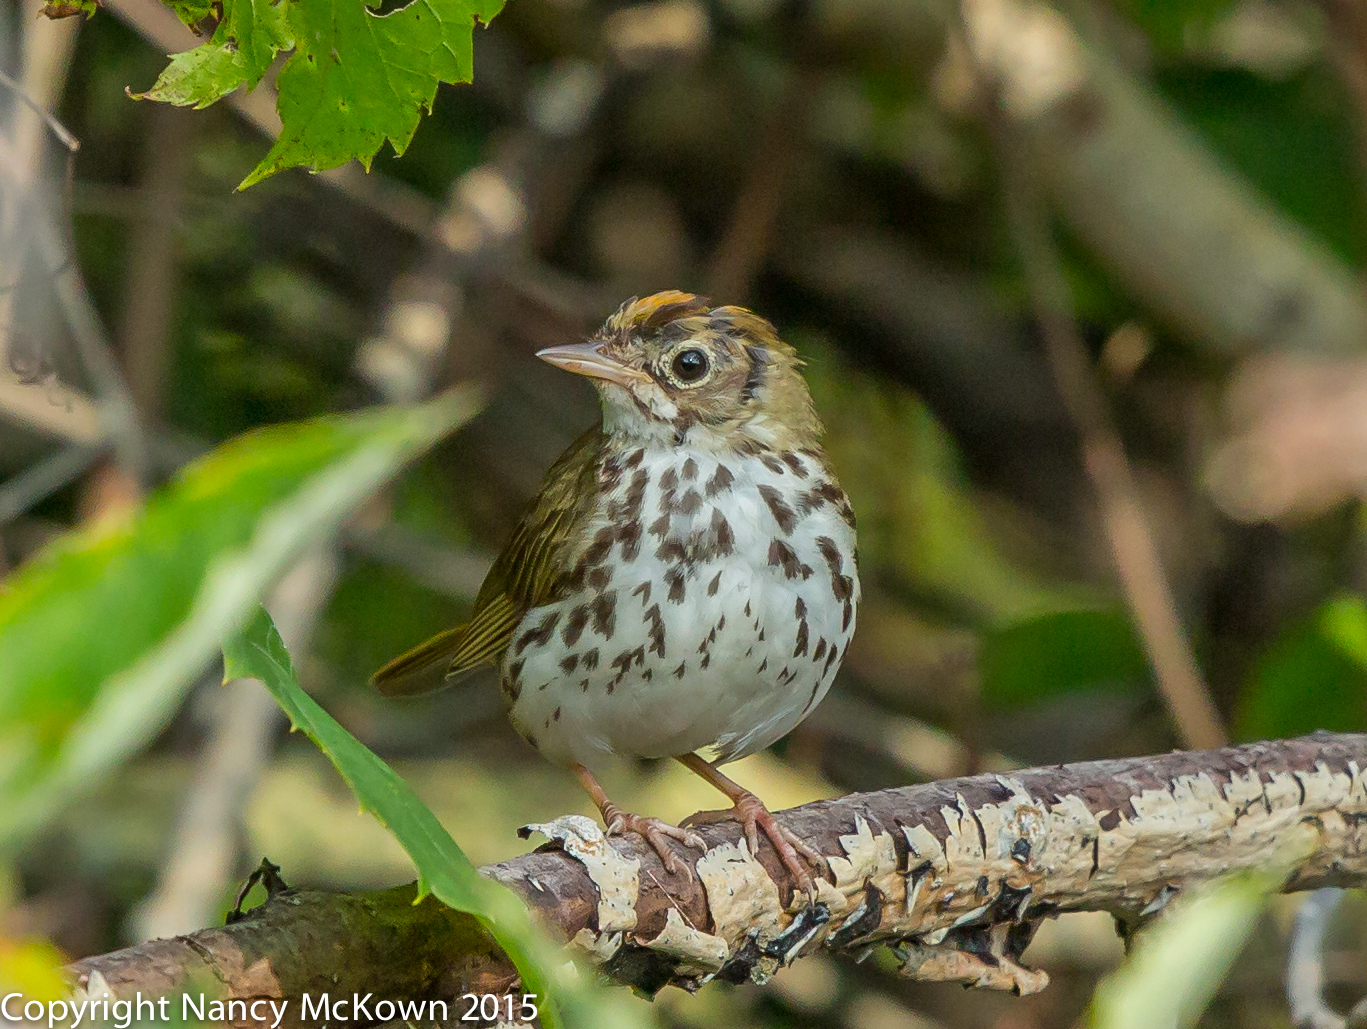
The sun filtering through the trees was bright… no doubt because the canopy of deciduous  trees above my house is full of holes left from fallen leaves. The migrating birds can not hide as well on the branches closest to my house, but a few tired and hungry ones still come to rest and replenish.

Photo of Ruby Crowned Kinglet
Ruby Crowned Kinglet
ISO1250; f/5.6; 1/500 Second

The Photographer as Wallflower

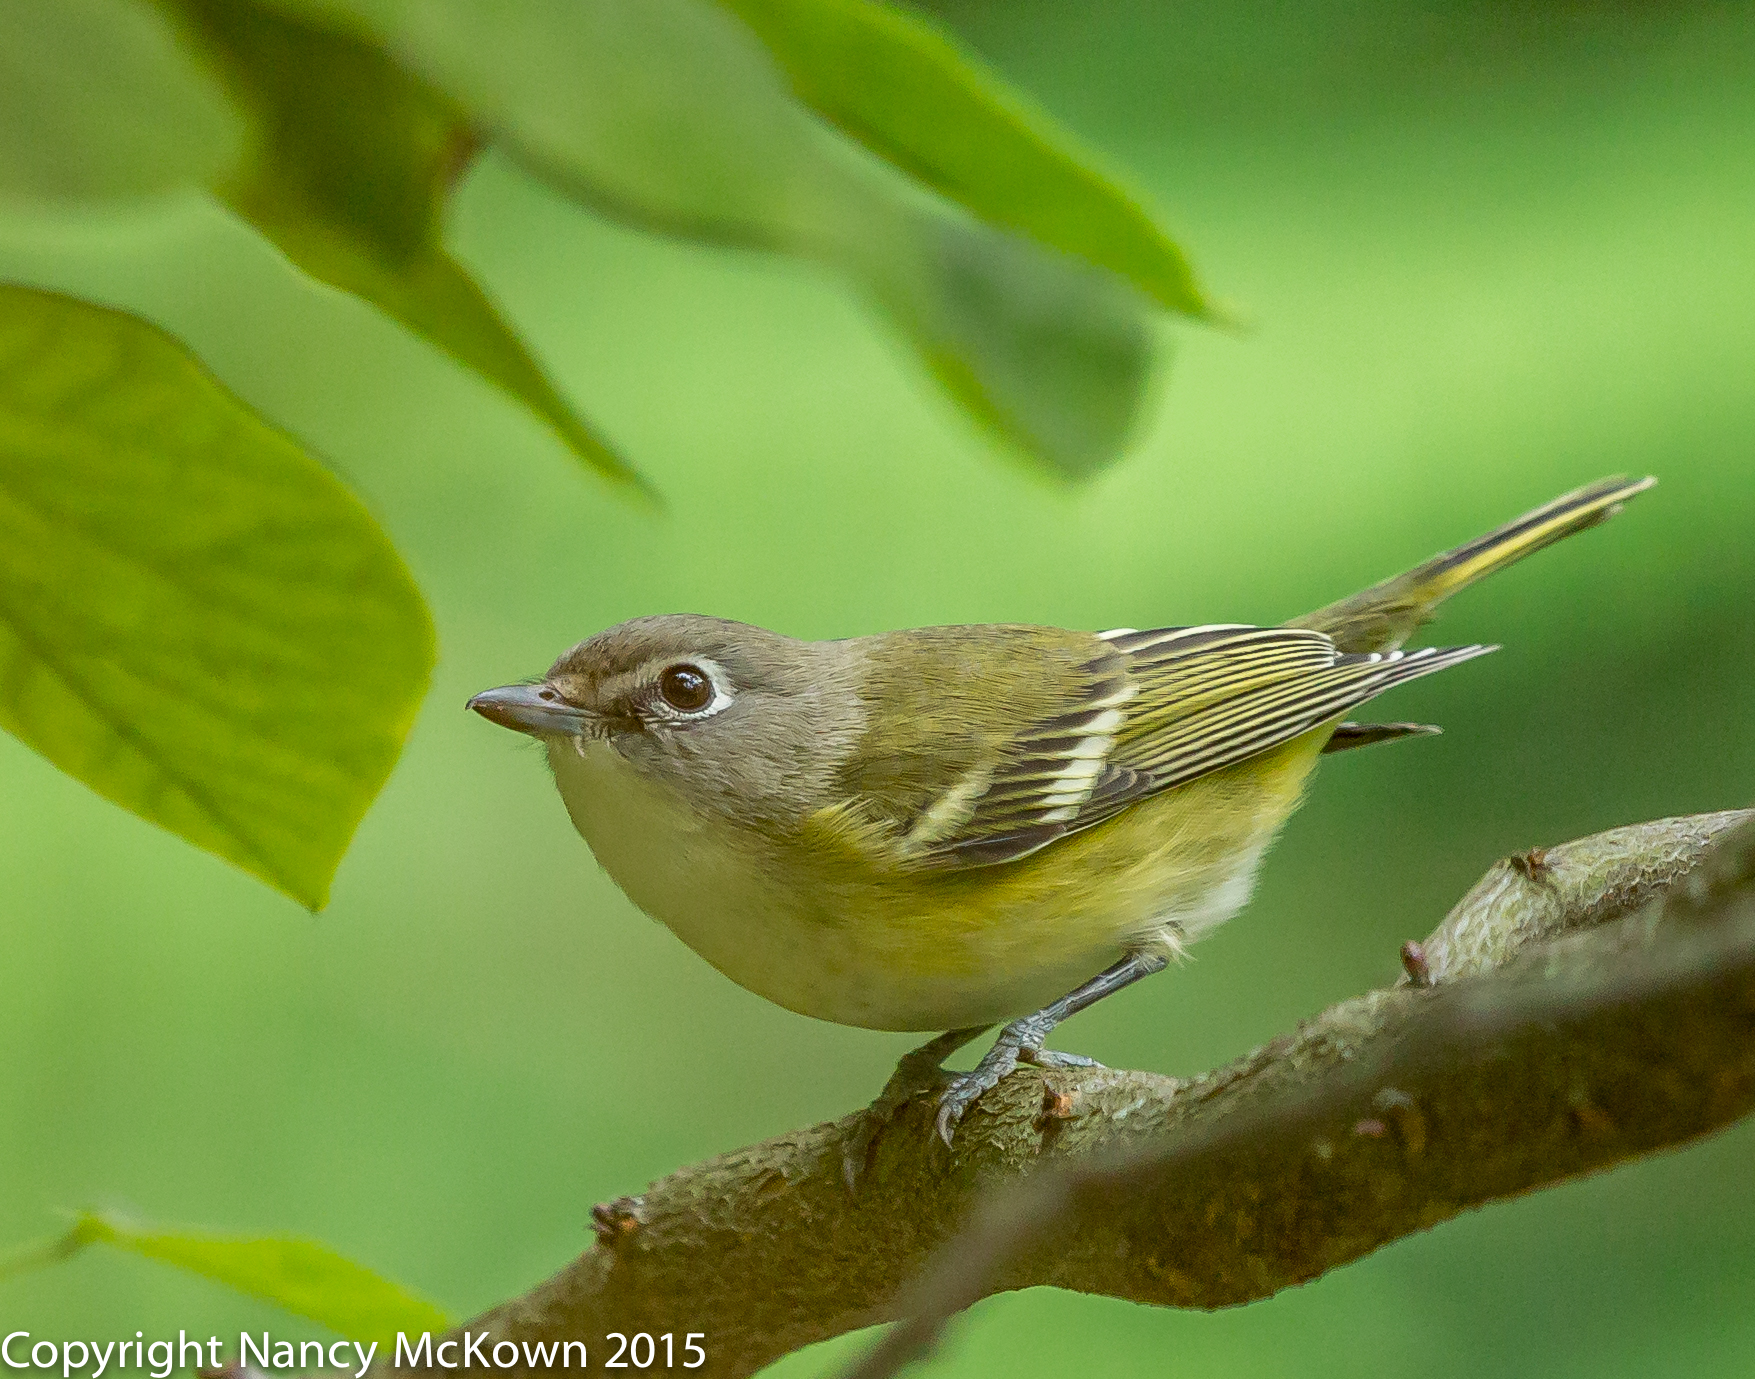
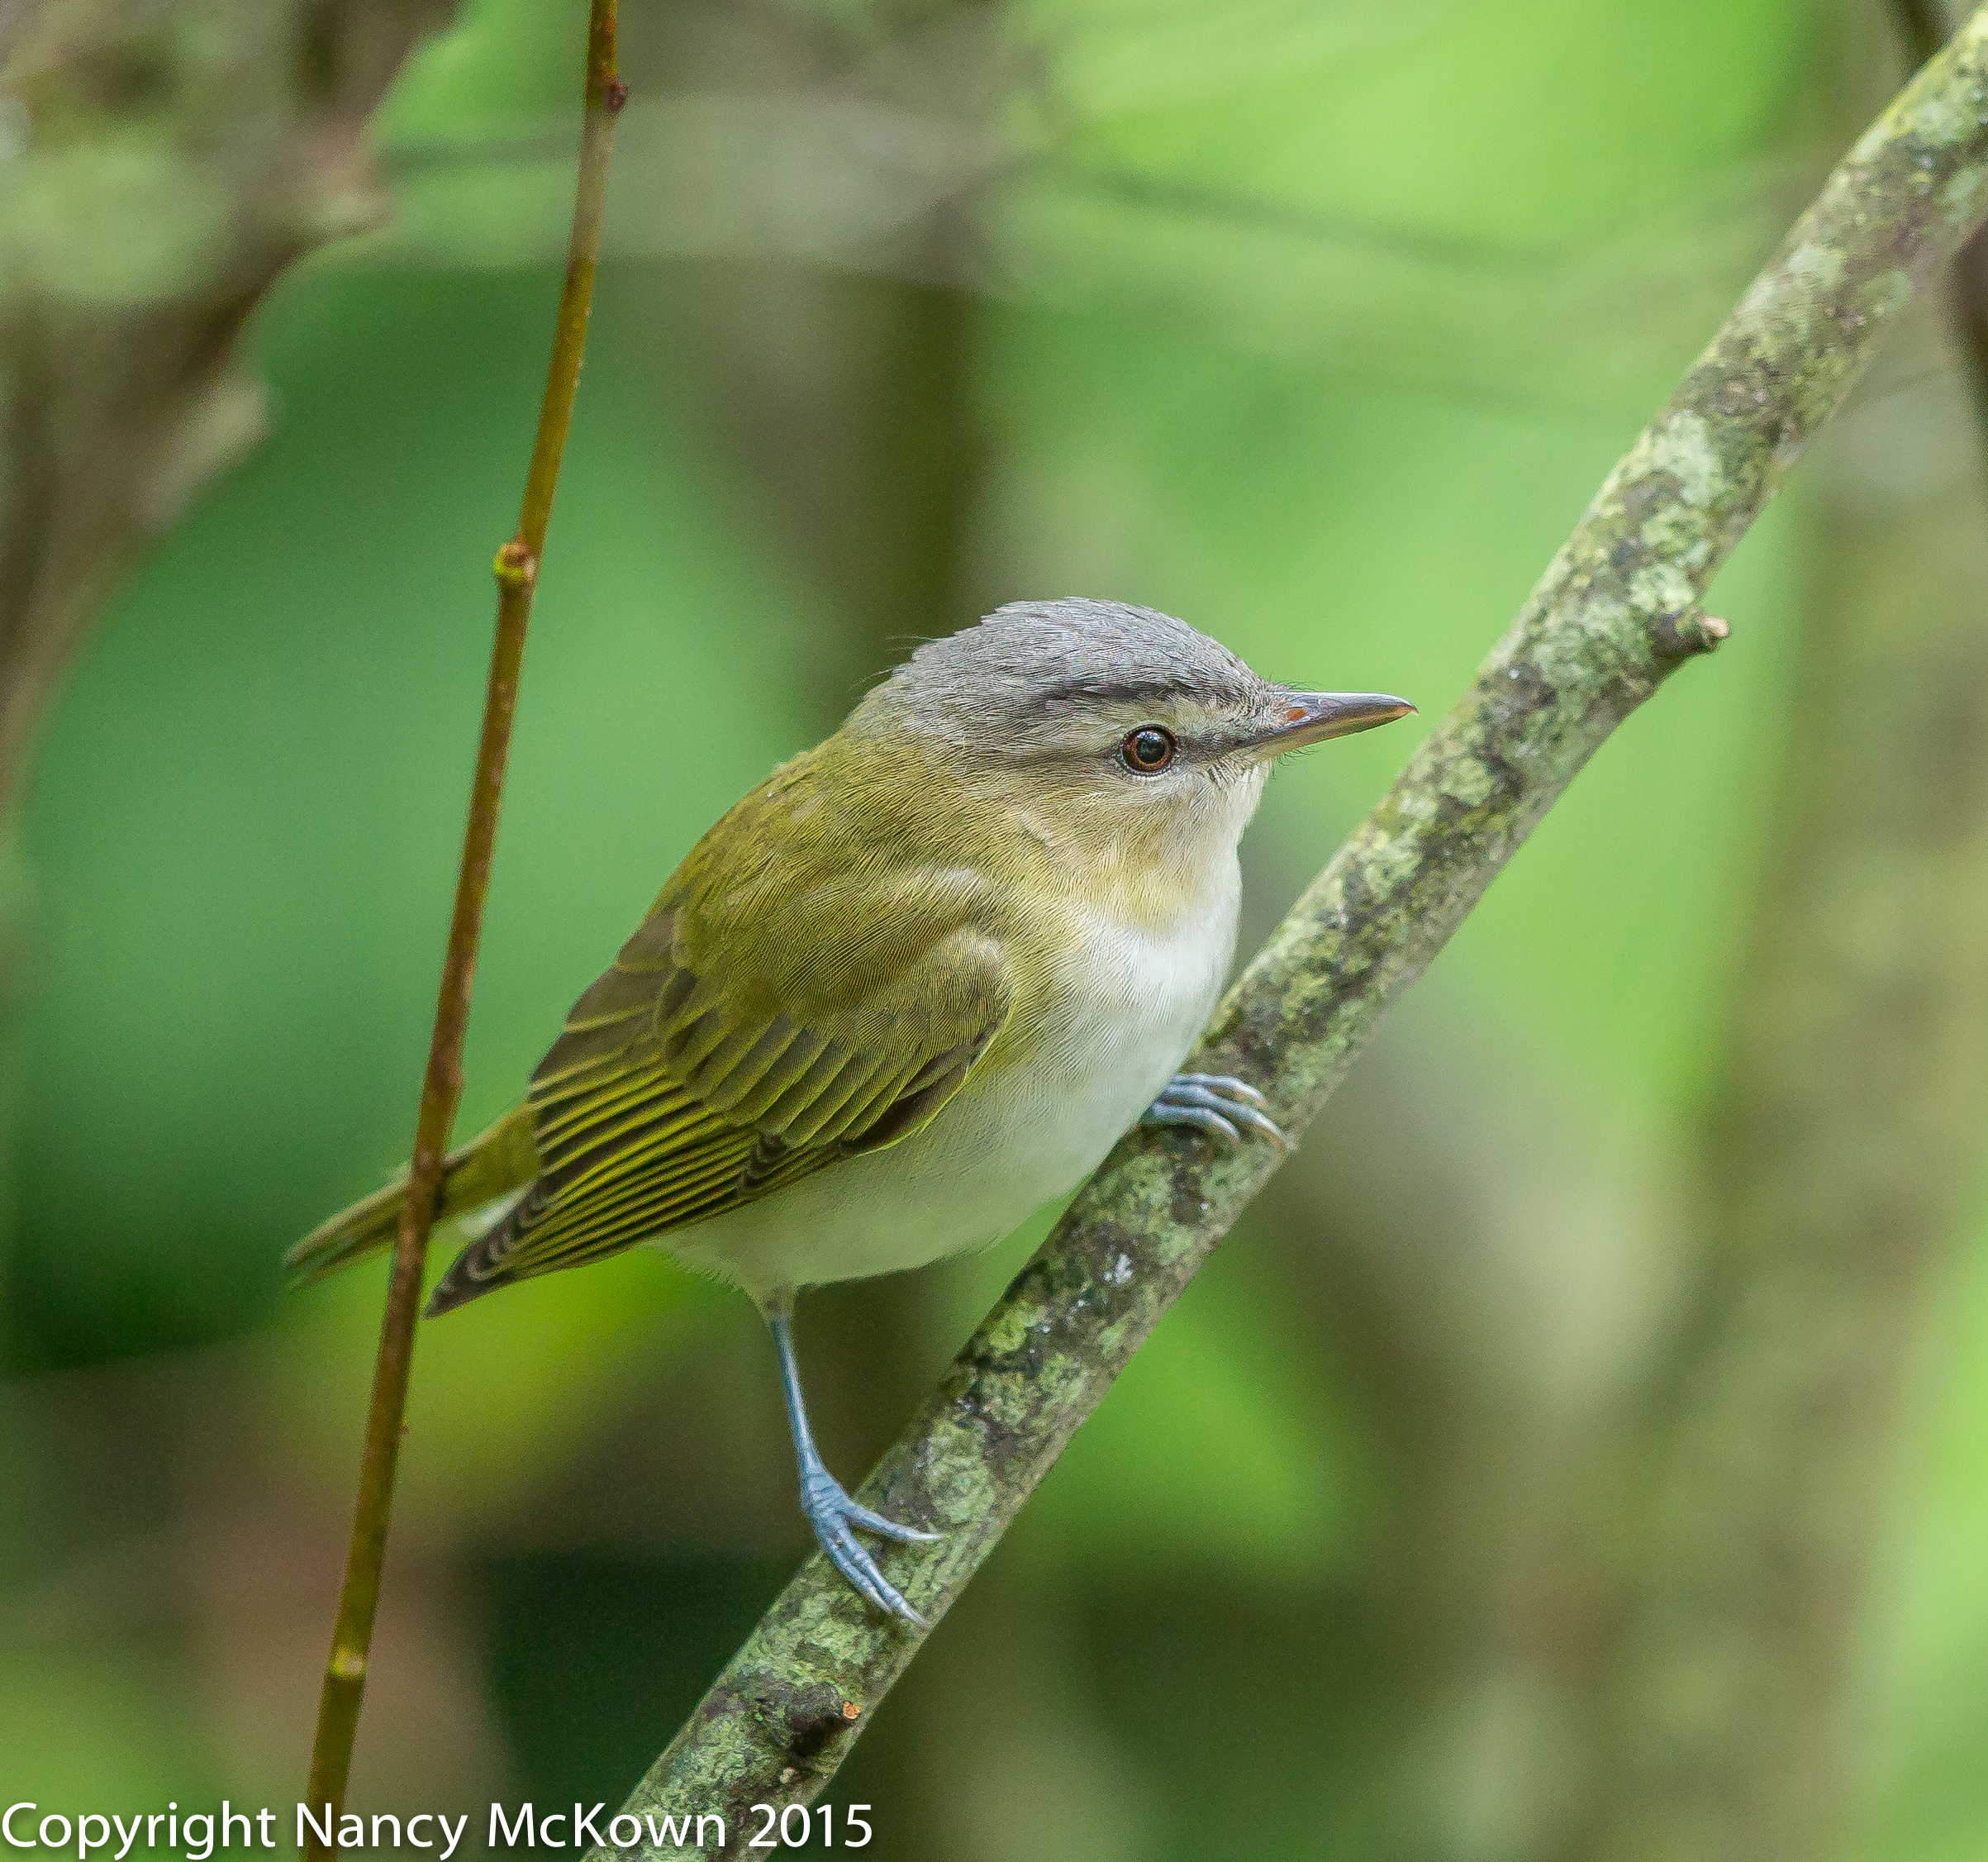
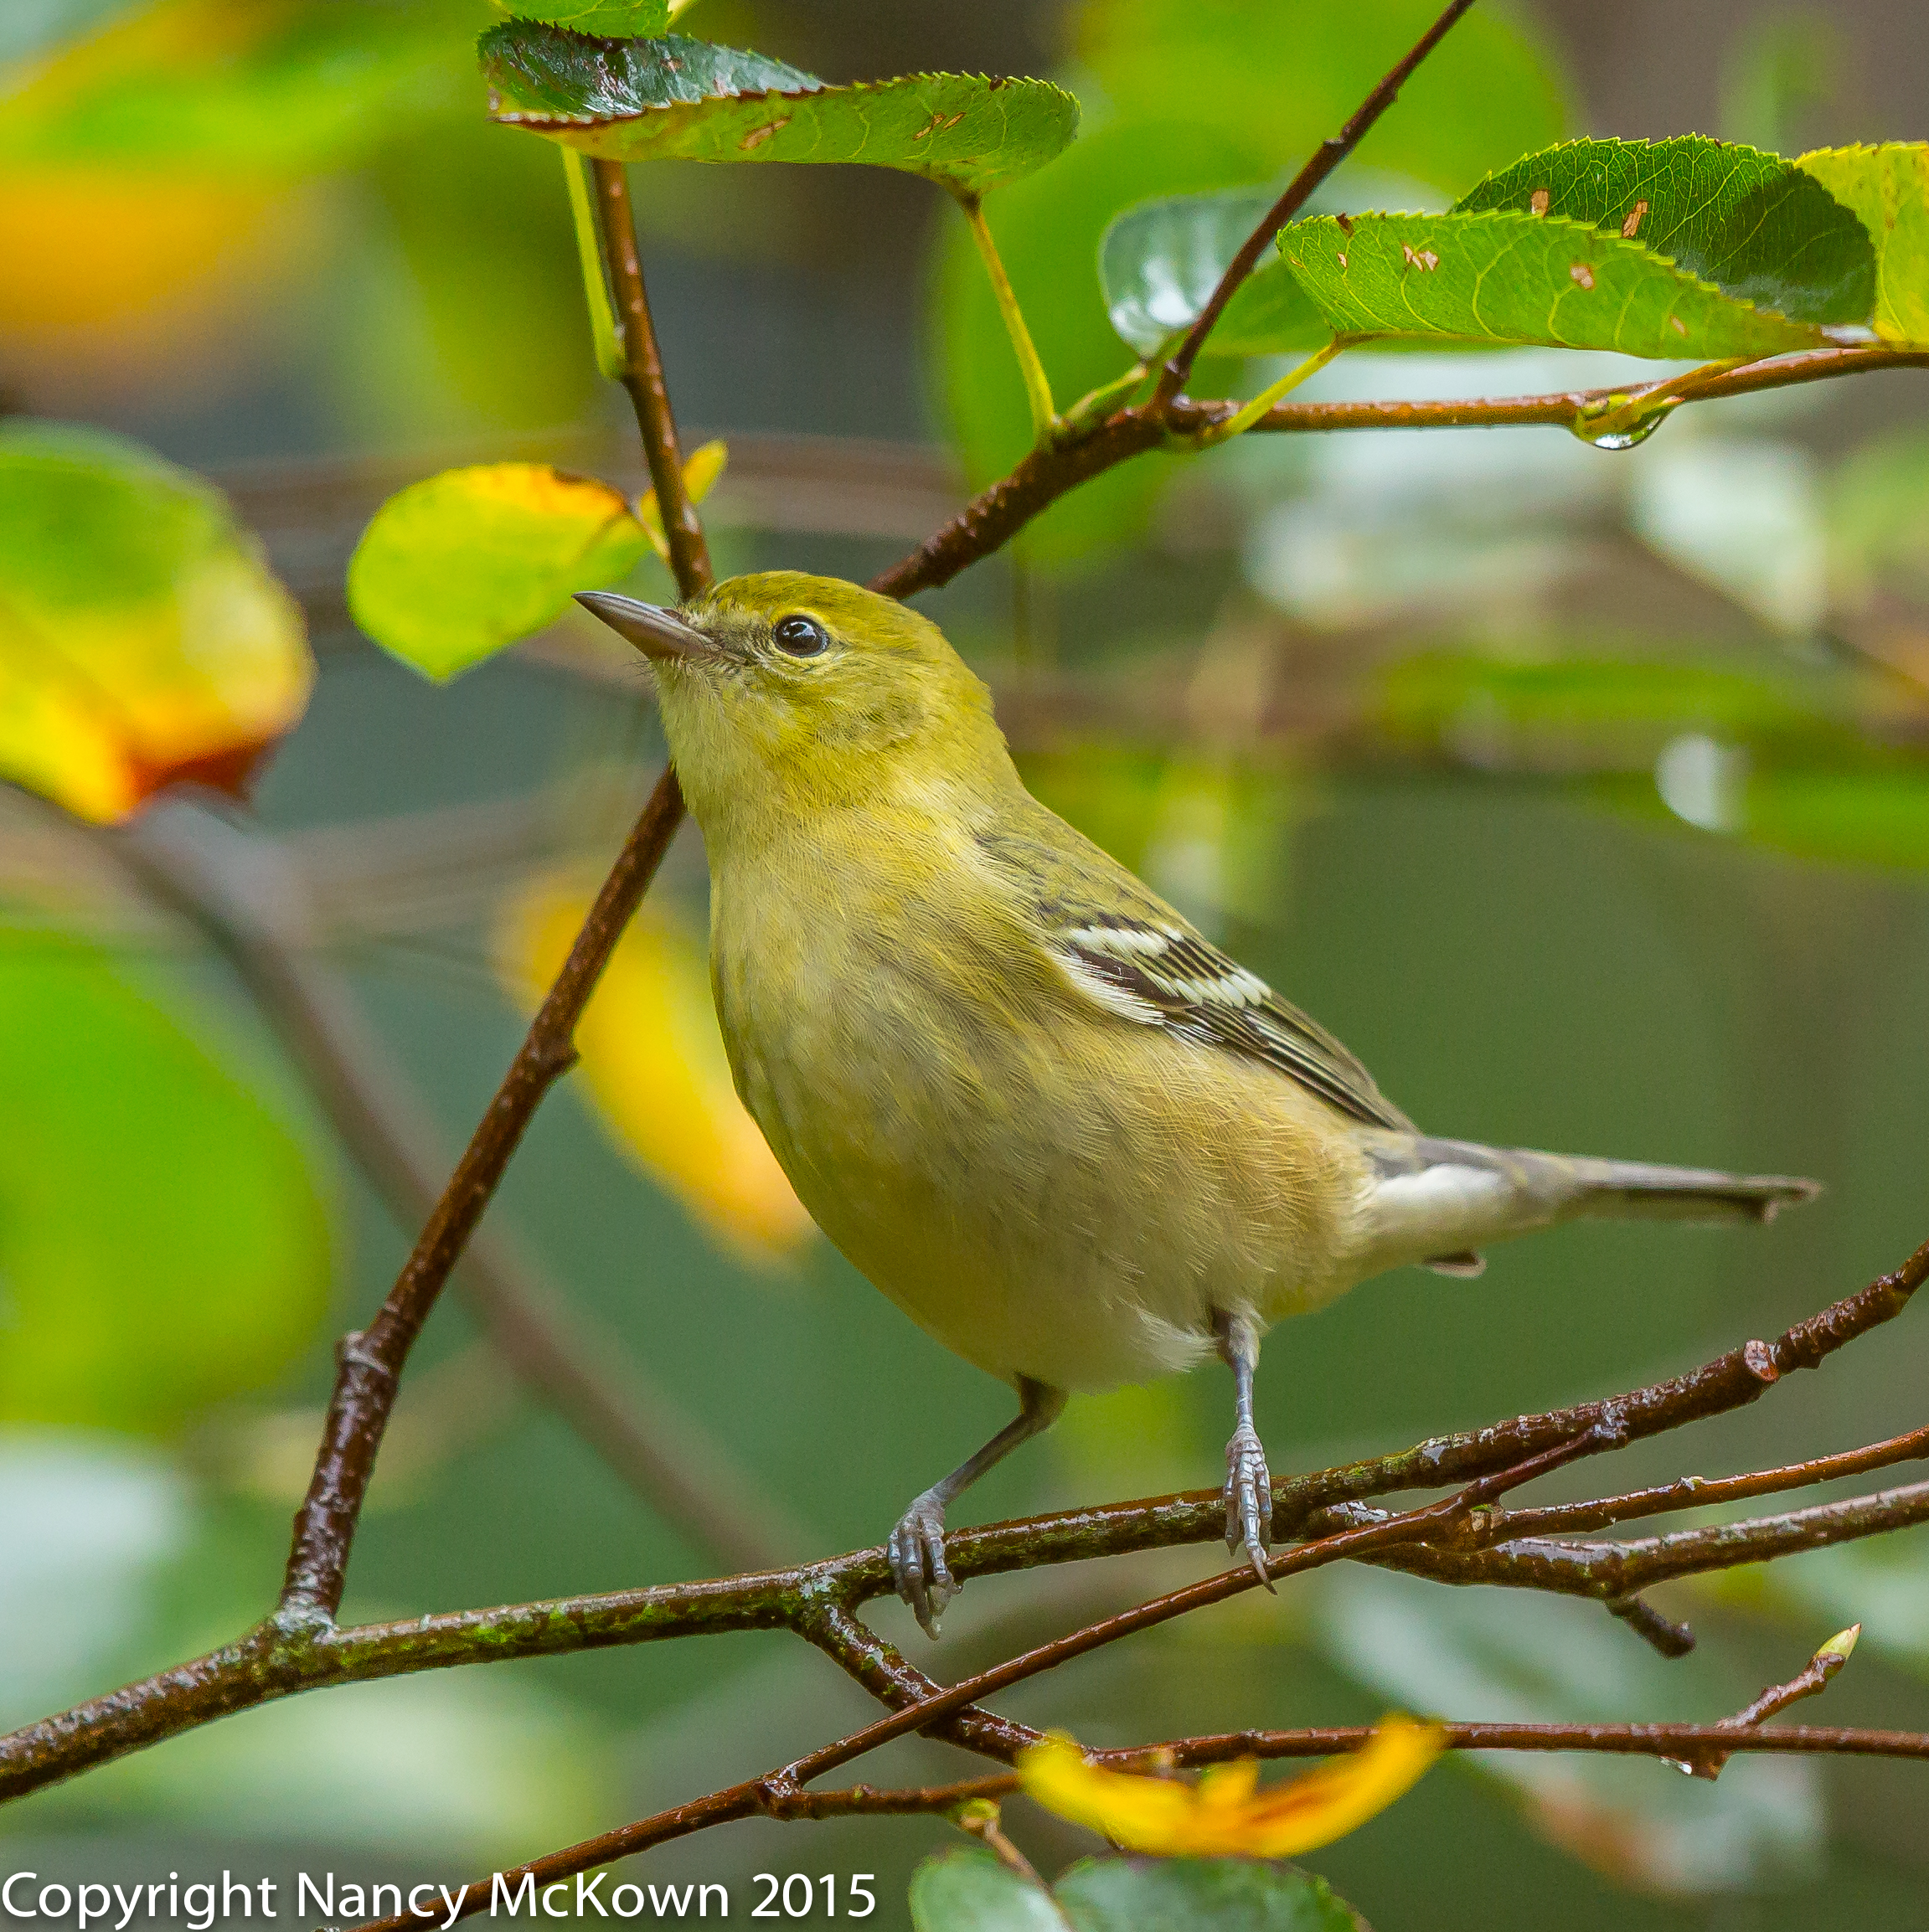
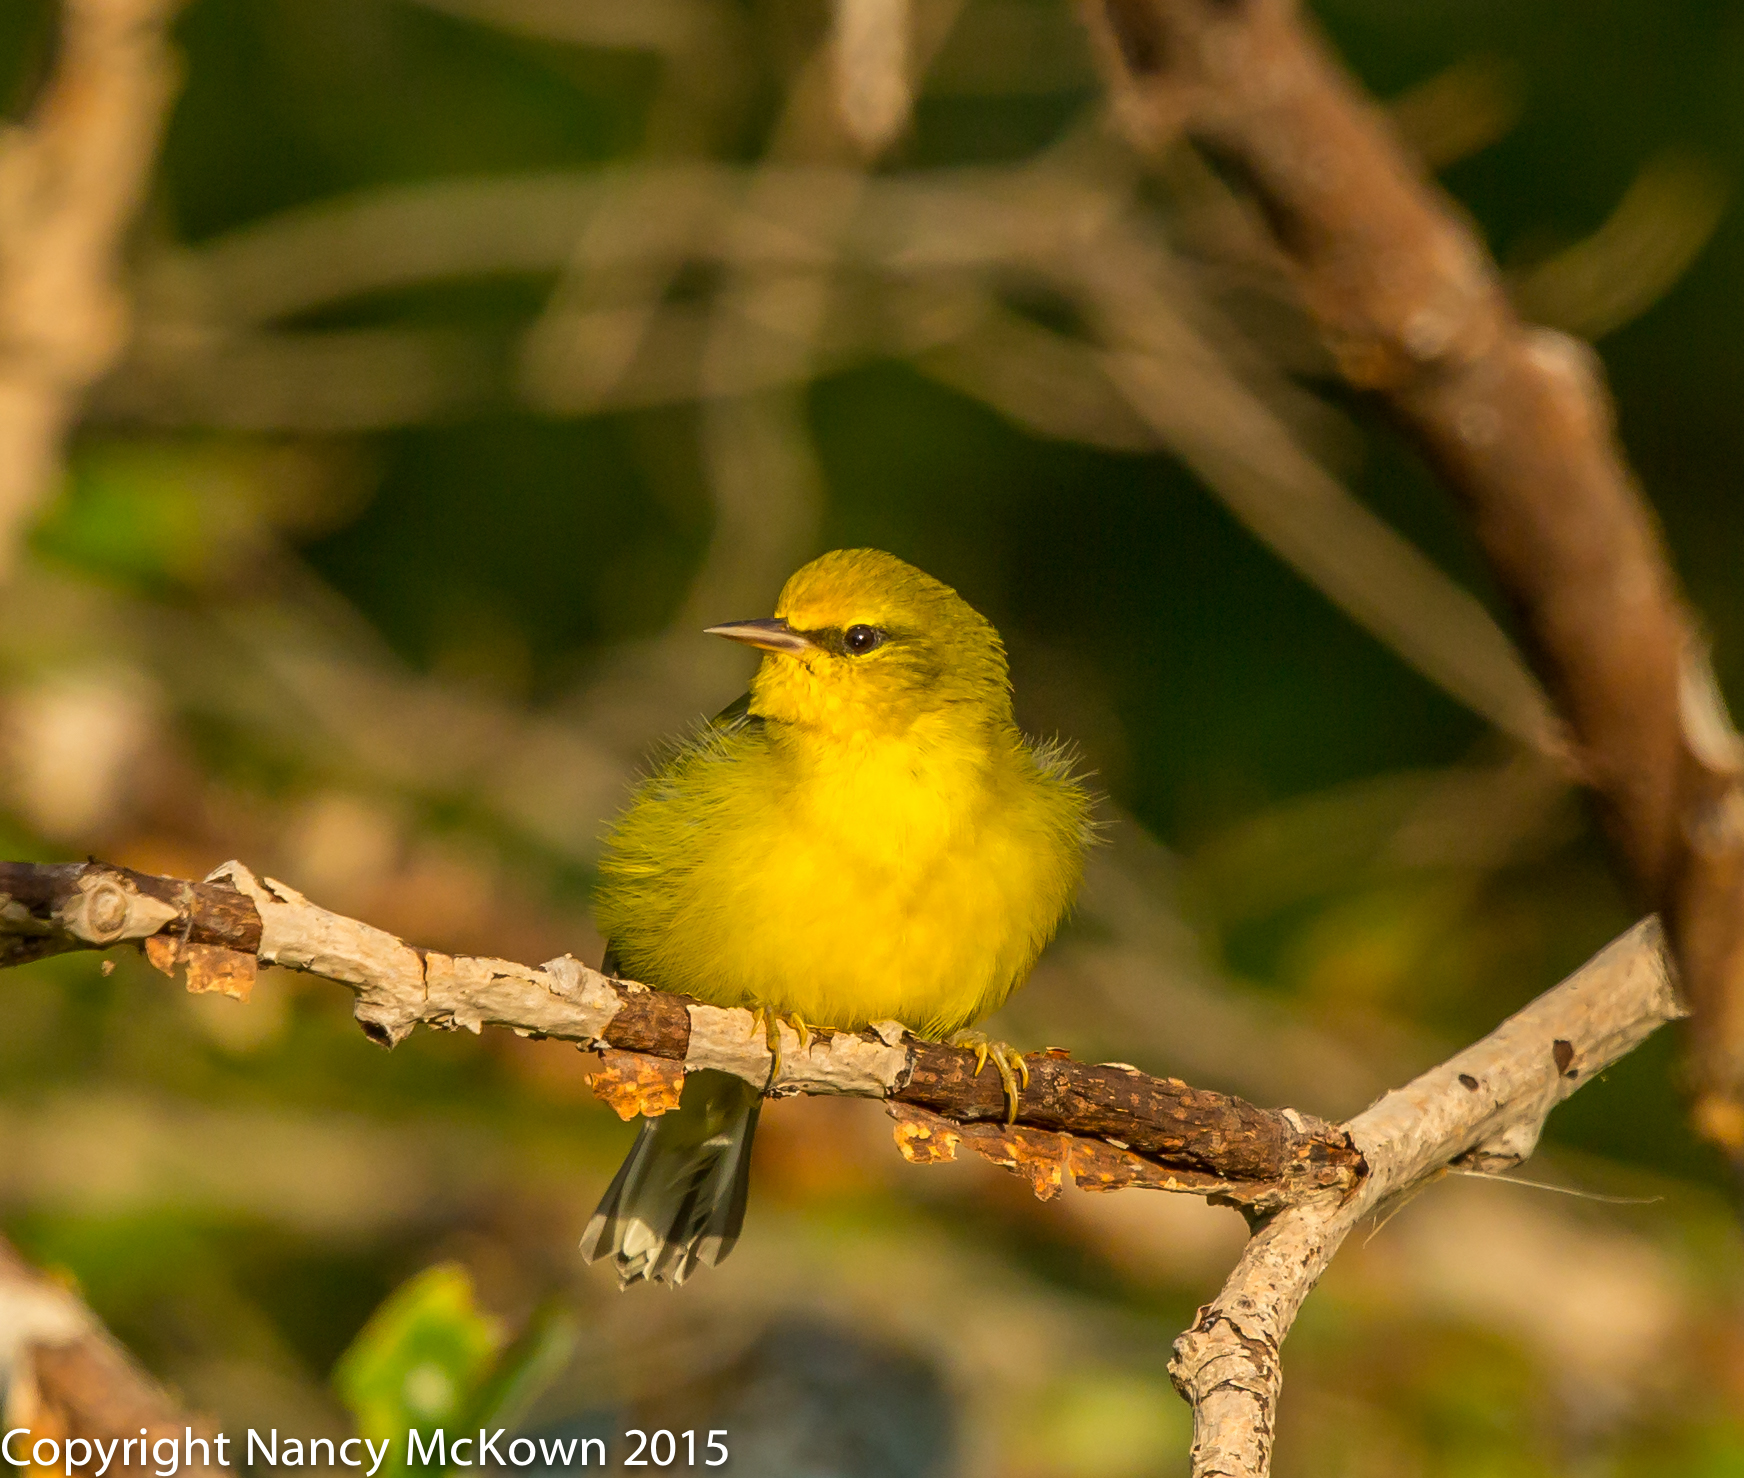
On windy days, it’s interesting to watch and wait for migrating birds to descend (seemingly out of nowhere) upon the trees nearest to my library windows. Whenever a cluster of clamorous titmice or chickadees come together to hop about on the Serviceberry or Redbud, I crouch behind my camera and wait for the vagrants to join the frenzy and alight on the same tree. Most of the time one or two come to see what all the fuss is about. (Safety in numbers?) Then, quiet as a wallflower, I point my long lens at the partygoers and join in on the fun.

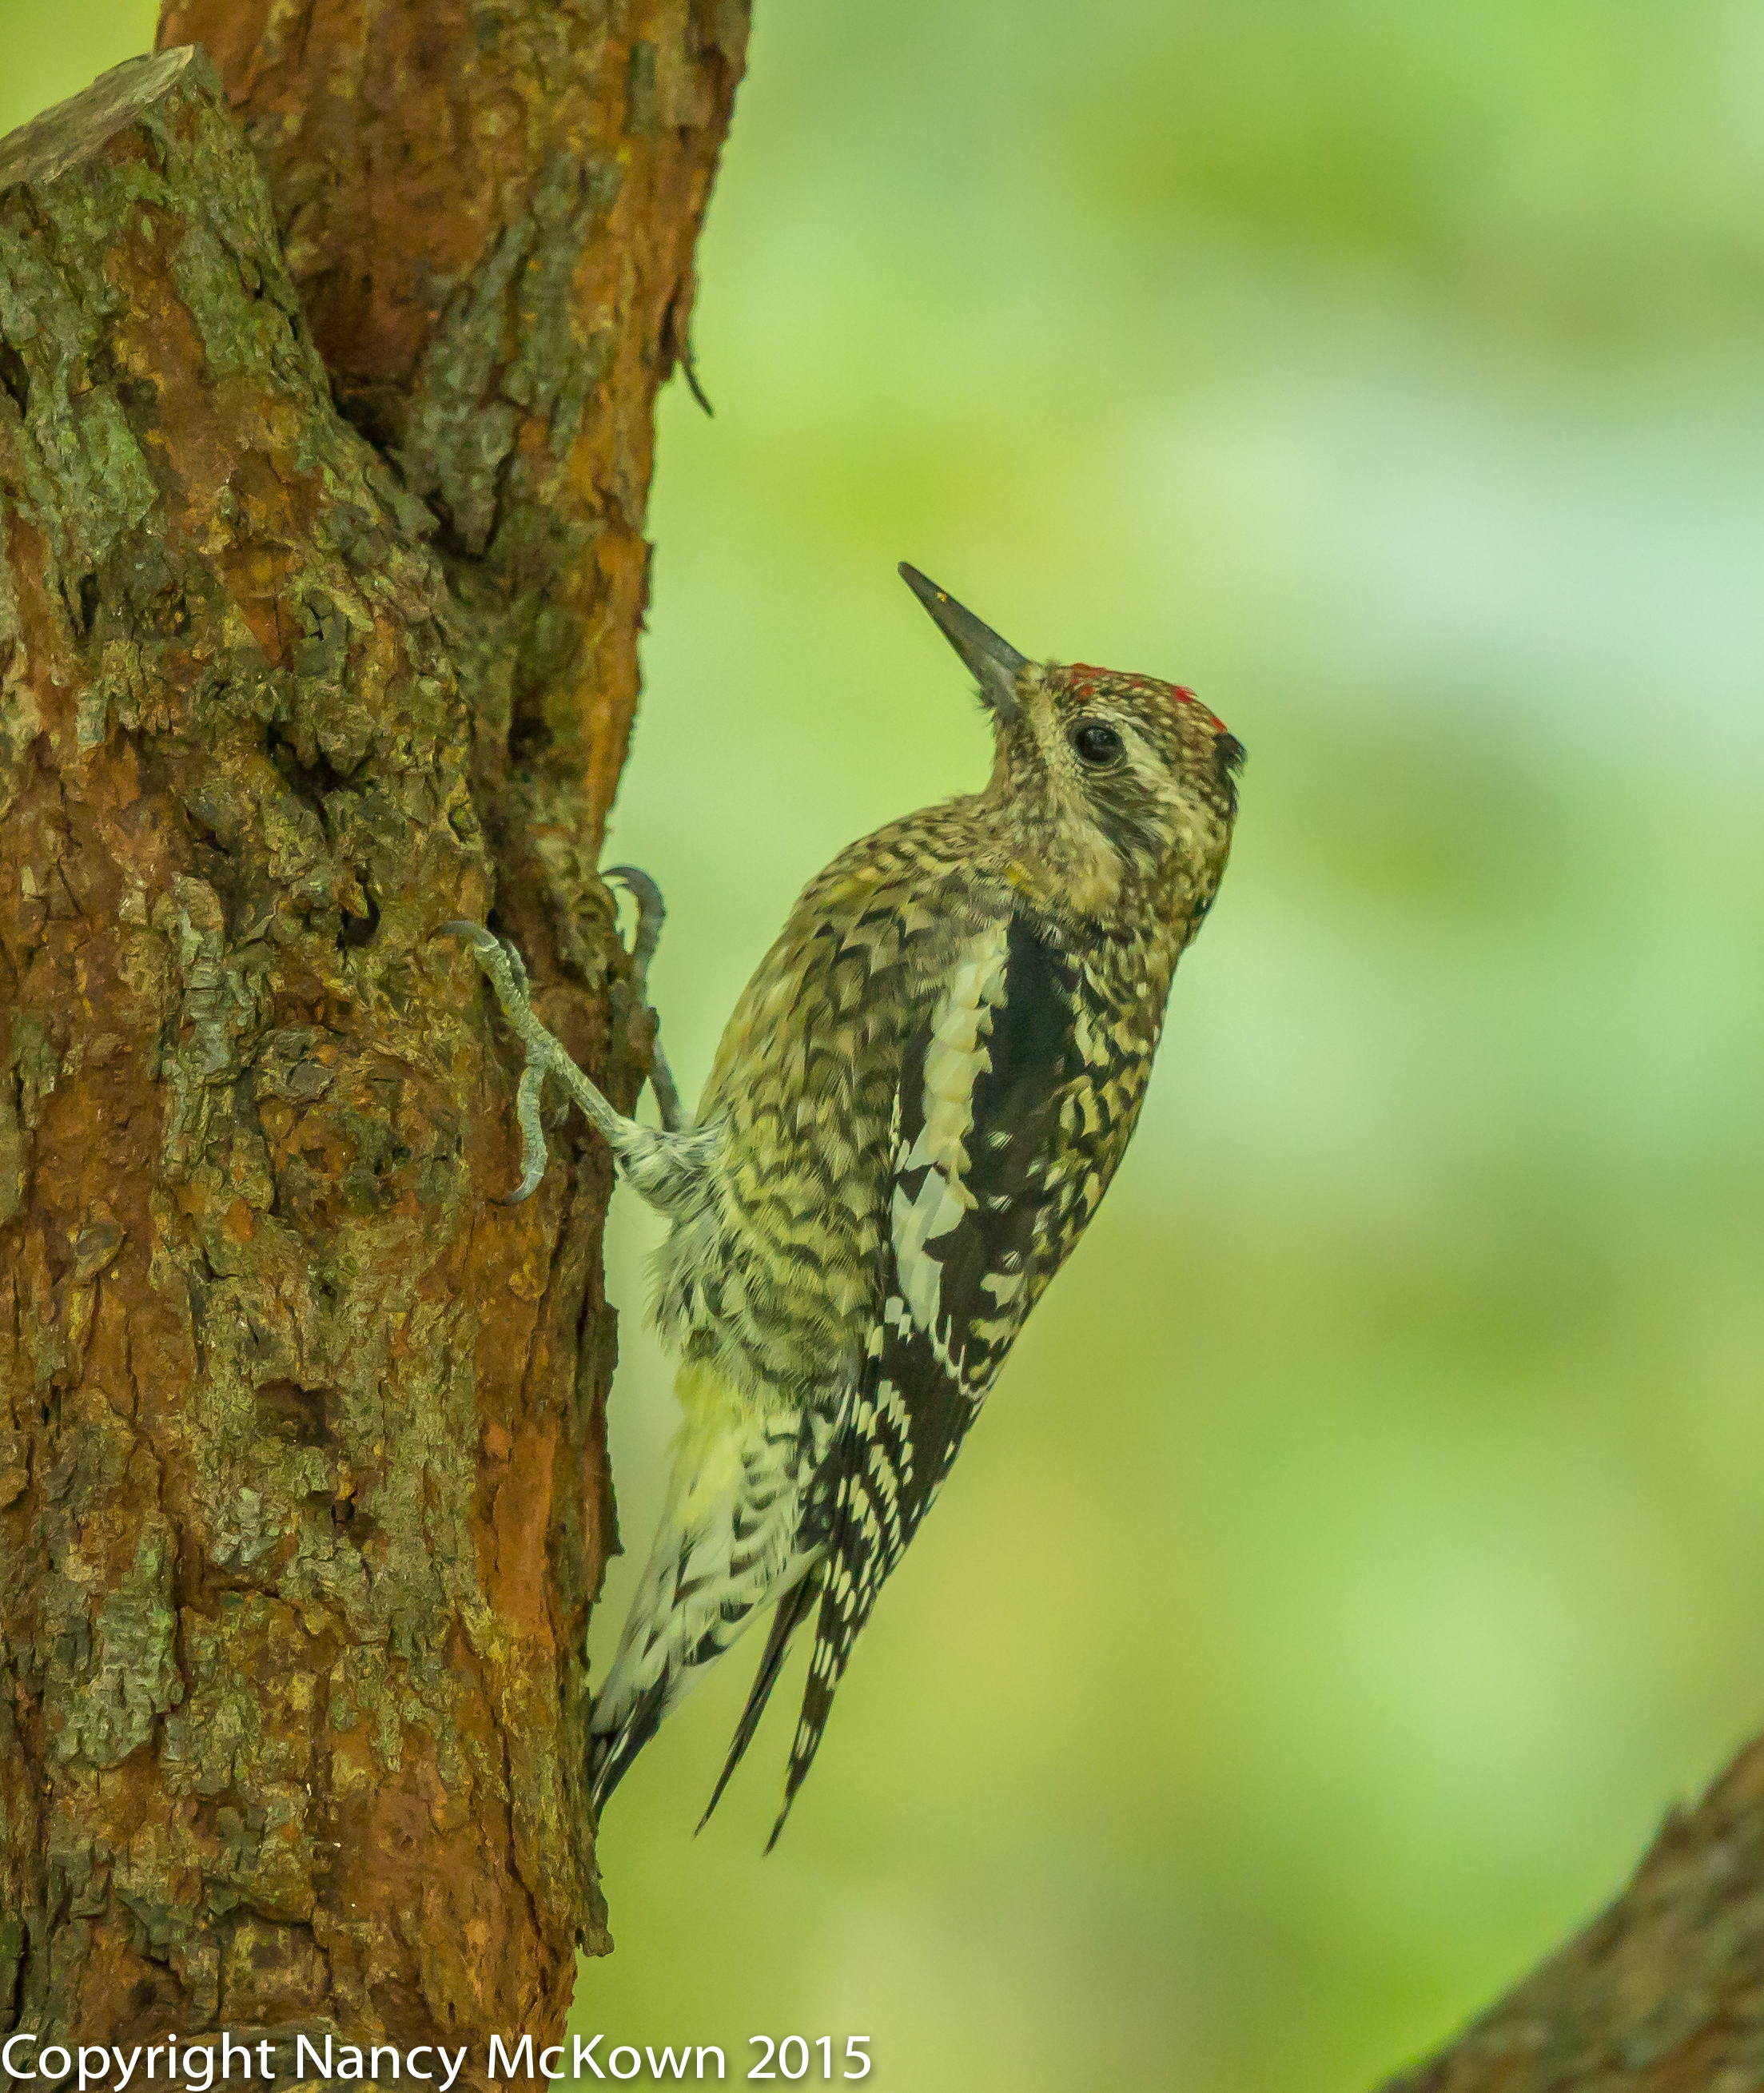
Up-Close Detail with Telephoto Lenses

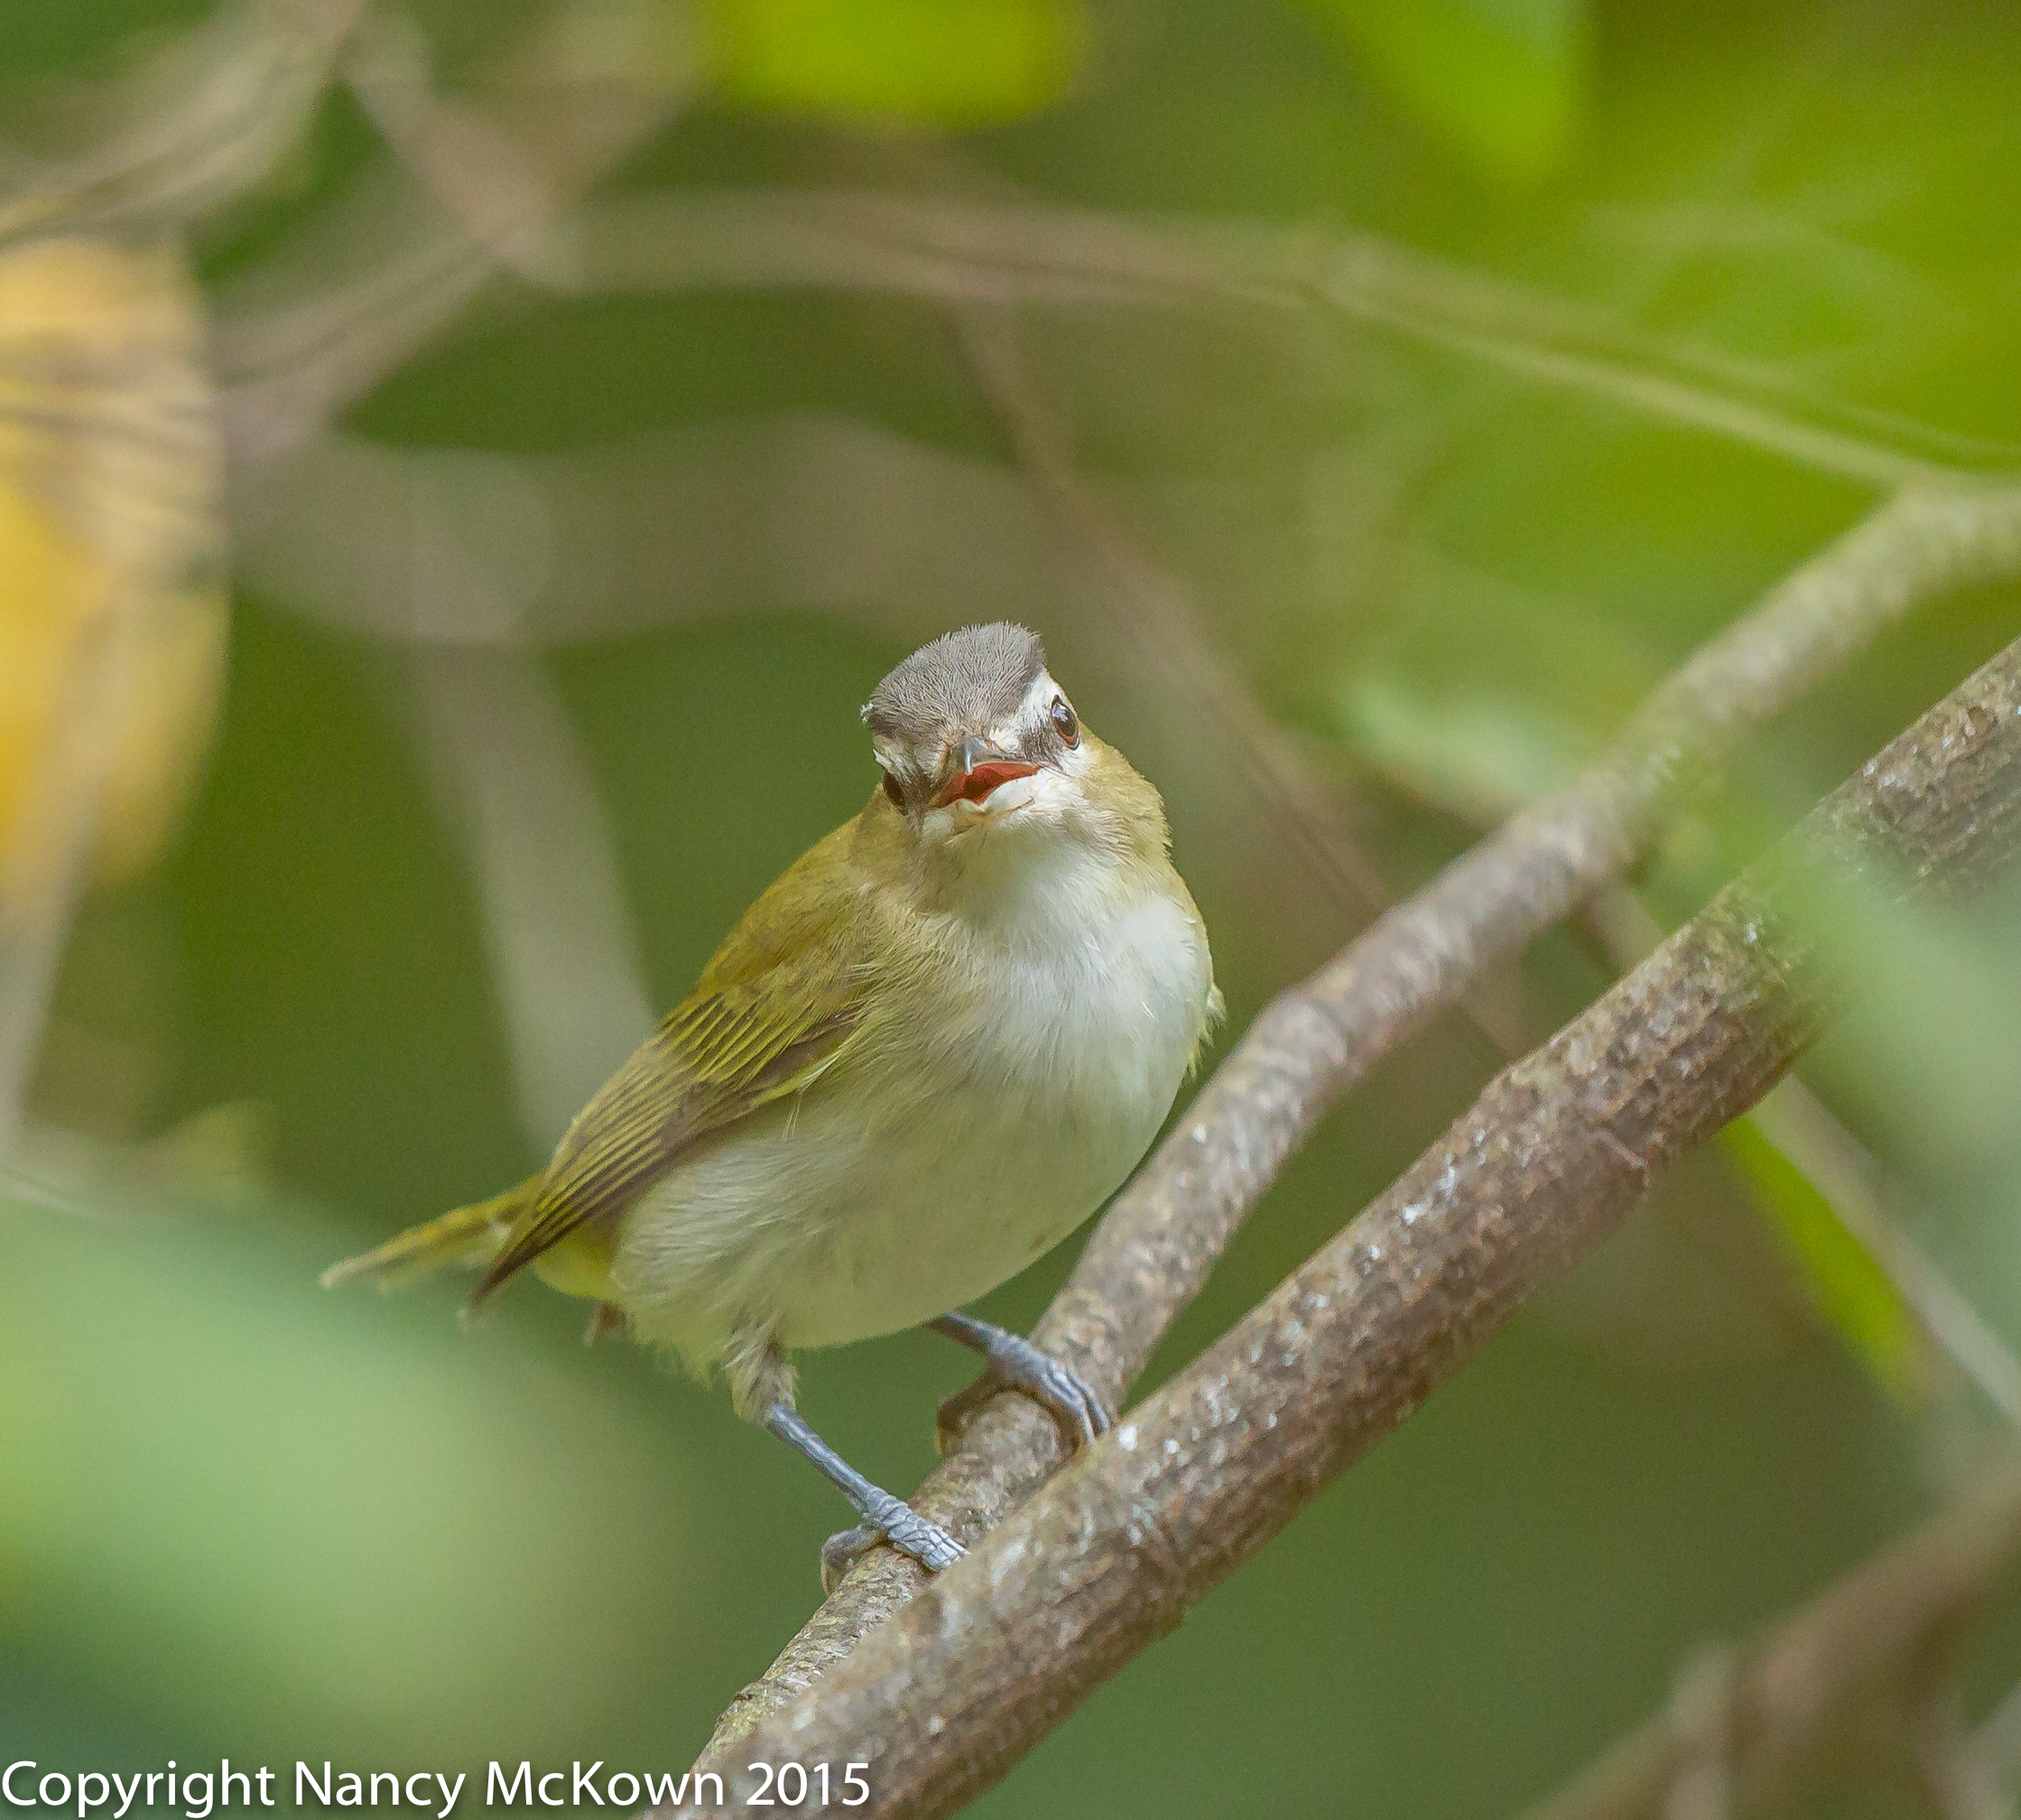
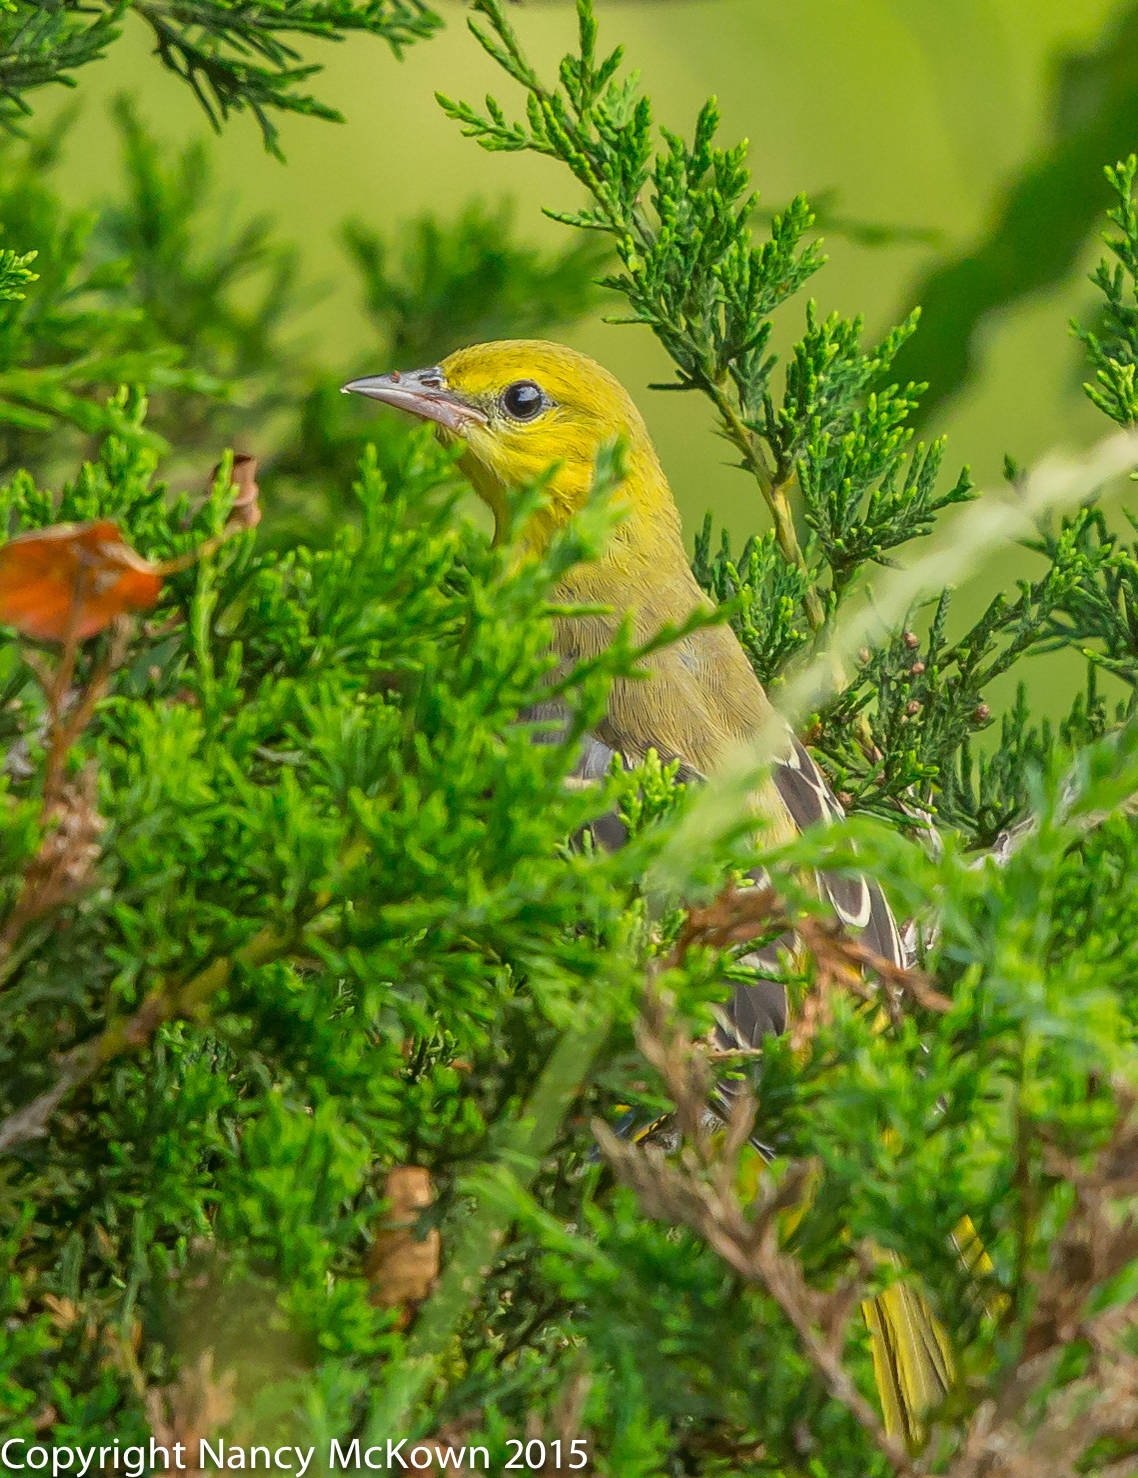
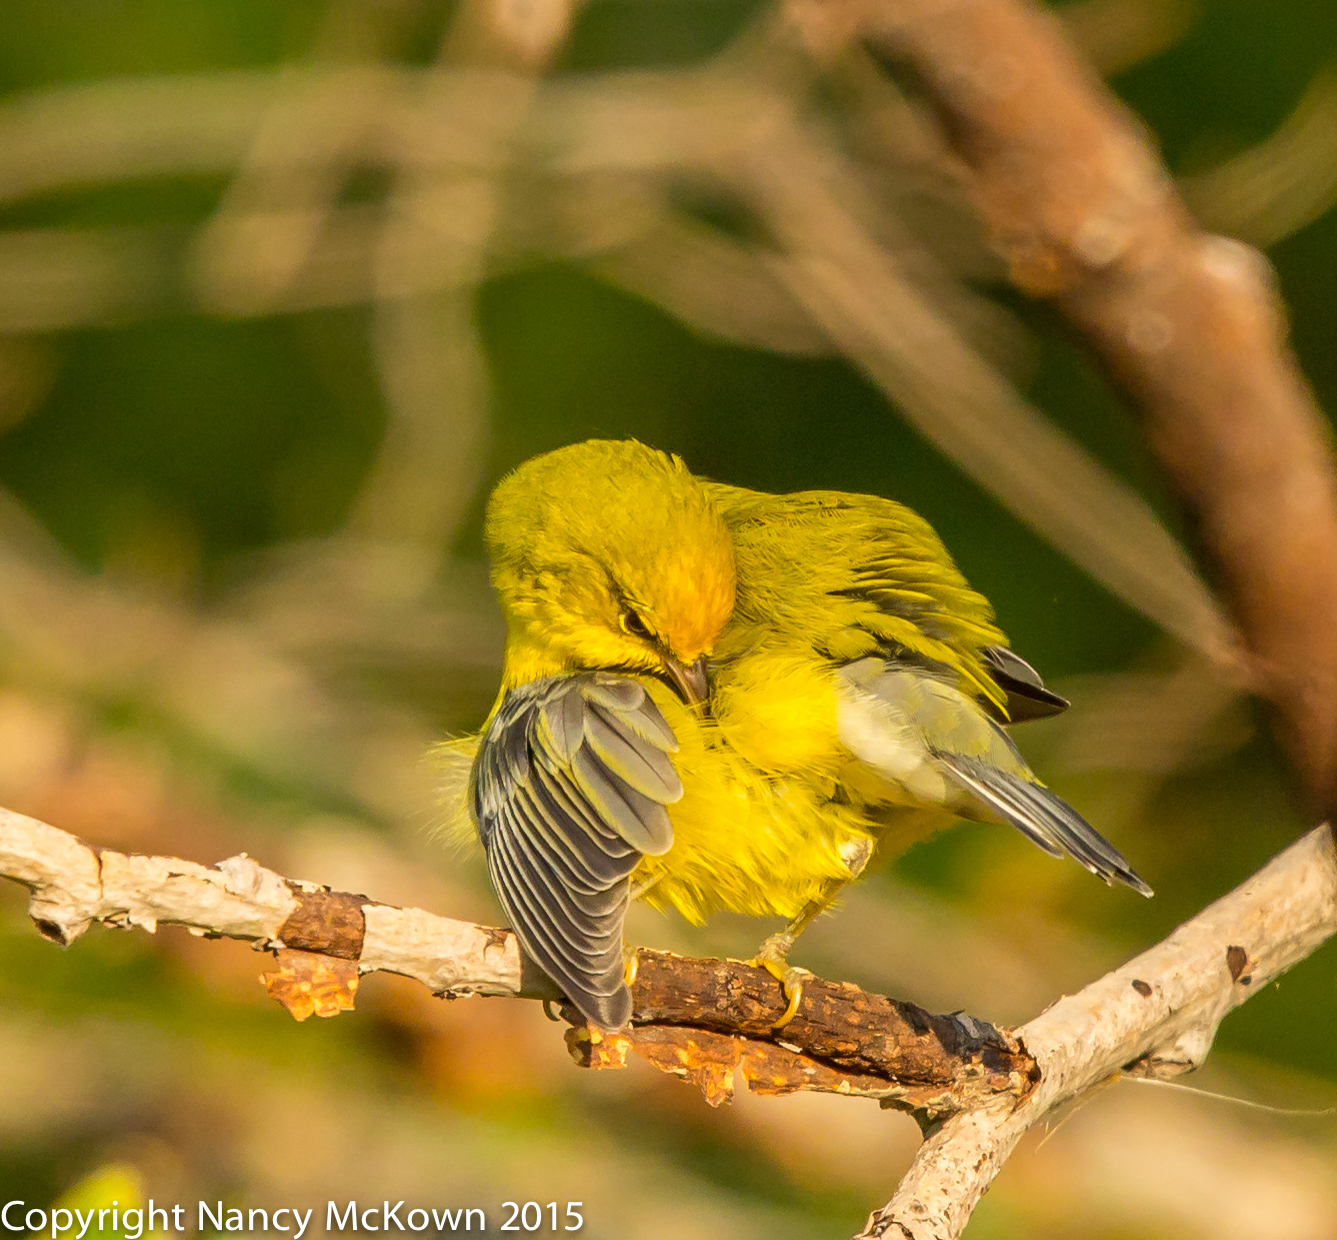
You don’t need a dedicated macro lens to capture fine detail in your images. Telephoto lenses allow you to magnify the details while not invading the comfort zone of your bird subjects. My Canon 500mm II f/4 L lens has a remarkably close minimum focusing distance  (12.4′ or 145.7″). Combine that with the narrow field of view that comes with amplification and you’ve got superior image quality.

Too Close for AutoFocus

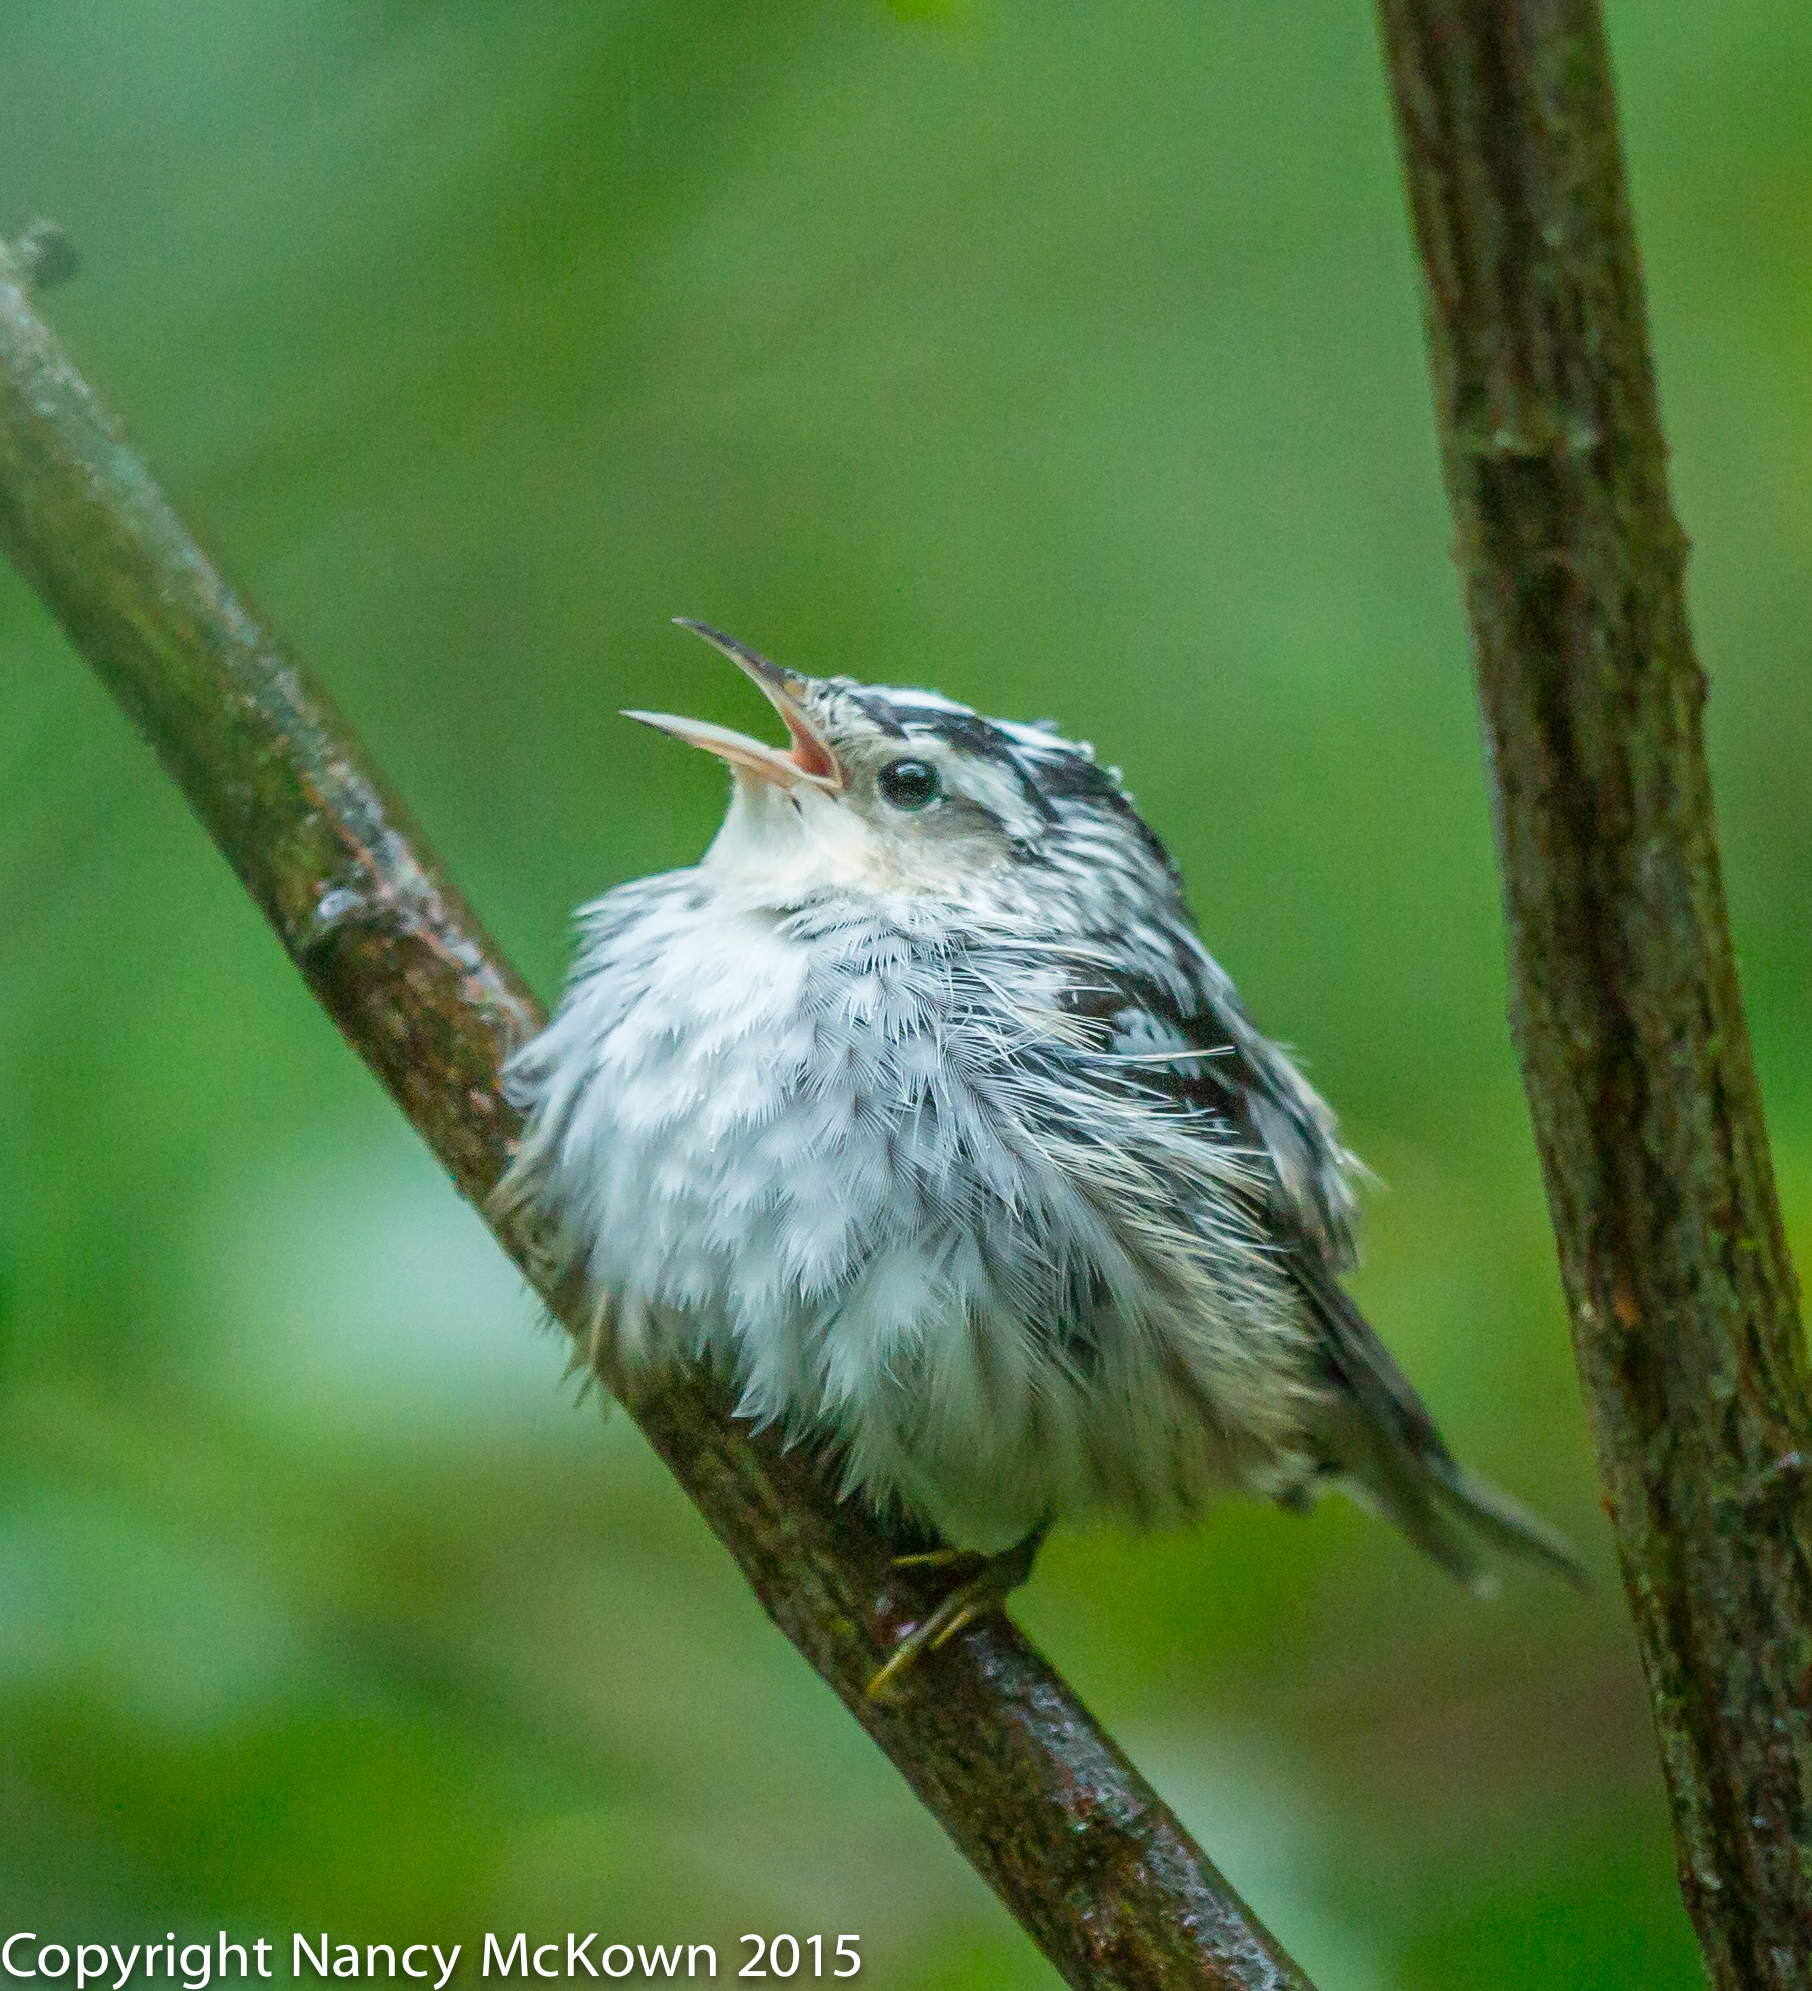
This Ruby Crowned Kinglet came in so close to the camera that autofocus was not quite capable of achieving focus. Assuming the kinglet would stay close, I had to make a quick choice…. either physically pick up the camera and tripod and back it up a couple inches or turn on Manual focus and hope that the minimal focusing distance would decrease just a touch and allow me to manually nail focus. The light and contrast on the scene were very good and would allow auto focus to work optimally. I went with picking up the tripod and moving back – and then letting the autofocus do its job.

Photo of Ruby Crowned Kinglet
Ruby Crowned Kinglet.
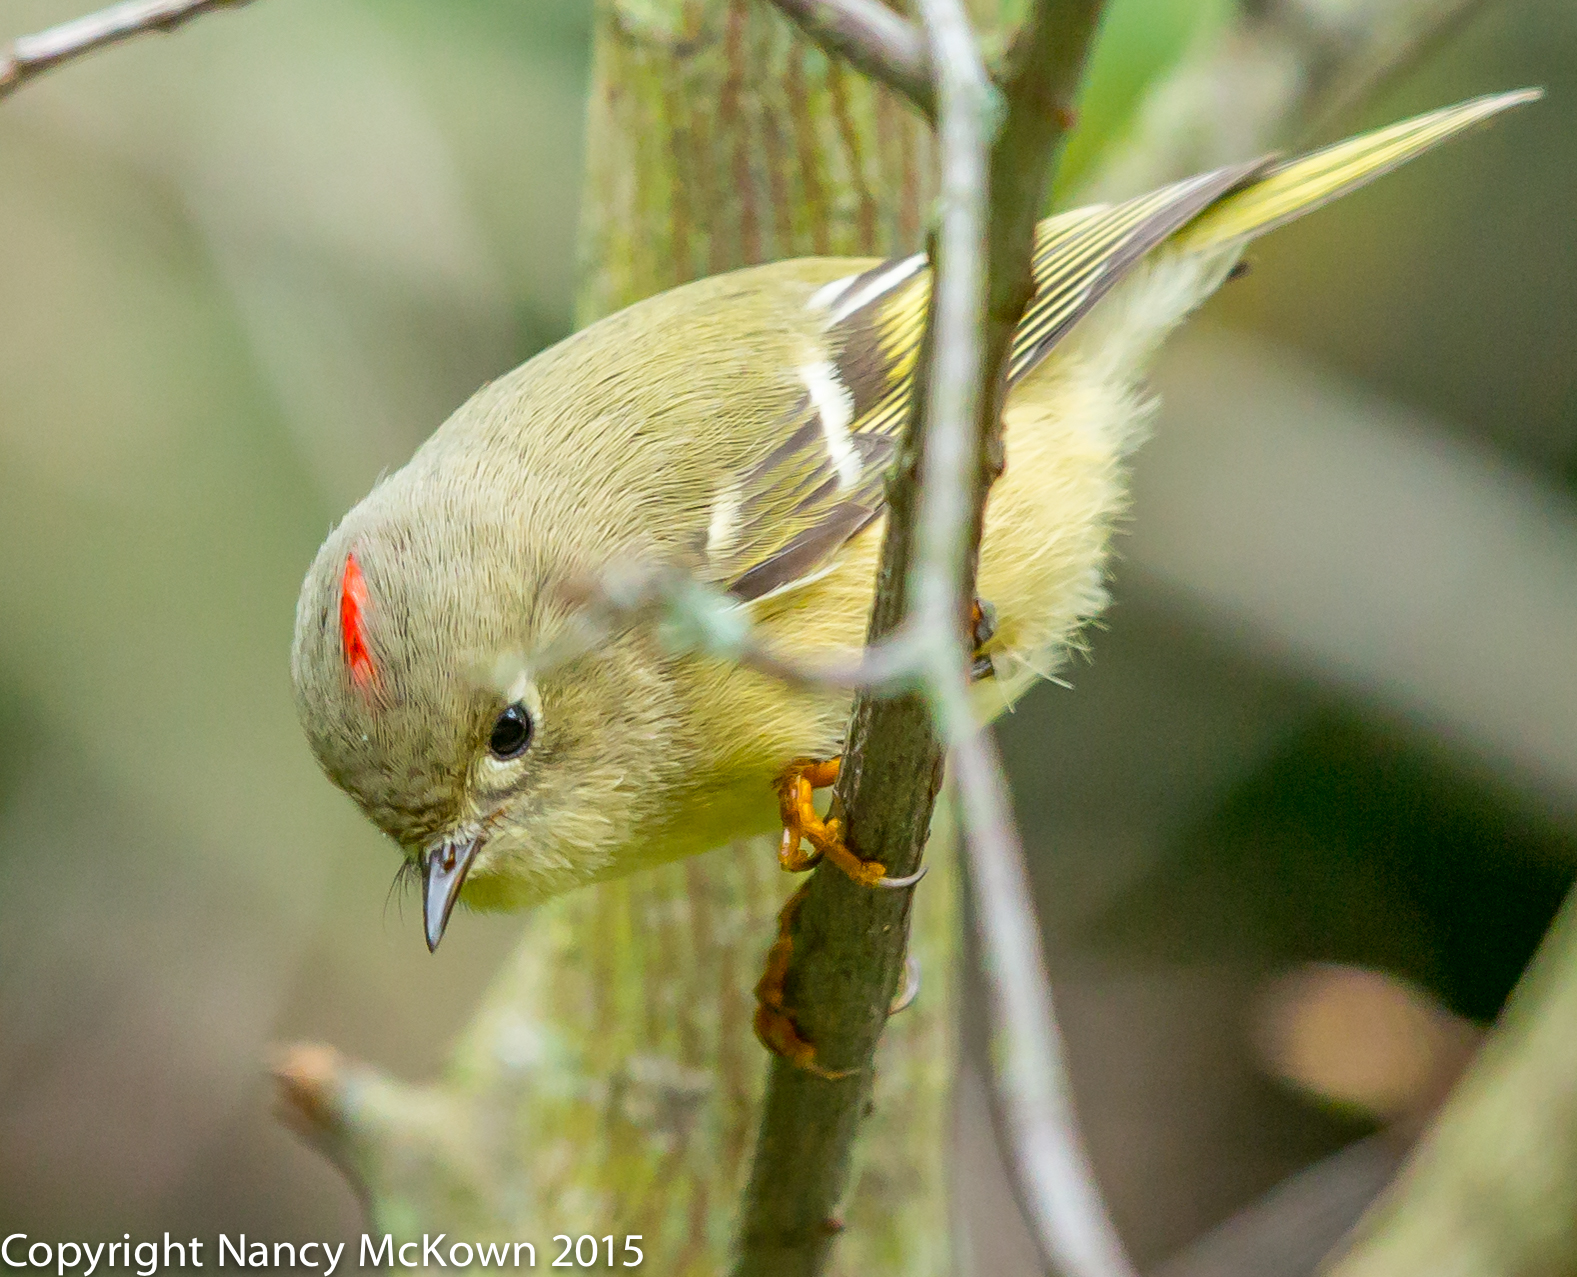
A Closeup View of His Ruby Crown.
ISO1500; f/5, 1/500 Second

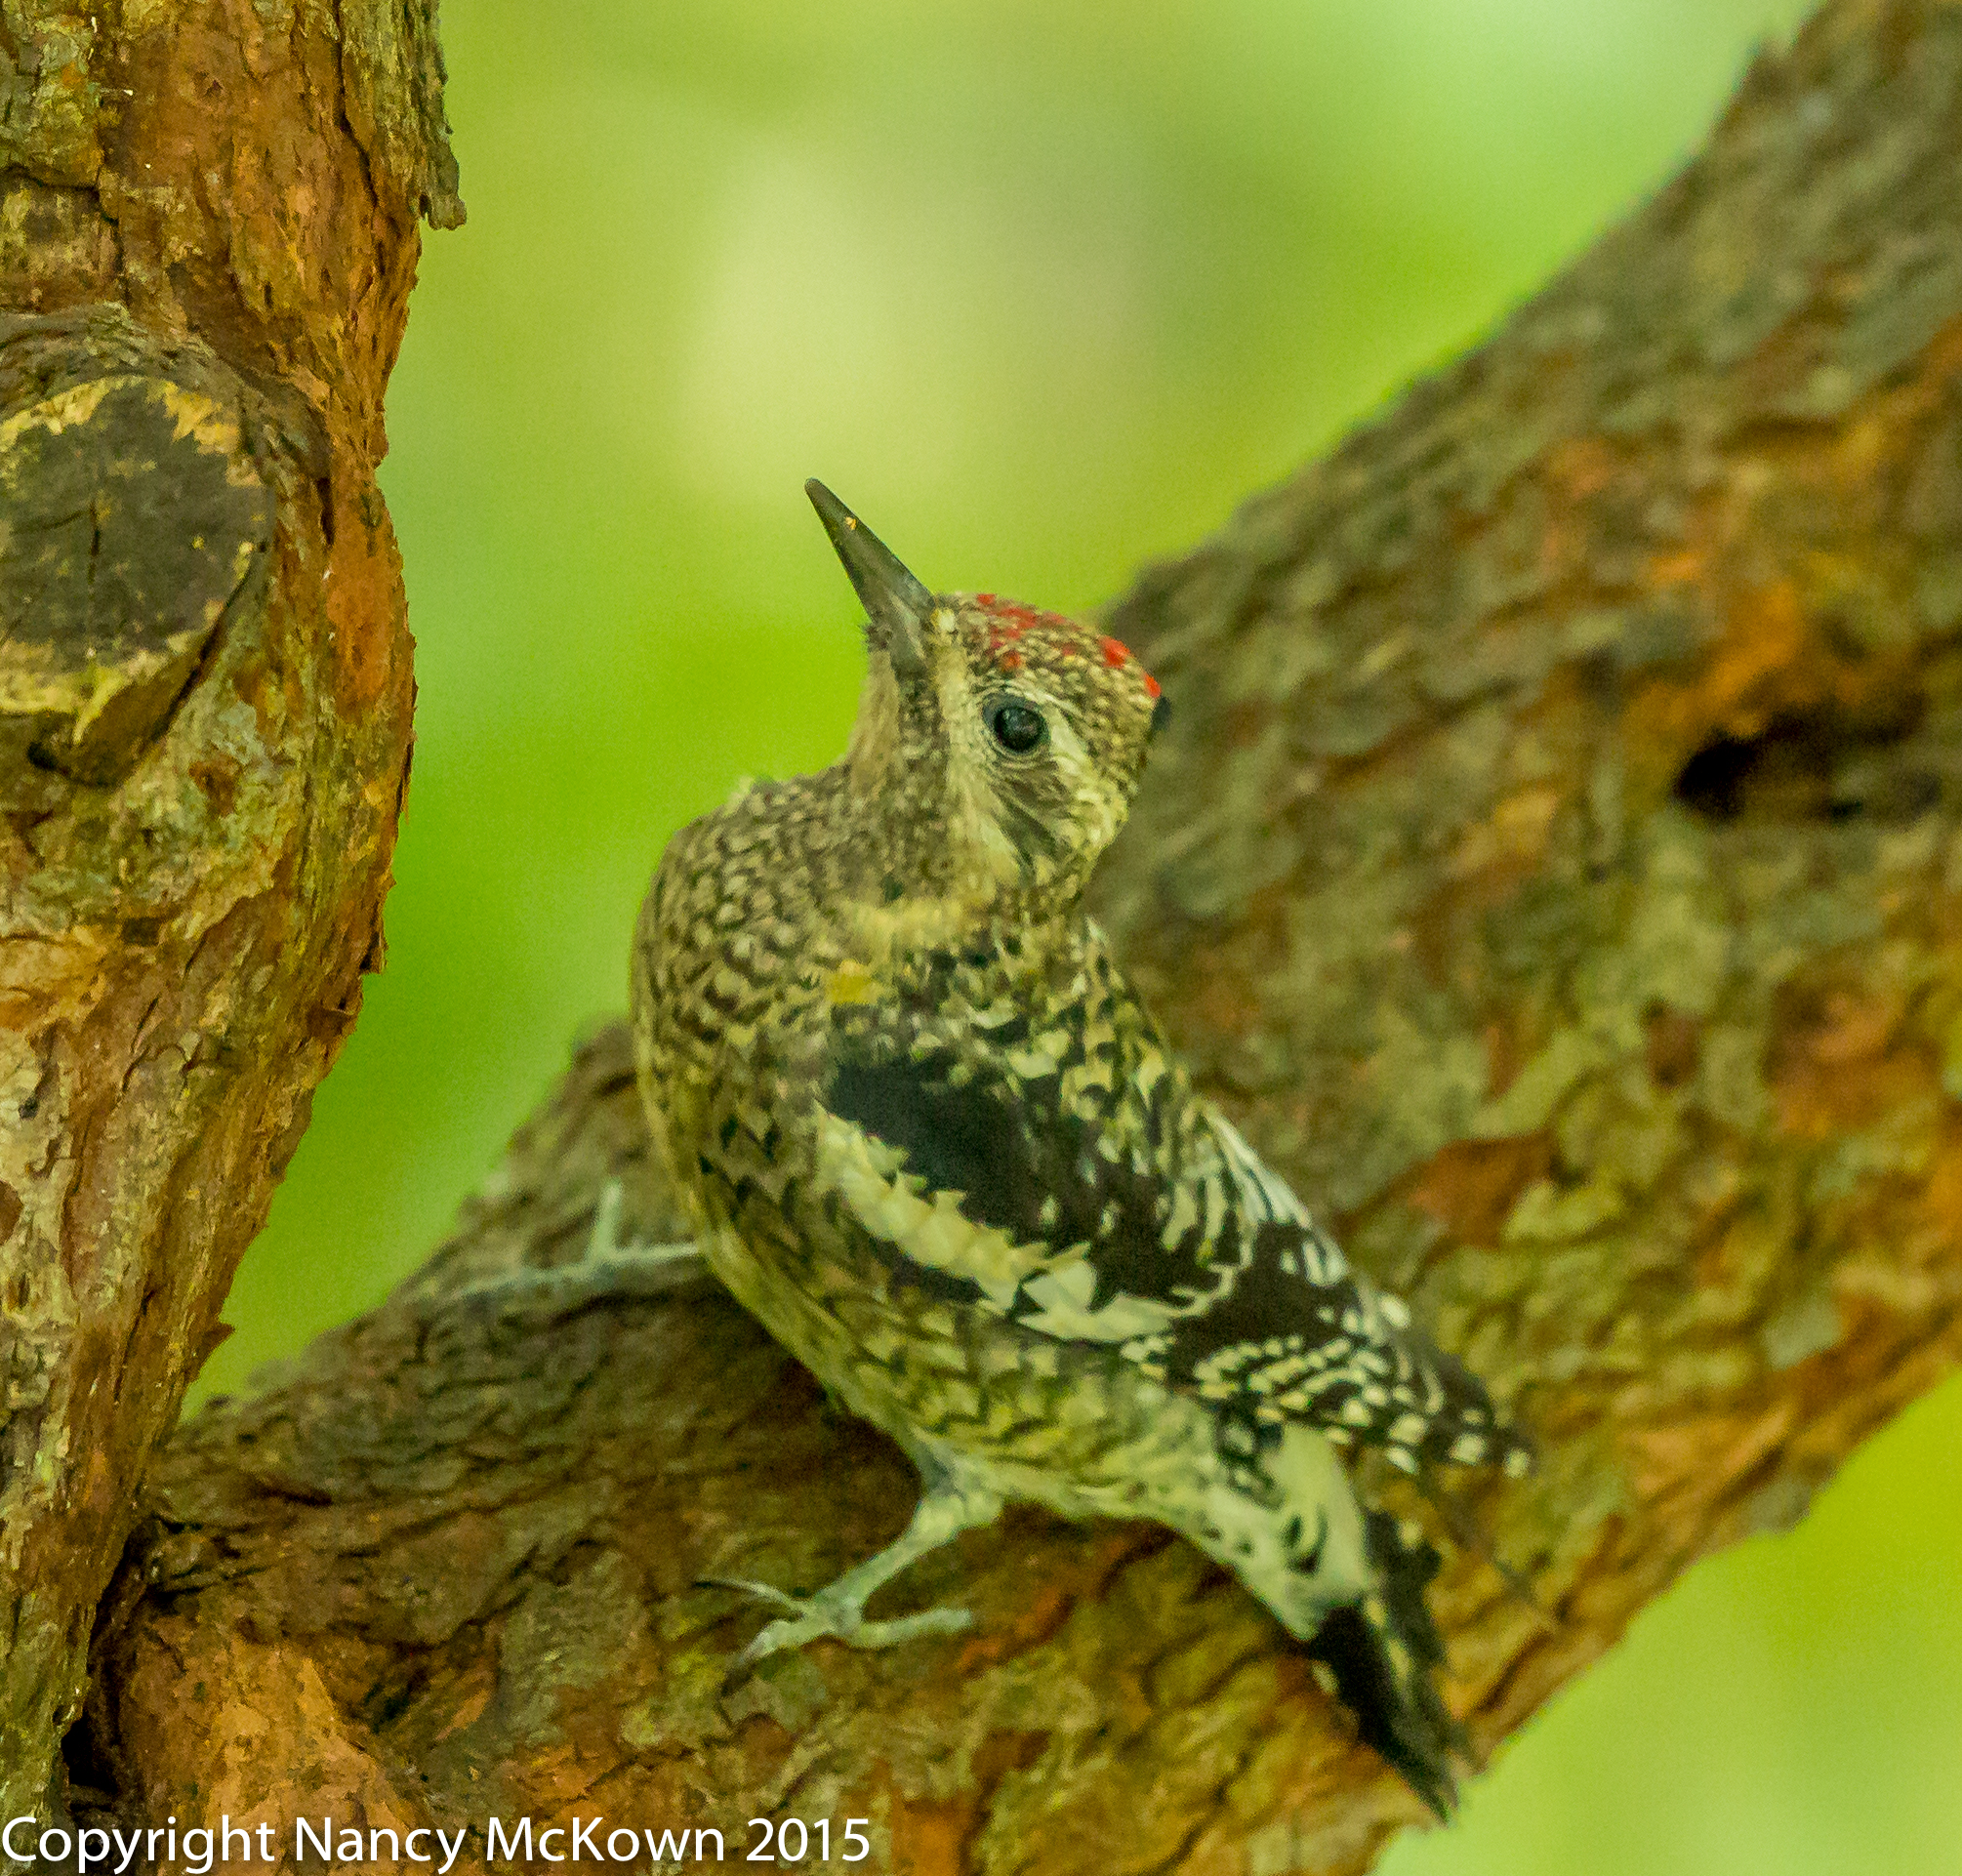
Does Manual Focus Decrease Minimal Focusing Distance?

There are lots of sites on the web touting the advantages of using manual focus over auto focus. One such benefit is giving the photographer a slight close-focusing edge by reducing the len’s minimal focusing distance. Later I did a quick (and unscientific) experiment to determine if switching to manual focus would reduce the minimal focusing distance of the Canon 500 L f/4 II lens. I fixed the lens on a bird perch spot right on the edge of where I knew auto focus could not achieve focus because it was a 1/2 inch or so too close to the lens. With the lens locked in place on the tripod, I turned off autofocus and tried to manually achieve focus on that spot. No luck. Manual focus didn’t seem to give me any advantage in the shorter distance category.

Just as well. I depend on fast auto focusing technology almost every day.

To read more about fast focusing technology, press this link.

To read more about close-up photography with telephoto lenses, press this link.


Photographing Magnolia Warblers and Thoughts About Camouflaging Your Telephoto Lens

Camouflage the Camera and Lens

Lately I have been researching online, trying to learn more about the art of stealth. I wish to camouflage my lenses with water resistant neoprene, similar to the stuff that wraps my bird blind and lens pouches.

Photo of Magnolia Warbler
Magnolia Warbler
Cautiously Taking a Look at the
Photographer and Camera.
ISO800; f/4.5; 1/400 Second

For the longest time, I convinced myself that I did not need to cover these bright white Canon telephoto monsters- that the birds just ignored them and did not need to feel more comfortable to perch a little closer. That’s just not the case.

Why Blend?

In bird photography, you must avail yourself to every advantage to keep the birds coming in close to the camera. Over the years, more and more migrating birds have been stopping off in our yard to rest and replenish. I have posted dozens of photos of these transients on my website and my flickr albums. I’m betting that if I make an effort to camouflage my equipment, more birds will come.

Photo of Magnolia Warbler
Magnolia Warbler
ISO1250; f/5; 1/500 Second

Options To Better Blend

First of all, why doesn’t Canon offer a painted-on camouflage lens option when they sell their professional photography equipment?  It’s true that third party vendors do market simple, pre-made lens wraps (for ridiculously big bucks) specifically designed for each brand and size of telephoto lens.  I just can’t bring myself to pay $100+ dollars for that stuff.

Since Canon will not step up, here are a few options for a photographer and her equipment to blend better into the birds’ natural environment:

  • Break the bank and buy a pre-made, form fitting, no adhesive, sleeve like and waterproof Neoprene lens covers. Lenscoat.com has options to protectively cover all your camera equipment (for $100+). Their website looks like a good place to start.
  • Conceal everything by throwing a green/brown cotton scrim net (with military pattern) over yourself, the camera and long lens. (Sort of like Harry Potter’s Cloak of Invisibility.) Lots of different sizes are available. The 42″ by 78″ costs $12.00 and is available at Amazon. This netting covers head to toe and is the most likely solution to conceal movement of the camera and photographer.
  • Make your own. One particularly ingenious photographer has designed his own home made, cloth camouflage jackets for his lenses. He has shared step-by-step directions at his website at this link.
  • Investigate Camouflage Gaffers Tape: 2 in. x 60 ft. in woodland forest green for $20 at Amazon. This will adhere vigorously to any lens. The manufacturer claims that Gaffers tape will leave no sticky residue when removed.

Working on The Art of Stealth

Billions of diverse species of birds migrate in the Spring and Fall, and we are very close to a major migration corridor along the shores of Lake Michigan. I am convinced that there are many more bird species near our yard that I can not see, birds that are not so approachable; birds who can no doubt see me with their keen eyesight and observation skills and consequently steer clear of the camera. To be a more effective photographer, I’ve got to do more to hide myself and the camera.

To read more about photographing Magnolia Warblers using manual focus, visit this blog posting.

To view the migrating birds that came through our yard last year, visit this post and this post.


Photographing a Blue Headed Vireo and Thoughts About Fast Lenses

Exposure Tradeoffs

We all know the low light exposure conundrum. The more you open up the aperture, in any lens, but most especially in long telephoto lenses, the more shallow (to the point of being razor thin) your depth of field becomes. With bird photography, that means (depending on the pose) that much of the bird’s little body is simply NOT in focus.

When I’m out in the State Game Area in the early morning, there’s usually lots of glorious sunshine allowing me to tighten up the aperture to 8.0 or smaller. Here at home, light filters down on a sunny day to accommodate a comfortable aperture of f/5 (with low shutter speed –assuming there’s no wind– and relatively high ISOs). But when it’s cloudy and rainy, the aperture on my 500 mm f/4L II IS lens  is mostly wide open. I could swap out lenses and use my 300 mm lens (2.8 L wide open), but then I sacrifice amplification. I’d much rather have high noise in an image that does not need cropping/zooming in post processing.

Photo of Blue Headed Vireo
Headshot of Blue Headed Vireo.
Beak and Eyes are in Focus, But not Much Else.
ISO1000; f/4; 1/500 second.

What’s a “Fast” Lens?

Lenses on which the aperture opens wide and thus allows more light on the focal plane are referred to as “fast” lenses. The more that aperture can open to let in more light, the “faster” the lens. The more light transmitting through the lens, the more flexibility with exposure parameters the photographer has.

NOTE: In aperture speak, when you “stop down”, you are letting in less light…. making the aperture smaller (by moving to a larger number)– and consequently, getting a deeper depth of field. Remember: The f/ represents the size of the hole allowing light into the lens. The smaller the f number, the larger the aperture.

Shallow Depth of Field

When I was photographing this Blue Headed Vireo, I had the 500mm lens wide open to f/4. See photo above. The head and eyes of the vireo are sharp because those bird parts were within the in-focus DOF arena. Those bird parts that were too close or too far away from the sensor are blurred because at f/4 there are only a few millimeters on which to lock focus.

To get an idea of how thin your depth of field can be at wide open apertures, see this DOF calculator. And, of course, if you want this information readily available in the field, there are DOF calculator apps available for iPhones and Droids.

Entire Subject Parallel to the Sensor

In the photo below, shot at f/5, most of the bird’s body is parallel to the sensor, and consequently, overall sharpness is good.

Photo of Blue Headed Vireo
Blue Headed Vireo.
Another Day, A Little Brighter.
Aperture Stopped Down, Just a Touch.
ISO2000; f/5; 1/400 Second

A Good Telephoto Lens

High end prime (fixed) lenses are usually “faster” than zoom lenses. Faster lenses are usually larger, heavier (I usually prefer a tripod with fast 300mm+ lenses) and much more expensive because of the sophisticated optics and highly responsive autofocus and metering technology incorporated into these lenses. A good telephoto lens will always be distinguished by its largest aperture setting. On a cloudy day, that means a lot.

To read more about image sharpness, please press this link.

Photographing a Yellow Bellied Sapsucker and Thoughts About Low Light Sensors

A New Woodpecker Comes to Town

Everybody has heard of this bird. Its name has been used in cartoon comedy for decades. The first time I saw a live Yellow Bellied Sapsucker was last week, clinging with its large, sharp claws onto the crusty trunk of the red bud tree right outside my window.  I’m used to seeing lots of woodpeckers, most of which stick around all winter. But photographing this transient, so distinctly wood-peckerish with its shock absorbing thick-head, chisel bill, and oversized clinging 4 toed feet (zygodactyl – two toes forward, two toes back) was a treat.

Photo of Yellow Bellied Sapsucker
Yellow Bellied Sapsucker Woodpecker.
ISO3200; f/4; 1/500 Second.

Drummer of Tree Bark

Yellow-bellied Sap Suckers are long distance migrators whose plumage looks quite different from our resident woodpeckers. Sapsuckers are woodland cavity nesters whose stiff tail feathers act as a prop as they hop up and down on tree trunks and drum on the bark. Like most large and mucivorous woodpeckers, they excavate the tree bark for sweet sap. Once these neatly arranged shallow holes are drilled, they feed and re-feed at their dripping “sap wells”, using their brush-like tongues to suck up the sap.  A good part of their daily routine involves maintaining and protecting their oozing sap wells from other sap loving marauders.

Photo of Yellow Bellied Sapsucker
Yellow Bellied Sapsucker.
ISO5000; f/4; 1/500 Second

Insufficient Contrast and Light

My ISO readings soared as I photographed this Yellow-Bellied Sapsucker clinging to the shedding red bud tree trunk. Despite my exposure settings, (low shutter speed and wide open aperture, mostly), conditions were just too dark to get a decent ISO.

Even sophisticated autofocus systems can only do so much when insufficient contrast and light are available. In addition, too much noise (caused by high ISO) disrupts the edges of an image, making them lose clarity and detail. The noise reduction software in Lightroom helps, but the more you try to reduce the noise in post processing, the more sharpness suffers.

The Canon 5D Mark III DSLR camera has a well balanced 22.3MP sensor, but the lack of sharpness on these images is readily noticeable. The only real noise reduction advantage I had during this shoot was that I photographed this woodpecker at fairly close range, thus reducing the need to zoom in and crop.

Photo of Yellow Bellied Sapsucker
Yellow Bellied Sapsucker.
ISO4000; f/4.5; 1/500 Second

The Sensors of Tomorrow

Since I photograph birds in low light conditions so often, I take notice of the research about new DSLR sensors under development. A new and improved 120MP sensor working prototype was introduced at the 2015 Canon Expo. Good thing hard drive space is cheap because each exported raw image gobbles up 210MB. This incredible resolution means that you can keep zooming and cropping in post processing (on a video monitor with enhanced resolution) and still see only fine detail, not pixels. 

At this point in development, the 128MP sensor demands the brightest of light to achieve sharp resolution. The DSLR camera that housed this new sensor was fixed at ISO100.  Too bad.

See this post about the advantages and limitations of the 50MP sensor Canon introduced this year on the Canon 5DS.

Addendum:  To my surprise, the Yellow Bellied Sapsucker came back the next day.  The light was better, so the ISO was considerably reduced.  (See photo below.)

Yellowed Belled Sapsucker
Yellow Bellied Sapsucker, in Better Light.
ISO1600; f/4.5; 1/500 Second
Photo of Red Eyed Vireo

Photographing the Red Eyed Vireo and Auto ISO

They Come, They Go

The Baltimore Orioles are gone. So are the Hummers, Red-winged Blackbirds, Robins and House Finches. I was so absorbed by the new and fun species coming through that I didn’t notice my summer avian neighbors departing.

Photo of Red Eyed Vireo
Red Eyed Vireo, Resting Long
Enough for Me to Make Exposure
Adjustments.
ISO1600; f/4.5; 1/500 Second

Photographing the Red Eyed Vireo

In the Spring and Fall, quite a few Vireos pass through on their migration path. At first I thought that this rather dull, olive colored Red Eyed Vireo was some kind of warbler, but upon closer inspection of his heavier beak, I knew he wasn’t. His most prominent features are the double white and black eyebrows, the lower black lines intersecting his eyes, and those ruby red irises. His foraging behavior is a little different too. It’s a more relaxed photo shoot because there is hardly any of the warbler-ish chaotic movement in and out of the foliage.

Photo of Red Eyed Vireo
Red Eyed Vireo,
Calling to the Photographer.
ISO2000; f/5; 1/500 Second

Auto ISO

If Web resources can be believed, lots of bird photographers consistently use the Auto ISO settings built into their modern DSLR cameras.  Auto ISO lets the camera’s computer automatically calculate (on the fly) the best ISO, given certain maximum and minimum parameters and the other exposure settings. It’s a valuable timesaver because the photographer can let the camera automatically respond to rapidly changing light levels.

For instance, if I’m shooting in “M” – Manual, with Auto ISO engaged, the camera’s computer is making one (ISO) exposure decision for me. (NOTE: It’s not really “Manual”, then, is it– see this post). If I’m shooting in Aperture Preferred or Shutter Preferred, with Auto ISO engaged, the camera is making two exposure decisions for me.

Photo of Red Eyed Vireo
Red Eyed Vireo. He Eventually Swallowed That Colorful Morsel (in the Protective Casing of a Gall?) ISO2000; f/5; 1/640 Second

The minimum and maximum ISO ranges that you can tolerate should be based on personal preferences and the noise reduction technology built into your camera’s sensor.

Spot Metering and Auto ISO

Auto ISO is my go to ISO setting when using Manual mode -even if lighting conditions are stable.

I had been using spot metering (along with Auto ISO) in my heavily shaded yard. Spot metering drastically reduces the size of the frame on which the camera calculates exposure. I thought this was a good exposure strategy because birds are tiny and like to hide in the shadows. However, metering these shadows with spot metering usually delivered a very dark exposure reading, causing the Auto ISO to skyrocket to unacceptable levels.

One strategy to keep AUTO ISO from rising too high is to set the camera to Evaluative Metering. The entire frame will then be used to read the light levels (including possible brighter areas away from where the bird is perched). Exposure may then brightened and cause the ISO reading (and consequent noise level on the image) to be reduced. (NOTE: Overall exposure adjustments can then be made in post processing.)

Read this post to learn more about how Evaluative Metering works.


Photo of Bay Breasted Warbler

Photographing a Bay Breasted Warbler and Playing with Exposure

Tracking Warbler-ish Activity with the Camera

I can now quickly recognize warbler-like activity; the in and out pecking and skittering movement of something tiny and yellowish, ever so slightly dipping the branches of trees, ferns and bushes. I have to admit that I can recognize and name only a few warblers on sight. To my eye, the differences between most warbler species are subtle, especially when they are not in full Spring plumage.

I enjoy the luxury of experts, time, and my trusty camera and long telephoto lens. Warblers come and go so fast during migration, that I’ve come to rely on my camera to capture and preserve the “warblish” details that the experts find so revealing and I find so elusive.

Photo of Bay Breasted Warbler
Bay Breasted Warbler, Checking Out the
Long lens
Pointing at Him.
ISO1600; f/4; 1/400 Second

Photographing the Bay Breasted Warbler

I was able to ID this female (or juvenile) Bay Breasted Warbler only after uploading a photo and consulting with the birding experts at WhatBird.com. The male Bay Breasted is unmistakable in the Spring with his black mask, dark gray streaking, and bright chestnut chin, head, breast and flanks. The males lose much of that colorful distinction and blend in appearance with other warblers sporting two white bars on the wings. The birders say that the black legs set Bay Breasted Warblers apart from the Blackpoll Warbler.

Photo of Bay Breasted Warbler
Bay Breasted Warbler. Notice the Black
Legs and Feet.
ISO1600; f/4; 1/500 Second

Playing with Exposure

As you can see by the ISO readings on the photos above, I continue to photograph migrating warblers in my heavily shaded yard when the rains and hunger drive them down to the trees.  Lately, I’ve been lucky because the birds have been perching on the serviceberries, low lying ferns, grasses and other less dense foliage outside my window. Even though the light is still dim on this greenery, the ISO gets a boost because those areas are more evenly lit.

Limit the Cap on Auto-ISO

I shoot in RAW almost exclusively, with the camera set to “M”, the manual setting. I set the shutter as low as I dare and open the aperture to get as much light as possible. The ISO is almost always set to “Auto”, and the ISO auto range is capped at 6400. (NOTE:  If the ISO is capped at 6400, and the light is still inadequate for proper exposure with the manually set aperture and shutter speed, the shutter will still fire, and deliver an underexposed image.) Despite the very good full-size sensor in the Canon 5D Mark III, the noise is objectionably high on ISO settings above 6400, no matter how close I am to my subject. On dreary days, I miss a lot of shots with this ISO cap. Sadly, exposure choices are limited with low (natural) light photography.

Raw Format

RAW format takes more time, more patience and so much more hard drive space, but I find it worthwhile for bird photography. When the camera is set to RAW, images are not processed in the camera. Once you import them into the post processing software, you see exactly what the sensor captured.

It’s not hard to screw up exposure settings when a fabulous bird appears unexpectedly in front of the camera. Despite all my time in the field, excitement can still cause me to I forget to change some setting on the camera. With the camera set to RAW, little screw-ups like that rarely matter.

Histogram Magic

When I first import RAW images into Lightroom, they always look a little dark… a little dull. So, how do you know (technically) how much exposure to add in post processing?  Check the histogram.

For Evenly Lit Images

Sure, you can eyeball it…but eyeballing hundreds of images can make your exposure dial trigger finger a little goofy. The histogram gives you a mechanically superior exposure. It’s simply an information graph mapping dark to light. Ideally, and assuming you have an evenly lit scene, you will see a bell curve. The best way to adjust correct exposure in post processing is to add exposure until the bell curve on the histogram peaks at the center of the chart.

Creative Choices

Having a technically well exposed image is not necessarily the goal in post processing. Go with your heart…. you may find that the image is more pleasing overall when you intentionally under or over expose your images.

One of these days, I will take the time to experiment more in post processing.  I usually go with the natural look, but I do find appeal in skewing the light, the grain, the focus. It starts out by playing with the other color and filter presets that come with Lightroom.

To read more about RAW format, visit this link.

To read more about the Histogram, visit this link.

Photo of Black and White Warbler Bathing

Photographing A Black and White Warbler Bathing

Low Light Bird Photography

Sometimes a bird photographer has no choice but to make the most of shooting in low light, rainy conditions. If you’re lucky, soft backlit raindrops can tickle the leaves just enough to make them shimmer and glow appealingly and cast dreamy light onto your subject. Sadly, this day had no such light.

Haze and moderately heavy rain dominated the scene when I noticed this Black and White Warbler perched in the Serviceberry tree right next to my library window. (So happy to have a roof over my head.)  My camera was set up and ready to go, just a little further back than usual to avoid the splash of the water cascading off the roof.

Photo of Black and White Warbler
Black and White Warbler,
Bathing and Drinking in the Rain.
ISO4000; f/4; 1/400 Second

Photographing Bathing Warblers

The Serviceberry offered this little warbler some protection from the rain, but its small leaves were not as densely packed as some of the more protective evergreens and redbuds near the library. The heavily packed leaves would have blocked more light – taking the already soaring ISO levels unacceptably higher. NOTE: In these photos, the falling raindrops are barely visible because of the slower shutter speed and lack of backlighting.

By the looks of this Black and White Warbler, he found the perfect breezy perch on which to bathe his boldly striped black and white feathers. He seemed invigorated, even joyful, despite the lack of privacy in his outdoor shower. While splaying his wing feathers and allowing the warm rain to soak the skin, he often opened his mouth for a drink.

I often see birds preening, but not bathing. A good soaking no doubt washes away the dirt and other particles that can’t be cleaned with the bird’s beak. The transients that visit our yard appear to enjoy a short drenching rain over the bird bath. This little one looks like he is singing in the rain, though there were no vocalizations.

Photo of Black and White Warbler
Black and White Warbler
Tussling His Feathers for
Optimal Coverage.
ISO5000; f/4; 1/400 Second

September’s Fall Bird Migration Traffic

Migration traffic in our yard has been slow (compared with last year). Looking back on my Fall, 2014 Flickr album, (Fall 2014 Flickr) a lot of the vireos, kinglets, thrushes and warblers arrived last year in late August. It’s still early though, and I’m hopeful that some newbies (birds I haven’t photographed before) will stop to rest and replenish in our yard. According to the migrating maps and charts put out by e-Bird, September is a big month. Almost every species of migrating birds are on the move–globally.

I haven’t seen this little Black and White Warbler since I photographed him. No doubt he’s on the wing again, continuing on his long and perilous journey south. Most of the avian transients are fair weather, nighttime flyers. My photos from last Fall confirm that when winds and rains come, the migrating birds descend, and I’m more likely to see and photograph some new visitors. I welcome the opportunity, and will photograph them in any usable light, despite high ISOs.

To read about the migrating birds who visited our yard last Fall, press this link and this link.


Photo of Immature Orchard Oriole

Photographing a Juvenile Orchard Oriole

Finally….an Orchard Oriole

I’ve been looking for an Orchard Oriole to photograph for over 2 years. The beautiful Baltimore Orioles are quite a common sight in southwest Michigan. They are bold and gregarious, especially near a feeder filled with grape jelly. But the Orchard Orioles are less numerous, and more cautious.

Photo of Immature Orchard Oriole
Immature Orchard Oriole, hiding in the bush.
ISO1000; f/7.1; 1/1000 Second

Auditory ID

Last Spring, one of my birding friends told me that he had heard the Orchard Oriole’s song near an old apple orchard in a corner of the Allegan Forest. This man is a birdsong auditory bloodhound, so I made it a point to spend some time in this space. I saw and heard lots of other insectivorous bird species nesting there- Eastern Meadowlarks, White Crowned Sparrows, Barn Swallows, Eastern Bluebirds, Robins, Chickadees, Bobolinks, and many many more, but no Orchard Orioles.

Finally, this juvenile Orchard Oriole made an appearance, flying back and forth, low and wobbly between a couple of evergreens. Once perched, he tucked himself within the branches, looked around and called anxiously for the adults. I changed the focus setting on my camera to single point spot auto focus, pointed my lens toward the branch on which the bird perched and tried to maneuver that spot in the viewfinder (a tiny square box on Canon cameras) on the bird’s head.

Advantages of Spot Focusing

When there is lots of foreground and/or background clutter, similar to the evergreen branches in the photo above, the telephoto lens will search forwards and back, trying to lock focus. Spot focusing is designed for those times when the camera’s auto focus point needs to be tiny and precisely placed on the spot that you want focused correctly.

When you first engage spot focus, the “spot” is located in the very center of the viewfinder. The best part about spot focusing is the ability to continually move that focus point around in the frame. Most advanced cameras have a four-way selector dial (in the back of the camera) with which to move the spot autofocus point exactly where you want it.

Positioning this focus point does take time, so spot focus works best when the subject is not on the move.

To read more about the difference between spot focus and spot metering, visit this post

To read more about auditory bird ID, visit this post.

Photo of Oven Bird Warbler

Photographing an Oven Bird Warbler in the Brambly Wood

Photographing an Oven Bird

Deep within the dense brambly Allegan forest, I found an enclave of warbler species that could scarcely be seen dodging in and out of the foliage. In this rich space, I saw flashes of blue winged warblers, yellow rumped warblers, yellow warblers and chestnut-sided warblers identifiable (just barely) through my dark, noisy and blurry photos.

Photo of Oven Bird Warbler
Oven Bird Warbler, Finally Showing Himself (mostly).
ISO1600; f/8; 1/1250 Second

ID Photos

As it is with most of my surprise bird encounters, my 500 mm lens with 1.4 extender was resting on the car door. The tall grasses in front of the dense brush were a hindrance to locking down focus. I took as many shots as the lens would allow, mainly trying to get a closer, identifiable look at what was hiding in there.

Thankfully, one brave warbler was curious enough to come out into the open long enough for me to get off a burst. The Oven Bird Warbler.

A Ground Foraging Warbler

A stocky warbler with dark streaking spots on its breast, the Oven Bird looks and acts more like the larger Swainson’s Thrush. Its wing and back feathers are a dull brown-olive color. A reddish brown crown bordered by two stripes sits on his head.

This warbler gets its name from the domed shaped (oven-like) nest it builds amongst the decaying leaves, moss, and grasses near roots and fallen trees. Like all warblers, (and some bird photographers) the Oven Bird abandons Michigan for warmer winter climates.

Achieving Focus Lock

A major challenge on this shoot was locking down focus. I had the focus limiter switch on my Canon 500mm 4.0L II IS USM telephoto lens set for the longest available focusing distance. Consequently, the lens took way too much time hunting back and forth from “4.5 m to infinity”.  I quickly changed the switch on the lens barrel to the “10m to infinity” setting. The hunt time was reduced substantially because the lens no longer tried to focus on the tall grasses closest to the camera.

Photo of Oven Bird Warbler
Oven Bird Warbler
Looking Vulnerable and New; Perhaps a Juvenile.
ISO2000; f/8; 1/1250 Second

Revisit this Enclave with Video

As much as I love photographing warblers, it’s hard to get photos with beautiful creamy backgrounds because of all that brambly wilderness in the spaces they call home. Since the warblers are mostly uncooperative about posing on perches in prime locations, I’ve considered mixing things up next time by turning on the little used video component on my fancy cameras.

Turning on the video component on both of my cameras (Canon 5D MarkIII and Canon 7D Mark II) is easily done with a flip of the switch. But sadly, a camera resting on the window of the car door is not a steady enough mount to engage video. Shaky videos just make me nauseous.  To do it right means waiting for a windless day and setting up the camera and lens on my most sturdy tripod.  Shutting off the audio component is a must because 1) the little mic on the camera is substandard, making audio an irritating distraction and 2) the bird will likely not vocalize much this time of year.

So, my mission in the next few weeks is to research how best to video birds and then make a good video of the the migrating warblers who stop to rest and replenish in our yard.

I’ve got a lot of research to do.

Read this post to learn more about locking down focus.

Read this post about photographing the Swainson’s Thrush.


Photo of Blue Winged Warbler

Photographing Blue Winged Warblers

Searching for Blue Winged Warblers

Photo of Blue Winged Warbler
Blue Winged Warbler, After
Preening. Looking
Shiny, Foofy, and New.
ISO1000; f/8; 1/1000 Second

Both the male and female Blue Winged Warblers are tiny, brightly colored balls of energy, tempered only by their quiet and bashful natures. Since the summer began, I have made a point to drive to a mostly deserted country road in the Allegan Forest next to a cluster of dense, brambly foliage at the forest edge. There, I watch and wait for a nesting pair of Blue Winged Warblers to appear. I know they’re in there because I have photographed many a blurry snapshot of their distinctive eyes as they stare at me from the thick brush. Those eye markings are hard to mistake. Looks like someone took a dark eyeliner and drew a heavy black line from the outside corner of one brown eye, past the pointy beak and through the other brown eye. Quite a striking attribute when drawn atop a bright yellow face.

How Long Should A Photographer Wait?

I pull off the road at the opening of a small 3′ x 3′ passage into the brush. There within, I can see a little secluded space, amply lit by the morning sun, where the warblers just might leave the comfort of their nesting area to perch on dead and peeling branches. (It would be so exciting if there are Blue Winged fledglings about.) My eyes are weary from raking the foliage, looking for the ever-so-slight warbler movement (like softly falling raindrops) on the interior branches. I wait….. how long should a photographer wait?  It’s 7:30 a.m. and I make a pact to leave by 8:00am- if I don’t see any action.

It’s past 8:00 am and I’m still waiting; still hoping. The light continues to softly illuminate the perch on which the lens in trained. I think I see second hand movement- reverburation from the forest floor. Blue Winged Warblers commonly build nests on or near the ground, but so do many other forest dwellers.  It’s impossible to know because I can not see through the low lying brush. My lens is resting on the storage bin that I keep in the passenger’s front seat. No need to worry about twisting and contouring my body to maneuver the lens..my only focusing option is to follow the light through this small and under-grown portal.

I see a flash of yellow. The male Blue Winged Warbler is bustling about, within partial view. Tentative and watchful, he knows I’m there and looks me over with those eye-lined eyes. Somehow, I pass inspection because he hops onto the peeling branch right in front of the lens and begins preening. He’s so tiny, and a good 20 feet away. I will have to do some cropping- but other than that I’ve got a perfect shot.

Photo of Blue Winged Warbler, Preening
Blue Winged Warbler,
Taking Pains to Groom His Feathers.
ISO1600; f/8; 1/1000 Second

Healthy Feather Grooming

Birds groom themselves multiple times a day. Good feather maintenance is essential to survival. The preen gland (uropygial gland- located at the base of the tail feathers) supplies the secretions needed to keep their feathers in optimal flying condition. Birds rub their bills and heads with these secretions and then methodically slather this mixture all over their feathers and feet, picking out unwanted dust, dirt and parasites with their beaks. (No doubt somewhere in the parasitic mix, are beneficial organisms essential to healthy feather grooming.)

Before flying off, this Blue Winged Warbler takes a few minutes to show off his freshly groomed plumage. His feathers look like they were professionally washed, blow-dried and styled. And then he is gone.

Warbler Waiting

More times than not, I find myself waiting for birds long past the time I pre-set in my mind to move on, and coming back home with nothing. For warbler waiting, all it takes to keep me on task at one location is a slight foraging movement. It’s not an efficient use of my time, but my self imposed deadlines fly by and I enjoy the sights and sounds that come with a glorious day in the woods. This time, I have beautiful Blue Winged Warbler photos to show for my patience.

To read more about photographing preening birds, please visit this post.