Monthly Archives: August 2016

Photographing the Lapland Longspur and Thoughts About Composition

Photographing the Lapland Longspur

The Lapland Longspur is an uncommon winter visitor in SW Michigan. Come Spring, this species migrates north to colder climates. Finding a Lapland Longspur in early summer, interspersed with other ground feeders like Horned Larks and Vesper Sparrows is a real treat. These rare sightings put me on high alert. I do NOT want to miss the shot.

Photo of Lapland Longspur
Lapland Longspur
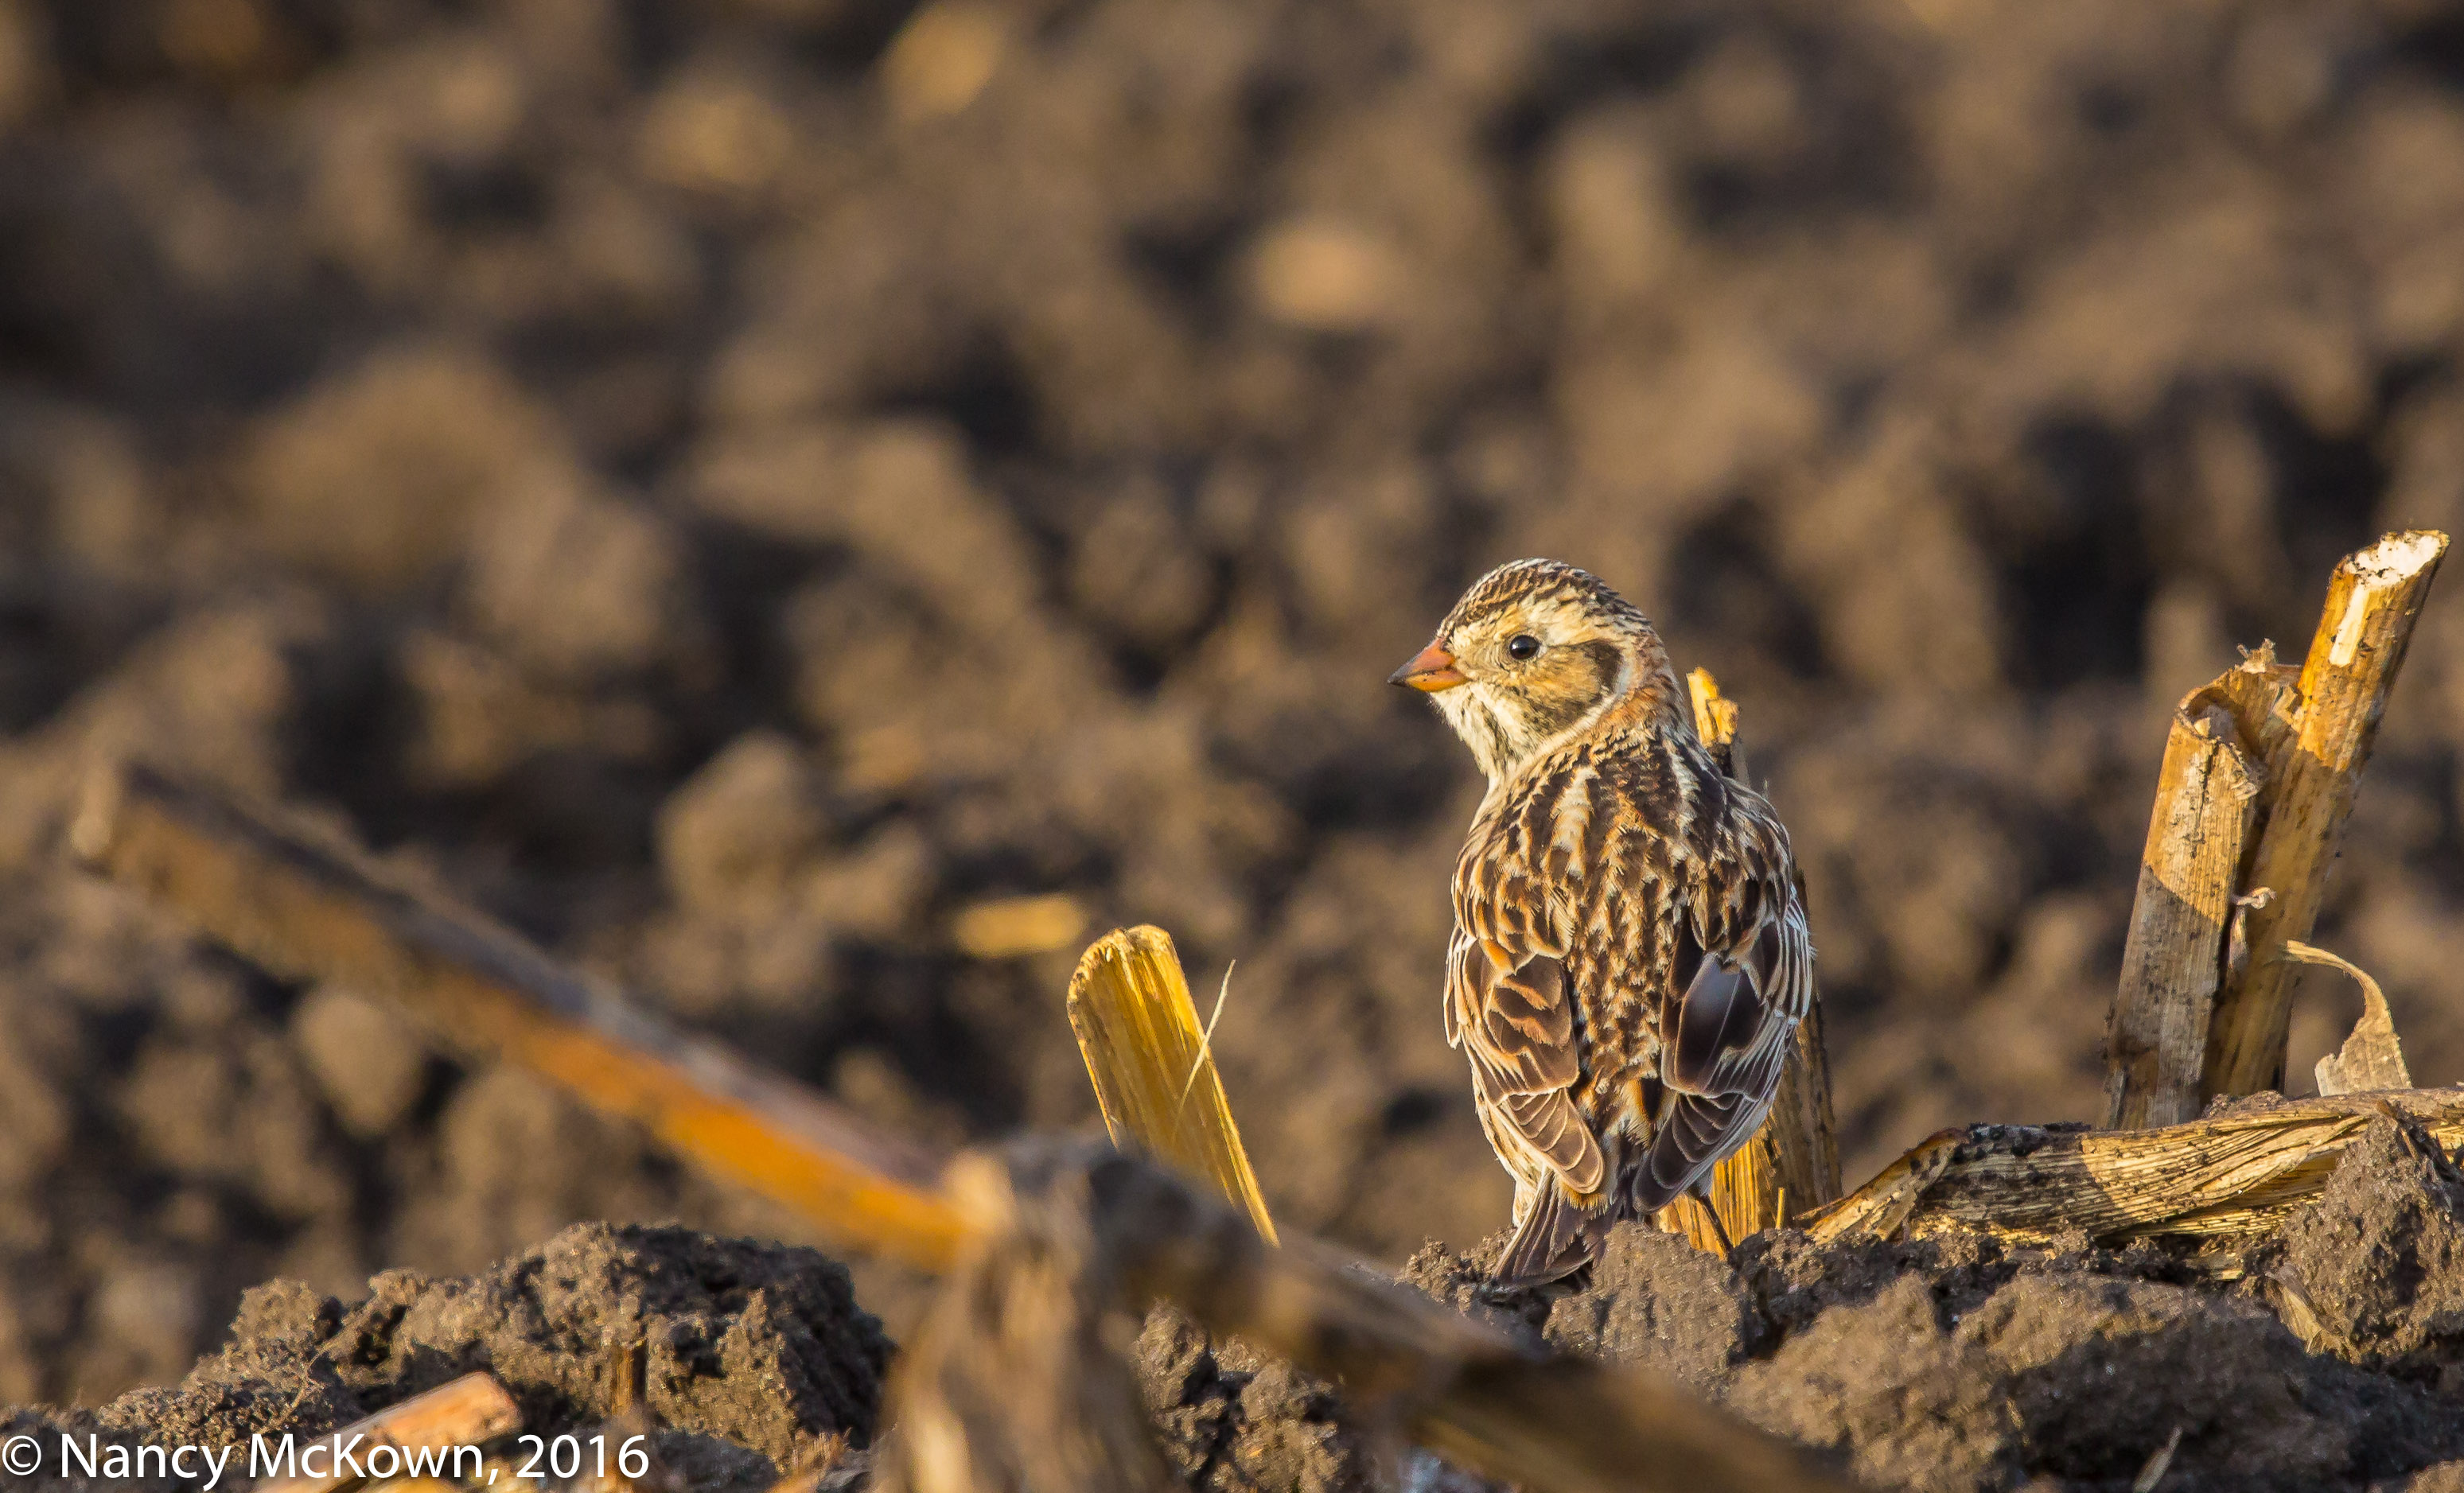
Head and Neck Framed in the Center.
ISO2000; f/8; 1/640 Second

Luxury of Composition

I found this avian treasure late one morning while driving on a deserted county road in the Allegan State Game Area. He was foraging in a spent corn field near the edge of the road ideally close to the camera. Warm earth tone colors dominated the scene; consisting of mostly dark, plowed chunky earth in umber and ochre colors. A few dried golden stalks from last year’s corn lay in the field, reflecting the morning sunlight and complementing the bird’s plumage.

Before I brought the car to a full stop, I lifted the camera, 500mm lens and 1.4 tele extender from my lap and rested it on the bean bag cushion protecting the car door window. The Lapland Longspur noticed me immediately and stayed less than a minute, but it was enough time to get off a couple quick bursts.

That’s often the way it goes. The bird is long gone before I have a chance to think about the compositional options available to me.

Compositional Guides

I feel less pressure when an uncommon bird is unafraid and lingers within close view of the camera’s lens. I find myself taking more time to compose thoughtfully and precisely.

DSLR camera composing guidelines (available via the menu system) are customized to help the photographer visually arrange what she sees through the viewfinder. They serve as a starting point by overlaying a 9-part grid intended to help compose more artistically.

This framework allows you to mentally apply the “Rule of Thirds” by compartmentalizing the image into equal parts, horizontally and vertically. You then compose the scene by positioning the subject(s) in the frame in or around those intersecting lines, thus leading your viewer’s eyes to your subject(s).

Photo of Lapland Longspur
Lapland Longspur
Framed with Guidance from the Camera’s Viewfinder Grid.
ISO1250; f/8; 1/640 Second

Compositional Food for Thought

I find that applying the Rule of Thirds helps me pull together and balance elements when I’m composing — to accentuate the subject in a more pleasing and/or stimulating way. It also helps me visualize a square frame through the viewfinder, instead of the usual rectangular frame. (NOTE: To read more about image composition, press this link.)

Judicious cropping in post processing becomes easier when I pay attention to the rule of thirds while composing. So often my images have the bird positioned smack dab in the middle. That’s OK, but sometimes it’s compositionally prudent to shift your subject away from the middle point and accentuate other parts of the scene that may reveal a more complete story.

Of course, it helps when there is something captivating within the scene of my viewing screen to pull together.

Setting the Scene

Although I mentally apply the Rule of Thirds when photographing birds, I do not activate the viewfinder gridlines in my DSLR cameras because I find them distracting. I am more likely to use the grids when photographing people or places… where I have the time physically manipulate the camera and/or the subjects before I start shooting.

Being Prepared Only Goes So Far

Ultimately, being prepared only goes so far in bird photography. If I stumble upon unexpected bird activity, the primary objective is to deal with the limitations of light and location and capture the moment quickly. There’s rarely time to stop everything to indulge in the lavish luxury of setting the scene.

That said, I like to think that my quick GET THAT SHOT response to bird photography also includes a spark of compositional creativity.   😎


Photographing Purple Finches and Thoughts About the Groundwork of Nature Photography

Photographing Purple Finches

While I watch for birds to photograph around our home, I often see a fox, thin and young, with a shaggy tail and reddish coat blotchy with mud. I think of foxes as being wiley….clever, stealthy, patient and quick, but this one just comes ambling through the backyard in broad daylight, looking around for an easy opportunity (perhaps a sleeping squirrel?) as she passes through. She does manage to displace some of the birds – though they don’t look especially worried about her presence.

The Purple Finches photographed here were watchful of the fox, but did not scatter as she came trotting through the area where we keep our feeders. I did not expect any threatening encounters as the finches rarely hop down to forage at ground level, nor can that fox climb trees.

Photo of Male Purple Finch
Male Purple Finch
ISO1000; f/6.3; 1/640 Second

A Different Approach

Early one morning I watched this fox gingerly carry her small, helpless baby kit in her jaws. That started me thinking about workable camera/tripod layouts for a different sort of photo.

The camera setup (as it is situated in my library) offers an eye-level view of birds in the nearby understory trees. It is targeted to capture up-close shots of song birds; on this day, Purple Finches. The minimum lens focusing distance of a Canon f/4 L II 500mm lens = 12′ 14″. The feeders are closer to the library window than that, but the tree branches nearest to the feeders upon which birds alight are between 13 and 18 feet from the windows. Lots of interfering branches and leaves near this foliage and in the immediate background, but with the camera and long lens positioned so close, it’s not hard to isolate the subject.

As comfy and convenient as my indoor set up is, it would not work for my new imaginary scenario. I would have relocate outside at ground level within my heavily wooded yard and close to where the fox regularly visits.

Photo of Female Purple Finch
Female Purple Finch
ISO2000; f/7.1; 1/800 Second

Steps to Actualize Dreams

Fabulous bird photos don’t just land in front of your camera lens. Once you become inspired, well thought out plans and actions are required.

  • Setup must not interfere with my bird friendly environment.
  • Setup arrangement would have to have enough clearance for the lens to successfully track moving subjects, at least minimally.
  • Stealth is necessary. Must determine the best spot to set up blind, taking into consideration background, light, time of day, telephoto lens (see field of vision post), wind and weather.
  • Within the blind, I must adjust the tripod legs so they are as low to the ground as possible – 12″. (Tripod center columns removed.)
  • I will be in the blind for long periods, so I insert my campy chair. (The Crazy Creek Chair, light weight nylon, adjustable, light, padded, low to the ground, with back support.)
  • Watch attentively, wait and hope.

Preparation Does Not Always Lead to Opportunity

It took a couple days, but I successfully re-created this dream scenario into an actionable setup. I have watched and waited for many hours in that blind. So far, lots of resident song birds, squirrels, chipmunks, mice and deer roaming about, but no fox; at least none that I saw within the confines of my blind.

Perhaps this fox is more deft than I thought.

Resilience and Tenacity

Watching the birds interacting with their environment and visualizing possible scenarios to photograph constitute a lot of what nature photographers do. Then comes the strategizing and setting up to actualize those dreams. Often nothing comes of it, but there’s always a chance that you will be in the right place at the right time with the right equipment.. and you get the shot.

If something serendipitous happens while you’re out there, all the better.

Photographing an Immature Red Bellied Woodpecker- LCD Screen Glare

Photographing a Young Woodpecker

The perching bird looked like a newly fledged Red Bellied Woodpecker….innocent, very shaky, possibly on her maiden voyage out into the wild. No trace yet of the red tinted feathers that will soon appear on her head and belly. (For a moment I wondered if this bird was another species of woodpecker but the black and white streak patterns on her wings were very distinctive.) She used her oversized clutching zygodactyl feet to latch onto a cracked and decayed tree bough that had been pock-marked with dozens of woodpecker holes. It was an ideal perch for bird photography- one that we had erected between two trees in front of a lush green background and away from distracting branches.

The fledgling looked around for a moment, spotted her parent, then began her harsh rattling call to be fed.

Photo of Juvenile Red Bellied Woodpecker
Fledgling Red Bellied Woodpecker.
Notice the Motion Blur– This Young Bird is
Fluttering her Wings To Signal Her Parents.
ISO1250; f/7.1; 1/500 Second

LCD Screen Glare

My camera was setup on a tripod with the low morning sun behind me. I positioned the lens to capture (as the bird’s background) a multilayered forest of feathery ferns huddling at far end of the driveway. I adjusted the aperture a little wider than usual to transform those individual fronds into lush, polished buttery green swirls-  picture perfect bokeh.

At first when I magnified the camera’s LCD screen to take a look at the images, I saw only a harsh glare. I could not review the quality of the background or see any detail on the woodpecker’s feathers. Hoping for more bird action, I stayed in that location until the light was no longer appealing and then went into the house to review my images.

Photo of Juvenile Red Bellied Woodpecker
Juvenile Red Bellied Woodpecker Calling for Food.
ISO1250; f/7.1; 1/500 Second

Anti-Glare LCD Viewfinders

It’s not uncommon to have the DSLR camera’s LCD viewing monitor compromised by reflection and glare. LCD protectors (for phones, computers, cameras) are available to help alleviate this problem. They purportedly let you closely inspect your images outdoors without the distractions of reflections or shadows. An added benefit is the claim that these anti glare covers help prevent scratches on the camera’s LCD screen.

My experience has been that these covers do work to reduce glare, but the additional layer of plastic or glass on the LCD screen make the images less sharp and colors less vibrant -especially when I attempt to closely inspect with magnification. I don’t apply them to my DSLR cameras, phone or computer.

These days, DSLR camera LCD screens are engineered to be resilient. They can still be scratched if the camera is crammed into a bag along with piercing keys, zippers or anything sharp. The scarred LCD screen will most likely still display your images – but who wants to look at surface scratch marks every time you review your images?  Professional level DSLR cameras are constructed to be ruggedly handled, but it’s best to treat them with deliberate care.

See more photos of summertime fledglings in this post.

Photographing An Orchard Oriole – Dealing with Impatience and Glare Control

Photographing An Orchard Oriole

It was only 8:30 a.m., a couple days before summer solstice, when I spotted my first adult male Orchard Oriole. The male Orchard Oriole looks very different from the female with his velvety black head and glossy russet colored breast and lower back. True to their name, this species are found in semi-open spaces like orchards (and rarely at feeders like Baltimore Orioles). Most E-bird maps classify Orchard Orioles as uncommon breeders in Michigan.

(Note: I saw and photographed a female or fledgling Orchard Oriole last year.)

Photo of Orchard Oriole
Male Orchard Oriole
ISO1600; f/9; 1/1000 Second

Glare Control

On this morning, sunrise was 6:10 am, at which time we were at another location. That sublime early morning light that adorns birds with a soft golden glow had long past.

Even though the sun was not that high in the sky, I had a terrible time (while in the car) dealing with distracting glare coming from the many reflective maple leaves. (NOTE: Sadly, I can not coax a bird to move into a shaded environment. I can better control these uneven bits of radiance when photographing people. The glare caused by bald heads and eye-glasses are a piece of cake to remedy because you can tell people how to pose, where to stand and, if necessary, move the camera.)

Polarizers

For this shoot, it would have helped if I had taken off my polarized sunglasses. If I had, I would have been able to see the brassiness of the maple leaves …so blatant that it competed with my subject for viewer attention.

Harsh light creates strong contrasts. To cut the glare, photographers in more manageable outdoor environments use a circular polarizing filter on their lenses. To use circular polarizing filters optimally, you must position your camera correctly… (preferably 90 degrees to the bird) and rotate the filter until you block certain wavelengths of light. (NOTE: Filters cut down available light considerably – from 1-2 stops.)

Circular Polarizers aren’t practical for long telephoto lens wildlife photography – and especially for birds as restless and unpredictable as this Orchard Oriole. Consequently, no filter threads are provided on the ends of most monster 500mm lenses. Instead a drop-in gel filter holder is provided near the base of the lens .

Photo of Orchard Oriole
Male Orchard Oriole
Much less Leaf Glare; but Branches are Distracting.
ISO1250; f/9; 1/1250 Second

Impatience Takes Over

Tracking a bird with your eyes is easy…..even within the limitations of a car.  Not so easy is tracking a lively bird with a cumbersome camera and 500mm lens while in a car.

This male Orchard Oriole was flying low, bopping between the glare filled Maple leaves on the north side of the road and a Cyprus tree on the south. The camera was resting on the door window pointing toward the Maple tree. I was hoping that the bird would cross the road and perch in front of the camera. He eventually did, but not right away. Impatience got the best of me.

For some reason, I decided that to successfully photograph this bird, I needed to reposition the camera to face the opposite direction. My husband was in the driver’s seat, making it impossible to secure the lens on that door window. With the oriole watching me, I opened my car door, threw a towel on the roof of the car, lugged my camera out and rested it on the towel, and then re-situated the unwieldy lens to point in the direction of the bird. (Whew!)

Before I could get off a shot, the Orchard Oriole dashed across the road again —to the very perch on which the lens was trained before I hauled it out of the car. He didn’t stay there long. With a big sigh, I got back in the car.

Actions that rise from frustration and exasperation are neither practical nor productive in bird photography. For unexpected bird sightings, patience is key.

I stayed in the car, rested the camera on the car door window ledge, watched, waited, and tried to calm down. Eventually the Oriole did return to the maple tree allowing me to successfully burst away.

Birds Don’t Wait for the Photographer

Turning the car around to face the opposite direction would have created too much of a disturbance. Getting out of the car to set up the tripod would also have chased the bird off. I’ve tried both of these strategies often enough- and no bird has ever waited for me to get situated. I can be quick and efficient.. but all that movement is neither quiet nor covert, especially when it happens at the spur of the moment. It is simply too much human activity for a bird to endure.

Patience

Patience is the mother of all virtue in bird photography. It is the key to help you let go of your expectations and drop those feelings of frustration. Most important of all, patience helps you rise above the feelings of urgency and optimally use your experience, enthusiasm and talent. Chances are you won’t miss out on anything.