Photo of Sandhill Crane

Photographing Sandhill Cranes in Flight

Sandhill Cranes in Michigan

Late last Fall, we went with some friends to watch thousands of sandhill cranes congregate at the Baker Sanctuary, near Battle Creek, Michigan. Every year, cranes stop at this sanctuary briefly before they continue south. It was glorious.

I had my camera, but the distance was too great for my equipment to get a worthwhile shot. I watched other photographers with much heftier lenses get their shots.

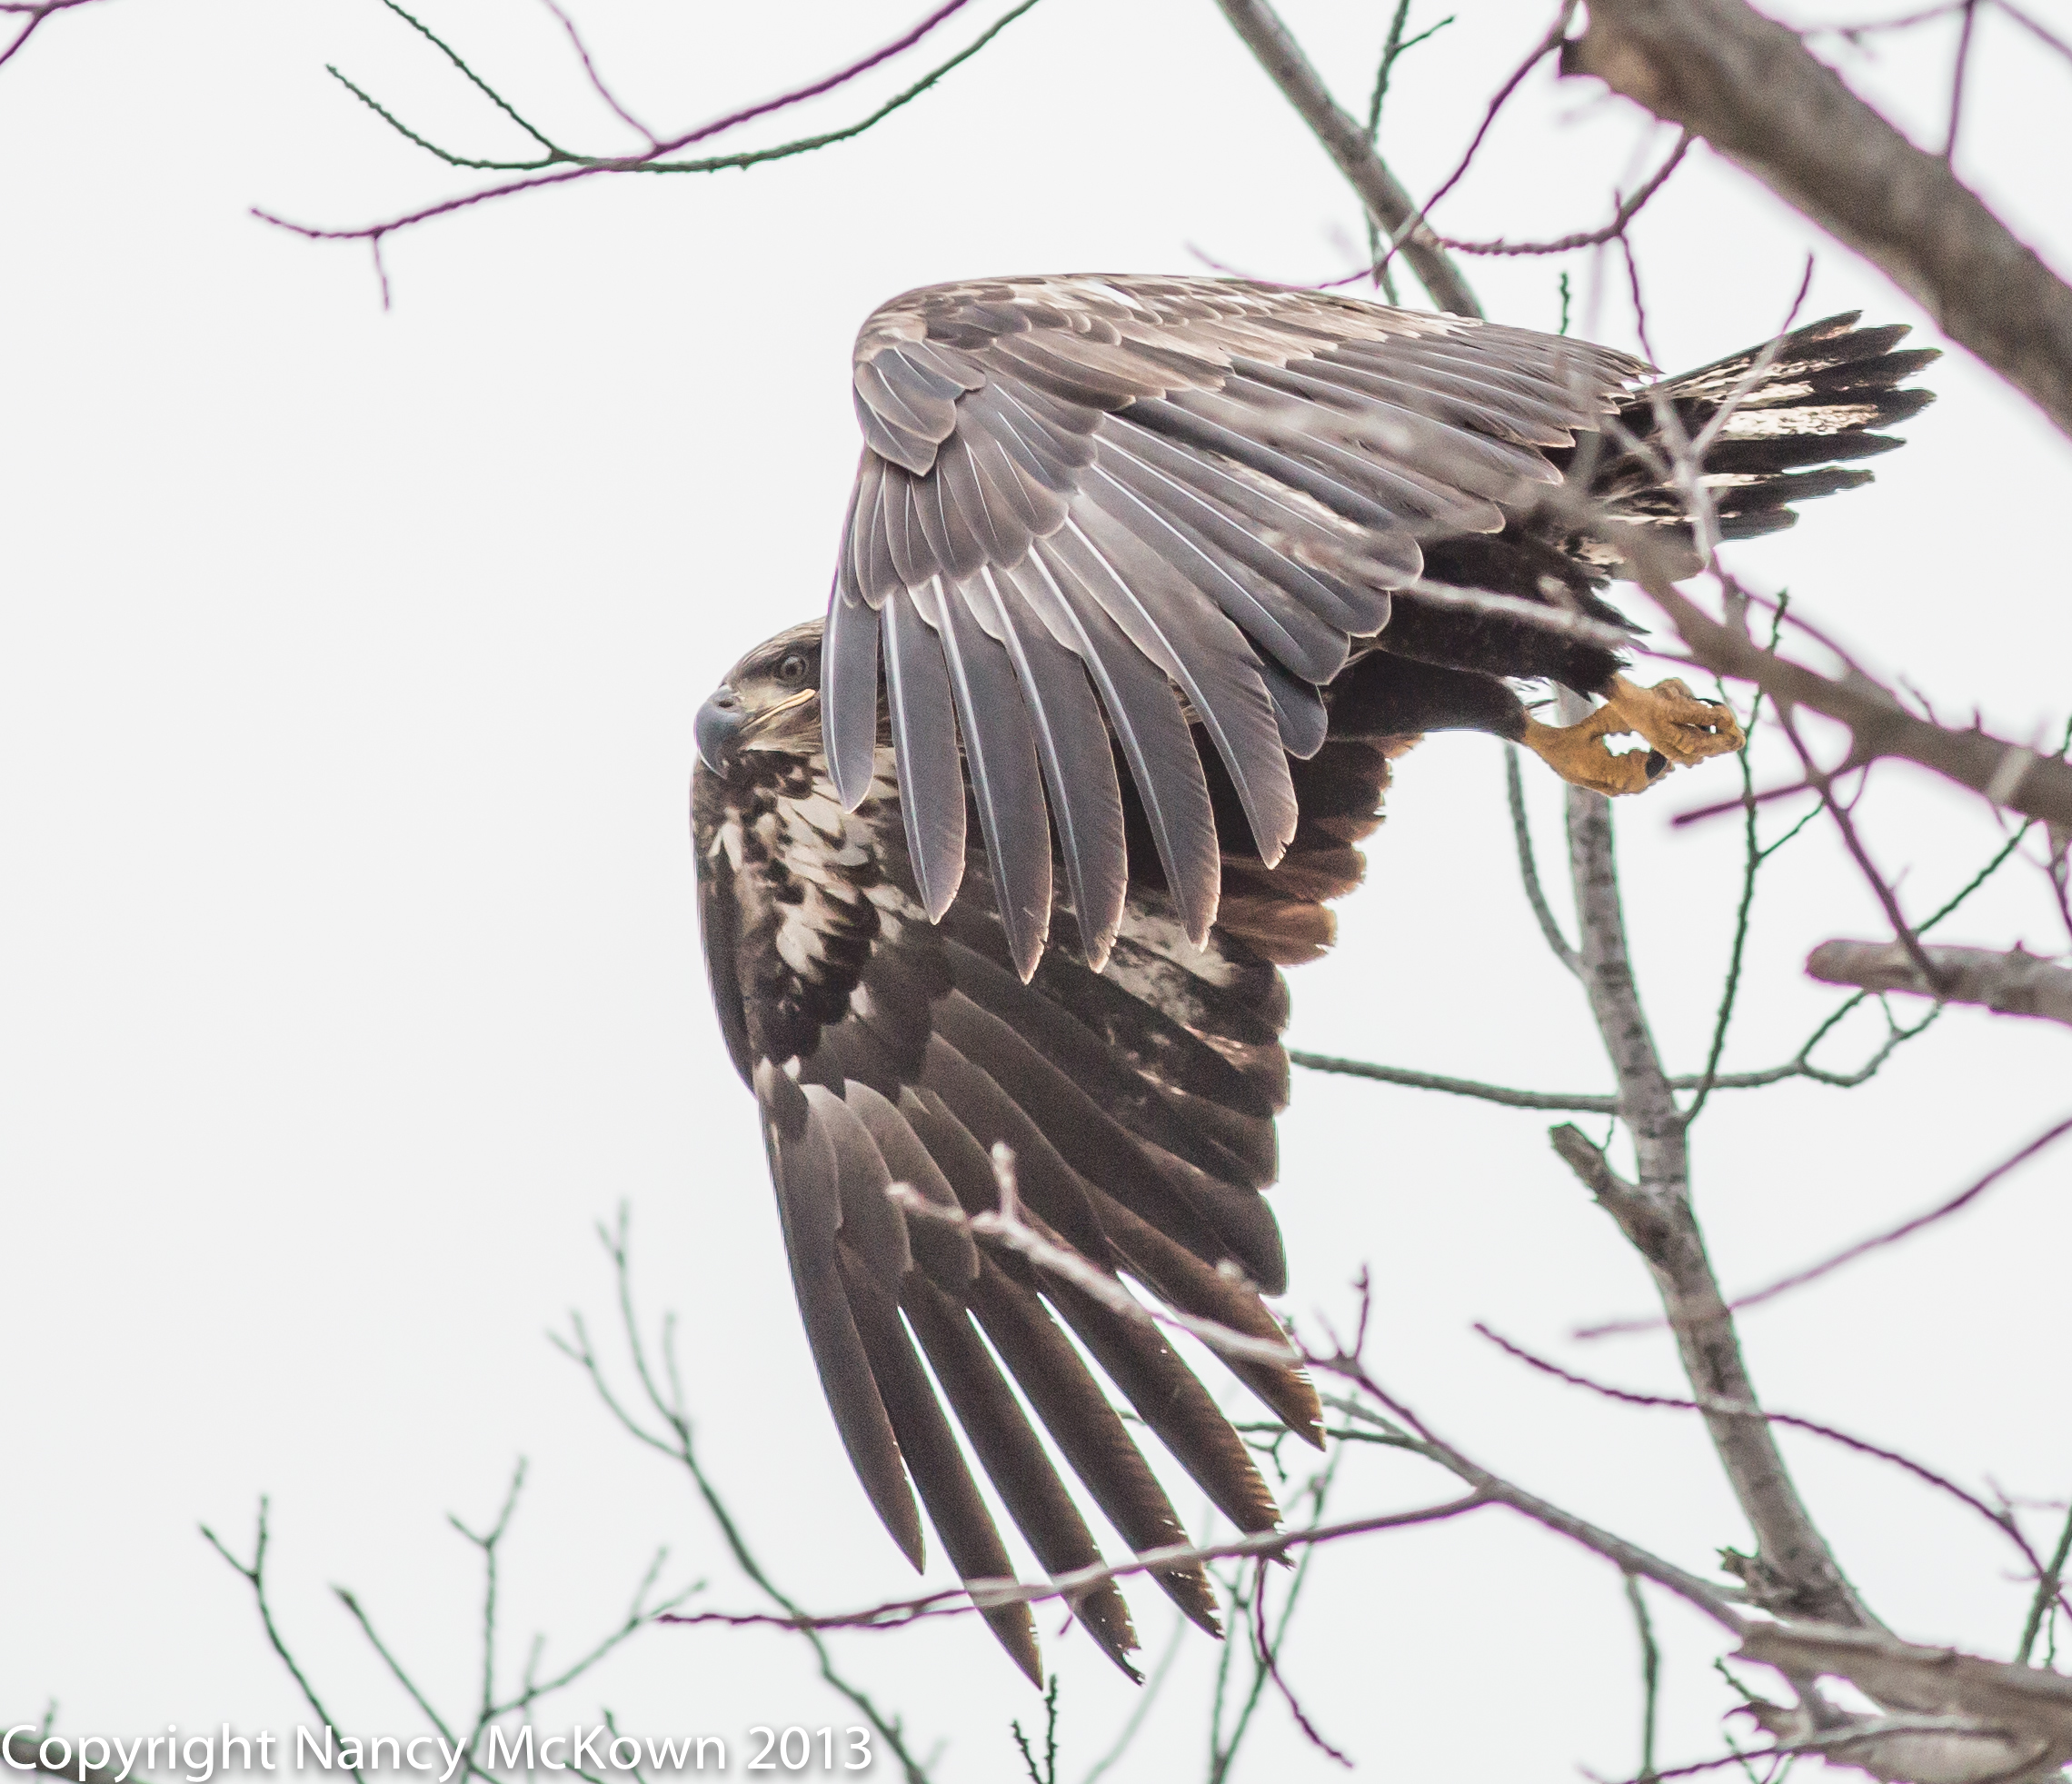
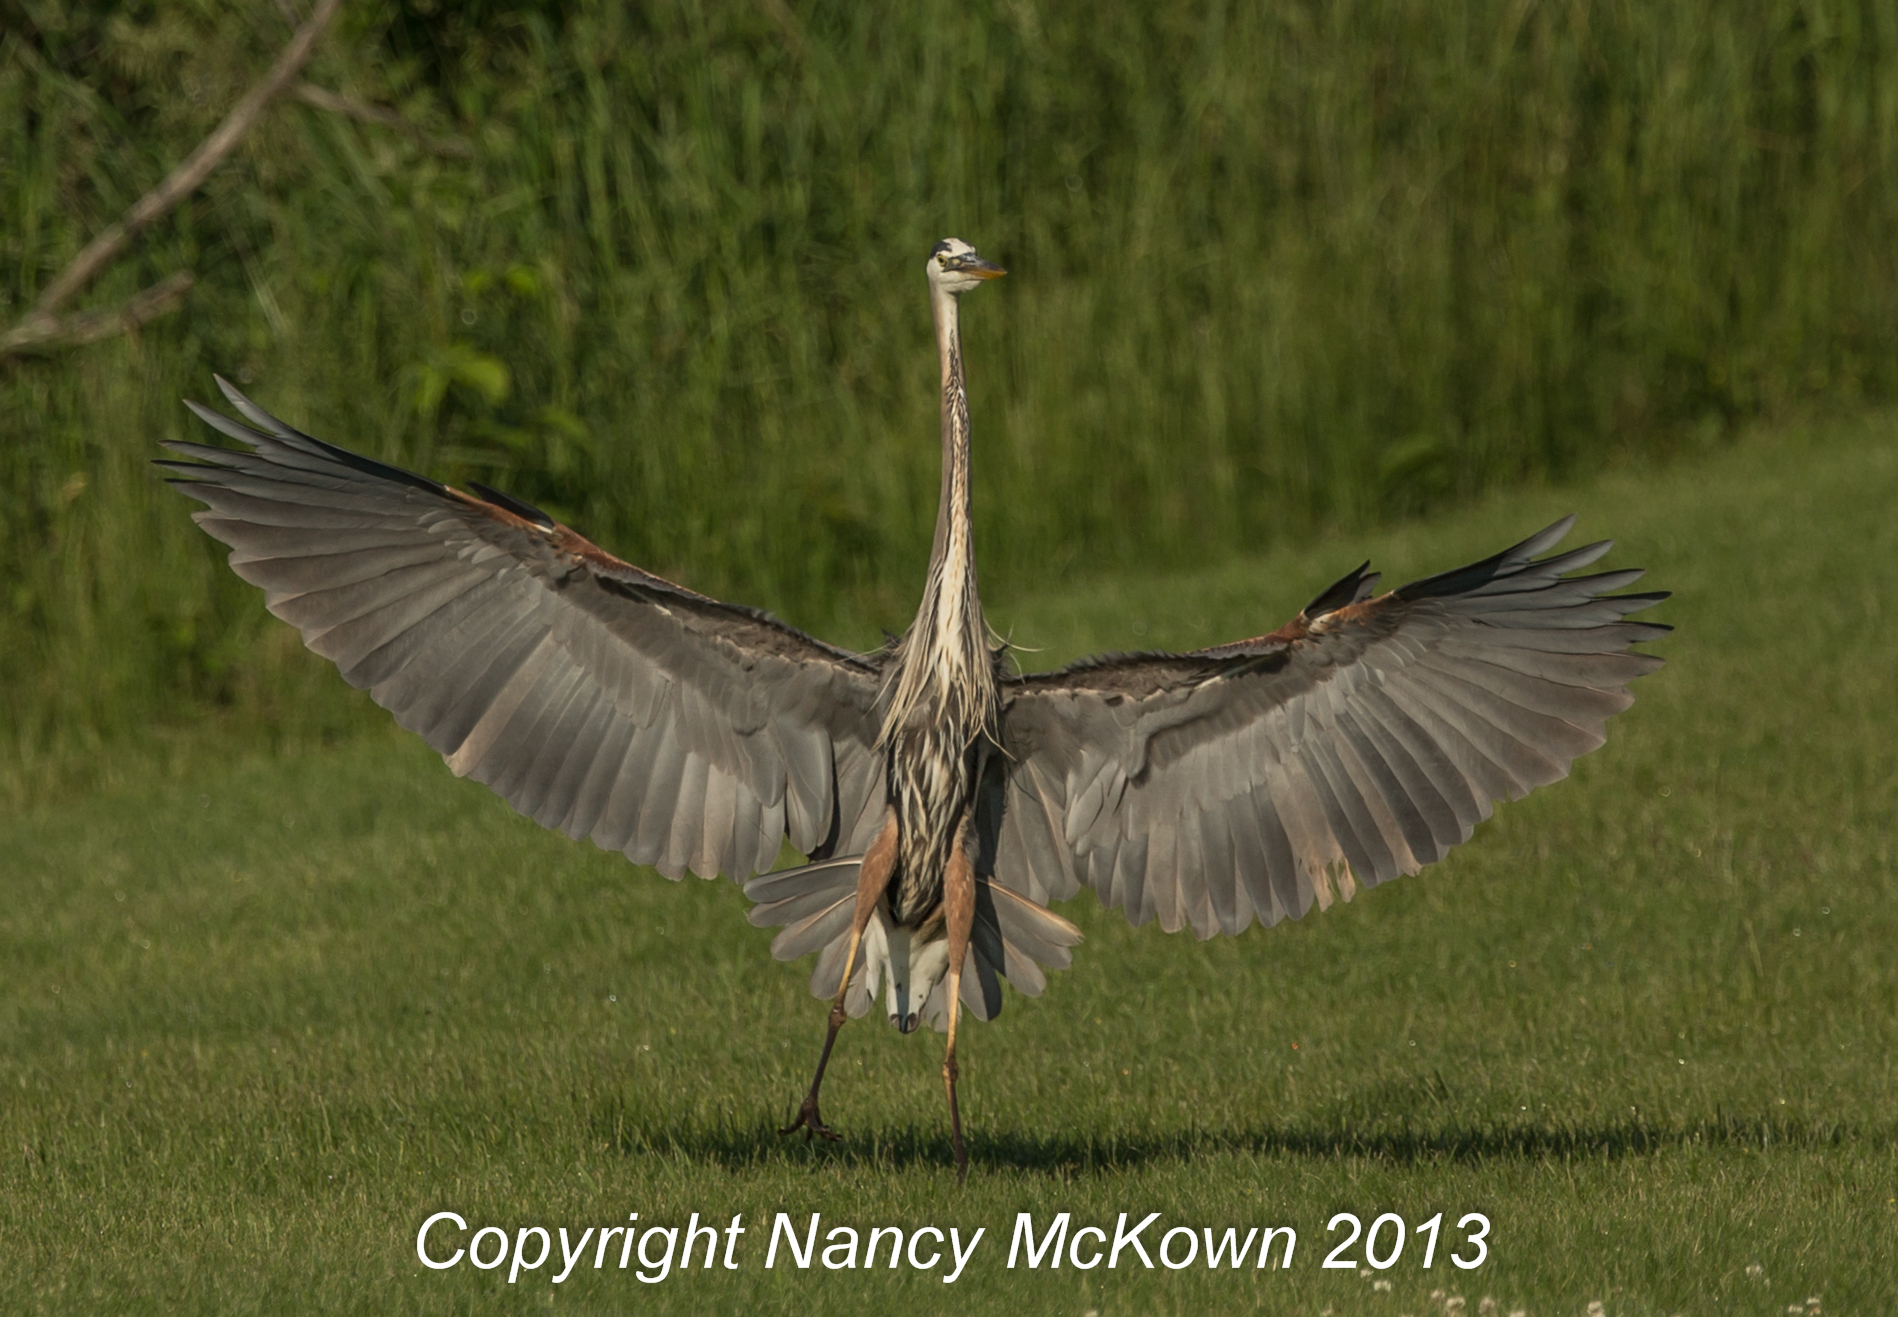
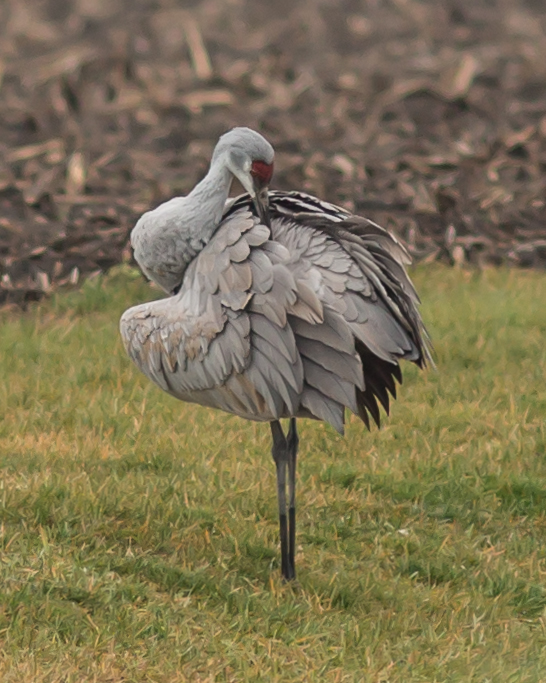
Sandhill cranes are an impressive sight. They are huge birds; five feet tall with wings that span six to seven feet. I used to confuse them with the great blue heron – but the art of bird photography forces you to be more observant. The great blue heron is smaller with no red forehead and it curls its neck close to its body when it flies. Cranes extend their necks when flying.

A Glorious Spectacle to Photograph

By far, the most fascinating part of watching sandhill cranes is when they dance. I’ve seen them engage in this ritual throughout the season. I love it when they bow and then leap into the air and throw branches and sticks with their beaks. Quite the spectacle.

Capturing Sandhill Cranes During Take Off and Landing

Although I’ve yet to capture sandhill cranes dancing, I have had some success at getting good photographs of these marvelous birds.

On a very gray Michigan morning, I observed dozens of sandhill cranes feeding in a cut farm field near my home. The birds were far enough off that I was not perceived as a threat, but close enough that I could reach them with my longest lens. I was able to get out of the car and set up my tripod in the field nearest to the road.

I did not observe any of the ritual dancing in the 3 hours or so that I was there. Quite a few of the cranes were coming and going, much of it right over my head. So I focused my attention on capturing these beautiful birds in flight.

Sandhill Cranes in Flight
2 Sandhill Cranes in Flight ISO1000; f/4.5; 1/2500 Second

Tracking Movement with the Camera

Tracking a moving target while keeping the lens in focus is difficult. Once the shutter release is pressed half way down, the camera must complete the  following functions before it will allow the photographer to complete the shot:

  1. Light Metering
  2. Image stabilization (assuming there is an image stabilizer on your lens)
  3. Focus

So, after you complete one shot and press the shutter button to take the next one, the camera automatically goes thru the process of metering, stabilizing and refocusing before you can take the next shot. Admittedly all these functions happen in seconds, but sometimes in the world of bird photography, that is just not fast enough.

Back Button Focusing

Back button focusing is a very useful option to track and continuously focus on flying birds. Using this function lightens the load on the shutter release while at the same time, allows the photographer to track focus faster and more accurately, especially when your subject is moving erratically.

Simple Procedure to Separate Auto Focus from the Shutter Button

Almost all DSLRs allow the photographer to separate the auto focus from the shutter release, and have for many years. Once you find this function on your camera, you can start practicing. It’s easy.

Simply focus on your subject, hold down the back focus button with your thumb and get ready to press the shutter release with your fore finger when the peak action starts.

The camera will continually focus on the subject, and the shutter will not try to focus before taking the photo. This means no half pressing the shutter button over and over again to re focus. Once the subject stops moving, let go of the back button focus and use the shutter button to focus as you did before.

Be Prepared

Things go very fast when your target starts moving. A tripod is essential here to help you pivot the lens as needed and track the action. Before you start shooting, make sure your settings are optimal – including the settings for focus tracking (AI Servo on Canon Cameras) and continuous (rather than single shot) autofocus shooting.

And most importantly, be sure that you have confirmed that your shutter speed is set high enough to capture in flight birds.

Adding a Little Color to the Gray Sky

I decided to liven up the background in the first photo by adding a little color. I used Lightroom to put a bluish/pink vignette in the four corners of the photo. The second photo of a sandhill crane coming in for a landing (see below) more accurately shows the dull gray of the morning sky.

Sandhill Crane in Flight and About to Land
Sandhill Crane Coming in For A Landing
ISO 1000; F4.0; 1/3200 second

I’m hoping that the next time I head out to that field with my camera, the sandhill cranes will perform their playful dance for me.


Male Cardinal Posing with Flowers

When Birds Look Back at the Photographer

Where the Birds Are

A lot of days, I concentrate on photographing the birds in my yard. I think the feeder is one of the more boring places on which to point my camera. But on those days that I am stuck inside, that’s where the birds are, at least the ones that I can readily see and reach with my camera.

I am constantly trying to improve my photography skills, and to do that I have to practice. Practice is more productive when I have a purpose in mind; when I deliberately focus on getting better at a particular skill.

This day, I decided to concentrate on depth of field. Depth of field is the “space” in your photograph that’s in focus. More specifically, it’s the distance between the closest point that is in focus and the farthest point that is in focus.

Understanding Depth of Field – Techie Alert

To determine what’s in focus (Depth of Field) and what is not in focus (Blur), the photographer must consider 3 things:

1)   Aperture setting,

2)   Focal Length of the Lens

3)   Distance the Photographer is to Her Subject

Longer lenses (200mm and longer) tend to give a very shallow depth of field (less space in focus). To further complicate matters, the farther away the photographer is to her subject, the more depth of field; or the more space you will have in focus.

Aperture Settings for Background Blur

Luckily, long lenses and long distances between photographer and subject are pretty common scenarios for bird photographers. That being the case, you just have to determine what aperture to use to achieve a good balance of subject in focus and background blur.

Male Cardinal Posing with Flowers
Capturing a Moment – Male Cardinal poses with a Bouquet of Flowers on the Bird Feeder

The Impact Aperture has on Photographs

A friend of mine asked how I pasted in the beautiful blurred background on my bird photographs.

Argle Bargle!  There is no emoticon to express how I felt when I heard that.

Understanding aperture is the cornerstone to achieving creative control of your photos. Aperture is measured in “F Stops”, and is the size of the opening in the lens that the photographer sets before a picture is taken.

Larger apertures produce more background or foreground blur and less space in focus. Smaller apertures produce greater depth of field, or more space in focus. If there are multiple subjects on which to focus and these subjects are not the same distance from the photographer, the depth of field needs to be tightened up so all your subjects are in focus. Given the right light and lens, you can set your aperture so small that everything in the frame will be in focus; nothing would be blurred.

The Quality of Out of Focus Areas

A photography term to describe the quality of background or foreground blur is Bokeh. “(BOKEH = noun, a Japanese term for the subjective aesthetic quality of out-of-focus areas of a photographic image.)”  Keep in mind that making a judgement on the bokeh quality of a photograph is highly subjective and hard to quantify. Generally, very pleasing bokeh is a function of the lens. A very high quality lens will most likely produce a very pleasing bokeh.

Achieving Balance in Your Photographs

You want to achieve a nice balance in your photographs. All of the subject(s) in your photo must be in focus and stand out from the background. The blurred background should be pleasing to the eye and not distract the viewer from the subject of the photo.

Making the Ordinary Photograph, Extraordinary

So with better control of my depth of field in mind, what can I do to make the birds on bird feeder photos more interesting? How can I take an ordinary scenario and turn it into an extraordinary photograph?

I asked my husband (Camera Boy) if he would pick some flowers from our yard to decorate our dinner table. He put together a beautiful bouquet for us and then decided to decorate the bird feeder platform with a bouquet as well. I didn’t think much of it, a little color is always nice. But then I noticed the difference it made.

Birds are always looking back at me through the window. Most times, they are just being cautious, gauging when/if they need to make a quick get away. They also have a “look” for me when feeder food is low and needs refilling. And sometimes they are just interested in what we are having for dinner.

Male Cardinal Eating at Feeder
It’s Time to Eat. Male Cardinal Looking Over His Shoulder at the Camera

In the first photo, this male cardinal flew in and positioned himself to the side of the flower bouquet on the feeder. Then he  looked directly at the camera and tilted his head slightly. That’s all it took. The cardinal looks as though he is offering a gift to me. The flower bouquet adds a whole new dimension to the photograph. In the second photo, the cardinal has started to eat, and looks at me over his shoulder. The flower bouquet adds something intangible to this photograph as well.

It’s so easy to identify with bird behavior. In these photos, I sense attitude, intent, and caring. I find this momentary connection between my subjects and myself gratifying on a personal level. And it’s captured forever in the photographs.

And how about that Bokeh and Depth of Field!!

Green Heron in Dawn Redwood Tree

Photographing the Green Heron

The Joy of Discovering and Photographing New Birds

One of the best parts of photographing birds is discovering new birds. I think it is very exciting when your camera is focused on a bird that you can not identify and have never photographed before. The first thought going through my head when this happens is that this new bird is a baby or juvenile of a bird I know and have already photographed? This is true quite often because the coloration of young birds is often very different than their parents.

Bird Identification Skills

Other birders out there always come to the rescue to help identify mystery birds. Also, bird identifier games, tools and apps are readily available on the web. You have to provide the size of the bird, where you saw it, identify the colors of the feathers, note the beak shape, observe what they are eating, how they move, etc. These are fun, if you have the time and information, but for photographers, it’s faster if you upload a photo of the mystery bird to your favorite bird share and ID site and ask other bird lovers to help. It takes only minutes before someone, or some computer, identifies the bird for you.

Mystery Bird Photograph

I was out with my camera midmorning, shooting near a small pond. There’s a limit to how close you can get to a bird before it flies away, even when you are in your car. I was in my car, with my back to the sun and had my long lens perched (and secured) on the car’s window ledge. In the distance, I saw flickers hopping about on the grass and one great blue heron fishing at the far end of the pond.

Suddenly a rather large bird circled the heron a couple times and landed in a dawn redwood tree on the edge of the pond. The great blue heron saw this newcomer before I did and tracked his movements in the sky. It looked to me as though the two birds were communicating; parent juvenile type communication, so I jumped to the conclusion that these birds were from the same nest. I was wrong.

Green Heron Photograph
Green Heron Well Within Reach of my 2.0 Lens Extender.

2.0 Telephoto Extender

To capture this far off action, I was lucky to have my 2.0 telephoto lens extender attached to my 300mm lens. This extender effectively changes the focal length on my 300mm lens into a 600mm lens. You can imagine the advantages of being able to get up that close to photograph a bird. This extender is light, easy to transport and attach to the lens, and doubles the effective focal length of my 300mm lens. And, it  is so much cheaper and convenient than buying a 600mm quality lens.

So why not leave the extender attached and have this extra reach all the time when photographing birds? Because there are some very consequential drawbacks that may outweigh the advantages of that extra reach. It seems like a win win deal, until you understand what you are giving up.

It’s All About Light

First of all, attaching an extender usually means that you no longer have what is referred to as a “fast” lens. A “fast” lens is a lens with aperture opening of 2.8 or larger. Fast lenses of quality carry high price tags and are usually considerably heavier than the slower lenses. Why pay the price? It’s a lens that gives you more flexibility when light is low because at its maximum opening, it allows more light to hit your camera’s light sensor. That means you won’t miss as many shots due to poor light.

So if you put a 1.4 extender on a fast lens, and increase your focal length from a 300mm to a 420mm, you will reduce the amount of light getting to the sensor by one full stop. That’s 50% less light. If you put a 2.0 extender on your fast lens, and increase your focal length from a 300mm to a 600mm, you reduce the light to the sensor  by 2 full stops. That’s 75% less light.

You must carefully weigh the advantages and disadvantages of attaching extenders to your lenses. Most times, it’s the only way that you can get close enough, but if light is low, the better choice might be to keep the extenders off. I usually carry the extenders with me and assess the distance and quality of light while in the field.

Green Heron, extended neck and black crest
A Green Heron in a Dawn Redwood Tree. This photo clearly shows his black crest atop his head.

A Beautiful Green Heron

This mystery bird is a green heron, probably a juvenile, on a bad hair day. At first I did not see much green in this green heron, but after a while, the subtleties of the colors in the feathers did indeed show green. In fact, he is beautiful. Short and stocky when his neck is not extended, he has a chestnut body, velvety back feathers with green hues, a black crest atop his head and bright yellow eyes.

There are 3 types of herons that frequent Michigan ponds, marshes, and waterways. I have already photographed the great blue heron and the green heron. I am now on the lookout for the much less common “American Bittern” Heron. Stay tuned. I may be loading my equipment into a kayak soon in an effort to photograph this elusive bird.

New Photos of the Green Heron

A mature green heron graced my viewfinder recently when I was photographing kingfishers in a nearby Saugatuck pond. The kingfishers were too far off for a good photo, even with the 2.0 extender attached. The green heron is a much bigger bird, so distance mattered less. Still, distance and low light did impact clarity.  On the positive side, the soft, clouded over morning light brought out vibrant blue colors in the feathers.

Here are a couple of those shots.

Photograph of Green Heron in Flight
A Mature Green Heron, Looking Quite Blue, Captured in Flight. The ISO was Very High Because the Light was Low. I Lowered My Shutter Speed as Much As I Dared for a Bird In Flight . This Reduced the Noise Level from 12800 to 10000. Post Processing Helped Reduce the Noise, But It Also Reduced Some of the Details.
ISO 10000 ! ; 1/1600 second; f/6.3


Photo of Green Heron
A Green Heron Waiting for His Next Meal. I was able to Lower the Shutter Quite a Bit Because He Was Not Moving Much. This Lowered the ISO Quite A Bit.
ISO 4000; 1/640 second; f/5.6


Photograph of Swans on Lake during Golden Hour

Photographing Swans During the Golden Hour

Understanding Natural Light in Photography

I wanted to try another early morning shoot. Early morning means being on site with tripod setup before the sun rises. I allowed plenty of setup time and brought a flashlight.My previous experiences with early morning photography focused on photographing birds perched on branches with blurred foliage in the background.

I set up my equipment in the darkness and pointed my camera toward the lake, where I had an unobstructed view of the pre dawn horizon. My goal was to photograph waterbirds during the golden hour.

Golden Hour of Photography
Swans on the Lake at the Early Morning “Golden Hour”

The Golden Hour of Natural Light Photography

The “golden hour” refers to the light in the first hour of the day right before and shortly after the sun rises and last hour of the day right before and shortly after the sun goes down. This light is referred to as magical because it is rare. It does not appear with every sunrise and sunset and certainly doesn’t last a whole hour.

You will know you’ve experienced the golden hour because the scene will be bathed in saturated colors and a golden glow. The diffused light and long shadows will bring out the details in your subjects. If you can position yourself and your camera so this light hits your scene at an angle, you can add depth and texture to your photos.

Photographers’ Tools

There are many phone apps out there that are basically sunrise/sunset calculators for any location, so you can pre plan your photo shoot to determine optimal times for the best lighting. Some of these apps also include  how and where exactly the sun (and moon) will be in the sky for any time of day for any location on earth.

These tools have no way of gauging if the light will be magical or not. In fact, there’s a very good chance that after your early morning scramble to be at the right place at the right time, the light will be flat, dull and uninspiring.

Photographing Swans on the Lake

The camera sees light differently than the human eye. When I focused my lens on the swans on this particular morning, I saw the steam coming off the water. I did not see the soft, luminous golden hues that add so much to this photo. The sun was not visible, but its rays were low on the horizon. The humidity that morning was heavy and probably had a hand in dispersing the light rays.

When I got back home and loaded the digital files into my post processing software (Lightroom), I could see that I had approximately 6-8 minutes worth of photographs taken during this golden setting. (NOTE: Even within this 6-8 minute window of great light, the light changed minute by minute.) Before that time, the photos were dark and shadowy. After that time, the light became more directional and contrasty. The magic was gone.

Planning and Practice to Better Understand the Impact of Light

The biggest factor that can make or break a photo is the quality, intensity and angle of light. With natural light, you can create mood and emotion in your photos.

Photographers must learn to recognize what constitutes bad, good and great lighting in their photographs. Is the light pleasing? Does it evoke an emotional response? What is it about that photo that makes you want to look at it again and again?

Good photography is about light. It takes lots of planning and perseverance, and lots and lots of practice. And sometimes you have to be out every single day and just keep hoping that you and your camera will capture all the potential the golden hour has to offer.

Photograph of Osprey Sitting in Nest

How to Photograph Ospreys

Photographer’s Assistant

Whenever I research the work of Annie Leibovitz (one of the best portrait photographers out there), she is surrounded by photography equipment and assistants. Her assistants do alot of the hauling in of equipment, setup and prepping of the lucky individuals scheduled to be photographed.

So wouldn’t it be a good idea for bird photographers to have assistants as well?

Camera Boy

I have a wonderful assistant. By day he is a competent, hard working attorney and the love of my life, and during my photography adventures, he is Camera Boy! Camera Boy does alot of the car packing and unpacking, and helps with setup. He also does the driving and helps scope out possible locations to photograph birds.

The photographer is generally too busy framing the shot and pressing the shutter to nudge a sitting bird to take flight. Often, the bird is content to just sit there while the sun rises to the point where harsh shadows will dominate the shot. This is where the assistant steps in. On cue, all he has to do is walk toward the bird. With a little luck, the bird will take flight at the exact time and in the intended direction needed for the perfect shot.

Perched Osprey Photo
Osprey Perched and Staring at the Photographer and Assistant. Not Looking Too Worried.

Photographing Ospreys in Florida

We came across 2 ospreys at Fort Pickens National Seashore on Santa Rosa Island, near Pensacola Florida. There wasn’t much gear to carry because I don’t like hauling a bunch of equipment when I travel.  My camera with my 300 mm lens and a monopod was all I brought with me.

The ospreys were perched on trees in and near their nest with a great view of the ocean. Their nest was built on a manmade nest platform not too high up from the ground. No baby birds were visible.

Ospreys are also known as Sea Hawks because they are so adept at diving and catching live fish. I was hoping to get a photograph of one of the ospreys coming back to the nest with a fish, but no luck. These birds were obviously acclimated to humans and seemed content to sit and watch us from where they perched.

In Flight

I was able to take many photographs of both ospreys sitting in trees with the clear blue sky as a backdrop.  Camera boy and I wondered if we could prompt some in-flight action by simply walking toward the birds.

I was in place, as close as I could get to one of the birds with my camera and monopod. I had the camera facing the side of the bird’s body, with the sun behind me. If we were going to prompt him to fly, a side view of him taking off in the direction we wanted him to go would be best. So Camera Boy was behind the bird, ready to walk forward, hoping his proximity would propel the bird forward.

Photograph of Osprey Ready to Take Flight
Osprey Almost Ready. Foiling our Plans, He Turned Away from the Camera Before Taking Flight

Ready!  Set!!  Action!!!

It was mid morning and there was plenty of soft light from the morning sun. On my cue, Camera Boy walked toward the bird. The osprey did indeed take flight at a time when I had the camera focused and ready.

Photography of Osprey in Flight
Finally, Osprey Taking Flight at the Intended Time in the Intended Direction.

The ospreys did not show fear, they did not fly away or move to a higher branch or dive bomb us. They simply flew to another close-by tree, perched and looked down on us.

It’s no wonder that Annie Leibovitz has assistants to help her set up for the perfect shots. Camera Boy and I will have to work out a plan to get a shot of the ospreys diving and catching fish.


Bald Eagle with Deformed Lower Beak

Unexpected Photograph of an Immature Bald Eagle

Be Prepared to Photograph the Unexpected

I try to carry my camera with me in the car, even when I’m not on a mission to photograph birds. I curse myself if I come across what could be an awesome bird shot and I don’t have my camera. Most of the time, I don’t use it because I’m on the road and generally don’t see anything worth stopping to shoot. But a while back, on a grey and windy day, I came across an immature bald eagle just resting on a dead tree branch overlooking Lake Michigan.

I pulled off the road. Even though birds are generally less spooked by cars than small humans tiptoeing toward them, there was no way I could stay in the car and get any worthwhile photographs. I got out of the car with my camera and immediately started shooting. I usually shoot, then take a few quiet steps, shoot again, and repeat this pattern until I get as close as I possibly can, or until the bird flies away. This way I’ve at least got something to take away with me besides the excitement of coming across one of these beautiful birds.

This time the eagle just looked at me as I slowly approached. In fact, he was so bored that  he started preening himself. I was able to climb down onto a friend’s deck (thank you Mary Kay and Mark) and keep shooting.

Immature Bald Eagle Preening.  First Sighting of the Lower Beak Deformity
Immature Bald Eagle Preening

Camera Shake Causes Blurry Images

It was a very windy day, and I did not have my tripod or the bean bag that I use as a stabilizer in the car. Wind is a problem for photographers. Even slight movements get magnified at the end of long lenses and  hoods and result in fuzzy images. This can happen even when using a tripod. I had to stabilize the camera as much as I could by propping my elbows on the deck railings and cradling it against my body. I also cranked up the shutter speed (I’d much rather have noisy photos than blurry photos) and, very gingerly, kept pressing the shutter button.

It’s quite an effort to hold the camera still when hand holding in heavy winds. The wind was coming out of the west, right off the lake. During this shoot, my hands could feel that 300mm lens move about and my eyes could see the effects the wind was having on my ability to center that subject in the viewfinder. Waiting for the wind to calm down was not an option, nor was sheltering the camera with my back.

Image Stabilizer on the Lens

A 300 mm lens is really the largest lens that can be reliably hand held. Anything bigger should have a tripod. On this shoot, the image stabilizer on my lens proved to be very useful to help compensate for camera shake caused by the wind. However, if the subject is moving, image stabilization will not help.  It’s only helpful to reduce blur that comes from the photographer during hand held shooting.

Also, above a certain shutter speed, the stabilizer is not useful and may even cause more blurriness. The image stabilizer on my lens automatically shuts off when it senses a tripod is attached.

What the Camera Captured

I wasn’t close enough to fill the viewfinder with the eagle, but it was still an impressive sight. I stood there, heart pounding,with elbows propped on the deck ledge and shot until the bird flew away, maybe 20 minutes.

The camera display showed some usable shots, but I didn’t realize what I had until I imported the photos into my post processing software. At first I was disappointed because it looked like most of my shots were blurred.

But when I zoomed in, it was clear from these photographs that this eagle’s lower beak did not match up with his upper beak.

Photograph of Immature Bald Eagle with Beak Deformity
Immature Bald Eagle with Lower Beak Deformity
Photograph of Immature Bald Eagle with Beak Deformity
Closeup of the Eagle’s Head, showing a Better View of the Lower Beak Deformity

I sent these photos to Rebecca Lessard, who heads Wings of Wonder, a non-profit raptor sanctuary focusing on education, rehabilitation and research, located in Empire, Michigan. Rebecca forwarded my photos to a supervisor of the US Fish & Wildlife Service for Michigan. He believes this deformity may have been caused by environmental contamination.

I keep watching for this bird, hoping to come across him again. No luck so far. He’s big, and he looks healthy, so my hope is that he will survive and thrive.


Immature Eagle Taking Off

How to Photograph a Bald Eagle

Bald Eagle Sightings

Bald Eagles are massive, powerful birds. Hard to miss them going down the road, even with the trees full in bloom. Too big to blend and too fast to chase, at least without a car. You can’t sneak up on a bald eagle mostly because they are usually looking down at you with their eagle eyes – eyes that are estimated to be at least 4 x sharper than human eyesight.

Where to Photograph Bald Eagles

I wish I had a spot to reliably photograph bald eagles. I’ve watched them over the years, trying to determine if there’s a pattern in their daily schedule that I can take advantage of to get a good shot. I’ve never seen an eagle’s nest that can serve as my spot, plus I would be very hesitant to risk having the nesting pair abandon their nest and/or hatchling because of the commotion I caused trying to photograph it.

The behavior consistencies that I’ve observed are that eagles search for food around water and are one of the first scavengers on the beach to get their share of dead birds and fish. I also notice other birds chasing them, so it’s a good bet that they go after nest eggs and fledglings of other birds.

Depending on Luck to Find Bald Eagles

It was a gray and cold winter’s day. I loaded my camera in the car and depended on luck as I drove the Lake Michigan shoreline road to get my eagle shots. Luck means that the eagle would be in a tree that would be close enough to shoot, that she would not get spooked when I got out of the car and she would fly away only when I’m ready to capture her in flight. Luck means that there would not be a crowd of people around the eagle, thereby increasing the chance of her flying away when I do spot him. That’s a lot of luck. But it happened.

I came across this immature eagle resting on a branch on the east side of the road. She was situated so I couldn’t photograph her unless I got out of the car. She wasn’t spooked, if anything, she was bored as he looked down at me with my 300mm lens taking his picture. There was not time to set up the tripod. Since she was sitting still, I moved the shutter speed around a bit – no lower than 1/640 second and as high as 1/2500 second.

When I first looked at this shot (see below), I thought the eagle’s face was hidden by her wing. It wasn’t. The eagle’s face blended with the contours and the colors of her wings, making it appear like her face was hidden by her wing. (See closeup)

Immature Eagle Taking Off
Immature Bald Eagle Just Leaving His Perch

Immature Bald Eagle Closeup
Closeup Photograph of Wings and Head of Immature Bald Eagle

Rule of Thumb for Setting Your Shutter Speed

As the absolute minimum, you should set your shutter speed (when hand holding your camera) to the length of your lens. If you have an image stabilizer on your lens you have more flexibility to set the shutter a little slower. So the minimum shutter speed for a camera sporting a 300mm lens should be 1/300 second. This is for a subject that is sitting still.

Don’t Follow the Rule of Thumb for Action Shots

Since you don’t know when a bird is going to take off, and action/in flight shots create more interesting photographs, you need to crank that shutter up much higher than the length of your lens. The shot above was taken at 1/2500 second.

Telling the Difference Between Male and Female Bald Eagles

I see quite a few immature yet somewhat independent eagles along the Lake Michigan lakeshore. These eagles are as large as the adults, but don’t have the white plumage on their heads. It takes 4-5 years before eagles are sexually mature.

Telling apart the adult males and females is easy according to web resources.  The females are approximately 30% larger. Besides being smaller, the males have brighter white plumage and their eyes look like they use black eyeliner. In addition, the female also have longer beaks- the mandible on the male doesn’t extend as far back.

It’s not easy to tell the male and female eagles apart unless you have a close up photograph. The only definitive way to tell the difference is to photograph a male and female pair together. I’m guessing that the photograph above is of an immature female, judging by the length of the mandible and the gray feathers (rather than black) around this eagle’s eyes.


Photograph of Blue Bird in Flight

Photographing the Eastern Blue Bird

Early Morning Blue Bird Photography

When I wake up early on a summer’s morning, bird song is all around. I always assumed that birds started their busy days at the crack of dawn,worked all day, and settled down for the night shortly after sunset.

Of course,I wanted to capture the soft, golden glow of  early morning light in my photos, so I too got up before the crack of dawn and was on location with my camera, ready to photograph these early risers.  Well, eastern blue birds do NOT get up at dawn or anywhere close to dawn. I was out there at least 3 mornings before 6:00 am, but it was just me and the mosquitos. The blue birds came around at a more civilized hour. 8:00 am and sometimes later.

Invaluable Assistance for This Photographer

Blue bird photograph, Blue Bird Clinging to Blue Bird House
This Blue Bird Kept His Eye on the Camera. Note the Dark Shadow Under his Beak From the Harsh Morning Sun.

First of all, I would not be photographing these blue birds at all if it wasn’t for Marv. Marv put up the blue bird house in a blue bird acceptable location, discouraged the attempts of other birds to nest there and attached cups of dried mealworms and water to help them along.

Soon enough, because of Marv’s diligence, there were 2 adult bluebirds and 5 eggs (4 of which hatched) residing in the bird house. NOTE: The birdhouse had a side door through which we occasionally peeked to see the progress of the babies.

Multiple Photography Sessions to Photograph Eastern Blue Birds

My goal was to photograph the blue birds every few days, to the point where the babies were able to leave the nest.  It’s a short window of approximately 16-22 days from hatching time to independence.

At least 3 of those sessions were in the morning. Since blue birds do not rise early, I was unable to take advantage of the drama that comes with light low on the horizon. By 8:00 am there were distinct shadows on the  birdhouse, by 9:00 am, harsh shadows were visible.

Too Close for Comfort to Blue Birds

I attached my blue tooth shutter remote and backed away as far as the blue tooth signal would allow. I brought a stool and sat down with remote in hand around 20 feet from the birdhouse. The blue birds did come, but every 30-40 minutes or so. They didn’t seem to mind the camera, but they were very suspicious of me on my stool out there in the open.

The blue birds were not as wary of Marv’s presence, so I assumed it was just a matter of time before they got use to me. They did not.

Photograph of Male Bluebird about to Feed Fruit to Baby
This Male Blue Bird is about to Feed Fruit to One of his Brood, But First Turns a Wary Eye to the Camera

Birds seem to be less suspicious of cars. Since those fledglings clearly needed to be fed more than once or twice every half hour, I decided to park my car as close as I needed to for the bluetooth signal to work and sit in the car with the remote. This worked much better. The birds came every 5-10 minutes with fruit and big insects in their beaks to feed their brood.

Vary the Camera Settings during a BlueBird Photo Shoot

I believe it’s best to vary the settings on the camera’s focus, shutter, aperture, and camera location during a shoot. That means getting out of the car as often as you can to make the adjustments.

I like the variety that comes with experimenting with the settings, distance and angle of the camera to the subjects. If you set the camera up and just leave it, without taking some time to check the results in the display, you may end up at the end of your session with a bunch of out of focus shots.

Photograph of Landing BlueBird
The Male Eastern Blue Bird -Touchdown at the Blue Bird House With Food In Beak

Camera Placement for Blue Bird Photography

I set up my tripod, with the camera and 300mm lens as close as I could with that lens. As usual, my back was to the sun. Even tho I have spot light metering on my camera, I always avoid facing the camera toward harsh sunlight, unless there’s a source of shade over my subject.

Shade allows much more flexibility when setting up a scene to photograph.  If it’s there, always take advantage of it.

Focus and Shutter

The camera is set to focus mostly on the spot, in this case, the entrance to the bird house. Since I wanted action shots, and the camera was situated so that my subject took up approx 1/3 of the viewfinder, I did not use spot focus. I widened the area of focus and set it for Al Servo to let the camera make some of the focusing decisions.

I set the camera to shutter preferred mode and varied it from 1/1000/second to 1/3500/second, using the higher shutters speeds to capture the in flight comings and goings of the blue birds.

Photographing Birds with the Continuous Shooting Setting

I set the camera for continuous shooting instead of single shot shooting. This setting allows the camera to get off 2-4  shots with one press of the remote. You have to be prudent with continuous shooting. Eventually, the camera has to stop shooting so it can save the images to the compact disk. This takes time, especially if you are shooting in RAW format. You may miss some shots while the camera is saving your previous shots.

If the action is non stop, and you want to work that continuous shutter, remember to set the camera for JPG setting instead of RAW. The JPG file size is much smaller, and takes less time to record on to the disk.

Photograph of Blue Bird in Flight
Blue Bird In Flight, with Food, Heading to the Feeder. A Fast Shutter Speed, AlServo Focusing, and Continuous Shooting all Contributed to This Shot.

Female Blue Bird

After the evening of my 3rd shoot, Marv reported that he found a female blue bird dead in the parking lot, reason unknown. I hoped it wasn’t the female to this nest, but it soon became evident that it was. I wondered if the male would give up, unable to handle the double duty, and abandon the nest. Instead, he stepped up to the task. Marv started leaving more dried meal worms in the cup. I left the nest alone for 5 days and when I returned, I put more distance between the camera and the bird house.

Male BlueBird Cleaning Nest
Despite Having to Feed and Care for 4 Fledglings by Himself, this Male Blue Bird Still Has Time to Tidy the Nest.

Get in and Get Out to Minimize Disturbing the BlueBirds

Occasionally the male blue bird would dive-bomb me during my camera/tripod initial setup. NOTE: He never dive-bombed Marv. He swooped in pretty low, clearly aiming at me and not the camera. He did not bother me when I got out of the car to make camera adjustments.

Knowing that this single parent was doing double duty, I made sure that my setup was mostly finished before I packed the trunk. It was just a matter of pull out and place at location.

I learned alot about blue birds, and once again have an urge to compare the behaviors of this single parent blue bird to humans. But I won’t.

Capturing Speed, Movement and Energy of More than One Bird

Capturing Speed, Movement & Energy in Bird Photography

Capturing speed, movement, and energy of multiple birds makes photos more interesting. The take off and landing shots are captivating because you can see how birds contort their bodies to do what we will never be able to do.

Photographing Tree Swallows

My goal for these photos was to capture the coming together of speed, movement and purpose/personality. This meant that I had to minimize the distractions, keep a cool background, find a bird that I had not photographed before, AND tell a story.

2 Tree Swallows Bickering
ISO 320 Aperture 2.8 Photo 1  I waited to see if one or both
of the tree swallows would give in and fly away. Nope. A very gray day – facing a parking lot, so there was no greenery in the background.
Good light, –Notice the blue in the feathers –boring background concentrates the eye
on the squawkers.

I took my camera to a local park to observe tree swallows. The tree swallows in this area have banded together to chase away all other birds. They have taken over every single blue bird house in the park.

Using A Monopod for Quick, Easy Setup of the Camera

To capture the activities of more than one bird, I needed to be able to quickly move the camera while at the same time keeping the camera stable.  I attached my camera/lens to my monopod.  Monopods are easy to travel with, light weight, easy to set up, and take up less space than my tripod.

As always, I’m there early, so the light is soft and complimentary. There are almost no trees near the bird house to provide shade.  I setup my equipment so my back is to the light.  Since I have to hold the monopod and I planned to be there awhile, I brought a 3 legged stool. I did not bring the tripod and remote because I did not plan to fix my camera on the spot. I wanted to be versatile and be able to swivel the monopod to capture the action.

NOTE: Being outside of your car and close to the subject does tend to make the birds nervous. It’s been my experience that to birds, cars are less scary than humans outside of cars.

AI Servo Focusing on Canon DSLR Cameras

Spot focusing is an option, but since I’m hoping to capture multiple birds, I widen the camera’s focusing gaze and set it to best respond when subject movement can be unpredictable. “AI Servo” is Canon’s predictive autofocus system.  It continuously refocuses and  tries to predict where the subject will be during the next focus”. If your camera has some sort of predictive autofocus, use it, so your shutter finger is not the only tool you have to help track focus.

Setting the Depth of Field for Multiple Birds

I set the shutter preferred to around 1/2000-1/2500 sec -and check what the aperture and ISO calculate out to be. Tree swallows are much bigger than hummers, and my setup is very close to my subjects. More of the view finder is filled with bird, so I’m not too concerned when I see a higher ISO. I let the ISO 2500 stay. As the morning gets brighter, that number will go down.

It’s bright enough so the aperture is not wide open at 2.8. I want more clarity in my depth of field just in case I get a chance to shoot multiple birds that are different distances away from the camera.  A 2.8 aperture will blur the background and possibly one of the birds.  I think about switching to manual mode and setting the aperture and shutter speed.  I decide to leave it on shutter preferred because the AI Servo tracking on the camera will tighten up the aperture as needed when it tracks multiple subjects.

Photograph of Tree Swallows Mating
Tree Swallows Mating
ISO 200; Aperture 3.5; 1/2000 second

Assessing the Photographs

Overall, I think I accomplished my goal.  I’m not happy with the background of the last photo.  It’s pretty, but also distracting. I had to zoom significantly to minimize the background. The first photo’s background is quite grey, the viewer’s eyes are focused on the birds squabbling.


Photograph of the Great Blue Heron takeoff

How to Photograph a Great Blue Heron -Part 2

In Flight Photographs of the Great Blue Heron

It’s quite a different challenge to photograph a hummingbird in flight compared to a Blue Heron in Flight. http://nancybirdphotography.com/hummingbirds-photography/

In flight photos are easier with big birds because they don’t move as fast as the smaller birds and the there’s much more bird upon which to lock focus.  Larger birds are also somewhat more predictable, especially if you are looking for an action shot.  If you are watchful, you can tell by their movements when they are preparing to lift off.  That’s when you start pressing your shutter, non stop.

The Subtleties of Light on Photographs of The Great Blue Heron

I’ve been photographing this particular Blue Heron for seven mornings now -same place, same time (at least I’m assuming it’s the same heron). What a study in light! The colors of the feathers, the variety and vibrancy recorded on the camera’s sensor, are not what I remember seeing when I took the photos. The camera’s digital sensor records light and color  differently, depending on intensity of the sun, time of year, time of day, length of exposure, depth of field, reflection of background colors, aperture  and probably countless other factors.

Below please find two photos of the Great Blue Heron flying plus a third photo showing this great bird readying for liftoff.  An adult Blue Heron stands about 4 feet tall and its wingspan is an impressive 6 feet wide.

Photograph of Great Blue Heron in Flight
ISO 400; F4/0; 1/2000 second
The sun is behind me, to my right as I pressed the shutter at around 8:00-8:30 am on June 7, 2013. The blue sky is the only blue I see in this photo of a Great Blue Heron. Lot’s of vibrant shades of yellow, gold, orange, brown, olives.


Photograph of Great Blue Heron in Flight
ISO 320; F4.5; 1/3200 second
I’m parked in the same place, the sun is behind me, to my right, as I pressed the shutter at around 8:00-8:30 am on June 8, 2013
No sky light in the background this time, just water and grass- giving it almost a stained glass look.
The blues on the wings are vivid. The darker green and blue background adds drama.
Photograph of the Great Blue Heron takeoff
Blue Heron preparing to Fly. Or Perhaps He is Just Flashing Me.