Peregrine Falcon

My Personal “Hot-Spot” To Photograph Raptors

Special Birding Hotspot

Bird Photographers are always looking up and around for locations upon which birds frequently perch – preferably locations that give the photographer a clear shot of a handsomely posed bird.

There are lots of “Birding Hotspot” recommendations on the web that list the best bird watching/bird photography destinations. I’ve been to a few of these, and they are very fruitful. However, I think every photographer needs to search out one special birding spot that’s close to home, not crowded with people, and guarantees a variety of visiting birds during the Spring and Fall migration seasons.

A Perch On The Dunes of Lake Michigan

One such hot spot for me is a large, long dead tree, standing strong in the dunes overlooking Lake Michigan. This tree is rather stark looking, with no leaf cover, so it’s perfect for raptors to perch upon while hunting for mammals, fish, and other birds.

I’m designating this dead tree as my hot spot for photographing raptors.

I’m lucky enough to have my neighbor’s permission to setup my equipment on her family’s beautiful deck. This deck is built into the dune, and puts me at eye level with the top most branches of the dead tree. Also, this tree is situated so I can get a fairly close shot if I happen to be on the road in my car with my camera.

So far, I have been lucky enough to photograph two raptors perched on this tree that I could not initially identify and have never photographed before.

Whatbird.com – A Valuable Bird Identification Resource

The expert birders at the WhatBird.com website (under the “Help Me Identify A Bird” tab) came to the rescue. NOTE: If you haven’t already, take a look at this informative site. In addition to being a valuable resource for bird photographers, it’s a great place to learn bird identification skills.

My two newbie raptors, perched on that long dead tree, turned out to be a Cooper’s Hawk and a Peregrine Falcon. Both of these raptors regularly hunt other birds.

Cooper’s Hawk

The Cooper’s Hawk (about the size of a crow) is an “accipiter” hawk. According to the experts, accipiter hawks have the kind of wings and tails that allow them to easily maneuver in tight spots, like wooded areas. These small hawks are also known to hunt smaller birds at bird feeders.

Photograph of a Cooper's Hawk
Cooper’s Hawk, Perched on a Dead Tree Overlooking Lake Michigan
ISO 1000; 1/3200 second; f/6.3

This Cooper’s Hawk perched on the tree for less than a minute. I pressed the shutter once and he was gone. His arrival wasn’t a surprise because he was heralded in by a mob of loud crows. This particular juvenile Cooper’s hawk was being insufferably scolded, harassed and pecked by the crows. I don’t think it was my camera and me that caused him to fly off so soon.
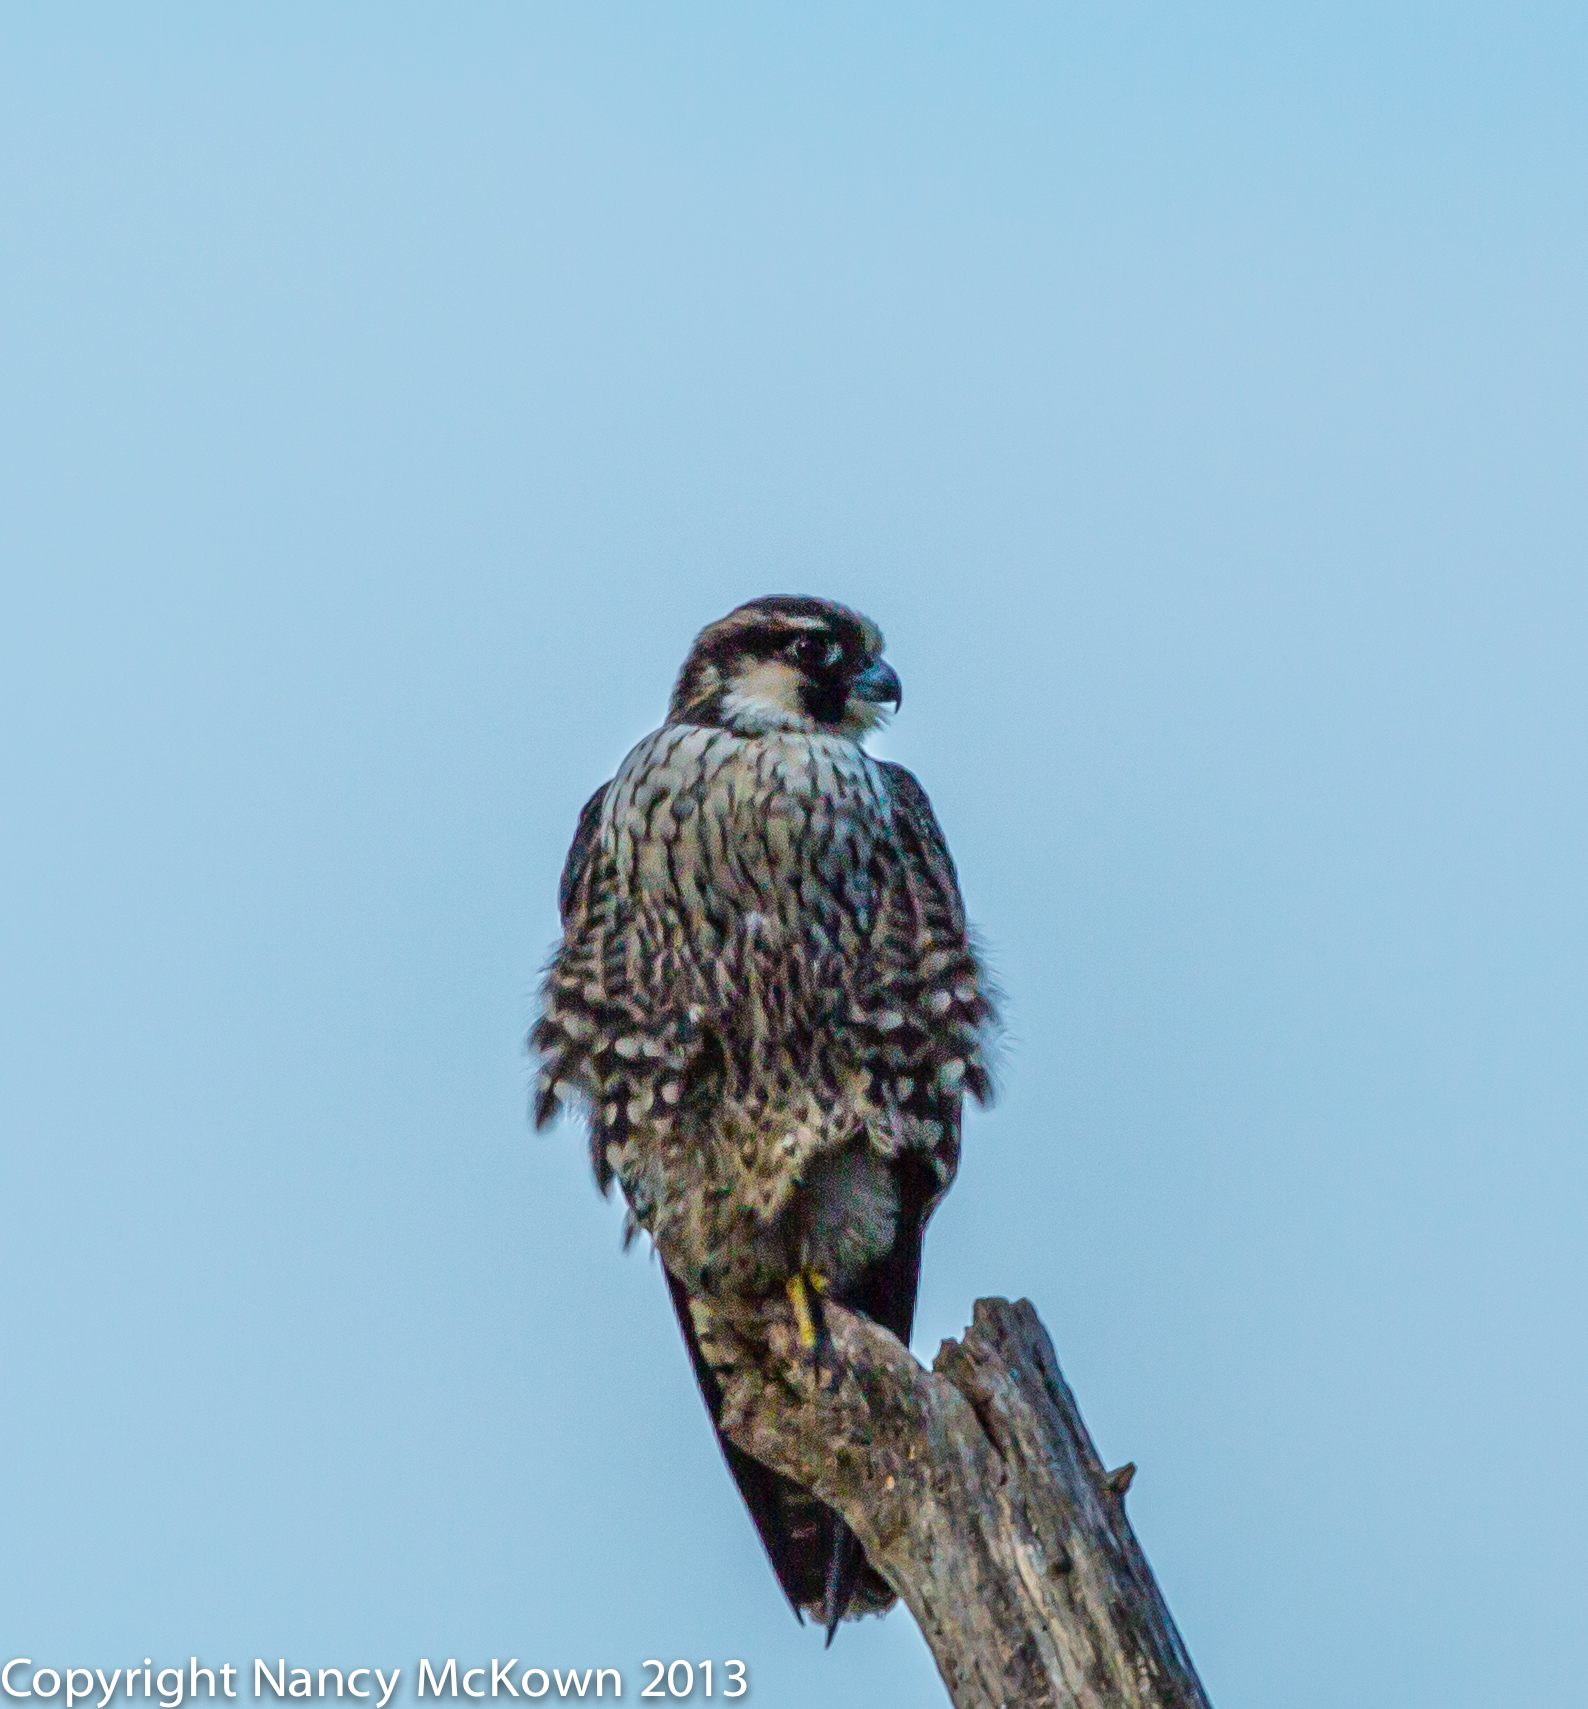
Peregrine Falcon

The second surprise visitor to my hotspot was a Peregrine Falcon. I was driving down Lakeshore Drive when I notice her on my hotspot. I stopped the car and shot this image from my car window.  Peregrines are about the same size as Cooper’s Hawks  – anywhere from 15″-20″ long, head to tail.

Photograph of Peregrine Falcon
Adult Peregrine Falcon Perched on a Dead Tree Overlooking Lake Michigan
ISO 250; 1/2500 Second; f/5.6

Peregrine Means Wanderer

In an effort to help restore the population of this raptor, peregrine falcons have been “transplanted” in a lot of different cities. They perch on tall buildings, nest on the building’s ledges and feed on doves, blackbirds, jays, pigeons and starlings.

This Peregrine was most likely migrating south along the Lake Michigan shoreline.  Crows were also mobbing this much faster, more powerful, mid-air hunter of other birds. Sadly, the peregrine falcon did not stick around for me to get more than one or two shots.

Mobbing Crows

Crows are known for their intelligence and curiosity. Makes me wonder why they harass raptors that specialize in eating other birds. Certainly makes it more exciting. I’m hoping that the crows haven’t also designated this dead tree on the dune as their raptor hotspot.


Photo of Nashville Warbler

Photographing Two Warblers Using Manual Mode

Manual Mode

Lots of photographers never venture outside the automatic modes provided by their cameras. There’s comfort in using them. Whether using full auto, program mode, auto ISO, aperture or shutter preferred, some photographers like the convenience of letting the camera do the thinking.

Setting the camera to manual mode means that the photographer must set more than one exposure setting. Manual mode is generally listed with the “creative” settings. In manual mode, the photographer decides what aperture and shutter (and sometimes ISO) to set.

The Creative Settings on a DSLR

Shutter preferred and aperture preferred settings on a DSLR make life easier because they allow the photographer to pick just one setting that is most important for the scene, and let the camera automatically set the rest of the exposure settings. Less stressful, right?

But there’s a price to be paid for the convenience of letting your camera’s computer make those exposure choices. The sharpness of your image may disappoint – either because the camera’s choice of aperture set the DOF too shallow or the camera’s choice of shutter speed did not freeze the action quite enough.

Two or More Exposure Choices

I can’t set my camera to my preferred aperture AND preferred shutter settings unless I set the camera to (M) manual mode. NOTE:  The camera is still somewhat creatively automated because the ISO is set to  “Auto”. I have an internal camera setting for auto ISO that will restrict the ISO from rising above 1000.

Photo of Nashville Warbler
Nashville Warbler in a Corn Field. Camera Set to M Mode
ISO 400; f/7.1; 1/1600 second

Photographing Beautiful Warblers

I shot both the Nashville Warbler (above) and the Palm Warbler (below) using the M-manual setting. This choice allowed me to set both the shutter and the aperture separately. The camera was set to auto ISO. In order to get tack sharp images and avoid noise, I kept a close watch on the ISO setting, making sure it did not go above 500.

Both images were shot with a relatively fast shutter – fast, that is, for a perching bird. I’ve noticed that when I set the camera to shutter preferred mode, the camera rarely sets the aperture smaller than f/6.3. However, I like the f/7.1 aperture setting better for these bird shots because it gives my subject a wider DOF. A wider depth of field helps make sure the whole bird – head to tail feathers – is in-focus. In these shots, f/7.1 still maintained a pleasing blurred background and low ISO.

Photo of a Palm Warbler - Eastern Yellow SSP
Palm Warbler – Eastern Yellow Subspecies. Camera Set to Manual Mode
ISO 320; f/7.1; 1/1000 Second
According to the Bird ID Experts at WhatBird.com, This Palm Warbler is Somewhat of a Rarity Around Southwest Michigan. They Recommended That I Submit An Observation Form to E-Bird.com, Which I Did.


The Advantages of Manual Mode When Photographing Birds

Experimenting with the M mode will help you better understand aperture, shutter and ISO, the basics of managing exposure. It will also help you better understand the “logic” the camera uses when making decisions in the shutter preferred and aperture preferred modes.

You may be surprised at how much versatility you have when you set your DSLR to manual mode.

Photo of Palm Warbler
Palm Warbler
ISO 1250; f/7.1; 1/1600 second
Camera Set to Manual Mode

Automation vs More Control

There’s nothing wrong with bird photographers using automated controls on their cameras. Those settings come in handy when the action is moving fast. Modern cameras have sophisticated algorithms that do a great job of automating exposure for quick and easy shooting. And the photos look great!

But the more you photograph birds, the more discriminating you will become, and the more control you will crave. You’ll learn more about the juggling act that is correct exposure. You’ll use M mode more because manual exposure balancing won’t be so threatening.

So, once in a while, get out of the comfort zone of the more restrictive creative modes. Carve yourself a new comfort zone in the world of manual mode.

Photograph of Male and Female Wood Duck

Photographing Wood Ducks In Low Light

ISO Matters in Bird Photography

The ISO on a digital camera refers to a light sensitivity setting. Low ISO means that there is plenty of ambient light for exposure.

DSLR cameras can be set to automatically adjust the sensitivity of the camera’s sensor (Auto ISO). If more light is needed for proper exposure (based on the shutter and aperture settings and how much light is getting through), then the camera will crank up the sensitivity of its sensor. The advantage of a high ISO setting is that photos can be taken in low light. However, the higher the camera sets the light sensitivity (ISO), the more appearance of noise (or grainy texture) the image has.

Clarity Sacrificed When Using High ISO

The appearance of grain is not an asset in wild bird photos.

I like the clarity of bird photos shot at a low ISO. Therefore, I try to shoot in rather strong, natural light to keep that ISO sensitivity low, below ISO 500 if possible. This is just a guideline. Alot of the time, given the ambient light, getting the ISO that low is simply not possible. So I have to decide whether to pass up the shot or take it at a high ISO setting.

Factors That Will Minimize Noise

The higher that ISO creeps up, the more grain that will surface on the image, and the more photo clarity is compromised. Most high end DSLR cameras allow you to pre-set a maximum ISO -let’s say 1000- above which the camera ISO setting does not cross. Of course, in low light situations, the shutter or aperture has to be adjusted to compensate.

There are a couple ways to minimize noise. Neither will give you tack sharp images, but they help.

  1. (Expensive Option) Buy a camera with a full size DSLR sensor that is engineered to produce less digital “noise” in low light situations.
  2. Use post processing software that helps reduce the impact of noise to a more acceptable level. (Examples are Lightroom, Noise Ninja).

Focus a Priority Over ISO

If you decide that the shot is worthwhile, despite the low light, then sharp focus has to be a primary concern. If you set the shutter too low to lower the ISO, your images will be out of focus. Long lenses exacerbate the focusing challenge.

Remember that in post processing, out-of-focus images are much harder to deal with than images with excessive noise.

Light Balancing Act

It comes down to a balancing act. If you don’t have enough light when photographing birds, you will have to anticipate some level of noise and accept the lack of detail and clarity after you take the images through post processing.

Photo of Male Wood Duck in Eclipse Plumage
Male Wood Duck In Eclipse Plumage in Low Light
ISO 4000; 1/1250 second; f/5.6

Photographing Wood Ducks

I found a fun little park near my home. The creek was dammed up to create a marsh with lots of  shady hidey holes for waterbirds. Beyond the marsh and all through the park are tall, thick trees, creating an abundance of shade. Not alot of sunlight gets through these trees. If I arrive at dawn, the sun is behind the trees. If I arrive a few hours before sunset, the sun is behind the trees. Even the overhead sun does not penetrate the trees over the marsh.

These wood ducks stayed at the far end of the marsh, under cover as much as possible. The parking lot is quite a distance from the water, so I got out of the car and set up my tripod as close to the shore as the ducks would let me approach. Ultimately though, the ducks were too far away for my 300 mm with 2x extender. NOTE: Distance also takes its toll on image quality.

Juggling Aperture and Shutter to Bring Down the ISO

To get these wood duck photos, I kept adjusting my aperture and shutter, hoping I could lower the ISO. The light was such that, to maintain good focus, even with the tripod, I had to shoot with an ISO of between 4000-6000.

Very noticeable noise. I brought the images into post processing to try to tone down the look of the grain. It did look better. The noise is less conspicuous, but clarity, texture and definition are sacrificed.

Photograph of Male Wood Duck in Full Plumage
Photo of Male Wood Duck with Full Plumage Taken in Low Light
ISO 5000; 1/2000 Second; f/6.3
Photograph of Male and Female WoodDucks
A Pair of WoodDucks- Female Wood Duck is on the Lower Branch. Taken in Low Light
ISO 4000; 1/1250 second; f/5.6.

Keep Trying To Minimize Noise

I like the photos, but I would never enlarge them or frame them. I like the colors, the blurred background, and they appear to me as artful and well framed. The photos are clearly focused, but the amount of noise makes details hazy.

Taken as a whole, they look fine. But I will keep trying to capture images of wood ducks in more favorable (stronger) light.


Photo of Savannah Sparrow

Photographing Savannah Sparrows – Understanding Focus

Different Degrees of Sharpness

I’ve often wondered why some of my bird photos are less sharp than others. Generally, I prefer the tack sharp, ultra clear photos, but I don’t always get them.

A photo that is in-focus does not mean that it is tack sharp. And soft focusing does not mean that the photo is out-of-focus. Out-of-focus means that all the lines are blurred to some degree. In-focus means that the various shapes in the focus area are sharp to some degree.

There are so many reasons why your images may not achieve their highest degree of sharpness. I included a list (at the bottom of this post) of all the reasons I could think of. No doubt there are more.

Ultimate Control is An Illusion

Since there are so many variables, it seems that it would be an impossible task for a bird photographer to consistently achieve tack sharp photos all of the time. That kind of control, for someone working in the great outdoors, is an illusion.

Be As Discriminating As You Can

I strive for image sharpness in every outdoor photograph I take. I also try to position my camera (the where/when/how) so that my photos are artful and well framed. Like any art form, what looks good and what looks sharp are both subjective.

So, be as discriminating as you can with your work and trust your eye and your perspective. Put sharp focus high on your list, but understand what you are up against. Get a better understanding of the  limitations of your equipment and the limitations of photographing wild birds. The constraints you will encounter with equipment and nature are minimal compared to the stunning images you will capture.

Savannah Sparrows

I was driving on the backroads of the Allegan Forest when I came across these savannah sparrows. Different settings, different light, different action, different levels of sharpness.

Photo of Beautiful Song Birds Squabbling- Savannah Sparrows
Savannah Sparrows – Beautiful Song Birds Squabbling
ISO 800; 1/2500 second; f/6.3
Photo of Savannah Sparrow
Savannah Sparrow
ISO 320; f/7.1; 1/1600 Second
Photo of Savannah Sparrow
Savannah Sparrow
ISO 320; f/7.1; 1/1600 Second
Photograph of Savannah Sparrow
Savannah Sparrow Stepping Off His Perch. More DOF Gives Clarity -Fast Shutter Captures Flight
ISO 500; f/7.1; 1/2000 Second

Issues That May Impact Image Sharpness.

  1. Is your shutter speed set high enough for your moving subject?
  2. Did you use a tripod and/or cable release? Or did you hand hold the camera?
  3. Is the amount of light optimal so that your ISO is as low as possible? Noise impacts clarity.
  4. Where’s the light coming from?
  5. What aperture setting is being used- wide open apertures cause DOF issues and softer images?
  6. How big is your subject?
  7. How close to your subject are you able to get?
  8. What type/quality of lens are you using?
  9. How far away is the background from your subject?
  10. What focus mode is set?
  11. What focus priority is set?
  12. Are in-camera “filters” set – so the camera automatically applies “fixes” that may affect focus?
  13. Does the camera/lens have a built in stabilizer?
  14. Did you use manual focus?
  15. Is the camera’s digital sensor high quality?
  16. Has the image been magnified and consequently looks less focused?
  17. Does you subject contrast strongly with its surroundings?
  18. And a few more things that stand in the way of tack sharp photos that can not be attributed to the camera, the photographer or the bird:  a) The pollen from the trees, weeds, grasses and  b) the dust, smoke and other particles that are floating in the air. These particles make everything your lens sees hazy and less clear.  Good News! Haze and Pollen are much reduced in the cold months…. so photos are clearer.
Wordle Depicting The Issues That Impact Tack Sharp Photos
Want Tack Sharp Photos? So Many Things to Consider


Photo of Immature Male Ring Neck Pheasant

Photographing the Ring-Neck Pheasant

Photography Opportunities on the Back Roads

Lately, I’ve been spending a lot of time in my car, traveling down the back roads in the Allegan Forest & Allegan State Game Area, near “Todd Farm”, the Fennville Farm Unit. Todd Farm is a wildlife refuge, located at the west end of the forest. It is full of corn and soybean fields planted specifically for migrating and gaming birds. The DNR officers who work there are friendly and helpful to bird lovers.

The Leaves, They Are A Changin’

Michigan is a great place to be in Autumn. The weather has been sunny and cool. Todd Farm will be open for hunting (in designated areas at designated times), so it won’t be long before the hunters dominate the fields and the birds (and this photographer) will not be out and about.

Photo of Immature Male Ring Neck Pheasant
Immature Male Ring Neck Pheasant on the side of a Country Road.
1/640 second, ISO 200, f/3.5

Photographing Male Ring-Neck Pheasants

Recently I came across 3 immature male ring-neck pheasants on the side of the road near a large, waterlogged ditch. They tolerated my car’s approach, but stayed close to the tall corn stalks and brush in case it was necessary for them to make a quick get away.

What a study in fall colors!  The feathers on these birds are bright, varied, spectacular and yet blend with the early autumn landscape. The mature males have elaborate green head feathers and a white ring around their necks. The hens’ feathers are a soft brown, quite plain in comparison to the males.

I have seen groups of these birds running off  in the distant fields, but have yet to digitally capture a mature ring-neck pheasant – male or female. The DNR officers said that they see pheasants drying themselves on the road after a rain. I’m hoping to be lucky enough to spot them before hunting season starts in October. I will add those photos to the end of this post if/when I do.

Stabilizer Tools for Photographers

Since the birds were not in a hurry to leave, I had time to try out my new stabilizer tool, a bean bag specifically designed for photographers to use in the field. I needed something to help stabilize the camera and heavy lens on the window ledge when I am in the car and out on the backroads. A quick response to photographing birds demands that the camera is in place and ready to shoot. A bean bag helps to provide quick and easy support on the window ledge. It would also work on a tree stump or post if I wanted to use a remote shutter release out in the field.

The bean bag offers some tension relief for my neck and back. It also allows me to quietly swivel the camera as needed to follow the action without scratching the window ledge or the camera lens. NOTE:  I usually have the camera strap around my neck just in case of a spill.

Unfortunately, the bean bag supports the camera right on the window ledge and consequently, does not always give me the height I need for some shots. For eye level support, I rest my camera on a contoured, high density foam neck pillow.

One More Support Tool for Photographers

Often times when I’m driving, I see the bird I want to photograph through the passenger side window.  This requires that I quickly move the camera from my window and point and shoot out the passenger window. Since I can’t reach the passenger window from the driver’s side, I can’t rest the lens on it, so I am hand holding that heavy camera/lens – trying to compensate for the inevitable shake with a high shutter speed. (The image stabilizer helps with the shake too.)

I bought a rather large storage bin that rests on the passenger seat; upon which I can stabilize the camera before I aim and shoot through the passenger’s window. This bin also provides enough space inside to store the camera when needed.

Photo of Two Immature Male Ring Neck Pheasants
Two Immature Male Ring Neck Pheasants
1/800 second; ISO 200, f/3.5

Upland Game Birds

My husband said that ring neck pheasants are upland game birds, along with grouse, prairie chickens, partridges, quails, and wild turkeys. They are not native to Michigan, but brought over from China in the mid 1800’s as game birds. They do fly, but their get-aways are more successful if they duck and run. (Survival of the fittest, the flyers were more likely to be shot by hunters.)  These young males have probably not yet experienced a Michigan hunting season.

And finally, just in case you need a refresher of the Autumn colors to come, here’s a close-up photo showing the variety of Autumn colors and intricate designs sported by the immature, male ring-necked pheasant.

Photo of Pheasant Feathers
This Young Male Pheasant sports a Cornacopia of Autumn Colors, not to Mention Gorgeous Feather Designs


Photo of Blue Heron Eating Grasshopper

Close up Photography with a Telephoto Lens – Focusing on the Details

A Great Blue Heron Out of Its Element

We were driving on the backroads in Allegan County searching for birds in the corn fields when we came across a very large bird that was not only out of its natural element, but strangely unafraid of moving cars and humans.

The Great Blue Heron is a long legged, wading bird usually found near water. Its long neck and sharp beak make it highly adept at fishing.

We came across this heron on a very dry looking country road. He was “fishing” for insects in the rows of corn.

When A Bird Lets You Come Close With Your Camera

The strange part about this particular bird was that we were not only able to move in very close, but we were also able to get in and out of the car as needed. The heron was not about to come meet us, but he definitely wasn’t fearful and did not attempt to fly off.  We were able to get so close that the 300 mm lens with 2x extender (600mm) was too long to get the entire bird in the view finder.

Instead of removing the 2x extender and using the 300mm focal length, I decided to leave it on and take advantage of the sharp, close-up possibilities that a telephoto lens can provide.

Photo of Great Blue Heron Eating a Grasshopper
Close up of Great Blue Heron Out in a Corn Field, Feasting on a Large Grasshopper.
f/6.3, 1/2500 second, ISO 640. 300 mm lens with 2x extender.

Macro Lenses Not Preferable for Bird Photography

I owned a Canon EF 100mm f/2.8L IS lens with macro. I used the macro for flowers and insects, but it never worked for photographing birds. I ended up selling it.

Even though macro lenses will let you capture incredible, close up detail, I found that it was not practical to use a macro lens in bird photography because it requires that you get as close as 2 inches away from a bird. When does that happen?

Telephoto Lenses Work Well for Close-Up Photography

If you want close-up photos of a bird, or bird parts, you can use your telephoto lens. This is especially true if you and your lens are able to get close enough to the bird to capture the details.

Photo of Grasshopper Trapped in the Beak of a Great Blue Heron
Close-up of Grasshopper Trapped in the Beak of A Great Blue Heron

Zooming In With Post-Processing Software

Close proximity to your subject is essential to get the tack sharp details. The less zooming you need to do in post processing, the clearer the close-up details will be.

Post processing software will help you to zoom in on any portion of a photo. As I wrote in my post labeled “How to Photograph a Great Blue Heron – Part 1”, digital images are made out of pixels/dots. You enlarge the dots when you zoom in to a relatively small component of the photo. The more you zoom in on a detail in the photo, the larger the dots become. As the pixels/dots enlarge, the image becomes less clear.

Photo Details

I like the long beak in the first photo. It’s all scuffed up; as if this crane has been in a lot of sword fights. And, of course, the details seen in the close-up of the poor, doomed grasshopper trapped in that razor sharp beak is fascinating. I would not have seen that detail if I was not able to get as close with my long lens.

So when a bird allows you to get close, take advantage of your long telephoto lens and focus in on details that interest you.

How to Photograph Red Tailed Hawk

Photographing the Red Tailed Hawk

Where the Hawks Are

It seems I’m always looking up, hoping to spot birds. Going down the road one morning, I spotted a red tailed hawk at the top of a utility pole, scanning the cut corn field looking for a meal. I knew the sun was too high and too bright to get a well exposed photo. Worst of all, the hawk was east of the highway, at my 2:00, so my lens was facing the sun. We pulled off the highway anyway.

From the passenger seat, I propped the camera (with the 300mm lens and 2x extender attached) on the window ledge, aimed, and took some test shots. I looked at the histogram and could see that the light wasn’t bad enough to send the graph clipping over the right side.

So what do you do if  the sky in the background is brighter than your subject in the foreground?  Here are 3 suggestions to address this problem:

1)  Attach a Graduated ND filter.  The photographer adjusts the filter on the lens so that the dark part is at the top (to reduce the amount of the light from the sky).

2)  Adjust the Ambient Light Exposure Compensation. (See post about histograms and exposure compensation called “Photographing Sandpipers on the Beach”.)

3)  Make the adjustments when you get back home with your post processing software.

I decided that this time, I would solve the uneven lighting problems in post processing.

Post Processing Software to the Rescue

The camera display confirmed that the photographs from this light and this angle would be full of unattractive shadows and highlights. These photos would definitely not be keepers; unless I was willing to spend a little time adjusting the exposure, light and shadows in my post processing software.

Photo of Red Tail Hawk - Before Processing
Red Tail Hawk as Shot – No Adjustments.

RAW and JPG Formats

There are generally two choices a photographer has to record digital files on the memory card;  RAW and JPG.

RAW files are not processed or compressed by the camera’s computer. Consequently RAW files retain much more information that can be manipulated (when you get back home) by post processing software.

JPG files are processed and compressed by the camera’s computer. A JPG file will therefore provide fewer details that the post processing software can manipulate.

Because RAW files are not processed, the digital files are much larger than the processed JPG files. This is a consideration when choosing between JPG and RAW formats because RAW files take up much more space on your camera’s memory card. And, since it’s a much bigger file, it will take the camera more time to save the data to the memory card.

Photograph in RAW Format If You Want Maximum Post Processing Control

I always shoot birds with the camera set to RAW format. It’s a big advantage to start from scratch, with all the data, when the lighting is subpar and post processing is needed. Many cameras allow the user to save both the RAW file and JPG file for each photograph. I would not recommend this setting because your camera is recording double the number of files on your memory card. It is, however, a good way to see the difference between how the same image looks in RAW and JPG.

NOTE: Since RAW files are so big, it is critical to start out every shoot with plenty of high capacity memory cards- at least 16 GB and usually 32 and 64 GB.

Photograph of Red Tailed Hawk
Photo of Red-Tailed Hawk -After Adjustments were Made to RAW file in “Lightroom” Post Processing Software. Voilà!

Post Processing Software

There are lots of free post processing software programs to choose from, and your camera may have come with its own software for this purpose. The free stuff does a good job, but the fixes they provide are limited, mainly because the problems they address tend to be “one size fits all”.

The first photo is shown as it came out of the camera, with no post processing adjustments. It is simply unusable in this state. The second photo is the same photo, but the highlights and shadows, details and exposure are adjusted in Lightroom 4.

Many more basic post processing options are available in Lightroom; like crop/rotate, adjust color/exposure, sharpening, noise reduction, etc. It’s also a great tool for organizing, sharing and backing up your files. The software is easy to learn. And, if you do need help to learn Lightroom, (or any post processing tool) there are plenty of targeted resources on the web.

Don’t Pass Up The Photograph Because of Uneven Light

Light will be one of the biggest challenges you will face when photographing birds. With the right post processing software, you won’t have to pass up a shot because the light is not optimal.


Photo of Red Headed Woodpecker

Photographing the Elusive Red Headed Woodpecker

The Elusive Red Headed Woodpecker

You don’t see very many red headed woodpeckers around Southwest Michigan.

Rarely, like once every few years, one will visit our feeders. The other woodpeckers, even the big Pileated Woodpecker, are more visible and less cautious then the Red Headed.

Non-birders often mistakenly identify the Red-Bellied Woodpecker as the Red Headed. Big difference. There’s a photo of the red bellied on my “Gallery of Woodpecker Photos” page.

The mature Red-Headed Woodpecker has red feathers covering its entire head. The immature Redheaded resembles the adult, but does not have its distinctive red head. Instead, its head is brown with just a  small, faint patch of red feathers on its forehead.

Red Headed Woodpecker
Adult Red Headed Woodpecker
f/5.6; 1/640 second; ISO 3200;

Adult and Juvenile Red Headed Woodpeckers

I was lucky enough to capture both the adult and juvenile Red Headed Woodpeckers one morning in a wooded glen near Lake Michigan. I usually use spot metering when I photograph very small birds (hummers, wrens) and partial metering for average size (robins) birds. On this shoot, I decided to experiment with what is suppose to be the most reliable of the automatic metering systems: Evaluative Metering.

What is Metering?

Photography is about light. All modern cameras are equipped with automatic metering systems that measure light; how much and how strong. Metering is the camera’s Job 1 because without first measuring the light, it can not set the aperture, shutter and ISO to create the proper exposure.

Evaluative metering (It’s called “matrix” metering for Nikon) works by dividing the viewfinder scene into different segments and calculating the exposure of each segment separately. The camera’s computer analyzes the data, throws in extra weight/importance around the focus points, and then, using a super secret algorithm and database comparison system, calculates exposure.

Immature Red Headed Woodpecker
Immature Red Headed Woodpecker. Just barely noticeable is the spot of red on its head.
f/5.6; ISO 3200;1/1600 second

Automatic Exposure Compensation Applied

Essentially, the algorithm that calculates evaluative metering is automatically applying exposure compensation (see previous post on exposure compensation: “Photographing Sandpipers on the Beach) by weighing the focusing areas more heavily in its calculations.

This evaluative metering algorithm is NOT applied when the camera is set to the other metering modes: spot metering, partial metering or center weighted average metering. That is why evaluative metering is considered the most reliable of the automatic exposure settings.

Does Evaluative Metering Eliminate the Need to Check the Histogram?

Unfortunately, no.

If evaluative metering is making exposure compensation adjustments based on its computer’s calculations, the photographer will be less likely to have to move the Exposure Compensation dial to adjust ambient light exposure.

But you still should make it a habit to check the histogram. Don’t assume that evaluative metering system has got the exposure under control.

A Tribute to the Red Headed Woodpecker

There was a tribute to the red headed woodpecker painted on a home near where I photographed them. I have included a photograph of that painting below. I can only assume that the owners of this house love these birds as much as I do. Since I don’t have a painting of this bird on my house, probably more.

Photo of Painting of Redheaded Woodpecker
Redheaded Woodpecker Painted on a House. A Beautiful Tribute to a Beautiful Bird.


Photo of Sandhill Crane Dancing

Photographing the Dance of the Sandhill Cranes

Bird Photography on the Road

Bird Photograpy on the road can stretch out to long, tedious hours. It’s hot. Impatient drivers behind you are leaning on their horns. The sun is rising in the sky fast, casting harsh shadows that you have to work around. Some days, all you see through your lens are the back feathers of robins and doves as they fly away from you.

Remember. You are on a photographic birding adventure! You’ve got to put time in the field to get the good shots. Persistence pays off.

Also remember that you are learning, and an essential part of learning is having FUN.

Planning Ahead Before You Go Out on the Road With Your Camera

When you are out with your camera, it’s a good idea to have a plan to keep yourself motivated and productive. The field guide that helps me determine my route for the day is A Birder’s Guide to Michigan by A.Chartier and J.Ziarno.

Most of my photography is done right from the car because, for the most part, birds are acclimated to vehicles. I park as close as possible to where I will be pointing my lens and then set myself a time limit. If the birds I came to photograph don’t show after an hour, I move to the next site on my schedule.

Stop and Take a Break

I take breaks. If I’m too far away from home, I stop for coffee and something to eat; and just to get out of the car. Today I stopped at Kismet Bakery, a great place for scones, bread (so-o-o-o  good!), and friendly faces.

Reinvigorated and all sugared up, I got back on the road. I retraced my morning route, just to check if the birds that weren’t there two hours ago had magically appeared.

And that’s when I saw them.

Sandhill Cranes Dancing in the Field

There, out in the open in a freshly cut farm field, stood five sandhill cranes feeding fairly close to the road. I pulled off to the shoulder of the road, shut down the car and got my camera into position. The cranes noticed me and slowly turned to move away. I thought it was going to be another bird back-end photo session. But then something wonderful happened. They started to dance.

Photograph of Sandhill Crane bowing
Sandhill Crane Taking a Bow

In my August 9 post about Sandhill Cranes, I wrote that the most fascinating part of watching sandhill cranes is when they dance. Well, right before my eyes, the cranes were bowing and leaping into the air, throwing branches and sticks with their beaks. Quite an amazing spectacle to behold. And I had my camera!

I was so excited, I wasn’t thinking about exposure or focus or shutter speed. Heck, I could hardly hold my camera straight. But somehow I got these shots.

Photo of Sandhill Cranes Dancing Photo of Sandhill Cranes Dancing Photograph of Sandhill Cranes Dancing Sandhill Crane Dance

You never know what’s going to transpire to make it a good day to be a photographer.

And the Next Week……

And, the following week, on two different occasions, I was lucky enough to photograph more dancing sandhill cranes. Please notice the difference in the lighting. The golden glow comes from the morning sun. The others are taken under cloudy skies.

Photo of Sandhill Crane Dancing


Photo of Sandhill Crane Dancing

Photo of Dancing Sandhill Cranes

untitled-8073 untitled-8071 Photograph of Sandhill Cranes Dancing untitled-8059

Photograph of Sandpiper on shoreline

Photographing Sandpipers on the Beach

Shore Bird Beauty

I love to photograph the sandpipers on the beach. Beautiful, subtle colors of the birds’ feathers complement the warm tones reflected in the sand and water. I usually sit down on the sand at bird level and secure my camera on a miniature tripod that is height adjustable, able to handle long lenses and manage the sandy terrain. Sometimes I cheat and bring a low stool with me. This makes it easier to get up and follow the birds quickly.

You’ll find different sorts of sandpipers skittering about on almost all beaches, poking around for invertebrates buried in the sand. Along with seagulls, they are an integral part of the beach scape. They blend. Even their nests (a slight depression in the sand) don’t stand out.

Sandpipers don’t seem especially wary of photographers, which helps when you are down in the sand with them. That lack of anxiety is a blessing to bird photographers because it gives us time to pause and think before we shoot. Quite a luxury in the world of bird photography.

Photograph of Sandpiper on shoreline
Sand Piper on Shoreline
ISO 200, f/7.1, 1/1600 second

The Luxury of Time

So you have the luxury of time when photographing sandpipers on the beach. Why not take this time to think about how best to improve your photography by learning more about how you can better manage your camera’s automatic exposure system.

Exposure Compensation Dial for Natural Light

Beaches are full of sand, sky and water, very reflective and very bright. The auto exposure metering system on your camera has all sorts of algorithms to do the math and figure out what exposure is proper for the scene. Since conditions on the beach are not average, the little computer that calculates the camera’s auto exposure can set the wrong exposure for the scene.

That’s why most digital cameras allow photographers to over ride the camera’s settings with an “exposure compensation” dial. When you play with the exposure compensation dial on your camera, you are essentially changing the camera’s “optimal” exposure reading.

How do you Know When to Adjust the Camera’s Auto Exposure Reading?

Photograph of Sandpiper
Sandpiper
ISO 200; f/6.3; 1/1600 second

Use the Camera’s Histogram

All digital DSLR’s have a display called the histogram. A histogram is a graph showing the brightness levels of the pixels for every image the camera takes. The graph runs from left to right and shows values from 0 (black/dark) to 255 (white/bright). Mid tone pixels are in the middle.

The fastest, most reliable way to determine if you need to adjust exposure while photographing on the beach is to follow this simple formula.

Simple Formula to Adjust Exposure on the Beach

1)  Find the Exposure Compensation Dial on your camera. (There should be 2 dials, one for adjusting light for your flash and one for adjusting natural light.) Make sure the Exposure Compensation dial for natural light is set in the center, on 0 or null. With this setting, the photographer is relying on the camera to determine the correct exposure.

2) Take a quick test photograph of your subject.

3) Check the histogram’s RIGHTMOST data for the photograph. (For this test, no need to check the data on the left side of the histogram.)

  • If the display is touching the right edge of the histogram, the exposure should be fine.
  • If the data is not quite to the right edge of the histogram, just add exposure by moving the dial a little to the right.  (on the “+” side)
  • If the data is crawling way over the right edge of the histogram (clipping) that means that there’s WAY TOO MUCH LIGHT. This is very bad. Lost details means lost forever. No post processing software can bring back those over exposed details. Simple solution: Move the dial one stop to the left, or subtract exposure. (on the “-” side).
  • Take another test photograph and recheck your histogram. Keep making adjustments until the RIGHTMOST data is just touching the right edge of the histogram.

All it takes is a quick look at the histogram. It will give you much more accurate information than just checking the display on the back of your camera.

One Last Thing

The beach is a pleasant place to photograph and the shore birds are generally patient and cooperative.  However, cameras and sand (especially blowing sand) are not a good mix, so take some precautions to minimize contact. And be sure to bring your camera bag for when you are not using the camera.