Monthly Archives: August 2013

Photo of Red Headed Woodpecker

Photographing the Elusive Red Headed Woodpecker

The Elusive Red Headed Woodpecker

You don’t see very many red headed woodpeckers around Southwest Michigan.

Rarely, like once every few years, one will visit our feeders. The other woodpeckers, even the big Pileated Woodpecker, are more visible and less cautious then the Red Headed.

Non-birders often mistakenly identify the Red-Bellied Woodpecker as the Red Headed. Big difference. There’s a photo of the red bellied on my “Gallery of Woodpecker Photos” page.

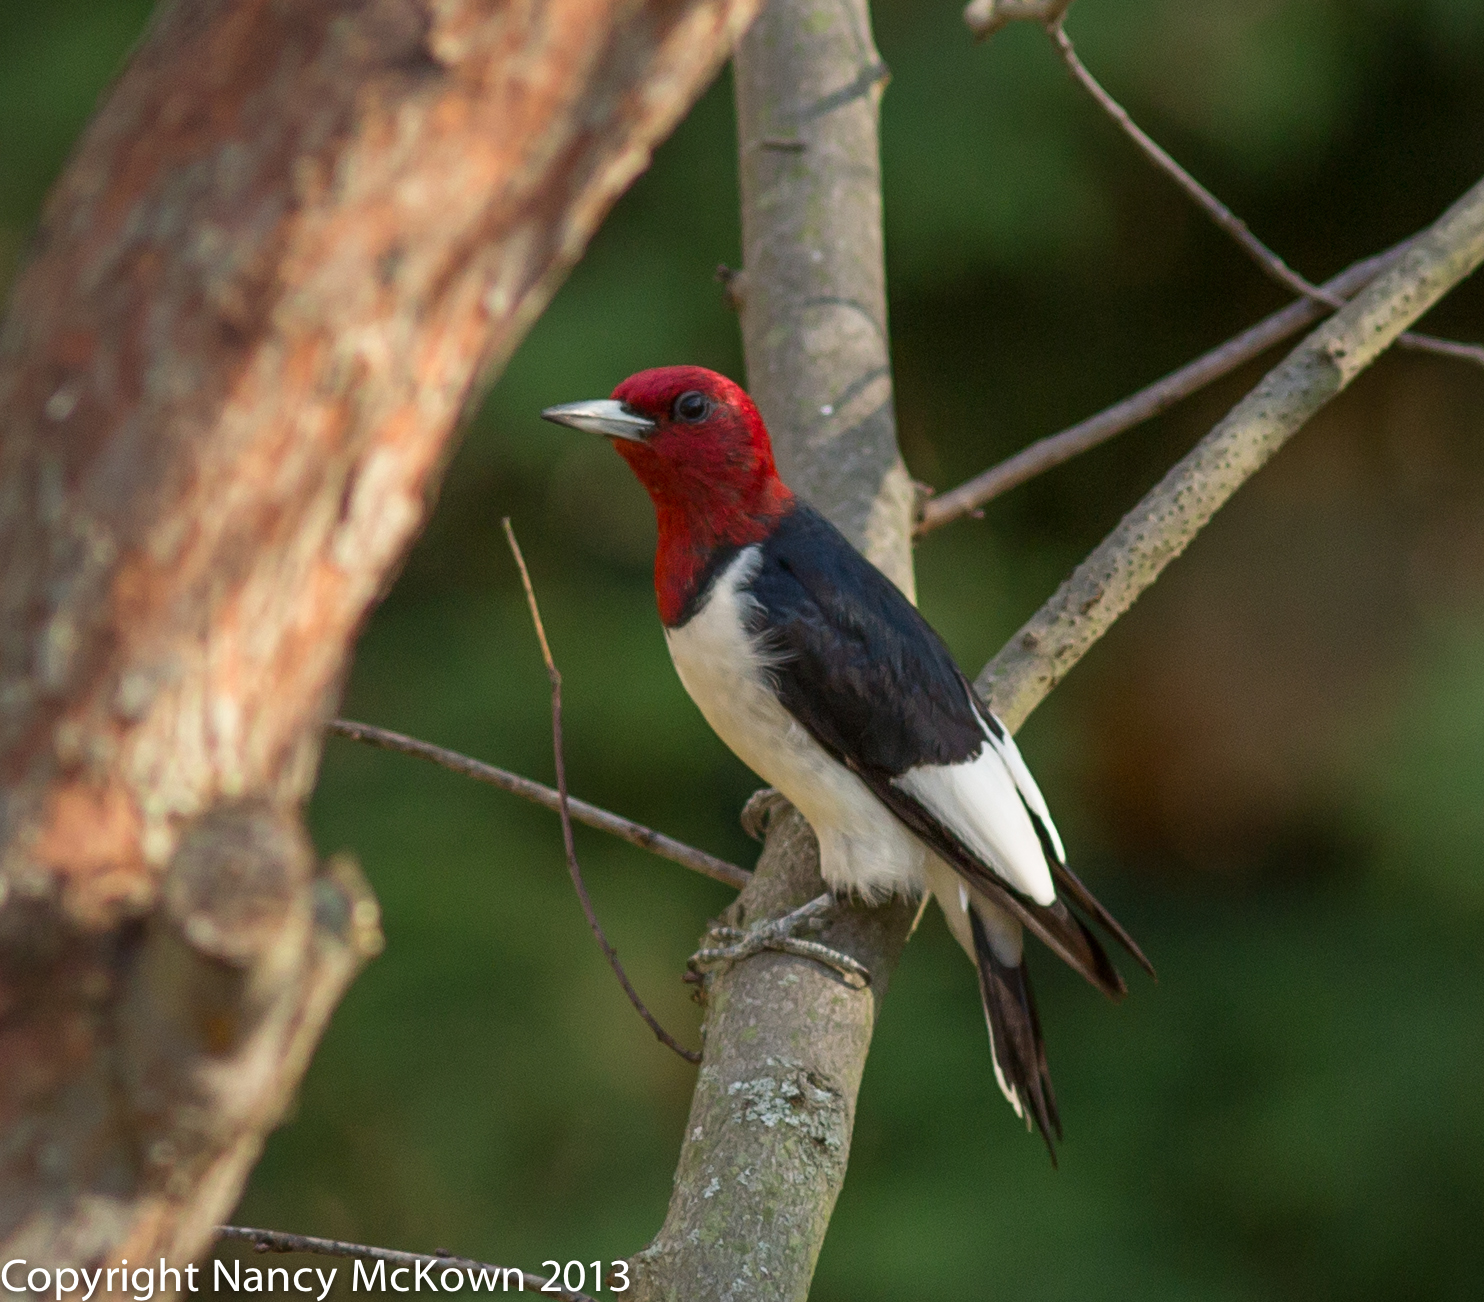
The mature Red-Headed Woodpecker has red feathers covering its entire head. The immature Redheaded resembles the adult, but does not have its distinctive red head. Instead, its head is brown with just a  small, faint patch of red feathers on its forehead.

Red Headed Woodpecker
Adult Red Headed Woodpecker
f/5.6; 1/640 second; ISO 3200;

Adult and Juvenile Red Headed Woodpeckers

I was lucky enough to capture both the adult and juvenile Red Headed Woodpeckers one morning in a wooded glen near Lake Michigan. I usually use spot metering when I photograph very small birds (hummers, wrens) and partial metering for average size (robins) birds. On this shoot, I decided to experiment with what is suppose to be the most reliable of the automatic metering systems: Evaluative Metering.

What is Metering?

Photography is about light. All modern cameras are equipped with automatic metering systems that measure light; how much and how strong. Metering is the camera’s Job 1 because without first measuring the light, it can not set the aperture, shutter and ISO to create the proper exposure.

Evaluative metering (It’s called “matrix” metering for Nikon) works by dividing the viewfinder scene into different segments and calculating the exposure of each segment separately. The camera’s computer analyzes the data, throws in extra weight/importance around the focus points, and then, using a super secret algorithm and database comparison system, calculates exposure.

Immature Red Headed Woodpecker
Immature Red Headed Woodpecker. Just barely noticeable is the spot of red on its head.
f/5.6; ISO 3200;1/1600 second

Automatic Exposure Compensation Applied

Essentially, the algorithm that calculates evaluative metering is automatically applying exposure compensation (see previous post on exposure compensation: “Photographing Sandpipers on the Beach) by weighing the focusing areas more heavily in its calculations.

This evaluative metering algorithm is NOT applied when the camera is set to the other metering modes: spot metering, partial metering or center weighted average metering. That is why evaluative metering is considered the most reliable of the automatic exposure settings.

Does Evaluative Metering Eliminate the Need to Check the Histogram?

Unfortunately, no.

If evaluative metering is making exposure compensation adjustments based on its computer’s calculations, the photographer will be less likely to have to move the Exposure Compensation dial to adjust ambient light exposure.

But you still should make it a habit to check the histogram. Don’t assume that evaluative metering system has got the exposure under control.

A Tribute to the Red Headed Woodpecker

There was a tribute to the red headed woodpecker painted on a home near where I photographed them. I have included a photograph of that painting below. I can only assume that the owners of this house love these birds as much as I do. Since I don’t have a painting of this bird on my house, probably more.

Photo of Painting of Redheaded Woodpecker
Redheaded Woodpecker Painted on a House. A Beautiful Tribute to a Beautiful Bird.


Photo of Sandhill Crane Dancing

Photographing the Dance of the Sandhill Cranes

Bird Photography on the Road

Bird Photograpy on the road can stretch out to long, tedious hours. It’s hot. Impatient drivers behind you are leaning on their horns. The sun is rising in the sky fast, casting harsh shadows that you have to work around. Some days, all you see through your lens are the back feathers of robins and doves as they fly away from you.

Remember. You are on a photographic birding adventure! You’ve got to put time in the field to get the good shots. Persistence pays off.

Also remember that you are learning, and an essential part of learning is having FUN.

Planning Ahead Before You Go Out on the Road With Your Camera

When you are out with your camera, it’s a good idea to have a plan to keep yourself motivated and productive. The field guide that helps me determine my route for the day is A Birder’s Guide to Michigan by A.Chartier and J.Ziarno.

Most of my photography is done right from the car because, for the most part, birds are acclimated to vehicles. I park as close as possible to where I will be pointing my lens and then set myself a time limit. If the birds I came to photograph don’t show after an hour, I move to the next site on my schedule.

Stop and Take a Break

I take breaks. If I’m too far away from home, I stop for coffee and something to eat; and just to get out of the car. Today I stopped at Kismet Bakery, a great place for scones, bread (so-o-o-o  good!), and friendly faces.

Reinvigorated and all sugared up, I got back on the road. I retraced my morning route, just to check if the birds that weren’t there two hours ago had magically appeared.

And that’s when I saw them.

Sandhill Cranes Dancing in the Field

There, out in the open in a freshly cut farm field, stood five sandhill cranes feeding fairly close to the road. I pulled off to the shoulder of the road, shut down the car and got my camera into position. The cranes noticed me and slowly turned to move away. I thought it was going to be another bird back-end photo session. But then something wonderful happened. They started to dance.

Photograph of Sandhill Crane bowing
Sandhill Crane Taking a Bow

In my August 9 post about Sandhill Cranes, I wrote that the most fascinating part of watching sandhill cranes is when they dance. Well, right before my eyes, the cranes were bowing and leaping into the air, throwing branches and sticks with their beaks. Quite an amazing spectacle to behold. And I had my camera!

I was so excited, I wasn’t thinking about exposure or focus or shutter speed. Heck, I could hardly hold my camera straight. But somehow I got these shots.

Photo of Sandhill Cranes Dancing Photo of Sandhill Cranes Dancing Photograph of Sandhill Cranes Dancing Sandhill Crane Dance

You never know what’s going to transpire to make it a good day to be a photographer.

And the Next Week……

And, the following week, on two different occasions, I was lucky enough to photograph more dancing sandhill cranes. Please notice the difference in the lighting. The golden glow comes from the morning sun. The others are taken under cloudy skies.

Photo of Sandhill Crane Dancing


Photo of Sandhill Crane Dancing

Photo of Dancing Sandhill Cranes

untitled-8073 untitled-8071 Photograph of Sandhill Cranes Dancing untitled-8059

Photograph of Sandpiper on shoreline

Photographing Sandpipers on the Beach

Shore Bird Beauty

I love to photograph the sandpipers on the beach. Beautiful, subtle colors of the birds’ feathers complement the warm tones reflected in the sand and water. I usually sit down on the sand at bird level and secure my camera on a miniature tripod that is height adjustable, able to handle long lenses and manage the sandy terrain. Sometimes I cheat and bring a low stool with me. This makes it easier to get up and follow the birds quickly.

You’ll find different sorts of sandpipers skittering about on almost all beaches, poking around for invertebrates buried in the sand. Along with seagulls, they are an integral part of the beach scape. They blend. Even their nests (a slight depression in the sand) don’t stand out.

Sandpipers don’t seem especially wary of photographers, which helps when you are down in the sand with them. That lack of anxiety is a blessing to bird photographers because it gives us time to pause and think before we shoot. Quite a luxury in the world of bird photography.

Photograph of Sandpiper on shoreline
Sand Piper on Shoreline
ISO 200, f/7.1, 1/1600 second

The Luxury of Time

So you have the luxury of time when photographing sandpipers on the beach. Why not take this time to think about how best to improve your photography by learning more about how you can better manage your camera’s automatic exposure system.

Exposure Compensation Dial for Natural Light

Beaches are full of sand, sky and water, very reflective and very bright. The auto exposure metering system on your camera has all sorts of algorithms to do the math and figure out what exposure is proper for the scene. Since conditions on the beach are not average, the little computer that calculates the camera’s auto exposure can set the wrong exposure for the scene.

That’s why most digital cameras allow photographers to over ride the camera’s settings with an “exposure compensation” dial. When you play with the exposure compensation dial on your camera, you are essentially changing the camera’s “optimal” exposure reading.

How do you Know When to Adjust the Camera’s Auto Exposure Reading?

Photograph of Sandpiper
Sandpiper
ISO 200; f/6.3; 1/1600 second

Use the Camera’s Histogram

All digital DSLR’s have a display called the histogram. A histogram is a graph showing the brightness levels of the pixels for every image the camera takes. The graph runs from left to right and shows values from 0 (black/dark) to 255 (white/bright). Mid tone pixels are in the middle.

The fastest, most reliable way to determine if you need to adjust exposure while photographing on the beach is to follow this simple formula.

Simple Formula to Adjust Exposure on the Beach

1)  Find the Exposure Compensation Dial on your camera. (There should be 2 dials, one for adjusting light for your flash and one for adjusting natural light.) Make sure the Exposure Compensation dial for natural light is set in the center, on 0 or null. With this setting, the photographer is relying on the camera to determine the correct exposure.

2) Take a quick test photograph of your subject.

3) Check the histogram’s RIGHTMOST data for the photograph. (For this test, no need to check the data on the left side of the histogram.)

  • If the display is touching the right edge of the histogram, the exposure should be fine.
  • If the data is not quite to the right edge of the histogram, just add exposure by moving the dial a little to the right.  (on the “+” side)
  • If the data is crawling way over the right edge of the histogram (clipping) that means that there’s WAY TOO MUCH LIGHT. This is very bad. Lost details means lost forever. No post processing software can bring back those over exposed details. Simple solution: Move the dial one stop to the left, or subtract exposure. (on the “-” side).
  • Take another test photograph and recheck your histogram. Keep making adjustments until the RIGHTMOST data is just touching the right edge of the histogram.

All it takes is a quick look at the histogram. It will give you much more accurate information than just checking the display on the back of your camera.

One Last Thing

The beach is a pleasant place to photograph and the shore birds are generally patient and cooperative.  However, cameras and sand (especially blowing sand) are not a good mix, so take some precautions to minimize contact. And be sure to bring your camera bag for when you are not using the camera.


Photo of Sandhill Crane

Photographing Sandhill Cranes in Flight

Sandhill Cranes in Michigan

Late last Fall, we went with some friends to watch thousands of sandhill cranes congregate at the Baker Sanctuary, near Battle Creek, Michigan. Every year, cranes stop at this sanctuary briefly before they continue south. It was glorious.

I had my camera, but the distance was too great for my equipment to get a worthwhile shot. I watched other photographers with much heftier lenses get their shots.

Sandhill cranes are an impressive sight. They are huge birds; five feet tall with wings that span six to seven feet. I used to confuse them with the great blue heron – but the art of bird photography forces you to be more observant. The great blue heron is smaller with no red forehead and it curls its neck close to its body when it flies. Cranes extend their necks when flying.

A Glorious Spectacle to Photograph

By far, the most fascinating part of watching sandhill cranes is when they dance. I’ve seen them engage in this ritual throughout the season. I love it when they bow and then leap into the air and throw branches and sticks with their beaks. Quite the spectacle.

Capturing Sandhill Cranes During Take Off and Landing

Although I’ve yet to capture sandhill cranes dancing, I have had some success at getting good photographs of these marvelous birds.

On a very gray Michigan morning, I observed dozens of sandhill cranes feeding in a cut farm field near my home. The birds were far enough off that I was not perceived as a threat, but close enough that I could reach them with my longest lens. I was able to get out of the car and set up my tripod in the field nearest to the road.

I did not observe any of the ritual dancing in the 3 hours or so that I was there. Quite a few of the cranes were coming and going, much of it right over my head. So I focused my attention on capturing these beautiful birds in flight.

Sandhill Cranes in Flight
2 Sandhill Cranes in Flight ISO1000; f/4.5; 1/2500 Second

Tracking Movement with the Camera

Tracking a moving target while keeping the lens in focus is difficult. Once the shutter release is pressed half way down, the camera must complete the  following functions before it will allow the photographer to complete the shot:

  1. Light Metering
  2. Image stabilization (assuming there is an image stabilizer on your lens)
  3. Focus

So, after you complete one shot and press the shutter button to take the next one, the camera automatically goes thru the process of metering, stabilizing and refocusing before you can take the next shot. Admittedly all these functions happen in seconds, but sometimes in the world of bird photography, that is just not fast enough.

Back Button Focusing

Back button focusing is a very useful option to track and continuously focus on flying birds. Using this function lightens the load on the shutter release while at the same time, allows the photographer to track focus faster and more accurately, especially when your subject is moving erratically.

Simple Procedure to Separate Auto Focus from the Shutter Button

Almost all DSLRs allow the photographer to separate the auto focus from the shutter release, and have for many years. Once you find this function on your camera, you can start practicing. It’s easy.

Simply focus on your subject, hold down the back focus button with your thumb and get ready to press the shutter release with your fore finger when the peak action starts.

The camera will continually focus on the subject, and the shutter will not try to focus before taking the photo. This means no half pressing the shutter button over and over again to re focus. Once the subject stops moving, let go of the back button focus and use the shutter button to focus as you did before.

Be Prepared

Things go very fast when your target starts moving. A tripod is essential here to help you pivot the lens as needed and track the action. Before you start shooting, make sure your settings are optimal – including the settings for focus tracking (AI Servo on Canon Cameras) and continuous (rather than single shot) autofocus shooting.

And most importantly, be sure that you have confirmed that your shutter speed is set high enough to capture in flight birds.

Adding a Little Color to the Gray Sky

I decided to liven up the background in the first photo by adding a little color. I used Lightroom to put a bluish/pink vignette in the four corners of the photo. The second photo of a sandhill crane coming in for a landing (see below) more accurately shows the dull gray of the morning sky.

Sandhill Crane in Flight and About to Land
Sandhill Crane Coming in For A Landing
ISO 1000; F4.0; 1/3200 second

I’m hoping that the next time I head out to that field with my camera, the sandhill cranes will perform their playful dance for me.


Male Cardinal Posing with Flowers

When Birds Look Back at the Photographer

Where the Birds Are

A lot of days, I concentrate on photographing the birds in my yard. I think the feeder is one of the more boring places on which to point my camera. But on those days that I am stuck inside, that’s where the birds are, at least the ones that I can readily see and reach with my camera.

I am constantly trying to improve my photography skills, and to do that I have to practice. Practice is more productive when I have a purpose in mind; when I deliberately focus on getting better at a particular skill.

This day, I decided to concentrate on depth of field. Depth of field is the “space” in your photograph that’s in focus. More specifically, it’s the distance between the closest point that is in focus and the farthest point that is in focus.

Understanding Depth of Field – Techie Alert

To determine what’s in focus (Depth of Field) and what is not in focus (Blur), the photographer must consider 3 things:

1)   Aperture setting,

2)   Focal Length of the Lens

3)   Distance the Photographer is to Her Subject

Longer lenses (200mm and longer) tend to give a very shallow depth of field (less space in focus). To further complicate matters, the farther away the photographer is to her subject, the more depth of field; or the more space you will have in focus.

Aperture Settings for Background Blur

Luckily, long lenses and long distances between photographer and subject are pretty common scenarios for bird photographers. That being the case, you just have to determine what aperture to use to achieve a good balance of subject in focus and background blur.

Male Cardinal Posing with Flowers
Capturing a Moment – Male Cardinal poses with a Bouquet of Flowers on the Bird Feeder

The Impact Aperture has on Photographs

A friend of mine asked how I pasted in the beautiful blurred background on my bird photographs.

Argle Bargle!  There is no emoticon to express how I felt when I heard that.

Understanding aperture is the cornerstone to achieving creative control of your photos. Aperture is measured in “F Stops”, and is the size of the opening in the lens that the photographer sets before a picture is taken.

Larger apertures produce more background or foreground blur and less space in focus. Smaller apertures produce greater depth of field, or more space in focus. If there are multiple subjects on which to focus and these subjects are not the same distance from the photographer, the depth of field needs to be tightened up so all your subjects are in focus. Given the right light and lens, you can set your aperture so small that everything in the frame will be in focus; nothing would be blurred.

The Quality of Out of Focus Areas

A photography term to describe the quality of background or foreground blur is Bokeh. “(BOKEH = noun, a Japanese term for the subjective aesthetic quality of out-of-focus areas of a photographic image.)”  Keep in mind that making a judgement on the bokeh quality of a photograph is highly subjective and hard to quantify. Generally, very pleasing bokeh is a function of the lens. A very high quality lens will most likely produce a very pleasing bokeh.

Achieving Balance in Your Photographs

You want to achieve a nice balance in your photographs. All of the subject(s) in your photo must be in focus and stand out from the background. The blurred background should be pleasing to the eye and not distract the viewer from the subject of the photo.

Making the Ordinary Photograph, Extraordinary

So with better control of my depth of field in mind, what can I do to make the birds on bird feeder photos more interesting? How can I take an ordinary scenario and turn it into an extraordinary photograph?

I asked my husband (Camera Boy) if he would pick some flowers from our yard to decorate our dinner table. He put together a beautiful bouquet for us and then decided to decorate the bird feeder platform with a bouquet as well. I didn’t think much of it, a little color is always nice. But then I noticed the difference it made.

Birds are always looking back at me through the window. Most times, they are just being cautious, gauging when/if they need to make a quick get away. They also have a “look” for me when feeder food is low and needs refilling. And sometimes they are just interested in what we are having for dinner.

Male Cardinal Eating at Feeder
It’s Time to Eat. Male Cardinal Looking Over His Shoulder at the Camera

In the first photo, this male cardinal flew in and positioned himself to the side of the flower bouquet on the feeder. Then he  looked directly at the camera and tilted his head slightly. That’s all it took. The cardinal looks as though he is offering a gift to me. The flower bouquet adds a whole new dimension to the photograph. In the second photo, the cardinal has started to eat, and looks at me over his shoulder. The flower bouquet adds something intangible to this photograph as well.

It’s so easy to identify with bird behavior. In these photos, I sense attitude, intent, and caring. I find this momentary connection between my subjects and myself gratifying on a personal level. And it’s captured forever in the photographs.

And how about that Bokeh and Depth of Field!!